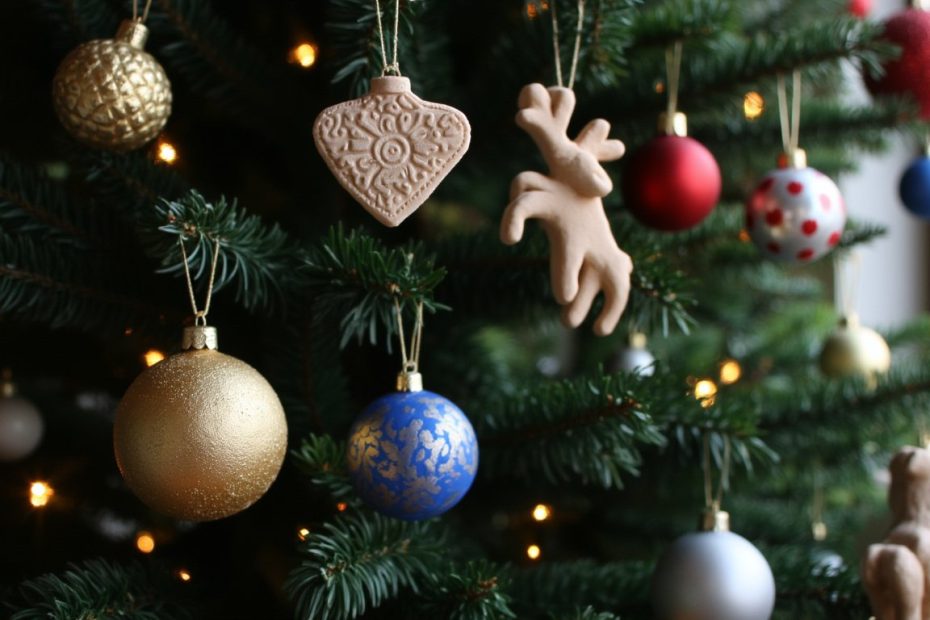
Okay, be honest. Are your holiday ornaments starting to feel a little… predictable? You unpack the same shiny balls and store-bought stars every year, and while they’re lovely, they lack a story. What if you could cover your tree in memories you literally made with your own hands? That’s the magic of DIY clay ornaments. I’m not talking about those lumpy, childhood pinch-pots (though we love the sentiment!). I’m talking about stunning, personal, and surprisingly easy-to-make treasures. Whether you’re craving rustic charm, minimalist modern vibes, or a full-blown family craft afternoon, one of these 18 clay ornament ideas is your perfect starting point. Let’s get those creative gears turning.
1. The Classic Fingerprint Heart
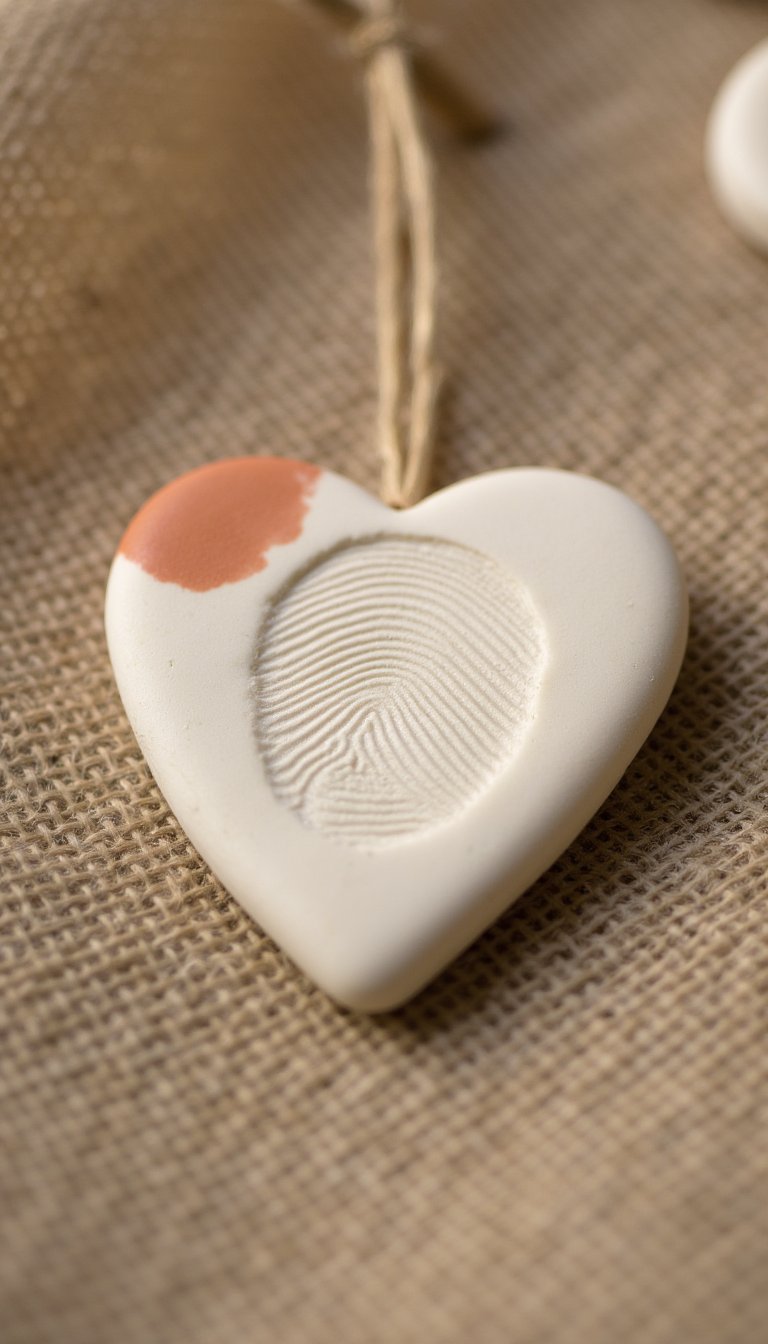
Let’s kick things off with a keepsake that melts hearts. Roll out a slab of white or natural clay and cut out a simple heart shape. Press a tiny finger (or thumb!) firmly into the center to create a perfect imprint. After baking, you can paint a delicate border or leave it raw and rustic.
The beauty is in the personalization. Make one for each family member, date them on the back, and you’ve started a priceless collection. Imagine pulling these out years from now and seeing how much those little prints have grown. It doesn’t get more sentimental than this.
2. Rustic Leaf Imprints

Bring the serene beauty of an autumn walk right onto your branches. Grab interesting leaves from your yard—maple, oak, or even ferns work beautifully. Roll out your clay and firmly press the veined side of the leaf into it. Carefully peel the leaf away to reveal a stunning, detailed fossil.
Cut around the imprint, poke a hole for the string, and bake. I love brushing a touch of gold or copper metallic wax over the raised veins after baking. It highlights the natural detail and adds a whisper of holiday shimmer. These ornaments have a wonderfully organic, earthy feel.
3. Geometric Terrarium Orbs

For a modern, minimalist twist, try these chic geometric shapes. Use a knife or clay cutter to form simple triangles, hexagons, or diamonds. The key is to cut a larger “window” out of the center of the shape. After baking, glue a small snippet of preserved moss or a tiny faux succulent inside the back of the window.
Pro-Tip for Clean Lines
Use a ruler and a sharp blade for cutting. A little sanding on the edges after baking makes them perfectly smooth. Hang these in clusters for a seriously stylish tree that looks like it belongs in a design magazine.
4. Whimsical Animal Faces
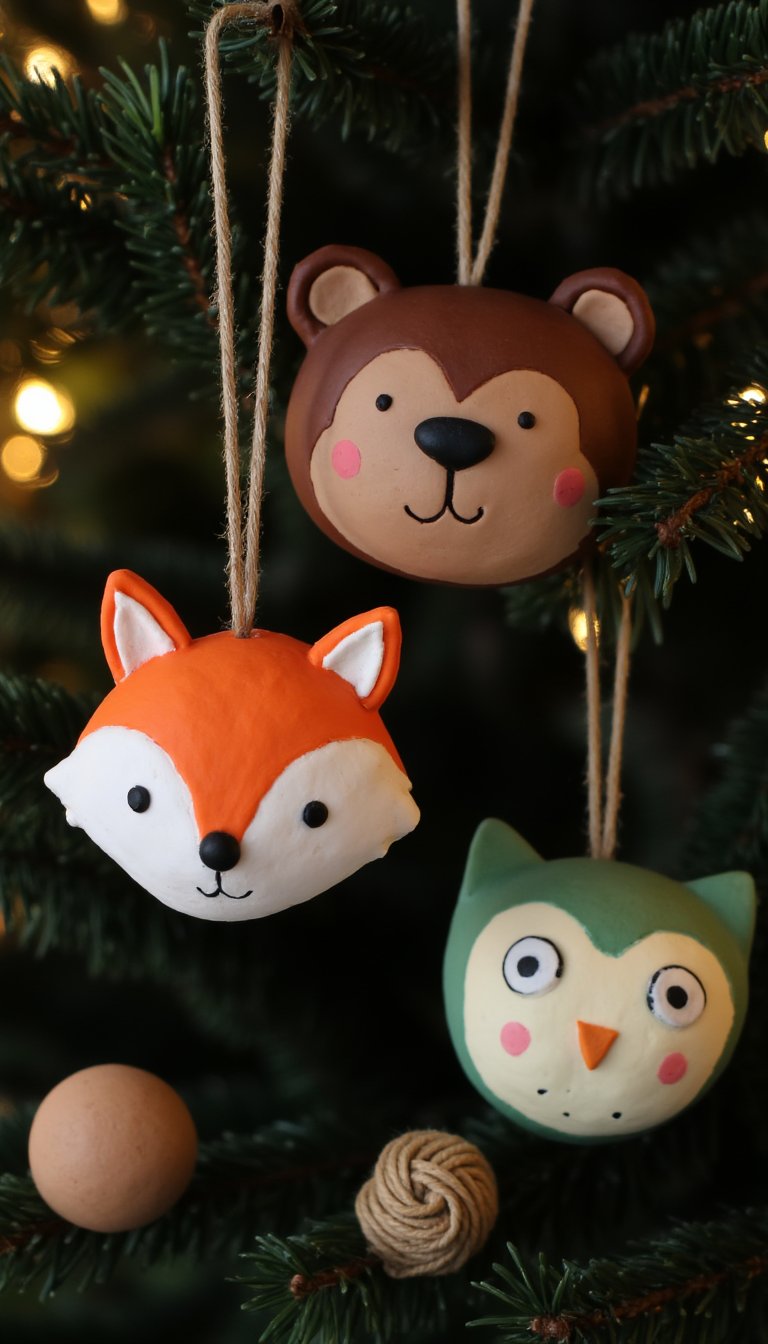
Unleash your inner child (or recruit an actual child) for this adorable idea. Start with a simple clay circle or oval as your base. Then, use tiny clay balls, coils, and scraps to build up features. Think a fox with pointy ears and a black nose, a bear with round ears, or an owl with big, wise eyes.
This is a fantastic way to use up clay scraps! Use a toothpick to add texture for fur or feathers. Once baked, a little acrylic paint brings their personalities to life. These make the cutest gifts for grandparents, hands down.
5. Stamped Words of Cheer

Sometimes, the message is the ornament. Roll out a uniform slab and cut it into neat circles, tags, or rectangles. Then, raid your collection of letter stamps. Press words like “JOY,” “NOEL,” “PEACE,” or even your family name and the year into the soft clay.
You can keep it clean or paint the stamped letters after baking for a pop of color. This idea is incredibly versatile and fast. Whip up a whole set for neighbor gifts in an afternoon. They’re simple, elegant, and carry a warm, direct sentiment.
6. Dainty Pressed Flower Dioramas

Capture the delicate beauty of spring and summer blooms for your winter tree. Press small, flat flowers like baby’s breath, forget-me-nots, or tiny pansy petals in a book ahead of time. Roll your clay and carefully arrange the dried flowers on top, then gently roll over them once more to embed them.
Cut around your creation with a fluted cutter for a cupcake-wrapper effect. The result is a gorgeous, frozen-in-time botanical specimen. Finish with a coat of clear, matte sealant to protect the fragile flowers and prevent fading.
7. The “Melted Snowman”

Ready for a dose of silly charm? This one always gets a laugh. Form a puddle-like blob of white clay. Add a small orange clay carrot nose, two little black eyes, and a smiling mouth. The kicker? Place his classic black top hat and a few tiny clay buttons *beside* the puddle, as if they’ve fallen off.
It’s a clever, playful take on a classic winter figure. You can even glue a tiny fabric scarf tail on the side. It’s a fantastic ornament for kids to help with, and it adds a lighthearted story to your tree’s landscape.
8. Marbled Clay Swirls

Don’t you just love the mesmerizing look of marbled paper? You can easily recreate it with clay. Take two or three contrasting colors of polymer clay (think white/gold, blue/silver, or green/red). Knead each separately, then twist them together lightly—just enough to swirl, not enough to blend into mud.
Roll this log into a slab and cut out your shapes. Every single ornament will have a unique, beautiful pattern. This technique works wonders for simple shapes like stars, circles, and teardrops, letting the stunning marble effect take center stage.
9. Miniature Wreaths
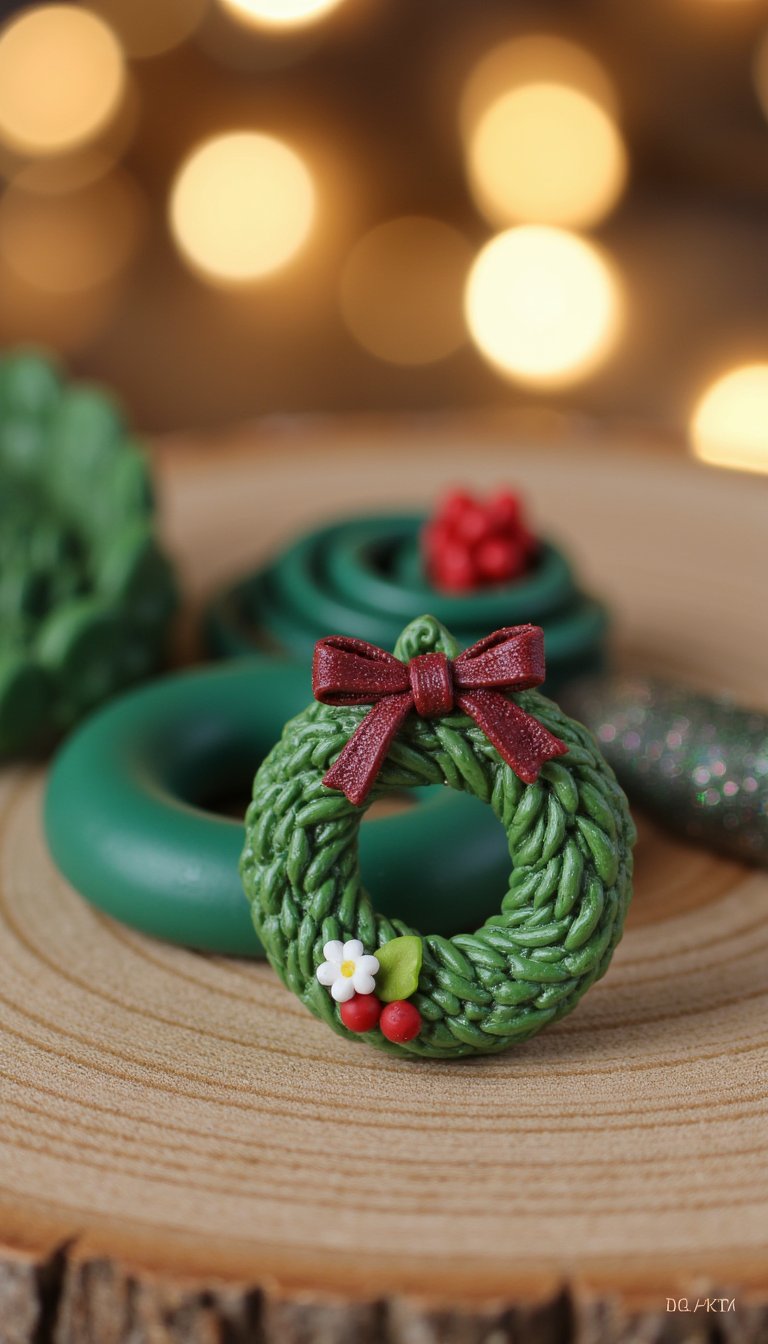
An ornament of an ornament? Why not! Create several small, thin ropes of green clay and braid or twist two together. Form this twisted rope into a circle, joining the ends seamlessly. Now for the fun part: accessorize.
Add a tiny red clay bow, microscopic berries (tiny clay balls), or even a dusting of glitter before baking. For an extra touch, you can gently press the wreath onto a texture sheet to give it a “pine needle” look before forming the circle.
10. Cosmic Galaxy Disks

Bring the majesty of a starry night inside. Start with a dark blue or black clay base. Then, using a very light touch, dab on tiny bits of purple, magenta, and white clay. Swirl them gently with a toothpick to create nebulous clouds. Press the clay into a mold with a cratered texture for a moon-like surface, or keep it smooth.
Sprinkle with iridescent or holographic glitter before baking to mimic distant stars. These ornaments are stunningly deep and captivating, perfect for adding a touch of cosmic wonder to your holiday decor.
11. Personalized Family Silhouettes

Turn your family (pets included!) into a classic silhouette ornament. Take a profile photo of each person, print it out small, and cut out the silhouette. Use this paper cutout as a template to trace onto a rolled-out clay slab.
Carefully cut out the shape with a craft knife. You can mount the silhouette on a contrasting clay background for a framed look. It’s a beautiful, timeless way to celebrate the people (and furry friends) who make your house a home.
12. Textured Knit-Look Sweaters

Cozy vibes only. Roll out clay and cut it into the simple shape of a tiny sweater or stocking. Now, create the knit texture: use a piece of real lace, a textured roller, or even the back of a knitting needle to press a pattern into the clay.
Add a little loop of clay at the top for the hanger. After baking, you can “personalize” it by painting on stripes or a tiny initial. These look adorable hanging in a group and instantly give your tree a warm, handcrafted feel.
13. Shiny Metallic Geometric Trees

Modern holiday decor, meet your match. Build a 3D tree by stacking progressively smaller clay circles or triangles. Layer them with small clay balls in between as spacers. Use gold, rose gold, or copper metallic clay for instant glam, or paint them after baking.
The dimensional effect is super eye-catching. Hang these on a tree with simple lights, and watch them sparkle and cast tiny shadows. They’re proof that elegant doesn’t have to be complicated.
14. Coffee-Stamped Circles

For the caffeine enthusiast on your list (or yourself, no judgment). Take the flat bottom of a mug that has a raised pattern or lettering—many mugs have a brand name or design etched there. Press this clean, dry surface firmly into your rolled clay to transfer the pattern.
Cut out a circle around the imprint. You can leave it as a neutral ceramic look or paint the stamped area. It’s a wonderfully subtle and personal nod to those cozy, coffee-filled holiday mornings.
15. Delicate Lace Doily Impressions

This technique creates unbelievably intricate, feminine ornaments. Place a piece of real lace or a paper doily on top of your rolled clay. Run a roller over it firmly to press every tiny thread detail into the surface. Gently peel the lace away.
Cut around the impression with a scalloped cutter for a double-textured effect. These bake into the most delicate-looking pieces. A wash of white or pearl paint can settle into the grooves, highlighting the gorgeous detail.
16. Quirky Dinosaur Baubles

Because who says holidays can’t be prehistoric? Use simple cookie cutters or a steady hand to cut out dinosaur shapes. A brontosaurus, stegosaurus, or T-rex silhouette is instantly recognizable and hilarious on a Christmas tree.
Get creative with decorations: give them tiny clay Santa hats, paint them in festive colors, or dot them with “polka-dot” wrapping paper patterns. This is a surefire winner for kids’ rooms or for anyone who loves a touch of whimsy.
17. Simple & Elegant Clay Bead Garland

Think beyond the single ornament. Make a strand of unique, handmade beads to drape on your tree or mantel. Roll clay into various shapes: spheres, short cylinders, cubes with rounded edges. Poke a hole through each one lengthwise with a skewer before baking.
The magic is in the finishing. Paint them in a cohesive color palette, use the marbling technique, or stamp them with tiny patterns. String them on a sturdy ribbon or twine. This project is meditative to make and creates a huge impact.
18. Memory-Inspired Charms

End your crafting journey with the most personal idea of all. Create miniature charms that symbolize your year’s highlights. A tiny clay tent for a camping trip, a simple book for a reading goal, a little wave for a beach vacation, or a house shape for moving.
Each one tells a chapter of your family’s story. Every year, you can add a new charm to the collection. Over time, you won’t just have a decorated tree; you’ll have a visual diary of your happiest moments hanging in the branches.
So, there you have it—18 clay ornament ideas that run the gamut from tear-jerkingly sweet to delightfully quirky. The best part about clay? It’s a forgiving and wildly versatile medium. You can start with an air-dry clay from the craft store for simplicity, or dive into polymer clay for more durability and color options. The real goal isn’t perfection. It’s about the laughter during the crafting, the glitter you’ll inevitably find in July, and the profound joy of hanging a piece of your heart on the tree. This year, give your holidays an extra layer of meaning. Get your hands a little messy, and create some magic that lasts far beyond the season.