
Fall brings crisp air, cozy sweaters, and the inevitable piles of colorful leaves. It also brings the urge to turn your living room into a crafting zone. If your kids obsess over your annual trip to the local farm, these DIY fall crafts will keep that excitement alive all season long. Let’s reclaim your dining table from screen time and get messy with some glue!
We designed these easy pumpkin patch craft ideas for kids to build motor skills, spark imagination, and use up household items you already own. Who says you need expensive craft store kits to make memories? Grab your washable paint, warm up the glue gun (for adult use, of course), and explore these simple autumn projects.
1. Paper Plate Pumpkin Patch

Transform standard kitchen paper plates into a vibrant farm scene. Your children paint the plates bright orange, add green paper vines, and glue on brown construction paper stems. You can cut the plates into different sizes to represent different stages of pumpkin growth. It keeps little hands busy and works great for toddlers who love big, messy brush strokes.
Pro Tip for Parents:
To avoid a giant mess, tape the paper plates directly to a plastic tablecloth before your kids start painting. This prevents the plates from sliding off the table and keeps the orange paint exactly where it belongs!
2. Mason Jar Pumpkin Lanterns

These glowing jars light up chilly autumn evenings with a cozy, warm glow. Kids paste orange tissue paper squares onto clean glass jars using diluted school glue. Once dry, they draw silly or spooky faces on the outside with a black permanent marker. Drop a battery-operated tea light inside to finish the project safely.
IMO, this is the ultimate fireplace mantel decor. Your kids will feel incredibly proud when you turn off the living room lights and let their creations shine. Plus, it serves as a wonderful nightlight for the entire month of October. 😉
3. Puffy Paint Pumpkins

Mix equal parts of white shaving cream and school glue, then add a few drops of orange food coloring to create homemade puffy paint. Children squeeze and spread this mixture onto cardstock templates to create 3D pumpkins that actually retain their texture when dry. It offers an incredible sensory experience for younger children who love tactile play.
Texture Secrets:
- Use thick cardstock because standard printer paper will warp under the weight of the paint.
- Add a sprinkle of real pumpkin pie spice into the paint mix for a delicious, sensory autumn scent!
- Let the artwork dry flat for at least 24 hours to ensure the puffy texture sets completely.
4. Toilet Paper Roll Pumpkin Stamp Art

Do you have empty cardboard rolls lying around the house? Bend the circular tube slightly into an oval shape to mimic the natural curve of a pumpkin. Kids dip the end of the roll into orange paint and stamp it repeatedly across a large sheet of butcher paper. This creates a giant, customized wrapping paper sheet or a beautiful banner for your wall.
This budget-friendly activity requires almost zero prep time. Once the orange stamps dry, kids can draw green vines connecting all their stamped pumpkins. It teaches pattern repetition and shape recognition without feeling like a boring school lesson.
5. Popsicle Stick Pumpkin Patch Sign

Line up four or five wooden craft sticks side-by-side and glue them to a cardboard backing. Have your kids paint the front orange, draw a wooden fence texture on it, and write “PUMPKINS FOR SALE” in bold letters. You can attach a green ribbon to the top to hang it on their bedroom door.
This project helps older children practice their handwriting and fine motor coordination. They love personalizing their signs with glitter, leaf stickers, or tiny plastic spiders. It serves as a rustic keepsake you can pack away and bring out year after year.
6. Yarn-Wrapped Pumpkins
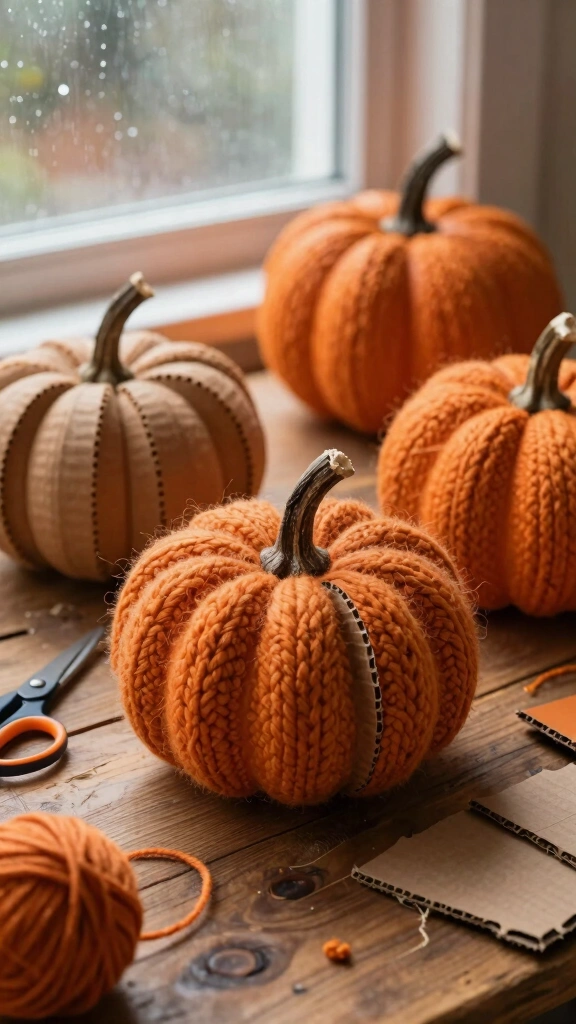
Cut pumpkin shapes out of sturdy cardboard and have your kids wrap orange yarn around them repeatedly. The yarn catches on the cardboard edges, creating a cozy, textured look that resembles woven knitwear. Tuck a real twig into the top loop to act as a rustic stem.
This activity keeps kids quiet and focused for surprisingly long stretches. The repetitive wrapping motion builds hand strength and improves concentration. FYI, it works wonders for restless kids on rainy autumn afternoons!
7. Tissue Paper Pumpkin Suncatchers

Cut the center out of a black paper plate or create a black cardstock frame shaped like a pumpkin. Stick a piece of clear contact paper to the frame, then let your kids cover the sticky surface with orange and yellow tissue paper squares. Hang the finished product on a sunny window to catch the afternoon light.
The translucent paper mimics the look of stained glass. It brightens up any kitchen window and looks absolutely stunning when the sun shines through it. It is one of the easiest pumpkin crafts for preschoolers because it requires zero drying time.
8. Fingerprint Pumpkin Patch Art

Draw a series of green vines across a white sheet of paper using a green marker. Kids dip their thumbs into orange ink pads or washable paint and press them along the vines to create the pumpkins. Once the fingerprints dry, use a fine tip pen to draw tiny details like stems, leaves, and curly tendrils.
This keepsakes activity captures the actual size of your child’s hands at this exact moment in time. You will cherish looking back at these tiny thumbprints years down the road. It also makes a sweet, personalized card to mail to grandparents.
9. Rock Painted Pumpkins

Search your backyard or local park for smooth, round stones. Wash them thoroughly, let them dry, and paint them with acrylic paint in various shades of orange, yellow, and white. Kids can draw faces on them or arrange them in a mini wooden box to create their own miniature tabletop patch.
Outdoor Setup Tips:
- Take this project outside to the patio table to make cleanup a breeze.
- Use multi-surface acrylic paint for vibrant colors that won’t fade or wash away in the rain.
- Seal the dry rocks with a clear outdoor spray if you plan to tuck them into your garden beds.
10. Paper Loop Pumpkins

Cut construction paper into one-inch wide strips. Kids glue the ends of the strips together to form loops, then stack and glue those loops together at angles to create a hollow, 3D paper sphere. A quick green leaf cut-out on top completes this simple, lightweight sculpture.
These look beautiful scattered across a Thanksgiving dinner table or strung together as a festive garland. The project teaches kids spatial awareness as they figure out how to turn flat paper strips into a three-dimensional shape. It requires only paper, scissors, and a glue stick!
11. Clay Pumpkin Patch Figurines

Use air-dry clay or colorful polymer clay to sculpt miniature pumpkins. Kids roll the clay into balls, use a plastic butter knife to press vertical ridges into the sides, and poke a small green clay stem on top. Once dry, they can paint their creations or coat them in mod podge for a glossy finish.
Sculpting clay develops hand muscles and allows children to experiment with forms. They can create an entire miniature farm scene with clay scarecrows, leaves, and dirt paths. It provides hours of open-ended creative play.
12. Egg Carton Pumpkin Cups

Cut individual cups from a cardboard egg carton. Have your kids paint the outside of two cups bright orange, then glue the open ends together to form a hollow sphere. Attach a green pipe cleaner to the top to serve as both the stem and a vine.
Who knew trash could look this good? Upcycling household packaging teaches kids environmental awareness while sparking their creativity. You can even hide small treats inside the cups before gluing them together for a fun autumn surprise party favor.
13. Coffee Filter Pumpkins

Flatten round coffee filters and let your children color them with orange, red, and yellow washable markers. Lightly mist the filters with water from a spray bottle and watch the colors bleed together to create a gorgeous watercolor effect. Once dry, cut them into pumpkin shapes and display them on glass doors.
The bleeding ink creates beautiful gradients that mimic the organic look of heirloom pumpkins. Kids love watching the science experiment unfold as the water moves the pigment across the paper. It is a mesmerizing, low-mess painting alternative.
14. Button Pumpkin Canvas Art

Draw a simple pumpkin outline on a small canvas or piece of thick cardboard. Have your kids fill in the outline by gluing down various orange buttons in different sizes, shades, and textures. Fill the gaps with tiny orange sequins or beads to create a rich, mosaic look.
This craft works wonders for developing fine motor control and sorting skills. Kids enjoy picking out the perfect buttons to fit into the design. The finished product looks like a high-end piece of rustic wall art that you will proudly display every single autumn.
Bring the Fun of the Patch Home
Creating these autumn crafts allows you to slow down and enjoy the season with your kids. They will love the sensory textures, bright colors, and pride of displaying their hard work around the house. Ready to make some memories? Choose your favorite project from this list, gather your supplies, and start crafting today! 🎃