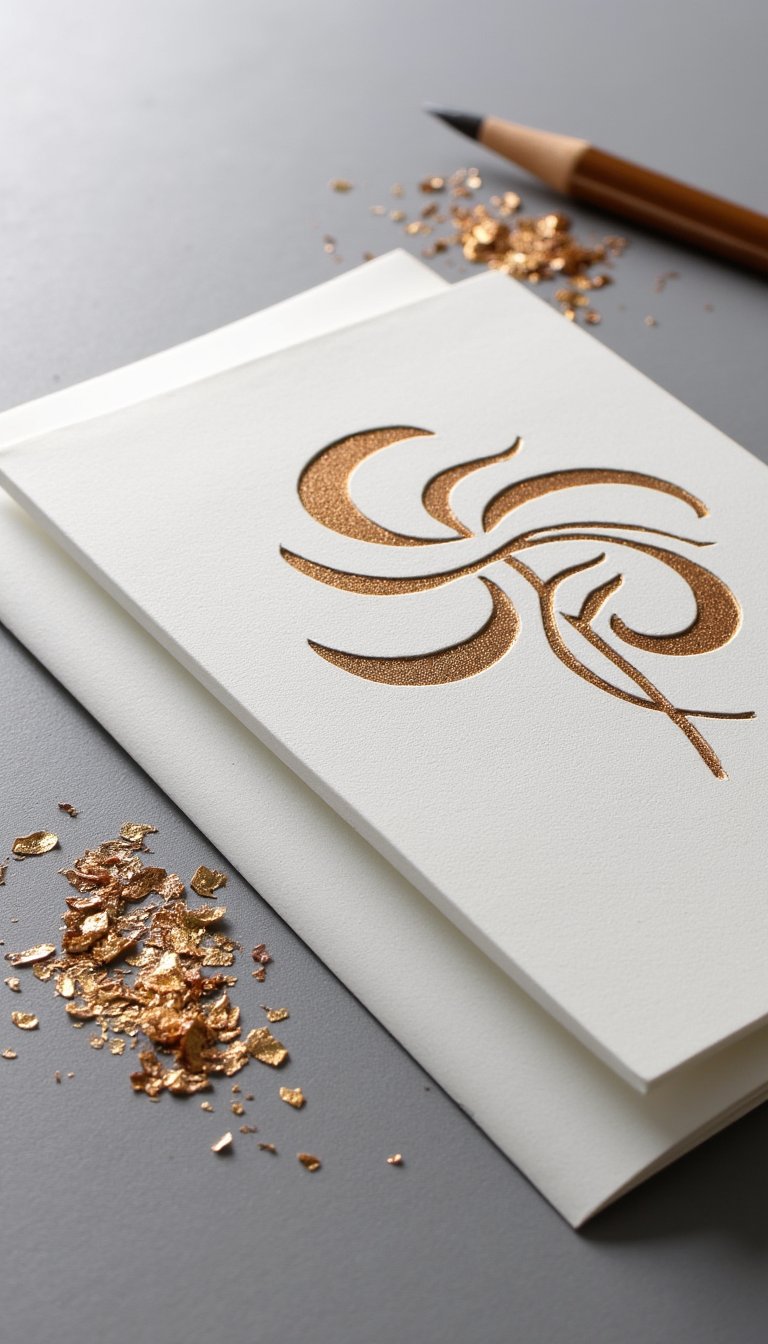
Okay, let’s be honest. We all have a stash of tissue paper. It’s stuffed in gift bags, crammed into drawers, and seems to multiply on its own. But here’s a secret: that crinkly stack of colors isn’t just for last-minute wrapping. It’s a total creative powerhouse. I used to think the same way, until a rainy afternoon and a bored kid forced me to think outside the gift box. What we made wasn’t just a craft; it was the start of an obsession. So, before you toss that next sheet, let me show you the 29 most surprising, beautiful, and downright fun tissue paper crafts that will completely change how you see this humble material.
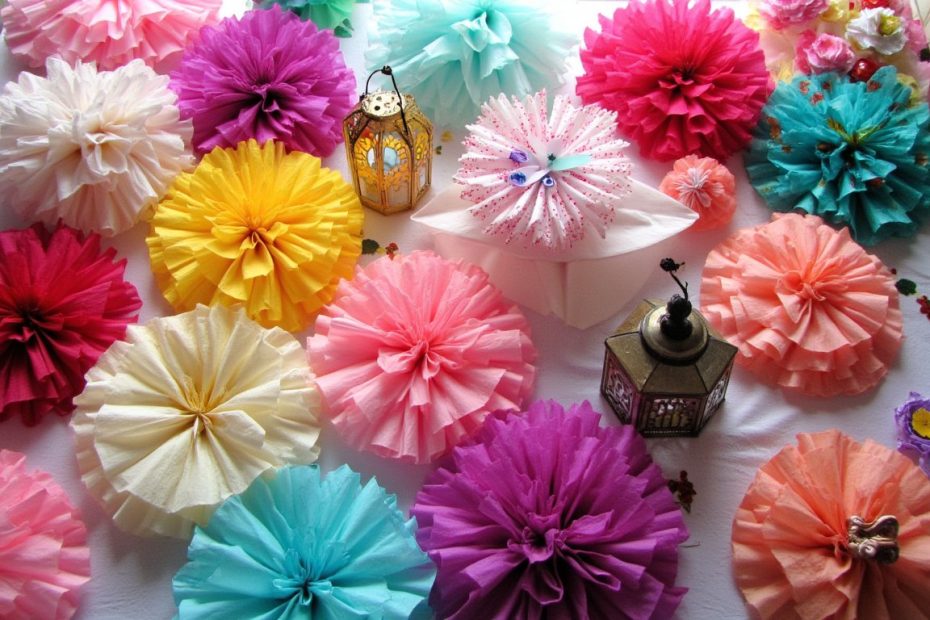
1. The Classic Tissue Paper Pom-Pom
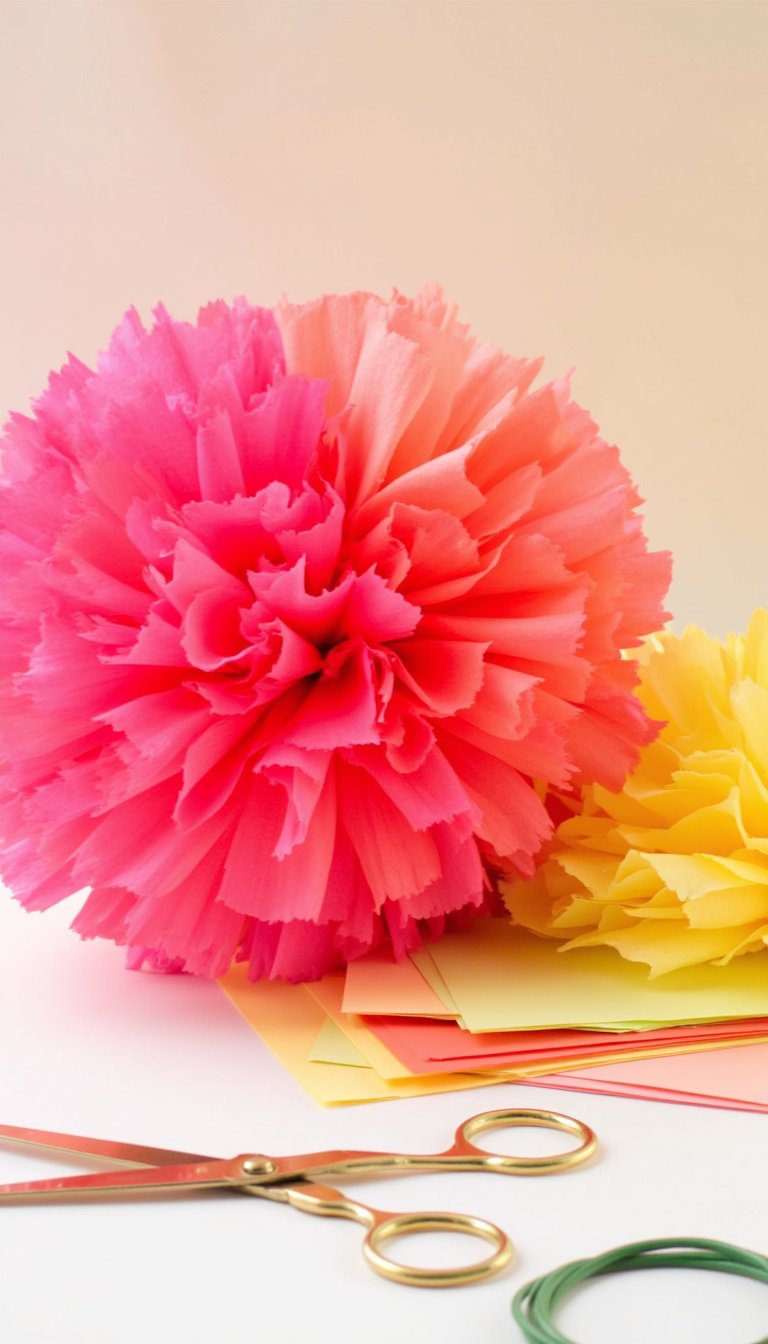
This is the gateway craft. Big, fluffy, and impossibly cheerful, a tissue paper pom-pom instantly elevates a party or a nursery corner. You just need a stack of tissue paper, some floral wire or string, and a pair of scissors. The magic is in the accordion fold and the careful fluffing of each individual layer. Pro tip: Use different-sized sheets to create a charming, cascading cluster.
2. Stunning Stained Glass Window Art
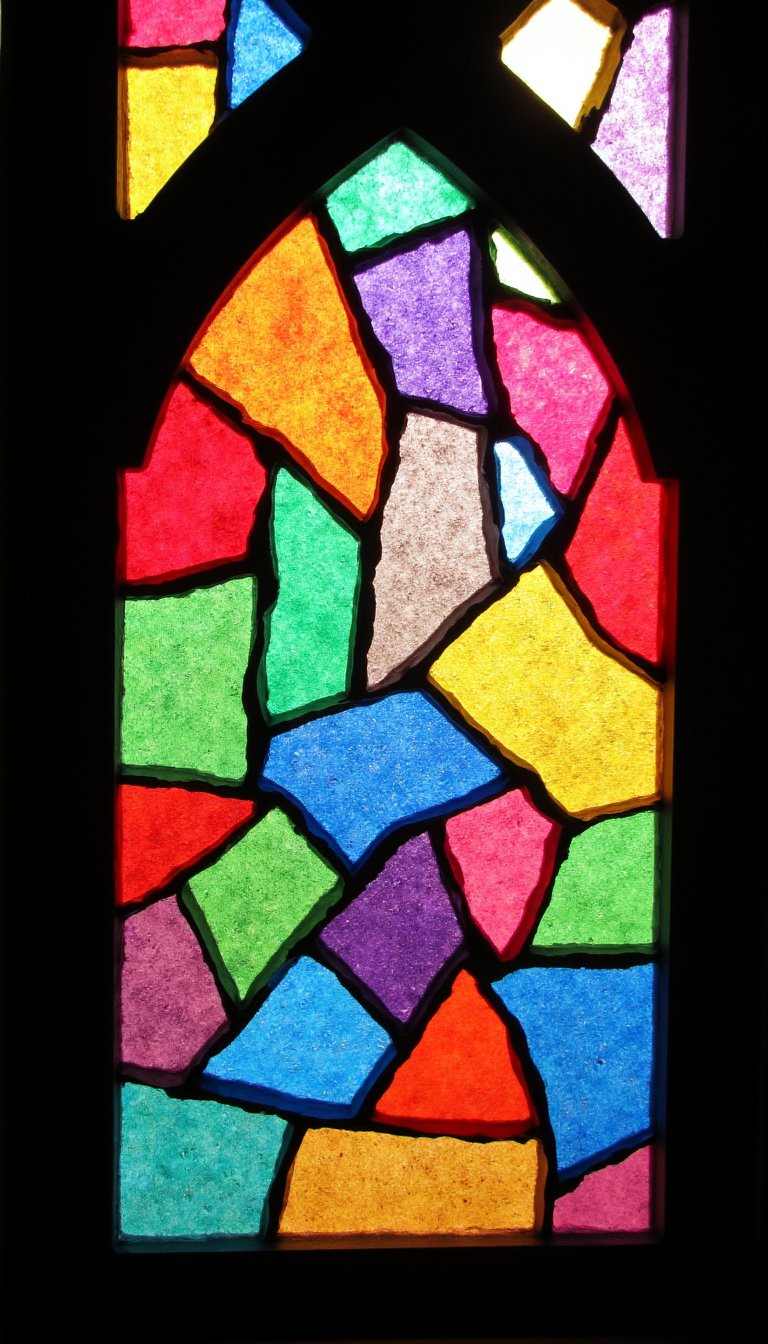
Bring a rainbow into your home without any glass cutting. Simply cut shapes from black construction paper to create a “lead” frame, and then use diluted white glue to stick small, torn pieces of colored tissue paper onto the back. When you hang it in a sunny window, the light will glow through, creating a breathtaking stained glass effect. Kids absolutely adore this one.
3. Elegant Decoupage Vases & Jars
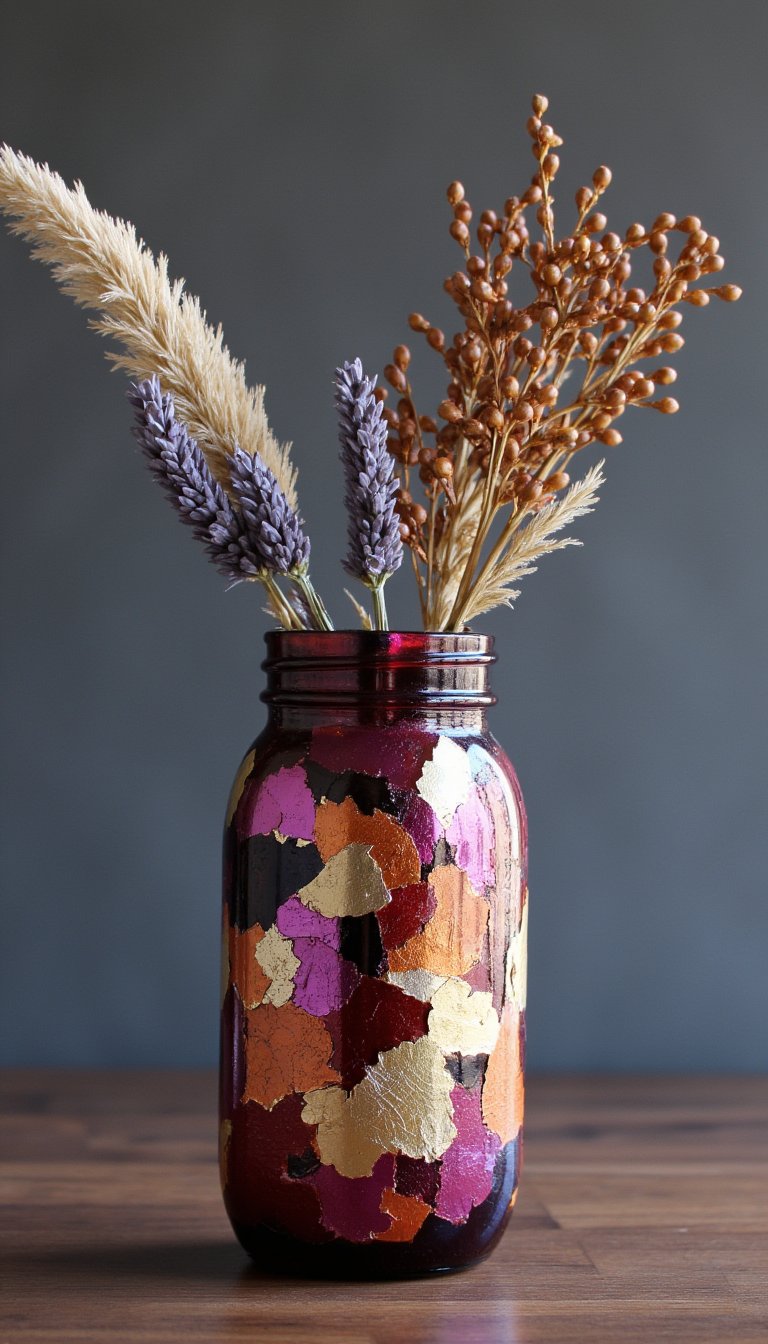
Don’t throw out those empty pasta sauce jars! Give them a glamorous makeover with tissue paper decoupage. Tear or cut the paper into interesting shapes, and use Mod Podge or a simple glue-water mix to adhere them to the glass. Layer the colors for depth. Suddenly, you have a custom vase for dried flowers or a chic container for kitchen utensils.
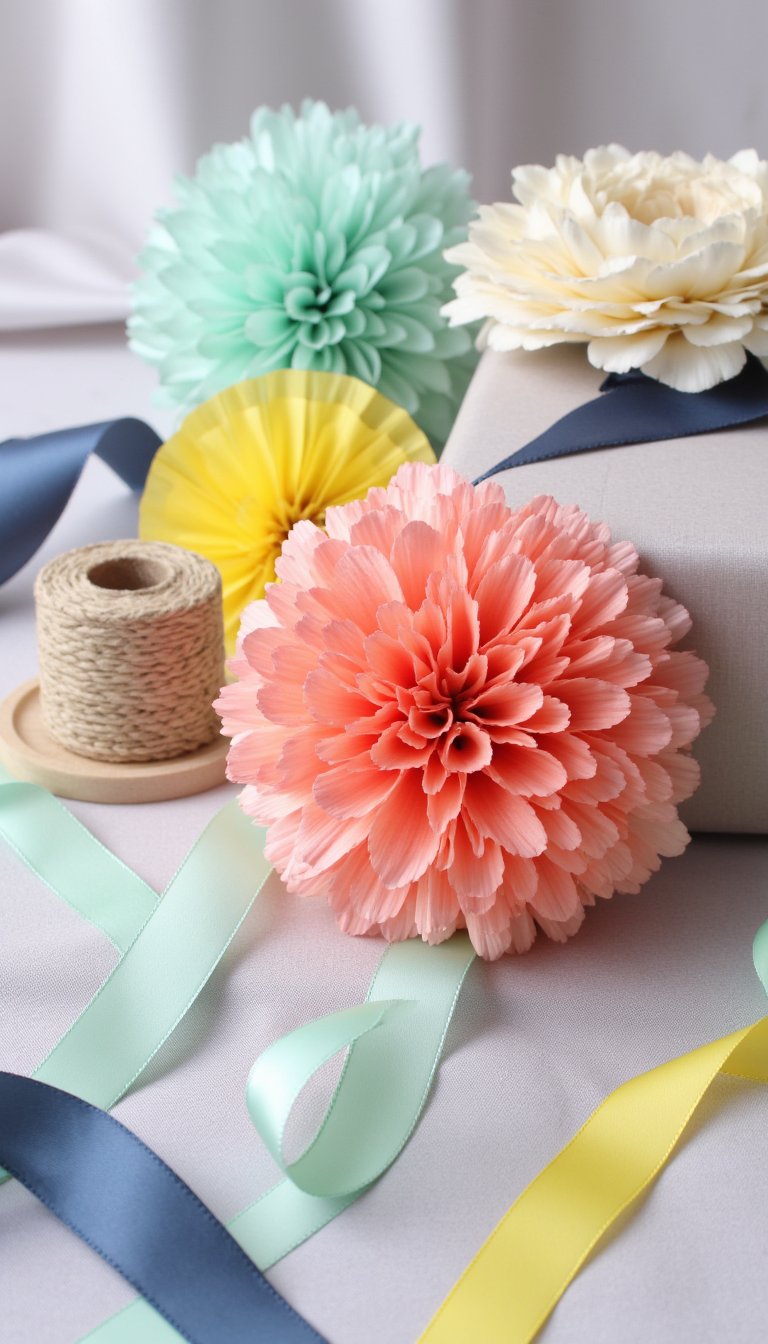
4. Whimsical Tissue Paper Flowers
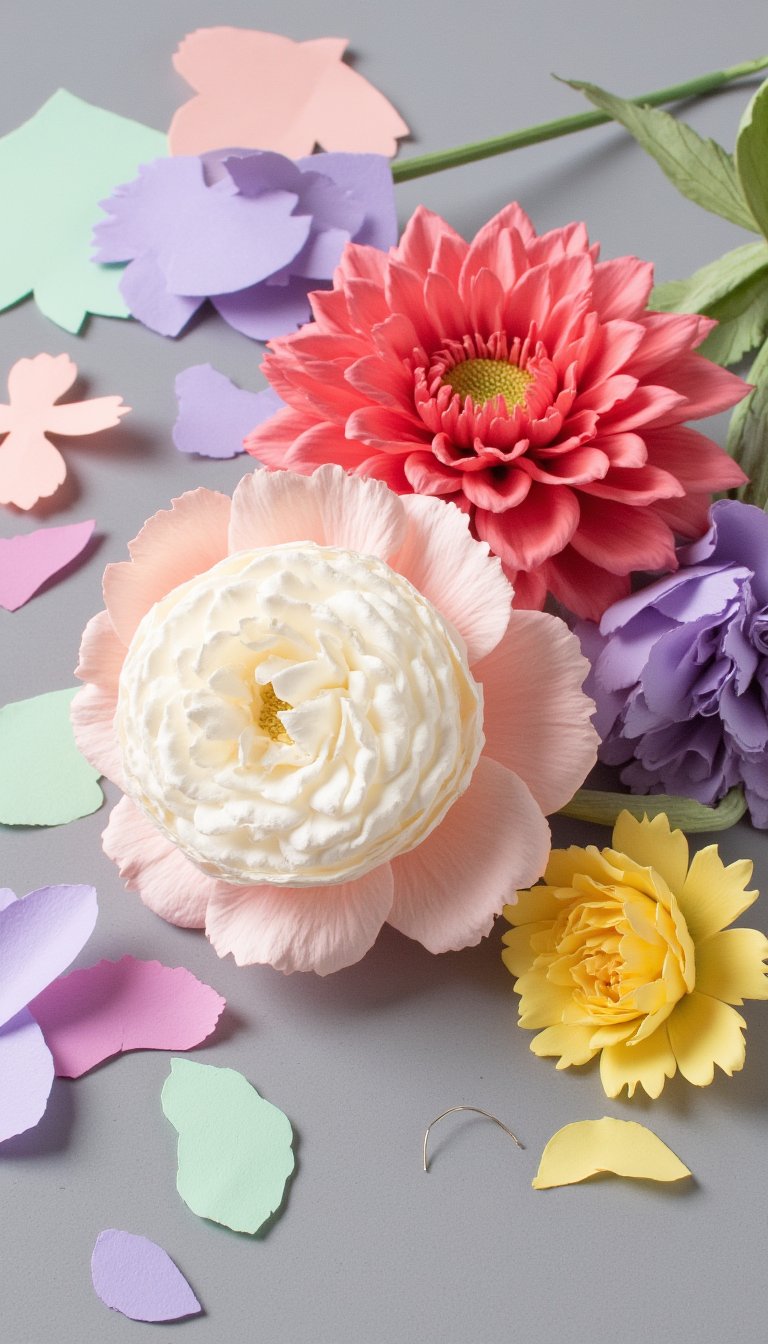
These aren’t your kindergarten flowers. We’re talking about realistic peonies, whimsy-filled dahlias, and simple blossom garlands. By layering, cutting petal shapes, and wiring them onto stems, you can create everlasting bouquets that never wilt. They make perfect table centerpieces or a heartfelt gift for someone special.
5. A Festive DIY Paper Piñata
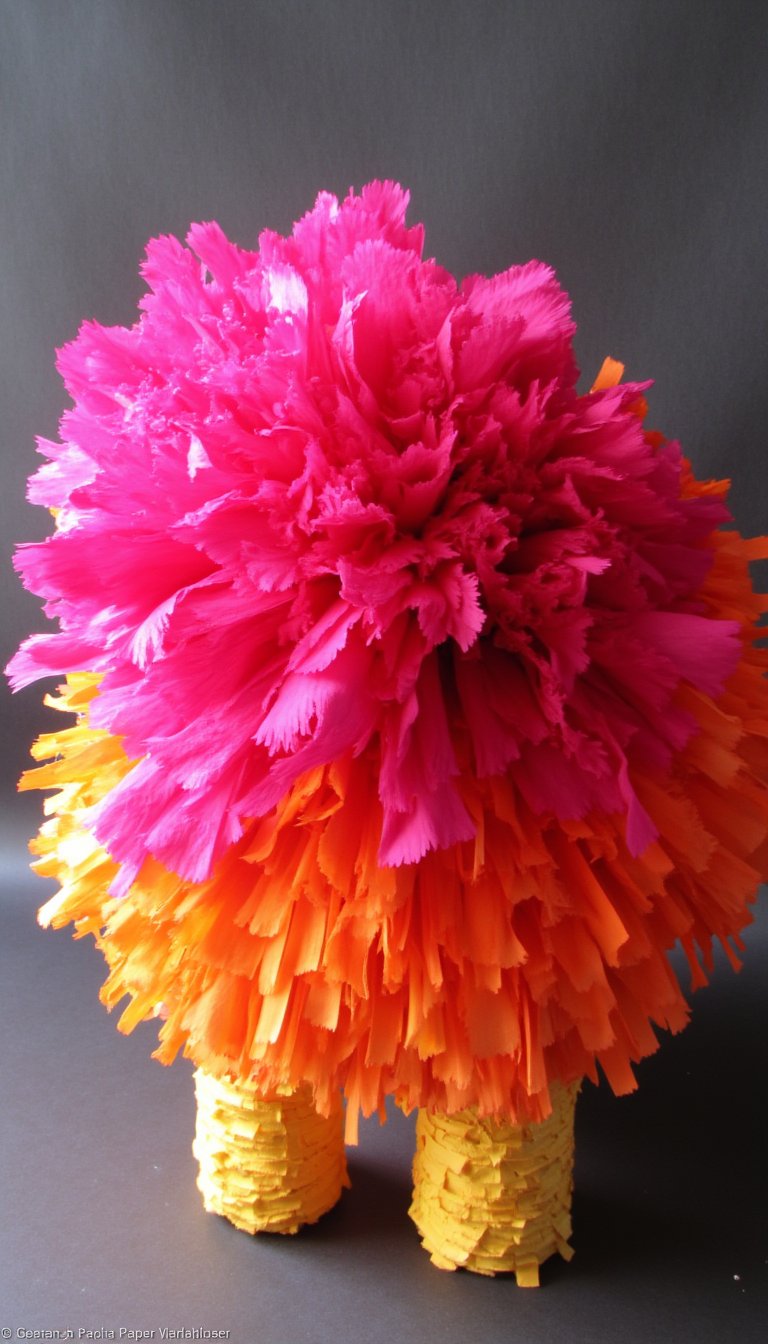
Why buy a flimsy, overpriced piñata when you can build a custom masterpiece? Start with a cardboard base or a balloon covered in paper mâché strips. Once it’s dry, cut a small hole, fill it with treats, and then cover the entire surface with fringed tissue paper strips. The layered fringe creates incredible texture and color. It’s a project that’s half the fun of the party.
6. Textured Tissue Paper Canvas Art
Channel your inner abstract artist. Crumple, twist, and layer tissue paper onto a canvas using decoupage glue. The paper creates incredible organic texture as it dries. You can paint over it with watercolors for a tinted effect or leave it as a sculptural, colorful piece. It’s surprisingly sophisticated.
7. Adorable Animal Figures
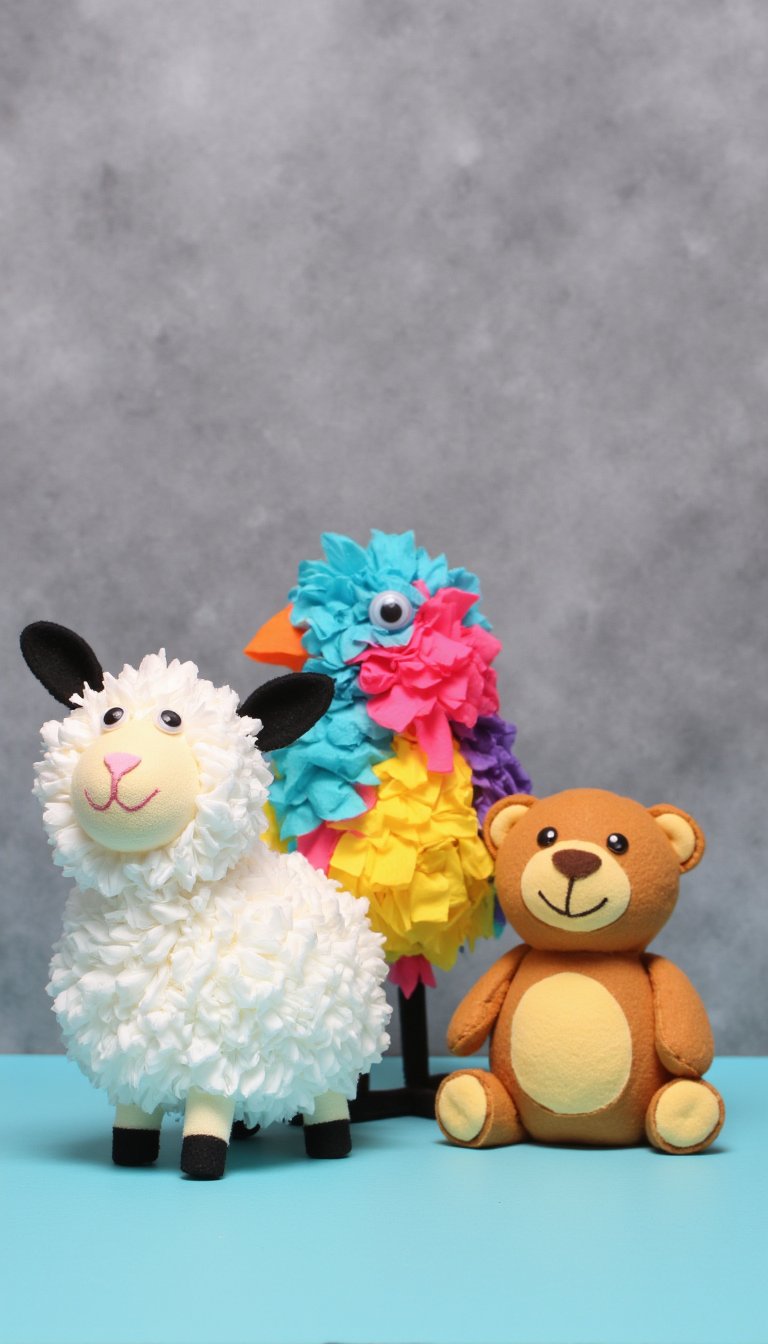
From fuzzy lambs to colorful birds, tissue paper is perfect for creating 3D animal crafts. Use a ball of newspaper as a base form, wrap it with tape, and then cover it with small, glued-on balls of tissue paper. Pipe cleaner legs, googly eyes, and a felt nose complete the look. It’s a fantastic fine motor skill activity for little ones.
8. A Luminous Tissue Paper Lampshade
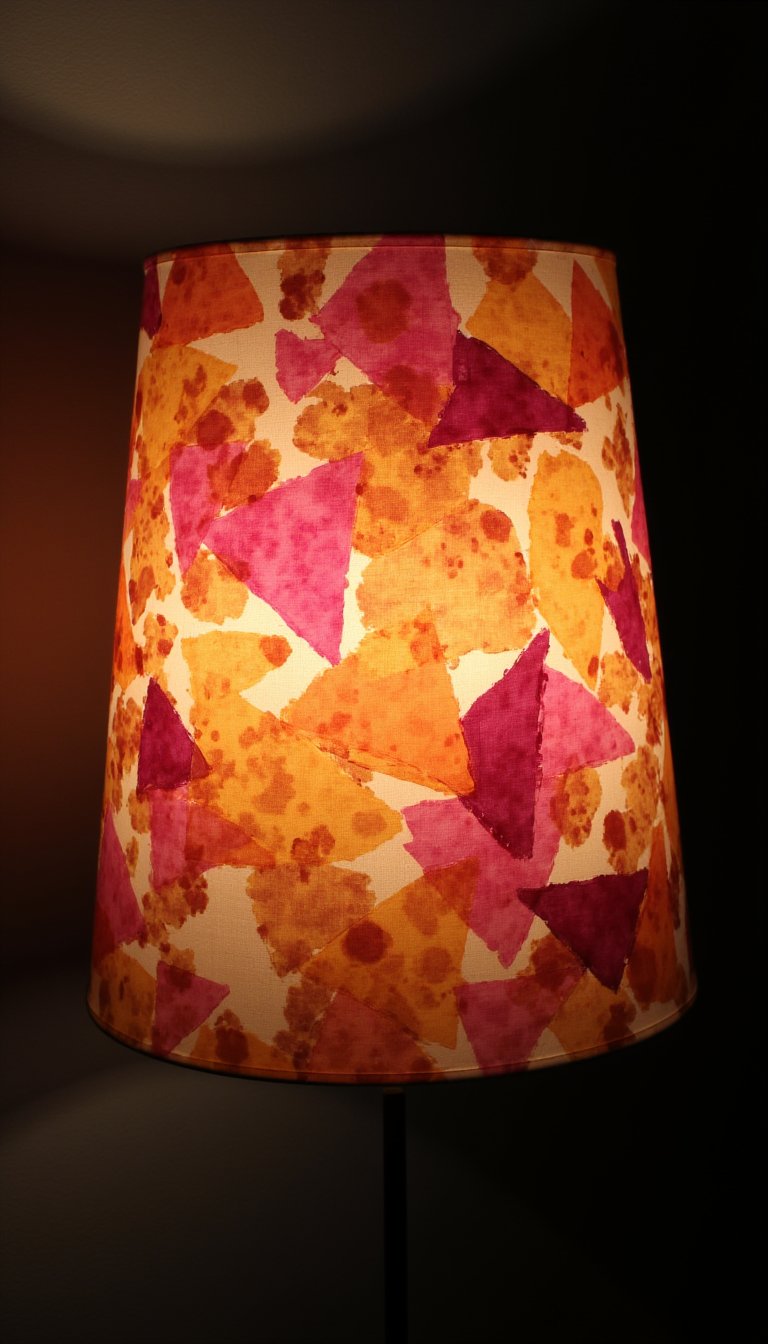
Transform a plain, boring lampshade into a glowing focal point. Cut or tear tissue paper into shapes (geometric or organic), and decoupage them directly onto the shade. When you turn the lamp on, the light will diffuse beautifully through the thin paper, casting a warm, patterned glow around the room.
9. Simple & Sweet Gift Toppers
Forget the pre-made bows. Make your gift stand out with a handmade tissue paper topper. Create a small pom-pom, a layered flower, or even a cute little fan shape. Attach it to the package with ribbon or twine. It shows you added a personal touch before they even open the box.
10. Colorful Suncatchers for Any Season
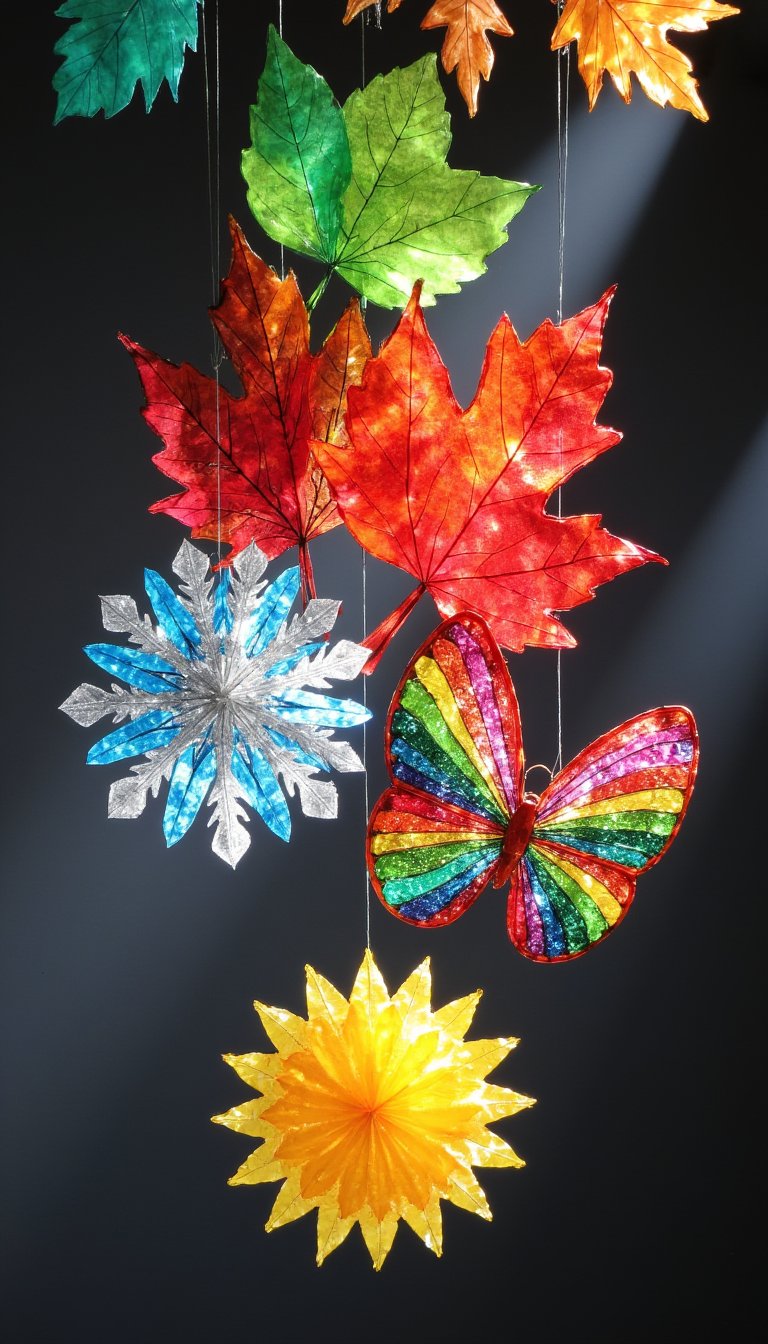
Similar to stained glass art, but often simpler. Use clear contact paper as your base. Let kids stick pre-cut tissue paper shapes onto the sticky side, then seal it with another sheet of contact paper. Cut it into a shape like a butterfly or a leaf, punch a hole, and hang it up. Instant sunshine.
11. DIY Greeting Cards with Depth
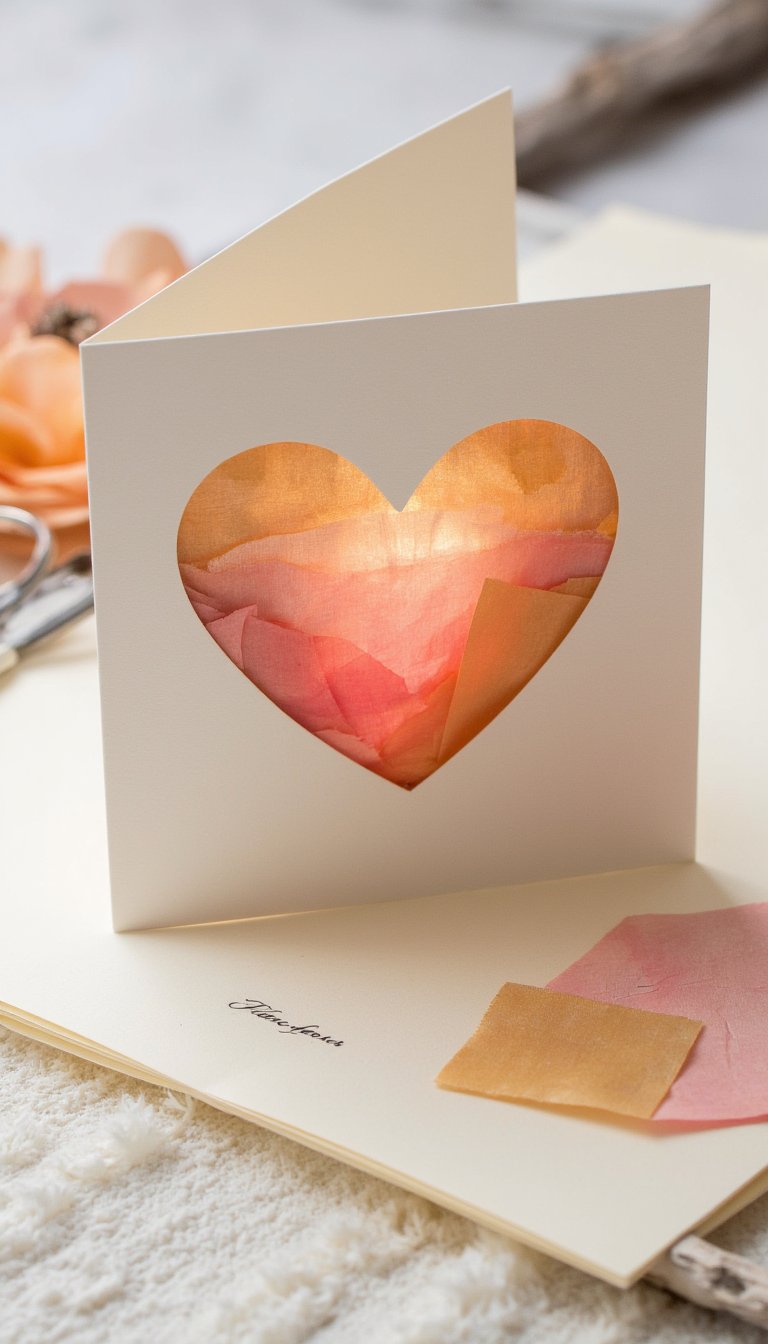
Elevate your card game. Cut a shape (a heart, a star, a balloon) out of the card front. On the inside, layer different colors of tissue paper behind the cut-out. When you close the card, you’ll see a beautiful, translucent colored shape. It’s elegant, easy, and looks like you bought it from a fancy stationery shop.
12. Faux Metal Embossing Art
This one feels like magic. Draw a simple design on cardstock with a bold line of glue from a bottle. While the glue is still wet, press pieces of metallic tissue paper (like the kind from fancy gift bags) over the entire design. Let it dry, then gently rub off the excess paper. The paper will stick only to the glue lines, leaving a shiny, “embossed” metallic drawing.
13. A Playful Tissue Paper Kite
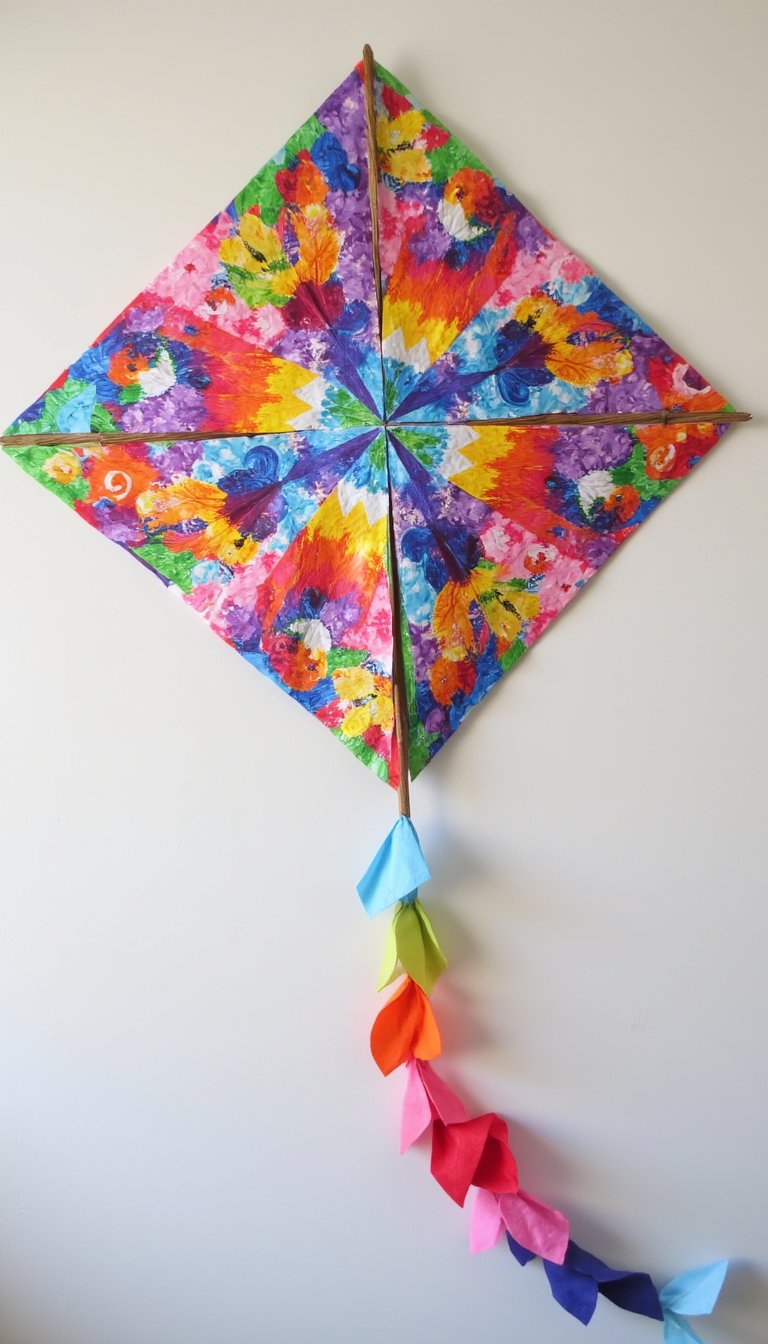
For a breezy afternoon, craft a simple diamond kite. Use lightweight wooden dowels for the frame and a plastic bag or newspaper for the base. Then, decoupage vibrant tissue paper shapes all over it for strength and incredible color. It won’t win aerodynamics awards, but the pride of flying something you made yourself? Unbeatable.
14. Beautifully Marbled Paper
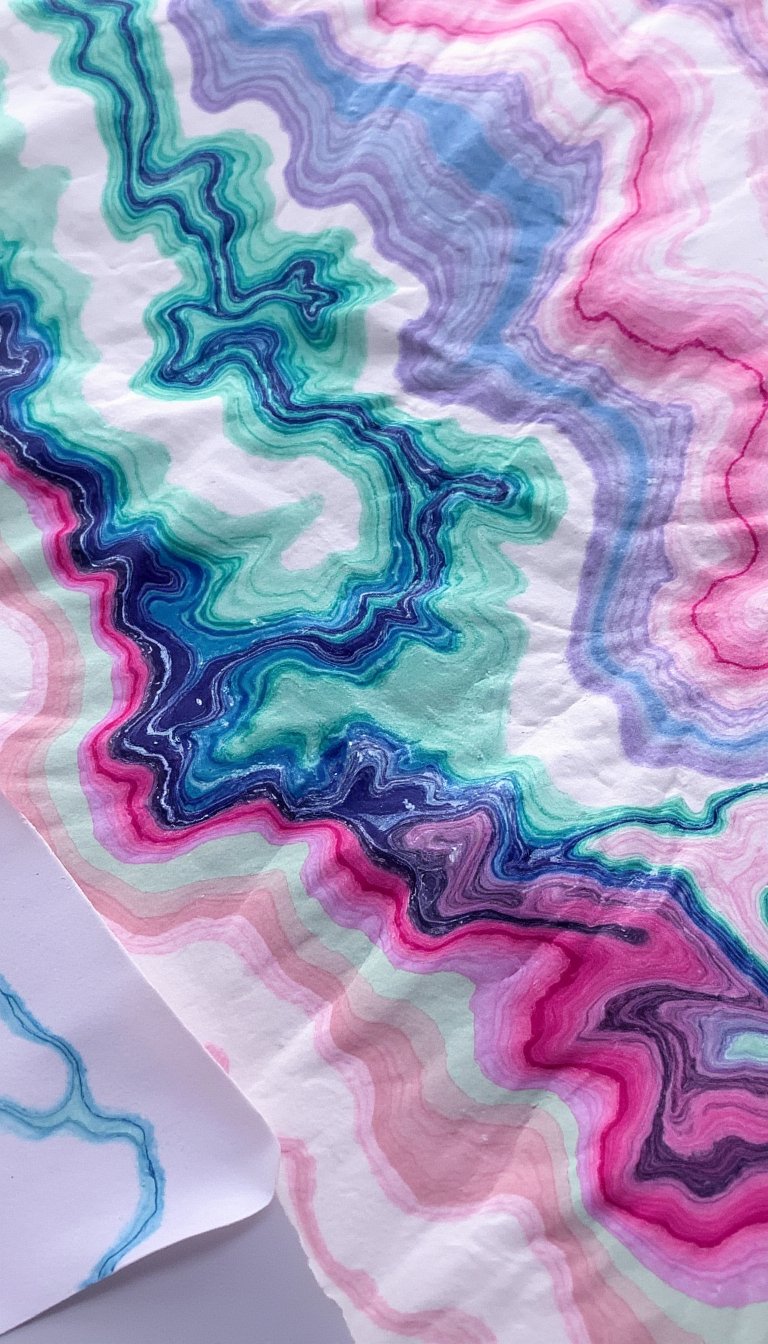
Create stunning, one-of-a-kind marbled paper for wrapping, journaling, or art projects. Crumple a sheet of tissue paper, then gently smooth it out on a tray. Use watered-down acrylic paints to drop color onto the crinkled surface. The paint will pool in the crevices, creating a gorgeous marbled effect when you press a sheet of plain paper onto it to absorb the design.
15. Festive Holiday Garlands
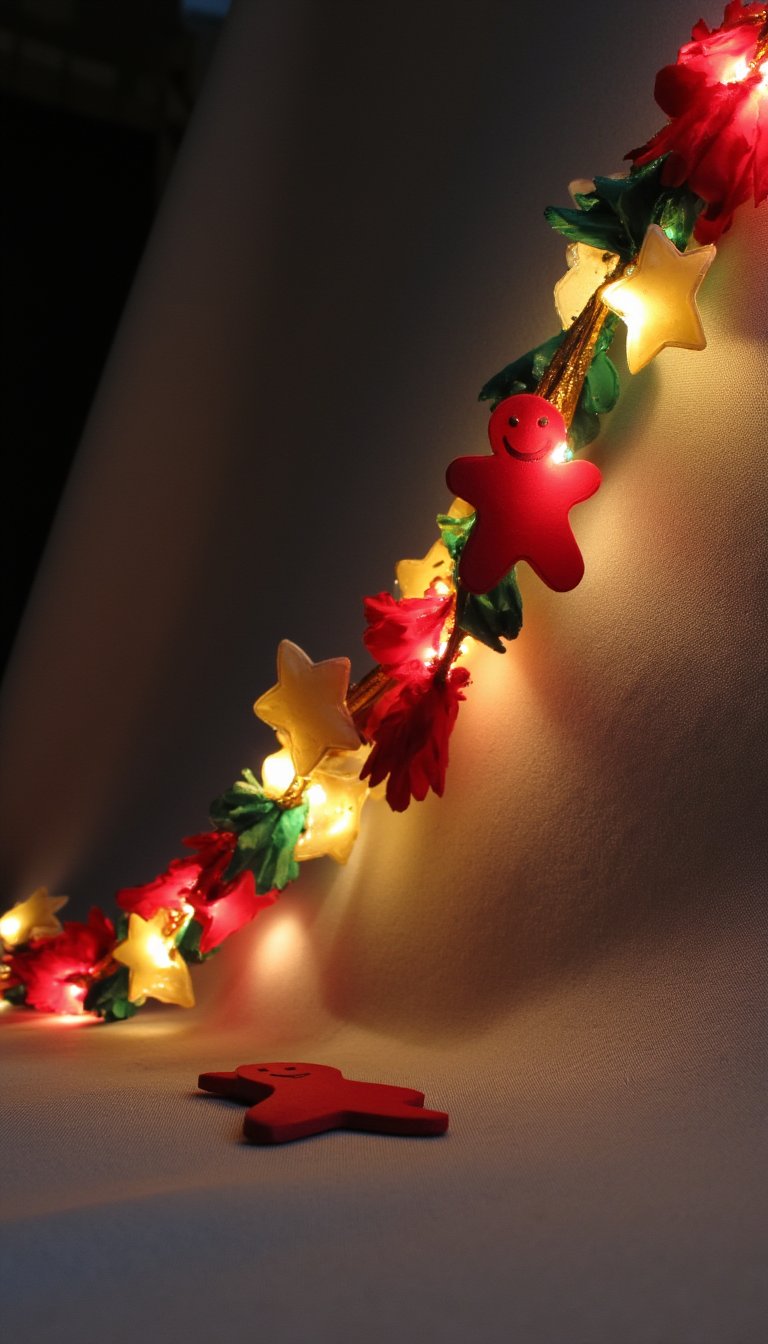
Ditch the store-bought plastic garland. Cut tissue paper into long strips or holiday shapes (like gingerbread men or stars). You can sew them together down the center with a sewing machine for a quick bunting, or simply tape them to a long string. It’s lightweight, colorful, and completely customizable for any holiday.
16. A Decorative Wreath for All Year
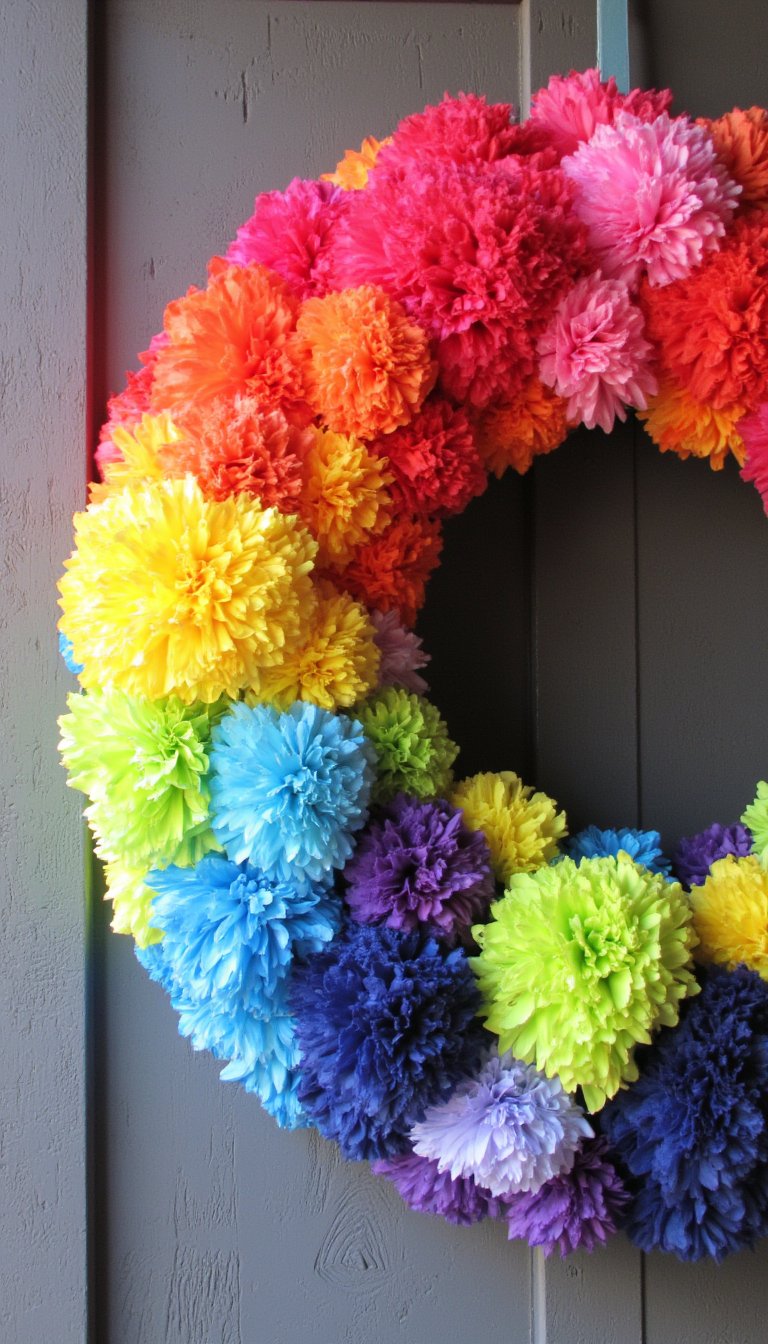
Grab a simple straw or foam wreath form. Now, make dozens of small tissue paper flowers or fluffy pom-poms. Attach them densely to the form using hot glue, covering it completely. You can make an ombre effect, use seasonal colors, or go full rainbow. It’s a stunning piece of door decor that costs a fraction of a store-bought wreath.
17. Creative “Bleeding” Tissue Art
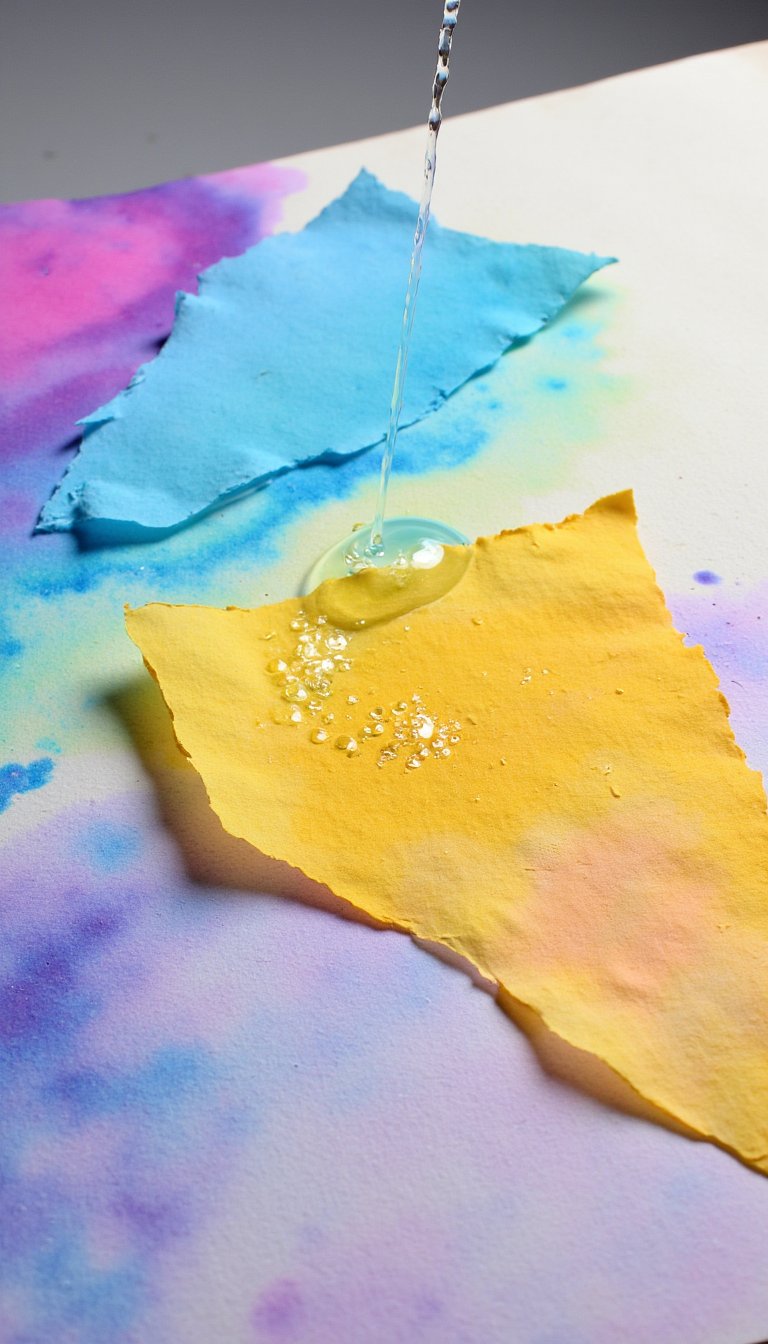
Use the magic of bleeding tissue paper (the cheap kind often does this!). Cut or tear shapes and place them on watercolor paper. Then, using a spray bottle, lightly mist the tissue with water. The color will bleed onto the paper below. Once dry, peel off the tissue to reveal a beautiful, soft watercolor background. It’s foolproof art.
18. Personalized Book Covers
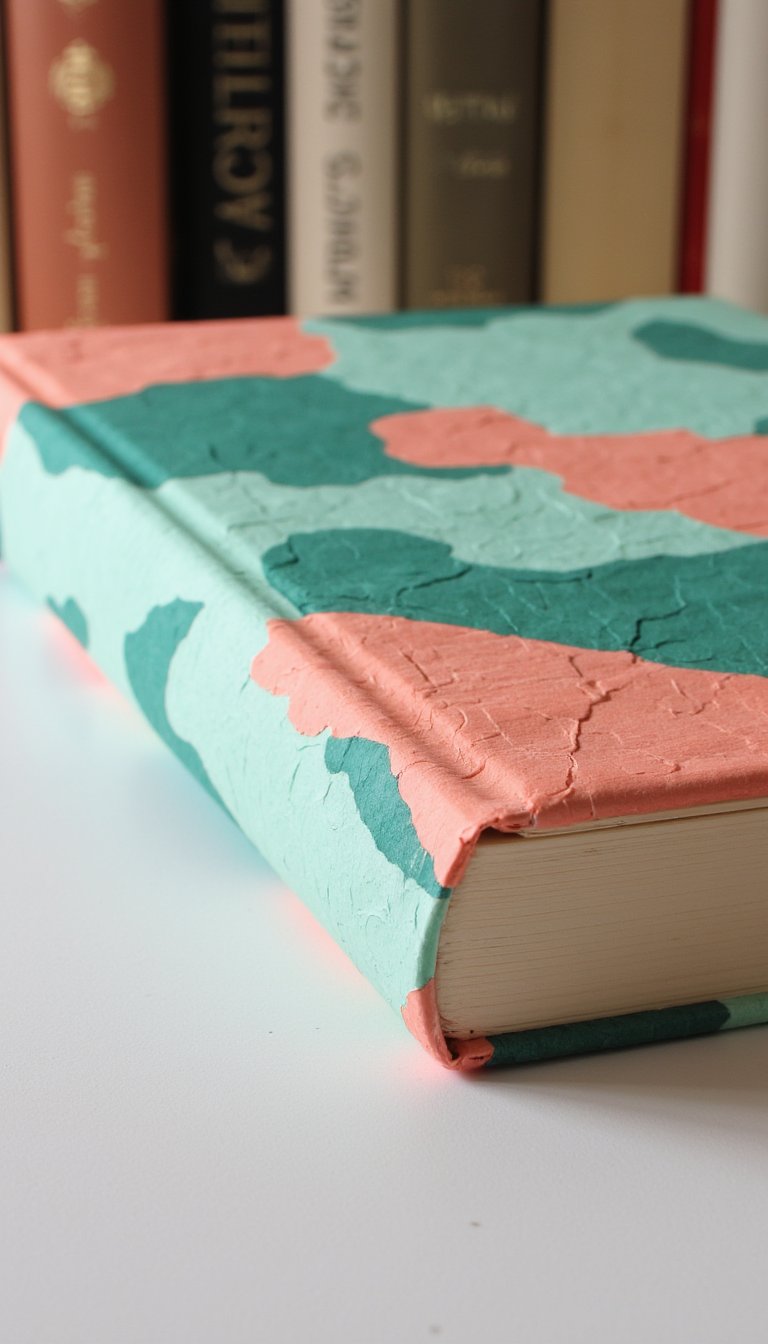
Protect your favorite paperback and give it a unique look. Measure and cut tissue paper to fit the cover, then use decoupage glue to carefully adhere it. You can use a single color, create a collage, or add tissue paper shapes. Seal it with a few extra coats of glue for durability. Your bookshelf will thank you.
19. Butterfly & Fairy Wings
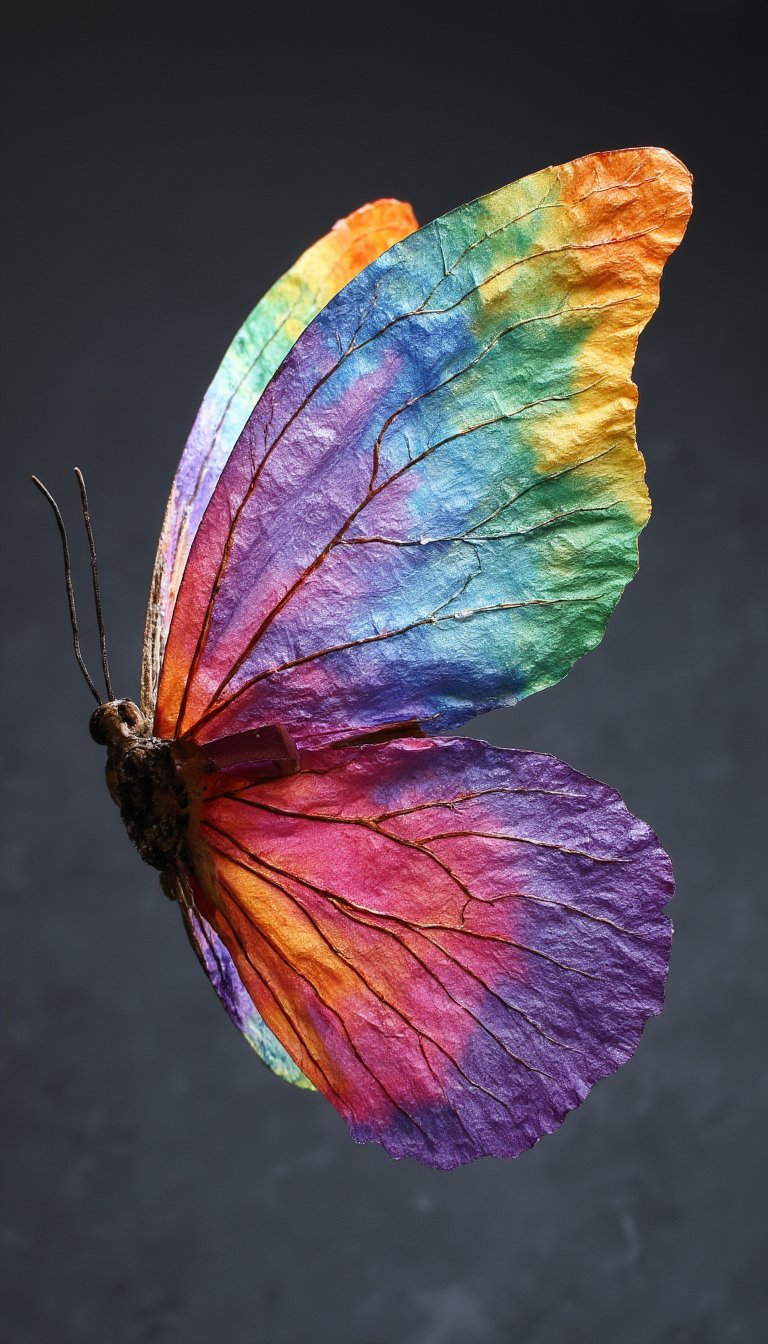
Perfect for dress-up or a costume party. Cut wing shapes from sturdy cardboard or a large piece of felt. Then, let the kids go wild gluing layers of tissue paper in all colors and patterns. Attach elastic straps, and watch them flutter around. It’s a craft that turns directly into imaginative play.
20. A Unique Tissue Paper Mosaic
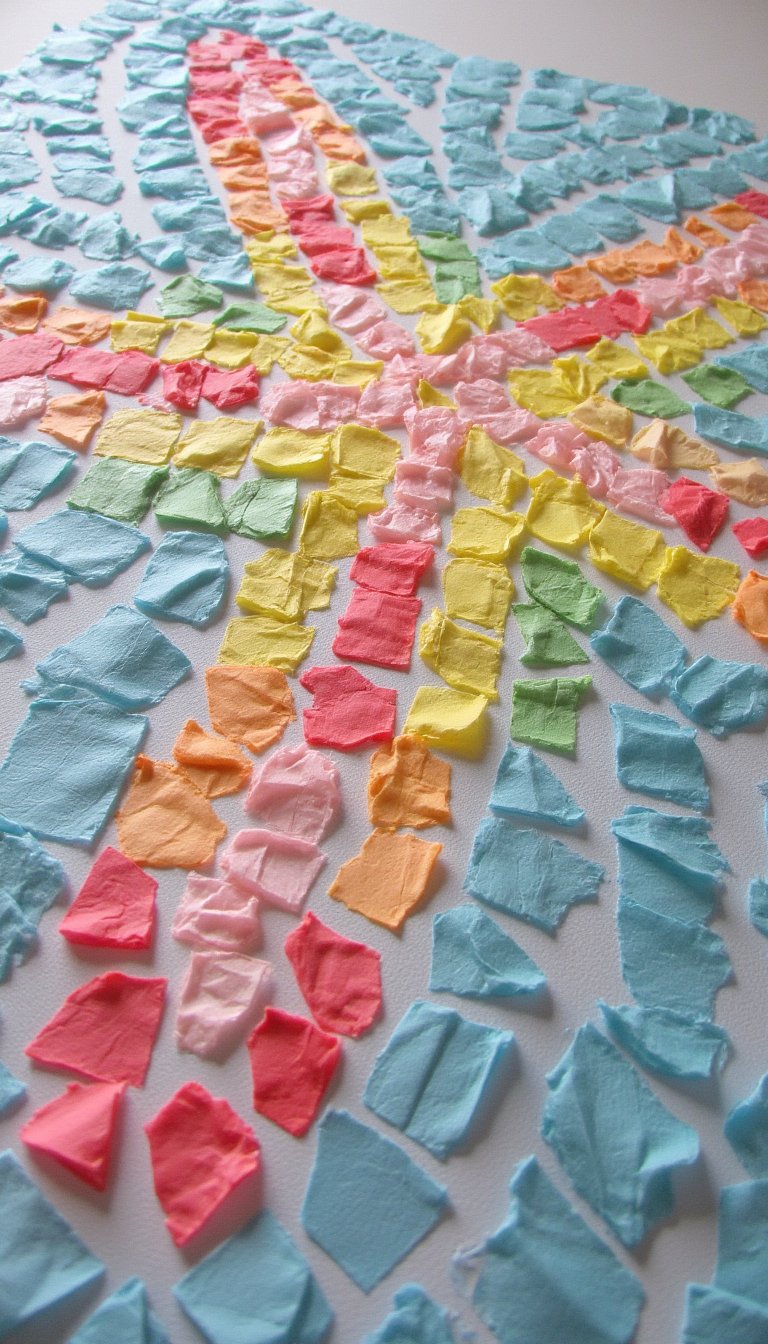
Think of it like a pixelated painting. Cut or tear tissue paper into hundreds of small, uniform squares. Draw a simple outline on a canvas or heavy paper (a heart, a tree, a starfish). Then, use a glue stick to place each tiny square, filling in the design. The result is a vibrant, textured mosaic with tons of visual interest.
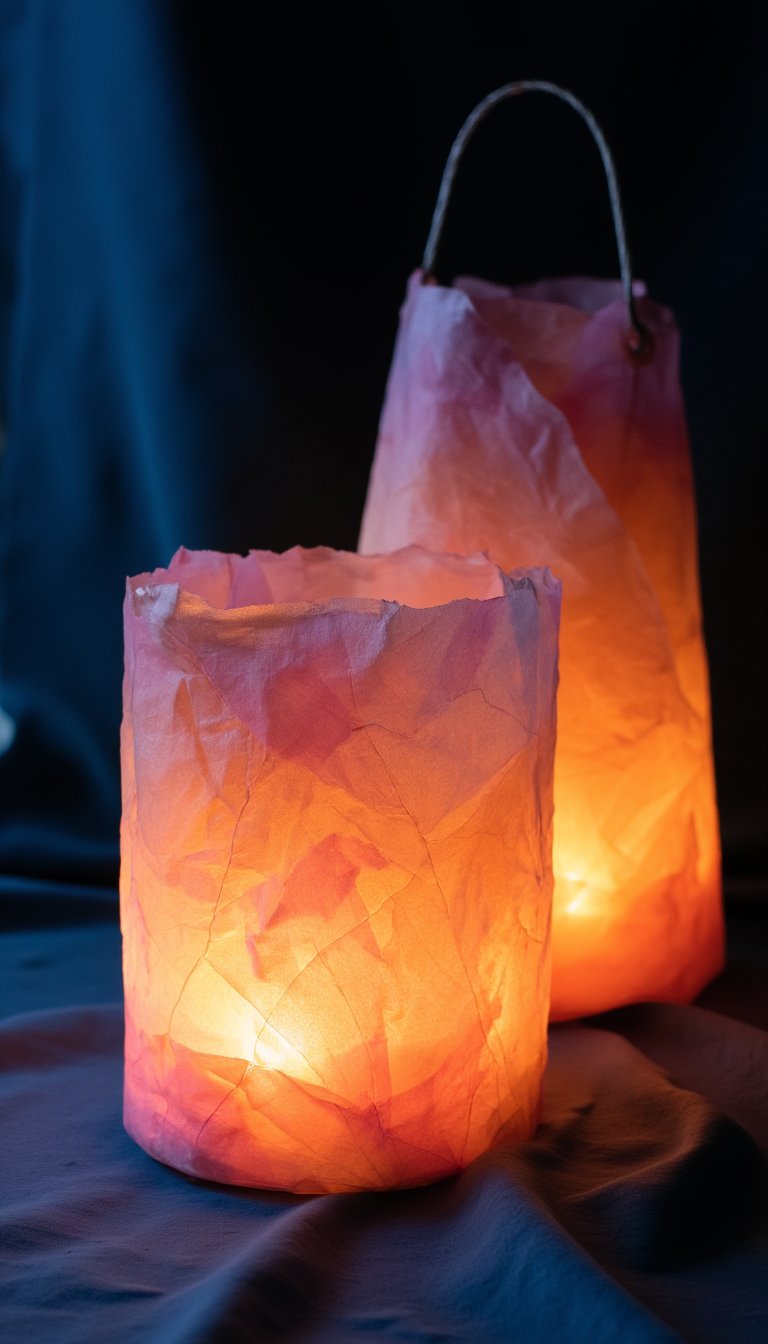
21. Luminarias or Path Lights
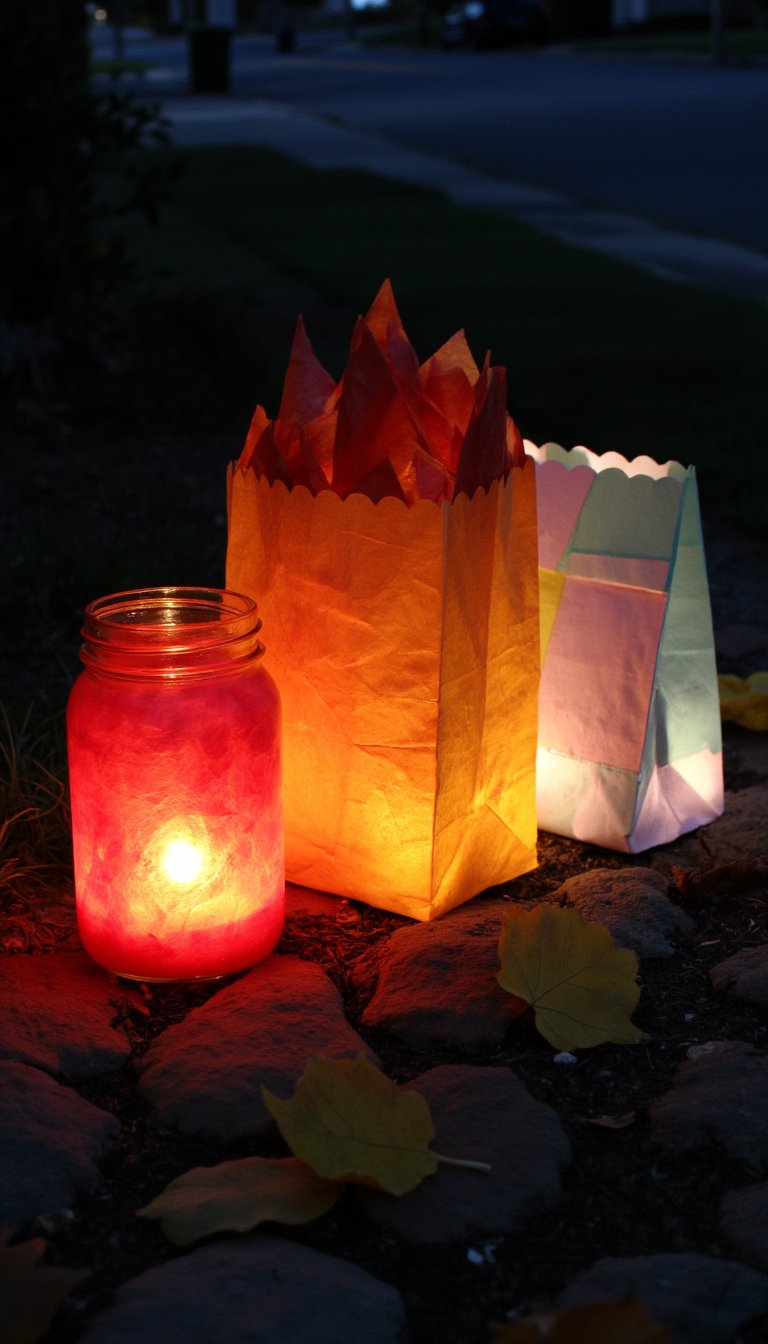
Line your garden path or patio with soft, flickering light. Take simple paper lunch bags or glass jars. Decoupage tissue paper in autumn colors or pretty pastels onto the outside. Place a battery-operated tea light inside. The tissue paper softens the glow, creating a magical and safe ambiance for any evening gathering.
22. Upcycled Tissue Paper T-Shirt
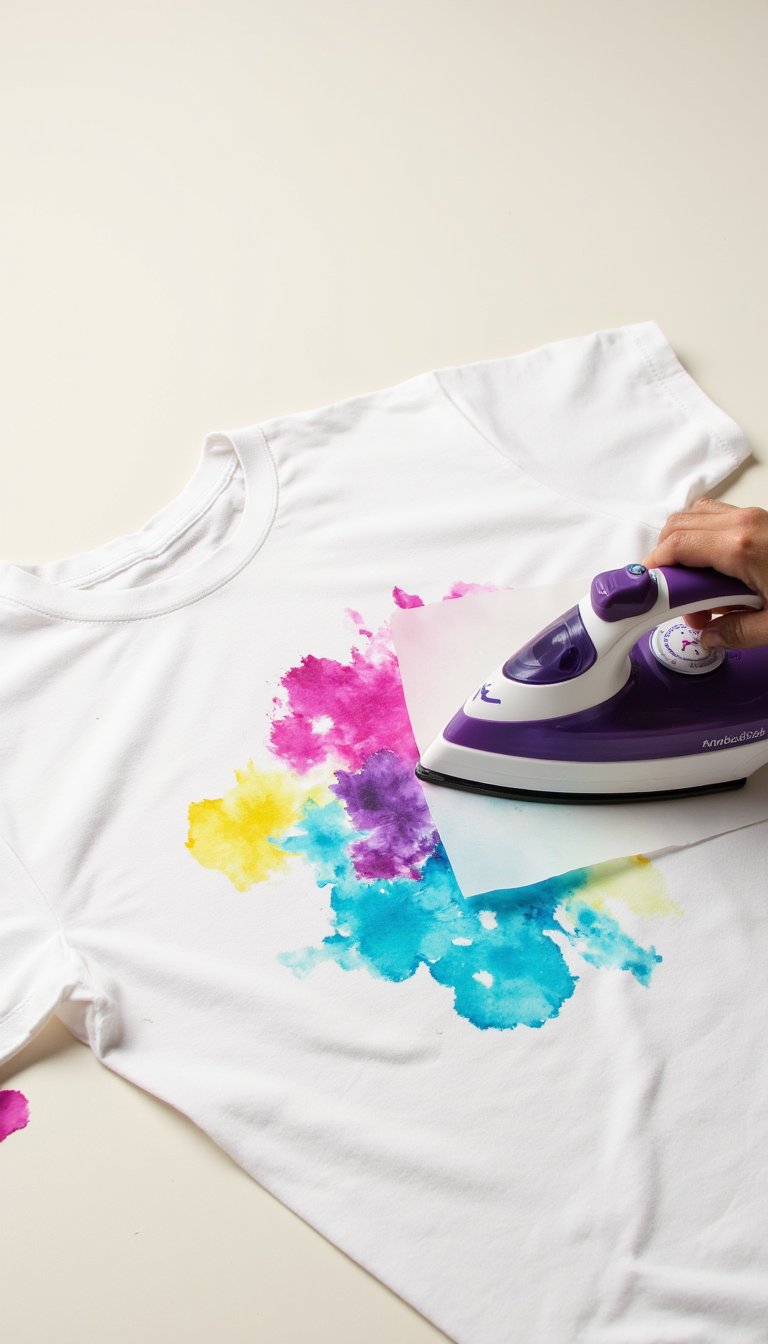
Customize a plain cotton tee with this easy technique. Lay tissue paper shapes on the shirt, then cover them with a piece of parchment paper. Iron over the parchment with a hot, dry iron (no steam!). The dye from some tissue paper will transfer onto the fabric. It’s a temporary, fun design that washes out, so you can change it up whenever you want!
23. Faux Frosted Glass Votives
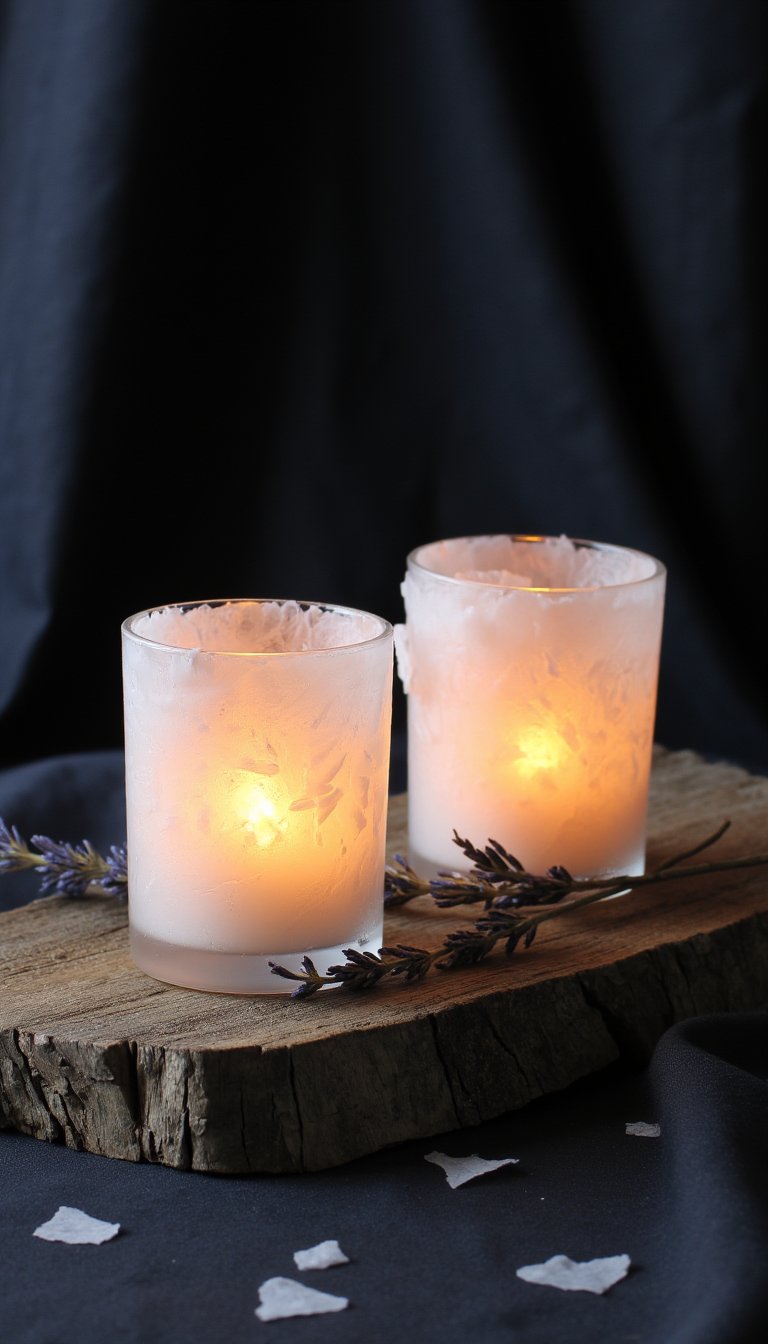
Give clear glass votive holders a frosted, private look. Brush a thin layer of decoupage glue on the outside, then apply a single sheer layer of white or light-colored tissue paper. Smooth out wrinkles and let it dry. The paper becomes translucent, diffusing the candlelight beautifully and hiding any wax drips inside.
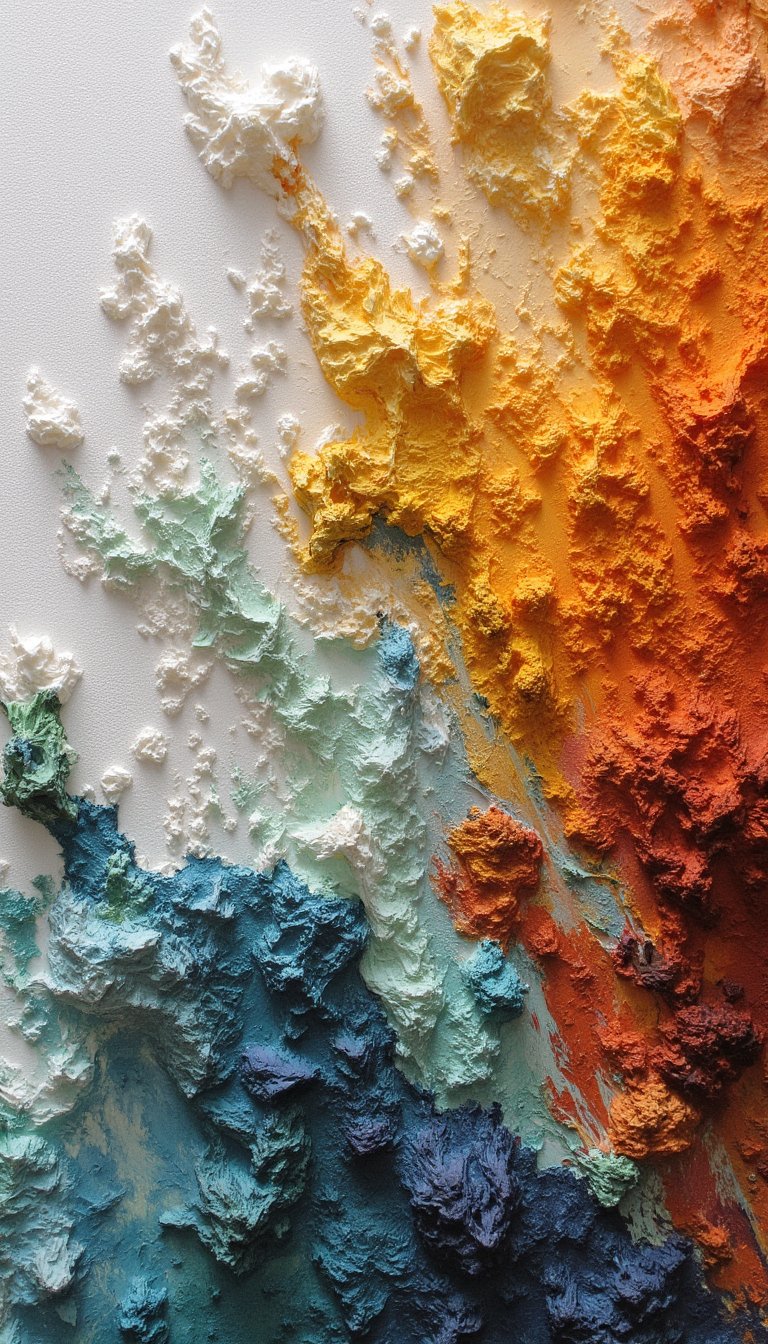
24. 3D Topographical Map Art
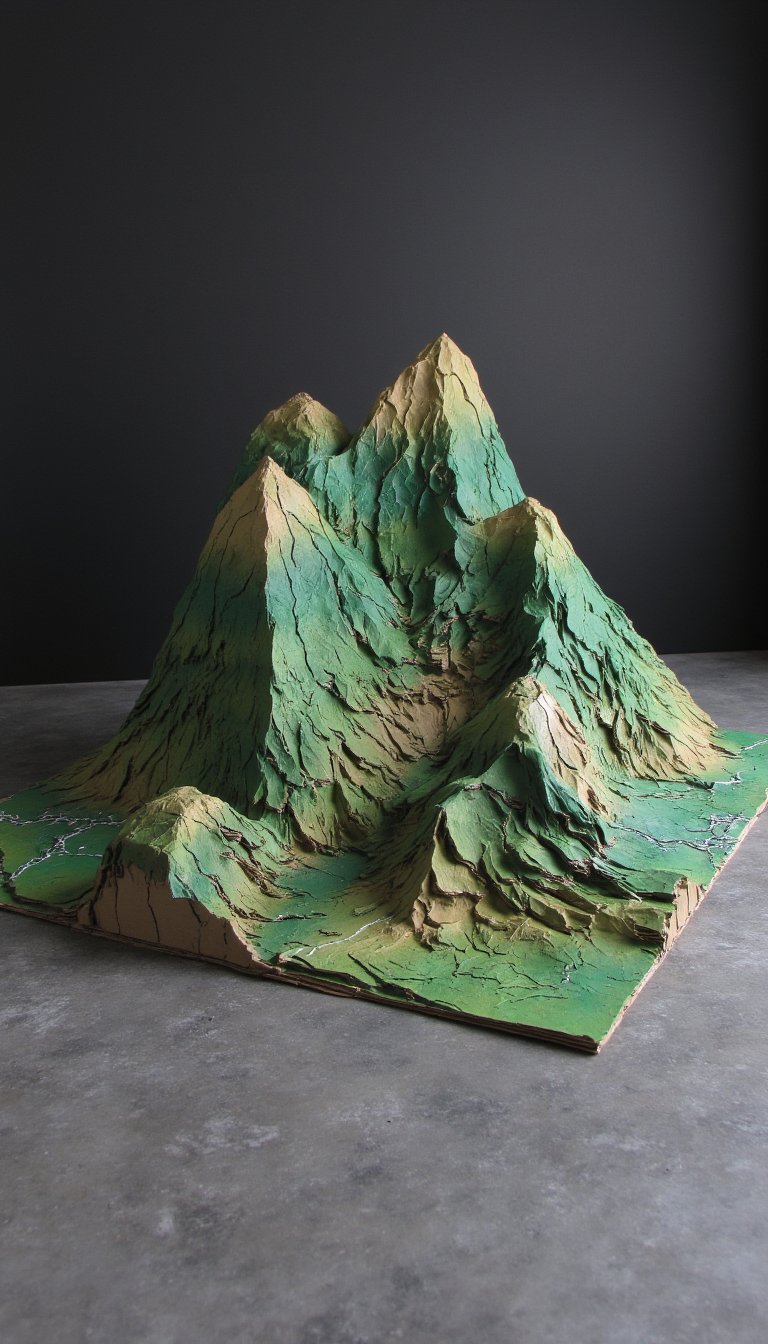
This is a seriously cool project for older kids or adults. Draw island or mountain shapes on cardboard and cut them out in layers. Cover each layer with different shades of green or brown tissue paper using decoupage. Then, stack and glue the layers together using small spacers to create a raised, 3D topographical map. It’s a stunning piece of geography-meets-art.
25. Delicate Paper Lanterns
Create beautiful, ambient lanterns. Form a cylinder out of chicken wire or use a pre-made wire form. Carefully decoupage tissue paper strips or sheets over the entire form. Once dry, add a wire handle at the top and pop in a battery-operated candle. Hang them or group them on a table for instant atmosphere.
26. A Tissue Paper “Quilt” Wall Hanging
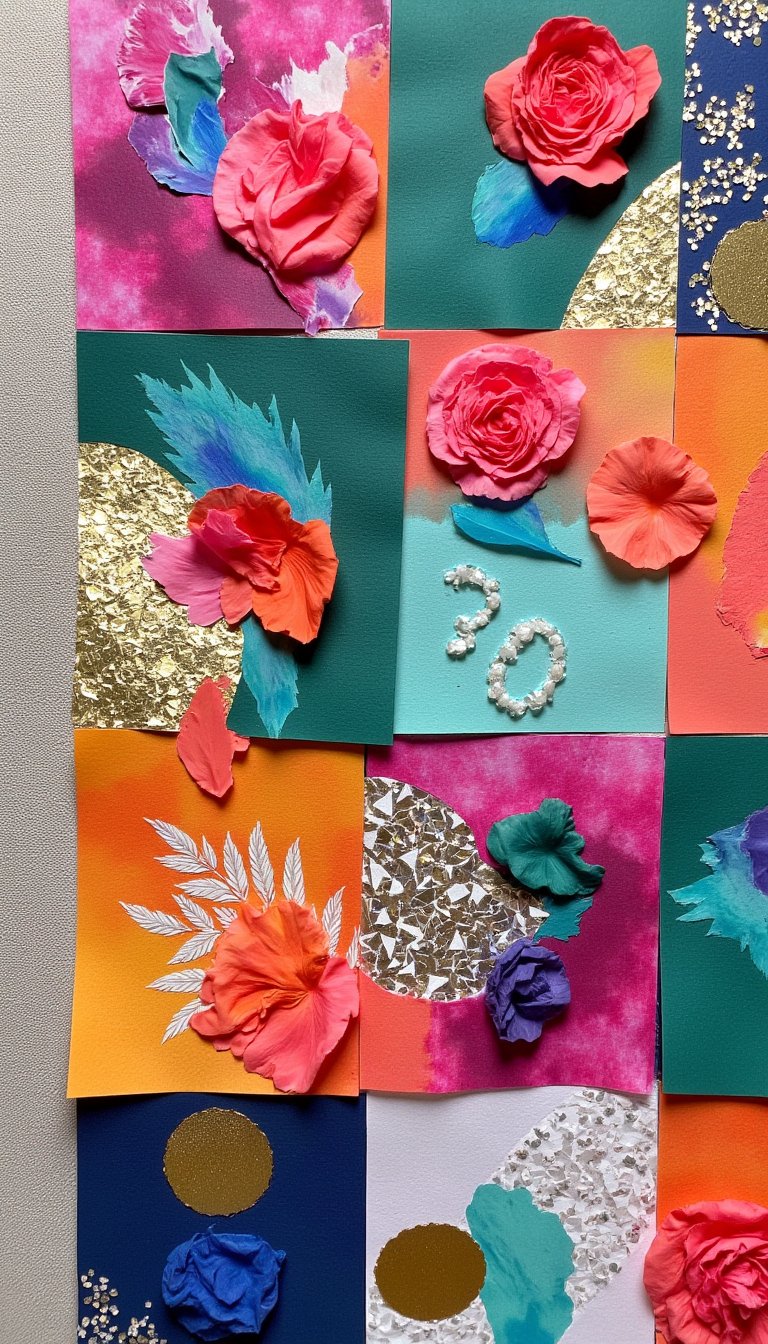
No sewing required. Cut squares from heavy poster board or cardboard. Decorate each square with different tissue paper techniques—bleeding art, mosaics, decoupage patterns. Then, arrange them in a grid and tape the backs together. It’s a large-scale, colorful piece of art that looks intricate but is made of simple, manageable squares.
27. Simple Monogram Letter Decor
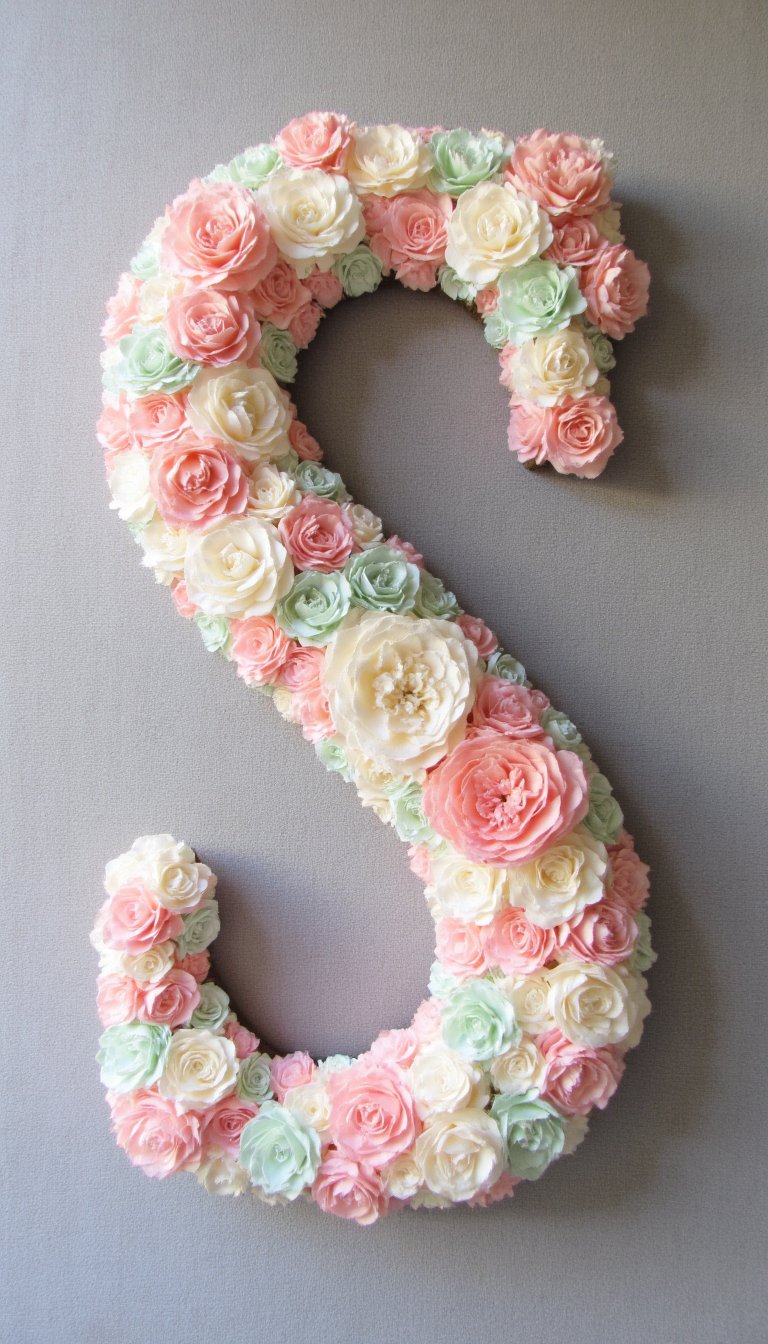
Find a large wooden or cardboard letter from a craft store. Now, cover it by making hundreds of tiny tissue paper “flowers.” Crumple a small square of tissue around the eraser end of a pencil, dip it in glue, and stick it onto the letter. Repeat until the entire letter is covered in a fluffy, textured bloom. It’s perfect for a nursery or bedroom.
28. DIY Confetti Poppers

For your next celebration, make the party favors. Use empty toilet paper rolls. Cover one end with tissue paper secured with a rubber band and fill the tube with homemade tissue paper confetti (just cut or punch holes in sheets!). Cover the other end, and you have a popper. Guests just punch through the tissue ends for a festive explosion.
29. A Gorgeous Decoupage Planter Pot
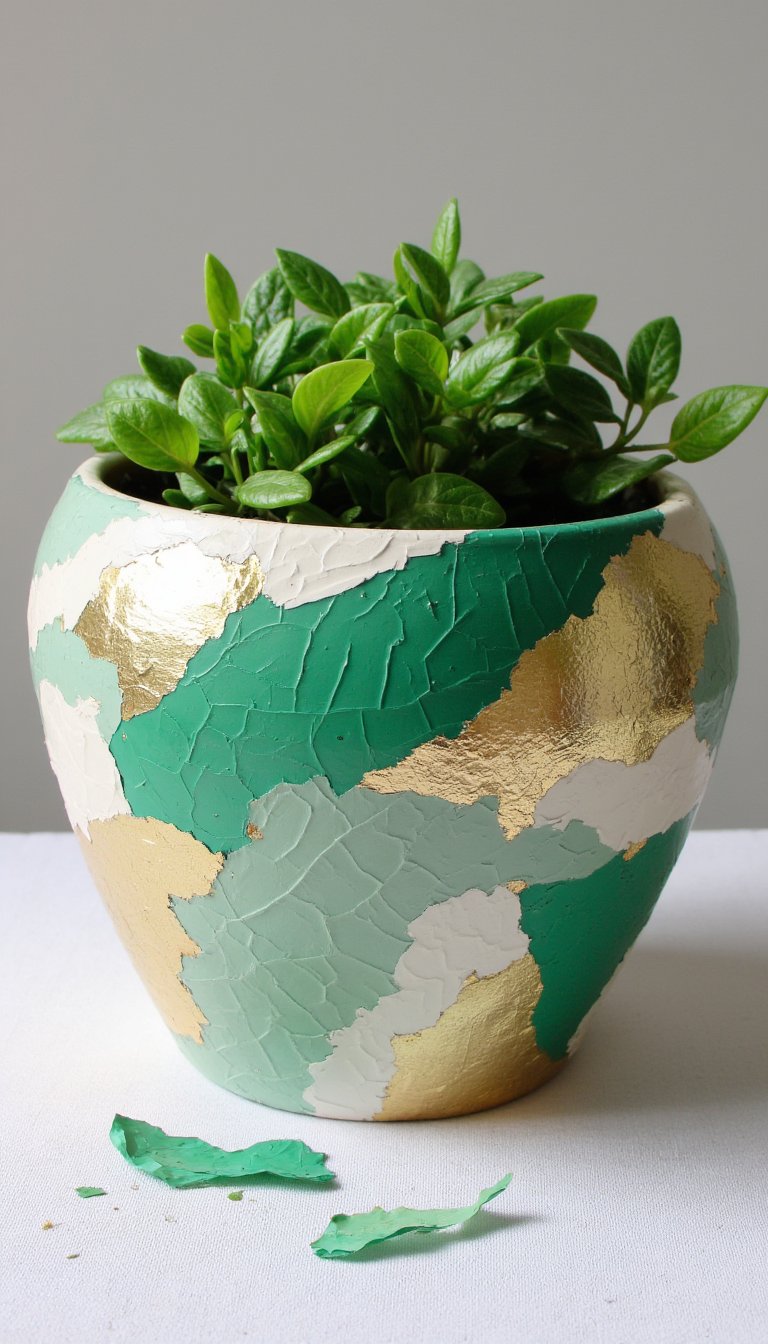
Bring your greenery to life with a custom pot. Take a plain terracotta pot and decoupage torn pieces of tissue paper all over it, overlapping for a layered look. Use colors that complement your plant. Seal it with a waterproof outdoor Mod Podge to protect it. It ties your whole plant display together and hides any boring plastic nursery pots.
See? I told you that tissue paper was a secret creative weapon. From quick kids’ activities to stunning home decor, this inexpensive material offers an unbelievable bang for your buck. The best part is there’s zero pressure—if you mess up, you’re out about two cents worth of paper. So dig out that stash, embrace the crinkle, and start creating something unexpectedly wonderful. Who knows, your next masterpiece might be hiding at the bottom of a gift bag right now. Happy crafting! 😊