
Is there anything better than that first truly warm day? You open the windows, hear the birds, and suddenly, the urge to create something colorful and new hits you like a sunbeam. But then you stare at a blank piece of paper or a pile of supplies and… crickets. Sound familiar? Don’t worry, I’ve been there too. That’s why I’ve pulled together this mega-list of 28 spring crafts—from quick wins with the kids to stunning projects that’ll make your home feel like a garden. Let’s ditch the winter grays and make something joyful.
1. Pressed Flower Lanterns
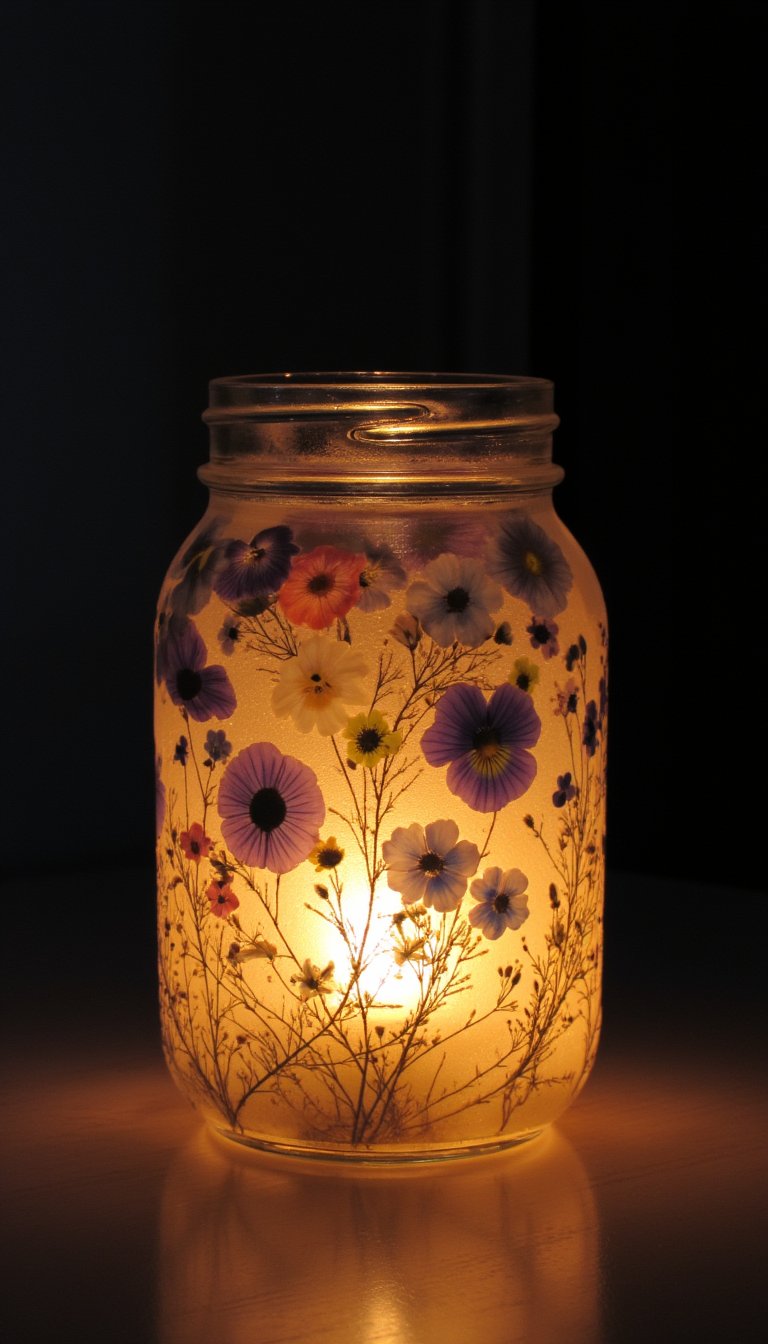
Capture the fleeting beauty of spring blooms in a glowing keepsake. This project is easier than it looks and creates a magical ambiance. Simply gather delicate flowers like pansies or forget-me-nots, press them between book pages for a week, and then use Mod Podge to adhere them to a clean glass jar.
Once the adhesive dries, pop a battery-operated tea light inside. The light shines through the petals, creating a stunning, ethereal effect perfect for a porch or bedside table. It’s a beautiful way to preserve those first flowers of the season.
2. Upcycled Bird Feeder from a Teacup

Got a chipped teacup or a thrift store saucer you adore? Give it a charming second life. This is one of those spring crafts that mixes whimsy with practicality. Using a strong outdoor adhesive, glue the teacup to its saucer at a slight angle, as if it’s tipping over.
Then, glue the whole assembly to a sturdy stake or a piece of garden decor. Fill the cup with birdseed and watch your feathered friends enjoy their very fancy dining spot. It adds a touch of vintage charm to any garden corner.
3. Rainbow Wind Chimes for Kids

This is a guaranteed hit for a rainy spring afternoon. Grab some paint samples in every color of the rainbow (the free ones from the hardware store work perfectly), a stick from the yard, and some string.
Cut the paint chips into simple shapes like clouds, raindrops, or just rectangles. Let the kids string them in rainbow order and tie them to the stick. Hang it up and listen to the soft, colorful clatter in the breeze. It’s a lesson in color order and a cheerful decoration all in one.
4. Decoupage Easter Eggs (That Last Forever)

Tired of messy dye kits that only last a week? Use wooden or plastic craft eggs for a permanent spring display. The technique is simple: tear pieces of pretty tissue paper, napkins with floral patterns, or even pages from an old book.
Use a decoupage medium to layer them onto the egg, sealing as you go. You can create elegant botanical eggs, quirky comic-book eggs, or anything in between. They make a gorgeous centerpiece in a bowl or nestled in some faux grass.
5. A Living Succulent “Bird’s Nest”

Bring the garden indoors with this adorable and easy-to-care-for project. Find a shallow, bowl-shaped basket or pot. Line it with sphagnum moss or coco coir to create a nest-like base.
Then, tuck in small succulent rosettes, arranging them like precious eggs. The succulents require minimal water and love bright light, making this a low-maintenance piece of living decor. It’s a modern, natural twist on classic spring crafts.
6. Painted Rock Garden Markers

Never forget what you planted where! Grab some smooth, flat stones from your garden or a craft store. Wash and dry them thoroughly, then paint them with acrylic paints.
You can paint simple vegetable and herb names, cute little illustrations of the plants, or even just colorful patterns. Seal them with an outdoor-safe sealant and place them at the head of your garden rows. Functional, durable, and totally charming.
7. Citrus and Herb Hanging Garland

This craft smells as amazing as it looks. Thinly slice lemons, limes, and oranges, and dry them in a low oven. Gather springs of rosemary, lavender, or eucalyptus.
Using a sturdy string or twine, simply tie the dried citrus slices and herb bundles at intervals along the length. Hang it in a sunny window or across a mantel. The light shines through the citrus, and the herbs release a subtle, fresh scent—pure spring in a garland.
8. Butterfly Clip Bookmarks

A perfect quick craft for book lovers. Use colorful cardstock or scrapbook paper to cut out simple butterfly shapes—think two connected hearts for the wings. Get creative with patterns!
Glue the paper butterfly to the top of a plain wooden clothespin or a large paperclip. Now you have a delightful bookmark that clips right onto your page, looking like a butterfly just landed on your novel. It’s a sweet, simple gift idea, too.
9. DIY Seed Bombs for Guerrilla Gardening

Become a secret agent of beauty! Mix together air-dry clay, potting soil, and native wildflower seeds. Roll the mixture into small, marble-sized balls and let them dry completely.
Then, on a damp day, toss them into neglected patches of dirt, vacant lots (where allowed!), or your own garden. The clay protects the seeds until the rain dissolves it, leading to a surprise burst of flowers. It’s one of the most rewarding spring crafts for community-minded creators.
10. Mason Jar Herb Garden

Grow your cooking herbs right on the kitchen windowsill. This is practicality meets rustic charm. Take clean mason jars and fill them with potting mix. Plant starter herbs like basil, mint, chives, or cilantro.
Label the jars with chalkboard paint or cute tags. Not only do you get fresh herbs at your fingertips, but the green sprouts against the glass look incredibly fresh and cheerful. Just make sure they have drainage—a layer of pebbles at the bottom helps.
11. Paper Plate Lacing Suns
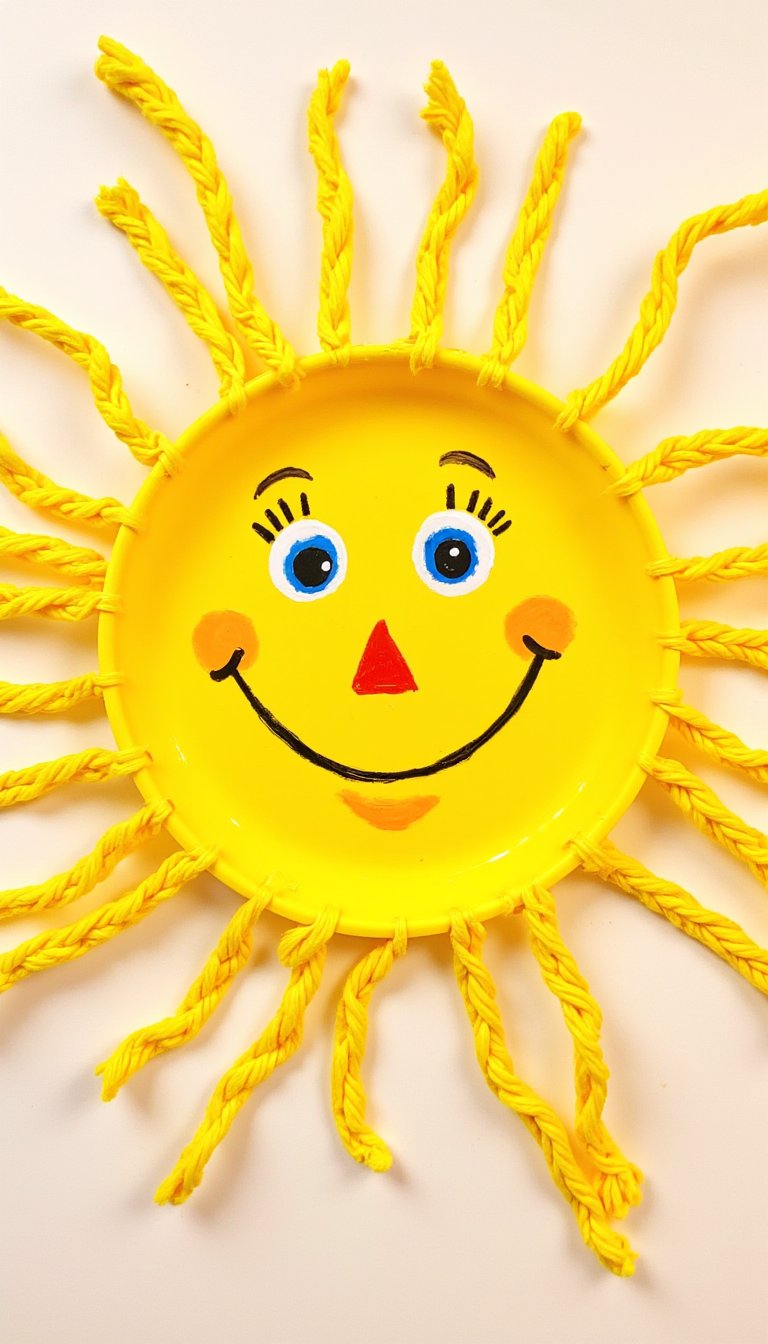
An excellent craft for developing fine motor skills in little ones. Give a paper plate a vibrant coat of yellow paint. Once dry, punch holes around the perimeter.
Provide your child with a long piece of yellow yarn with tape wrapped around one end (to make a “needle”). Let them lace the yarn through the holes to create sun rays. Add a happy face, and you have a beaming masterpiece ready for the fridge.
12. Washi Tape Vases
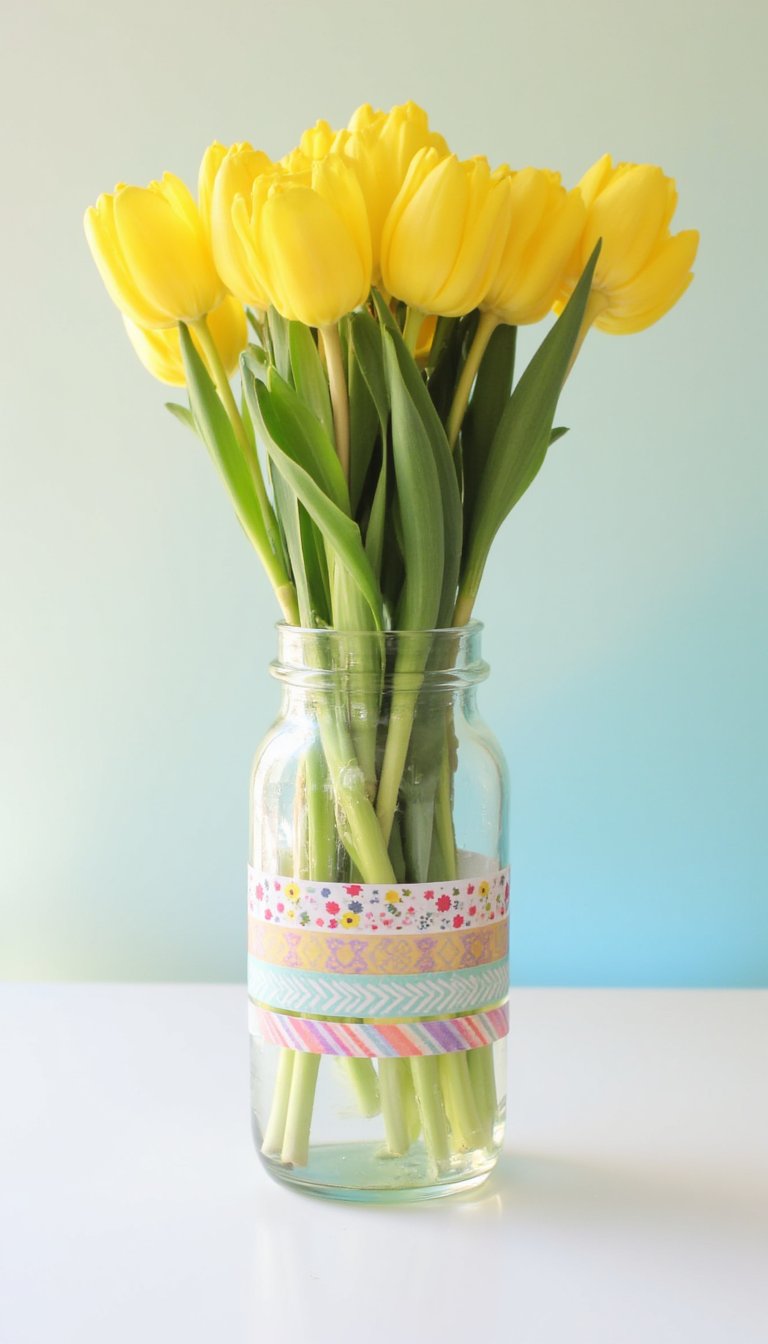
Transform a plain glass vase or bottle in under five minutes. Raid your collection of decorative washi tapes—think florals, pastels, and geometric patterns.
Simply tear and stick the tape in stripes, criss-crosses, or a chevron pattern around the vase. It’s completely removable, so you can change up the design with your mood. Pop in a bunch of tulips, and you’ve got an instant, custom centerpiece.
13. Pinecone Fairy Houses

Encourage imaginative play with a bit of forest magic. Gather large pinecones, moss, acorn caps, and tiny pebbles. Use hot glue to turn the pinecone into a little house: an acorn cap for a door, pebbles for a path, and moss for the roof.
You can place these in potted plants or create a whole fairy village at the base of a tree. It’s a wonderful way to get kids observing and interacting with nature.
14. Bleeding Tissue Paper Art

Watch colors bloom like magic. This process-art project is mesmerizing for all ages. Cut or tear pieces of “bleeding” tissue paper (the cheap kind that runs when wet). Arrange them on thick watercolor paper.
Using a spray bottle, lightly mist the tissue paper with water. The color will bleed onto the paper below. Once dry, peel off the tissue to reveal a beautiful, watercolor-like background. You can leave it as abstract art or use it as a base for drawing flowers or butterflies.
15. Clay Leaf Impression Dishes
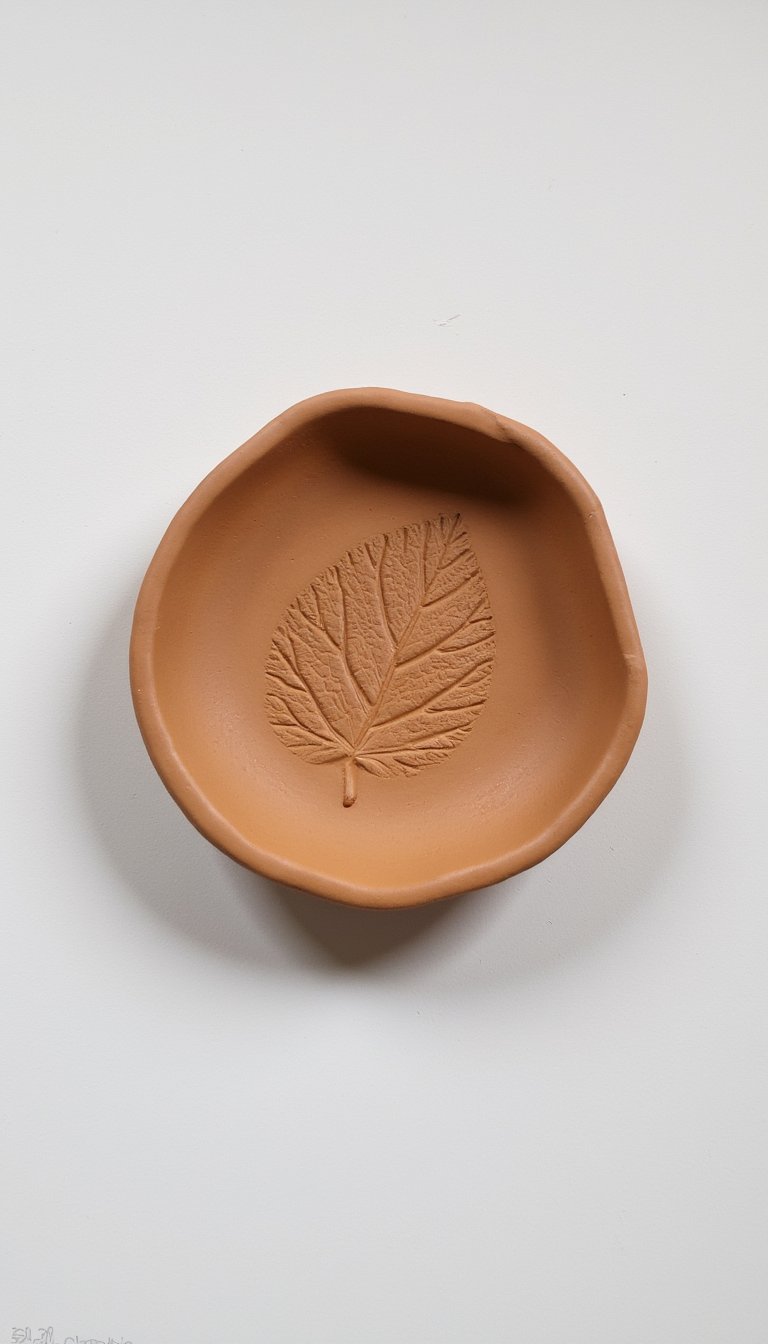
Make a permanent impression of spring’s delicate leaves. Roll out air-dry or oven-bake clay to about 1/4-inch thickness. Press a beautifully veined leaf (like a fern or maple) firmly into the clay, then carefully peel it away.
Cut around the impression with a knife or cookie cutter and shape the edges into a shallow dish or trinket tray. Once baked or dried, you can paint it or leave it natural. It’s a gorgeous, organic piece of functional art.
16. Pom-Pom Caterpillars

These fuzzy friends are ridiculously easy and cute. All you need are colorful pom-poms, googly eyes, a pipe cleaner, and glue. Glue a line of pom-poms together, largest one at the front for the head.
Attach the googly eyes and cut small pieces of pipe cleaner for antennae. Bend the caterpillar into a cute curve. It’s an instant toy, decoration, or story prop. See? Not all spring crafts need to be complicated to be delightful.
17. A “Bee Hotel” for Solitary Bees

Support your local pollinators with a DIY sanctuary. Take a small wooden box or a length of untreated timber. Drill holes of various diameters (2mm to 10mm) into one side, but not all the way through.
Mount it in a sunny, sheltered spot in your garden. Solitary bees, which are excellent pollinators and rarely sting, will use these tunnels to nest. It’s a craft that gives back to your garden ecosystem in a big way.
18. Shaving Cream Marbled Paper

Prepare for some messy, magnificent fun. Spray a layer of shaving cream onto a tray and smooth it out. Drop dots of liquid watercolor or food coloring on top, then swirl with a toothpick.
Press a piece of cardstock onto the surface, lift, and use a squeegee or ruler to scrape off the shaving cream. Underneath, you’ll reveal stunning, marbled paper perfect for making cards, covering notebooks, or framing as art. The cleanup is half the fun!
19. Yarn-Wrapped Monogram
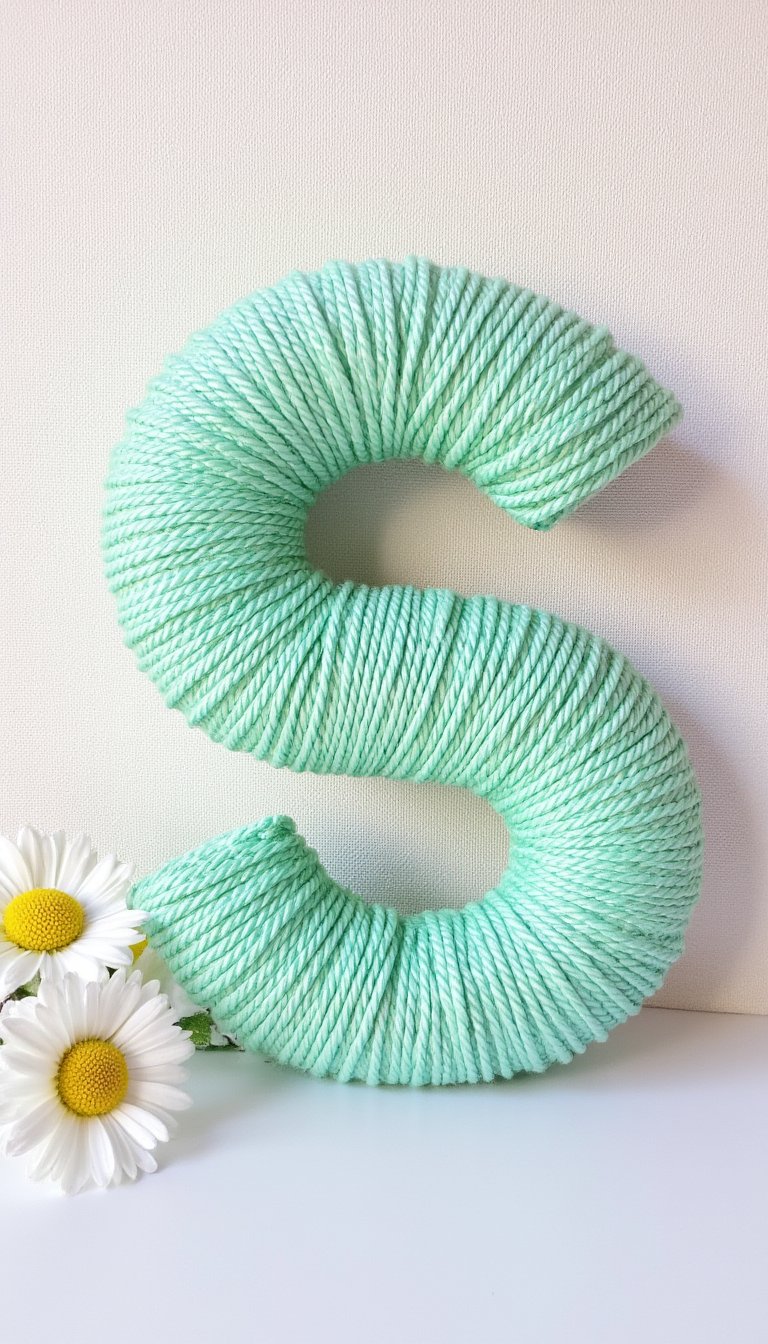
Add a cozy, personalized touch to a spring wreath or wall. Cut a large initial letter from thick cardboard. Choose a spring-colored yarn—mint, coral, or soft yellow.
Secure the end with a dot of glue and start wrapping, covering the cardboard completely. Change colors if you like. Once finished, you can glue on small faux flowers or leave it sleek and modern. It’s a satisfying, almost meditative craft.
20. Egg Carton Tulips

Upcycle with purpose! Cut the cups from a cardboard egg carton. Trim them into tulip-like shapes with four petals. Let the kids paint them in bright, cheerful colors.
Poke a green pipe cleaner through the bottom for a stem, and secure it with a dab of glue inside. “Plant” a whole bouquet in a painted pot filled with crumpled paper or clay. They never wilt, and you’ve kept waste out of the landfill. Win-win.
21. Suncatcher Jars with Tissue Paper
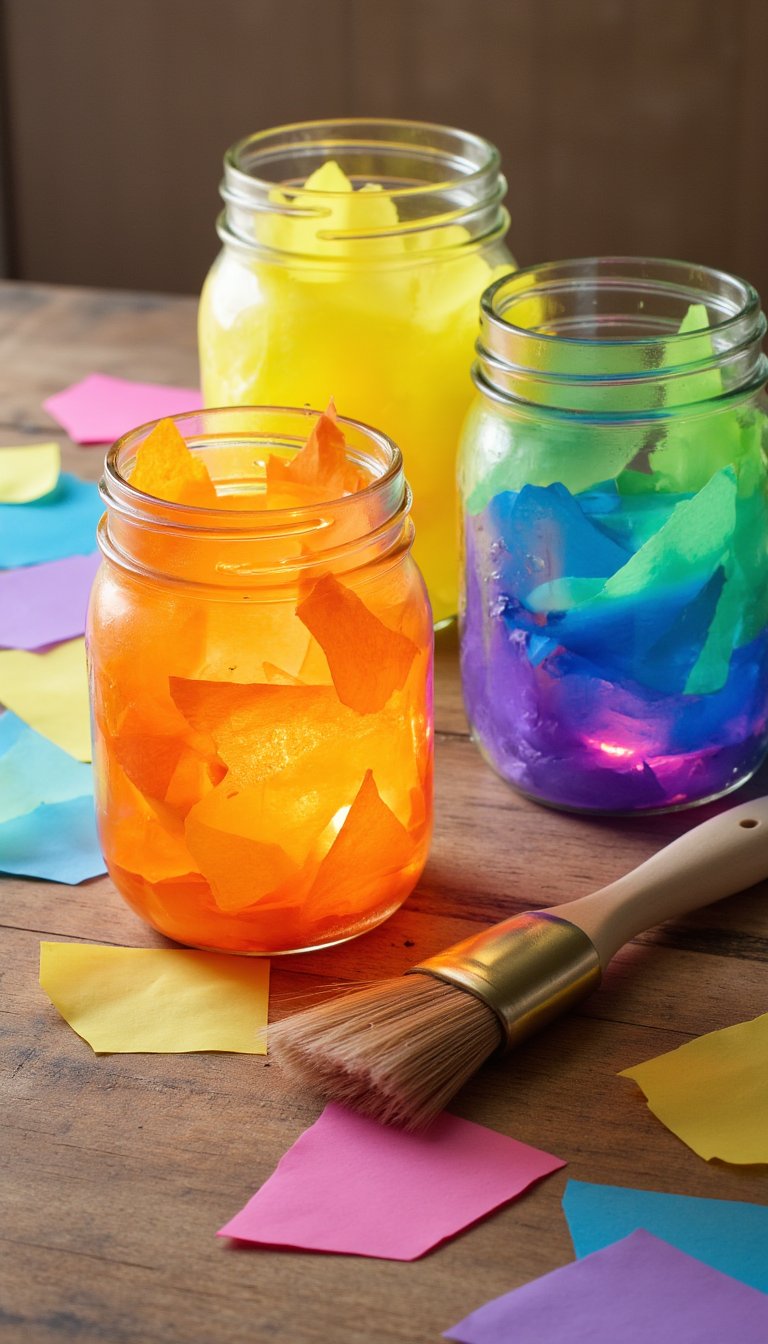
Harness the power of the sun with this stained-glass effect. Cut colorful tissue paper into small shapes. Using a mixture of white glue and a little water, brush the outside of a clean glass jar.
Apply the tissue paper pieces, overlapping them, and seal with another layer of the glue mixture. As it dries clear, the colors will glow brilliantly when placed in a sunny window. It’s like holding a piece of rainbow.
22. Nature Walk Collage Frame

Turn a family walk into an art project. Head outside with a bag and collect small treasures: pretty leaves, flower petals, interesting seeds, and feathers.
Back home, arrange your finds on the cardboard insert of a picture frame. Once you have a composition you love, carefully glue everything down. Insert it into the frame (without the glass) for a beautiful, 3D snapshot of your local spring.
23. Pasta Butterfly Mobiles

Raid the pantry for this one! Use bowtie (farfalle) pasta for the butterfly wings. Let the kids paint them with vibrant acrylics or even dip them in food coloring.
Once dry, glue them around a clothespin or a small piece of pipe cleaner for the body. Add tiny bead antennae. Hang several from a branch or embroidery hoop with clear thread for a fluttering mobile.
24. DIY Rainstick from a Cardboard Tube
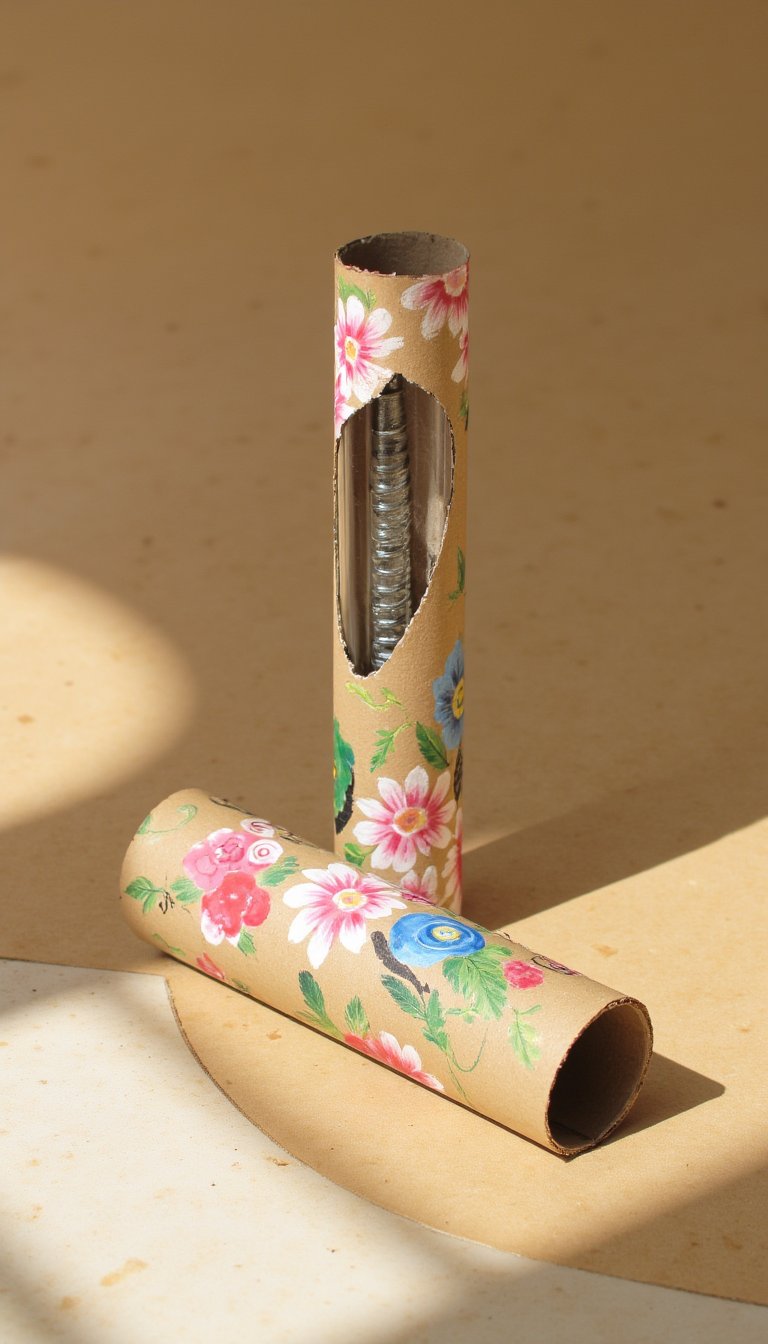
Bring the soothing sound of a spring shower inside. Seal one end of a long cardboard tube (from wrapping paper). Hammer nails or push pins partway into the tube in a spiral pattern.
Pour in a cup of dry rice or lentils, seal the other end, and decorate the outside with paint or patterned paper. When you tip it, the filler will cascade over the nails, creating the gentle, rushing sound of rain. It’s incredibly calming.
25. Handprint Cherry Blossom Tree

Make a keepsake that grows more precious each year. Paint your child’s forearm and hand brown and press it onto a large sheet of paper to create the tree trunk and branches.
Once dry, let them use their fingertips dipped in pink and white paint to dab clusters of blossoms all over the branches. The result is a beautiful, personalized piece of art that captures their size right at this moment.
26. Decorative Garden Spheres
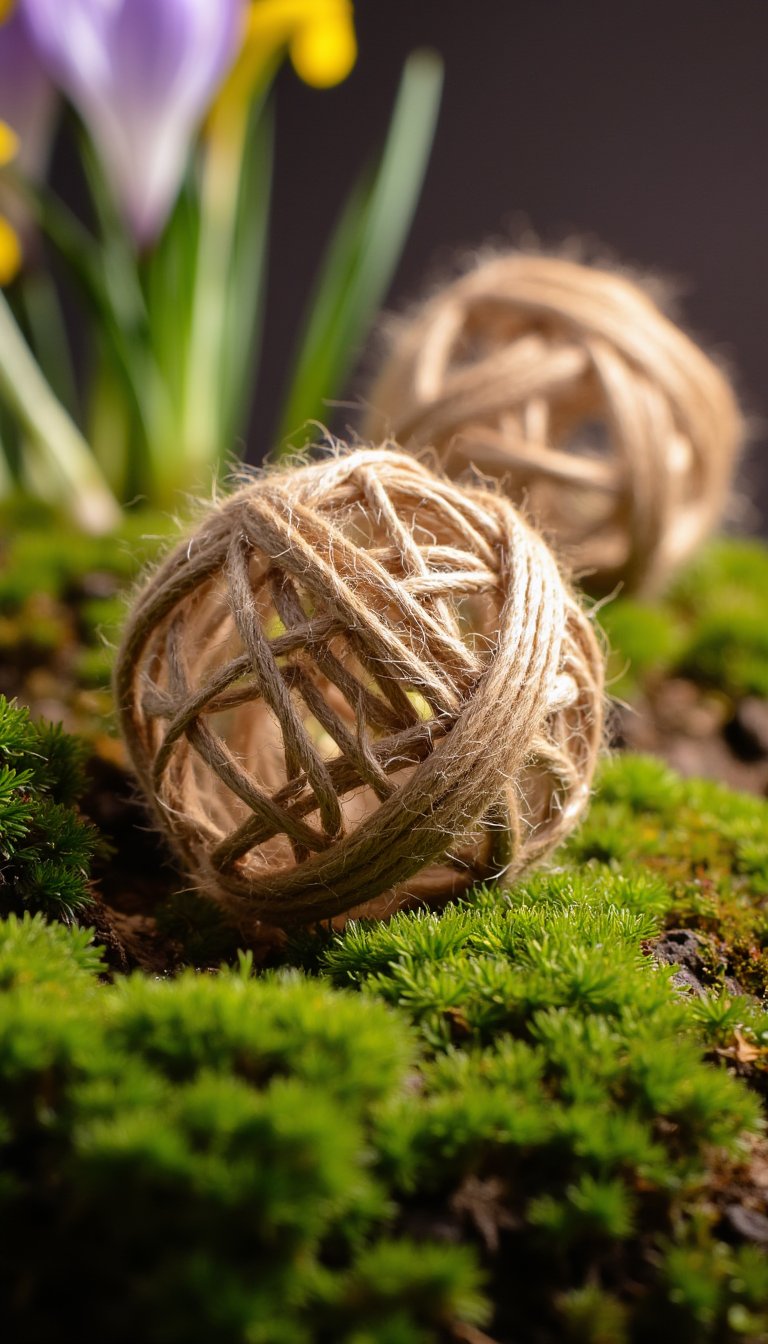
Add a sculptural element to your flower beds. Blow up a balloon to your desired size and wrap it tightly with jute twine or thick yarn that’s been soaked in a mixture of white glue and water.
Let it dry completely, then pop and remove the balloon. You’re left with a delicate, string sphere. Place it amongst your plants or hang it from a tree branch. It catches the light and dew beautifully.
27. Coffee Filter Peonies
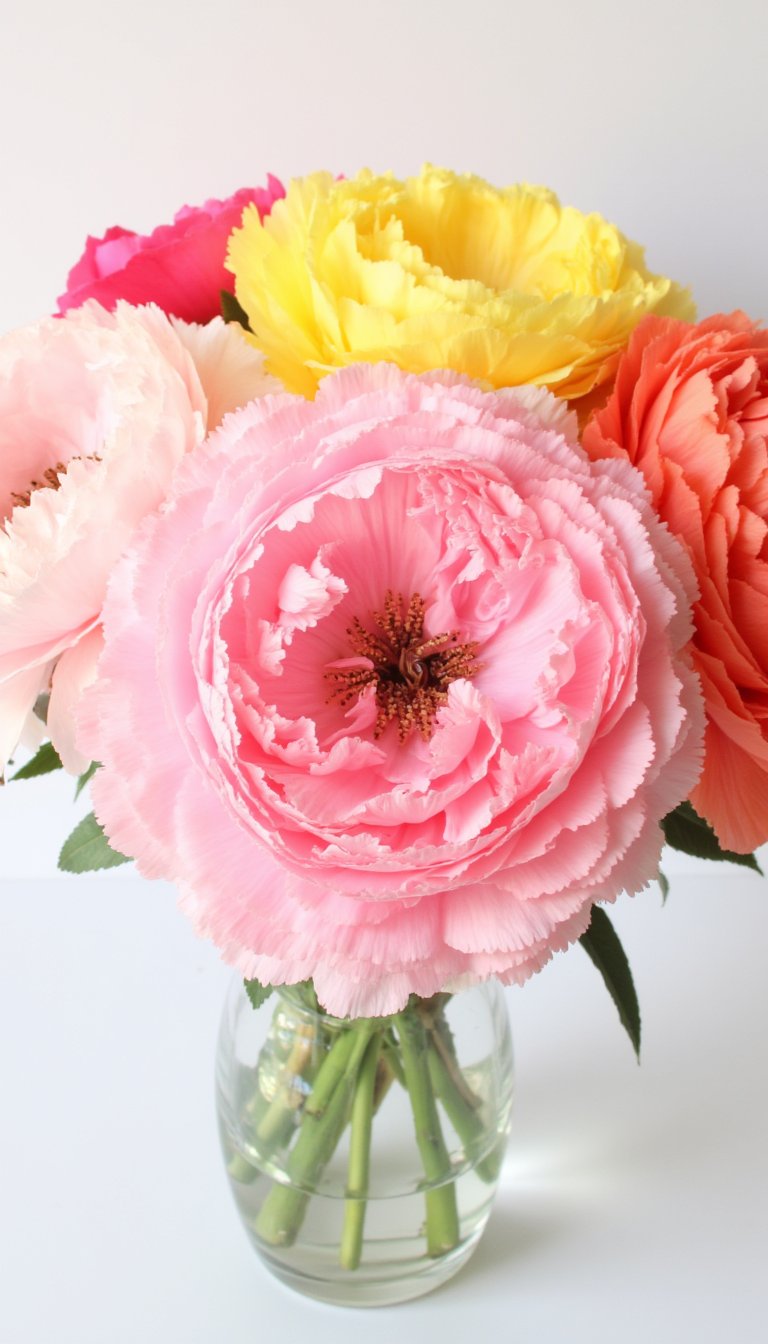
Create lush, full blooms that never need water. Flatten white coffee filters and use watercolor paints or even markers (spritzed with water) to color them in pinks, corals, and yellows. Let them dry.
Stack 4-5 filters, pinch the center, and wrap it with floral wire. Then, gently fluff and separate each layer to form a gorgeous, ruffled peony. Arrange a bunch in a vase for a foolproof, everlasting bouquet.
28. A “What’s Blooming?” Chalkboard Sign

Combine organization with rustic decor. Find an old picture frame or a piece of wood and paint the center with chalkboard paint. Use a regular piece of chalk or a chalk marker to create a simple, beautiful header like “Garden Blooms.”
Then, list the flowers currently showing off in your yard. Update it as the season progresses from crocuses to daffodils to roses. It’s a functional piece that celebrates the ever-changing show right outside your door.
And there you have it—28 spring crafts to fill your days with color, creativity, and that wonderful feeling of making something with your own two hands. The best part? You don’t need to be a master artist. You just need a little inspiration and the willingness to get a bit messy. So, which one are you trying first? Pick a project, open a window, let the spring air in, and create something that makes you smile. Happy crafting! 🌼