
You spent all summer tending to those blooms, watching them unfurl in the sun. Now, as the seasons shift, that vibrant color feels fleeting, doesn’t it? What if you could hit pause on that beauty? Pressing flowers is more than a childhood craft; it’s a way to capture a moment, a memory, a whole season in its most delicate form. But let’s be honest, a flower sitting in a book is lovely, but it’s not exactly home decor. So, I’ve gathered 13 stunning pressed flowers DIY ideas that will transform those paper-thin petals into art, jewelry, and heirlooms you’ll actually want to show off. Ready to get creative?
1. The Heirloom Botanical Resin Coaster Set

Combine the timeless beauty of pressed flowers with the modern magic of resin. This project creates functional art you can use every day. Imagine your morning coffee cup resting on a garden of preserved blooms.
Pro-Tip: Use a two-part epoxy resin for crystal-clear results. Arrange your flowers in the coaster mold first, then pour a thin “seal coat” of resin to prevent them from floating. Once that’s tacky, pour your main fill layer. The key is patience and working in a dust-free zone—trust me, you don’t want a cat hair immortalized in your masterpiece.
2. Personalized Pressed Flower Birth Month Bookmarks

Forget boring scraps of paper. Create meaningful gifts by using flowers that correspond to birth months. Think lily of the valley for May, honeysuckle for June, or poppies for August. It’s a thoughtful detail that shows you really cared.
Simply laminate delicate pressed blooms between two sheets of clear, adhesive bookmark film or seal them with clear packing tape. Punch a hole at the top and add a silk tassel or ribbon. It’s a quick, beautiful project that makes reading a more personal experience.
3. Framed Floral Initial or Monogram Art

Make your mark—literally. This pressed flowers DIY adds a huge dose of personality to any wall. You can create a monogram for a wedding gift, a family initial, or a child’s first initial using blooms from their birth season.
Sketch your letter lightly on the backing paper inside a deep-set frame. Then, use a small dab of clear-drying glue (like Mod Podge) to carefully place each flower and leaf, building the shape. The 3D texture against a simple matte background is absolutely stunning.
4. Pressed Flower Sun Catchers for Your Window

Harness the power of light! When the sun hits these, the petals glow, revealing veins and colors you might not see otherwise. It’s like having a little piece of stained glass, but made by you.
You’ll need clear glass or acrylic blanks and special gallery gel. Sandwich your pressed flower design between the layers, sealing the edges. Hang it in a sunny kitchen window and watch it come to life every morning. Pure magic.
5. Elegant Pressed Flower Candles

Take a plain pillar candle from basic to breathtaking. This technique adheres pressed flowers directly to the candle’s surface, creating a soft, romantic glow when lit.
Warning: Never embed flowers inside a candle you plan to burn—it’s a fire hazard. Instead, use the heat transfer method: place flowers on the candle, wrap tightly with parchment paper, and gently melt the wax surface with a heat gun. The wax will seep through the parchment, sealing the flowers in place safely on the outside.
6. A Pressed Flower Terranium in a Locket

Wear your garden close to your heart. This is one of the most delicate and personal pressed flowers DIY projects. You’re creating a tiny, wearable world.
Find a locket with a deep enough bezel. Use fine tweezers to arrange miniature pressed flowers, fern spores, or even tiny butterfly wings. Seal everything with a drop of resin or a clear locket glaze to keep your miniature landscape secure. It’s a conversation starter, for sure.
7. Botanical Greeting Cards & Stationery

Why buy a card when you can send a piece of art? A pressed flower card feels incredibly special to receive. It says you took the time to create something unique.
Use simple white or kraft card stock. Adhere your floral arrangement with a glue pen or double-sided tape. For protection, you can add a thin layer of vellum over the top or use a glue-sealant over the flowers. Handwritten note optional, but highly recommended 😉.
8. Pressed Flower Clay Ring Dishes & Trinket Trays

Air-dry clay is your best friend for this. It’s inexpensive, easy to shape, and creates a beautiful, organic canvas for your flowers. Roll out the clay, press your blooms firmly into the surface, and let it dry.
Once dry, you can leave it as-is for a rustic look or seal it with a matte varnish for durability. These make perfect little catch-alls for jewelry, keys, or even as a soap dish in a guest bathroom.
9. A “Garden in a Globe” Snow Globe DIY
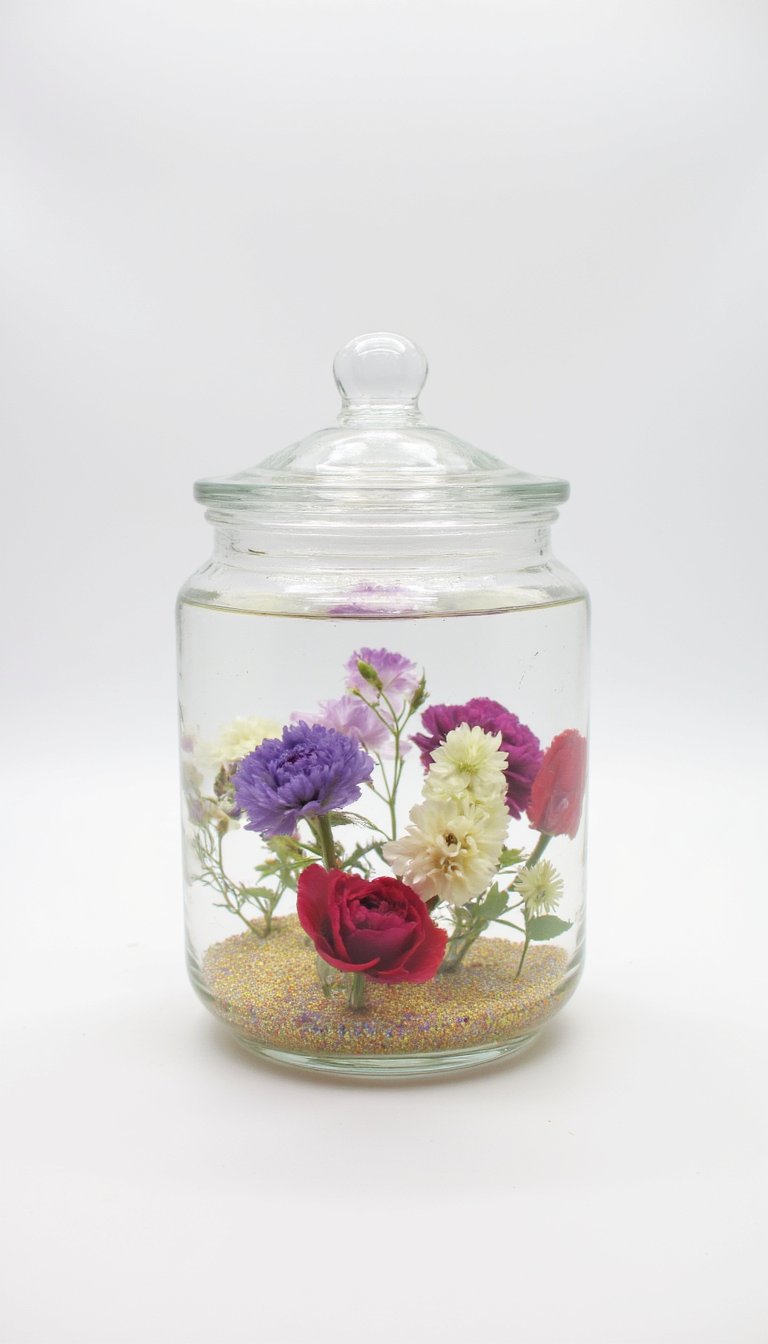
Who says snow globes are just for winter? Create a whimsical, shakeable garden scene. This project flips the script on the traditional snow globe in the most beautiful way.
Use a clear jar with a tight-sealing lid. Adhere your pressed flower arrangement to the inside of the lid using waterproof glue. Fill the jar with clear glycerin and water (to slow the “snow” fall), add your glitter or white sand, screw the lid on tightly, and flip! Now you have a blizzard of petals.
10. Pressed Flower Phone Case Personalization

Customize your most-used accessory. This is a fantastic way to carry a bit of nature with you everywhere. The method depends on your case type.
For a clear case, arrange the flowers on your phone’s back and slip the case over them—instant and changeable! For a permanent fix, decoupage the flowers directly onto a plain case with several thin layers of sealant. Just be prepared for everyone to ask, “Where did you get that?!”
11. Fragile Beauty Pressed Flower Night Light

Create the most serene night light. The soft LED glow from behind will illuminate your pressed flowers, casting delicate shadows and creating a calming ambiance.
You can use a pre-made night light base or get crafty with a mason jar and a battery-operated fairy light strand. Adhere your pressed flower design to the glass, place the lights inside, and enjoy a gentle, floral glow that’s perfect for a bedside table.
12. Pressed Flower Clay Jewelry Pendants

Move beyond the locket. Polymer clay or air-dry clay allows you to mold unique pendant shapes—think leaves, circles, or abstract forms. Press tiny flower fragments or whole delicate blooms (like forget-me-nots) into the clay.
Bake or dry according to instructions, then drill a small hole for the jump ring. Seal with a jewelry-grade varnish. You’ve just created a one-of-a-kind accessory that no fast-fashion brand can replicate.
13. The Grand Pressed Flower Shadow Box Wall Art

Go big. This is the ultimate pressed flowers DIY statement piece. A deep shadow box frame lets you create layered, dimensional botanical art that feels like a curated museum display.
Collect flowers, leaves, seed pods, and even interesting grasses. Play with composition on the backing board before you glue anything down. Think about color gradients, textures, and negative space. This isn’t just a craft; it’s your masterpiece.
See? Pressed flowers are so much more than a forgotten bookmark in an old dictionary. They’re your raw material for creating stunning, personal, and meaningful objects. The true magic lies in the process—from choosing the blooms in your garden to patiently waiting for them to dry, to finally giving them a new life as art. Each project holds a memory of sunshine and soil.
So, what are you waiting for? Grab a heavy book, pick some flowers (responsibly!), and start pressing. Your future self will thank you when you have a cabinet full of beautiful, handmade treasures that whisper of summers past. Now, which project are you trying first?