
October creeps up fast, and suddenly your kids beg for Halloween decorations. You look at store prices and silently scream. Why spend thirty bucks on flimsy plastic when you can craft better decorations at home? Plus, crafting keeps little hands busy and away from screens. Win-win, right?
I remember my own mom dragging out boxes of craft supplies every autumn. We created the weirdest, most lopsided paper monsters imaginable. Now, I pass that messy, magical tradition down to my own goblins. You can build unforgettable childhood memories with just a little glue, some construction paper, and a lot of imagination 😉
Grab your scissors and prepare your kitchen table for some serious artistic chaos. I gathered the best, easiest, and most affordable spooky projects for your family. Ready to bring some friendly phantoms to life?
1. The Classic Cotton Ball Ghost
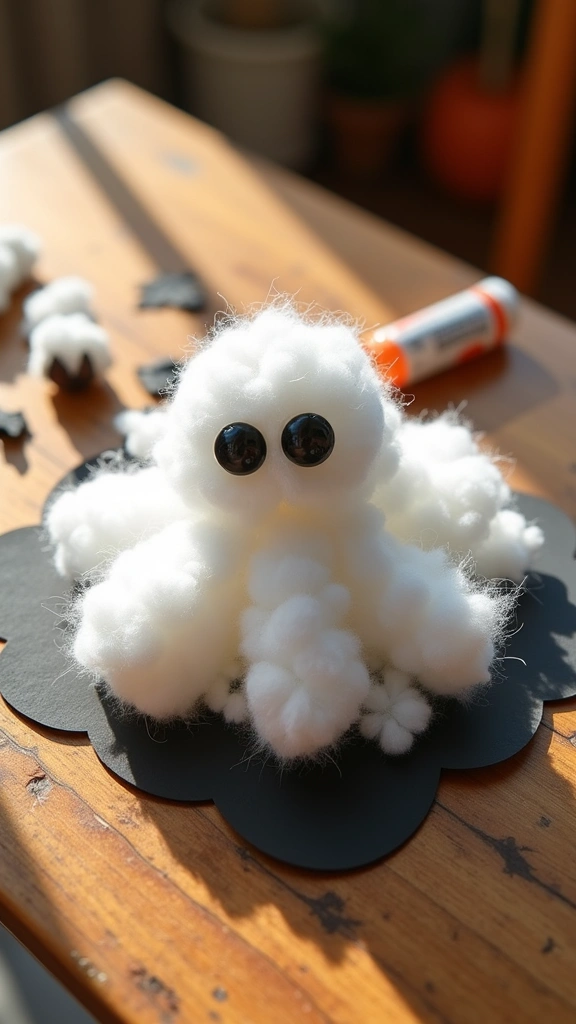
You probably made this exact craft in kindergarten. Guess what? It still rocks. Toddlers absolutely love tearing apart soft cotton balls and gluing them everywhere.
Grab some black construction paper and cut out a simple ghost outline. Hand your kid a glue stick and a bag of fluffy white cotton balls. They just smash the cotton onto the paper until the ghost looks perfectly plump. Add two googly eyes to finish the masterpiece.
Why We Love It
This project builds essential fine motor skills for preschoolers. You also spend almost zero money on supplies. Keep a vacuum handy for the stray fuzz!
2. Twirling Paper Plate Spirals

Want a decoration that actually moves? These twirling paper plate ghosts catch the slightest breeze and dance around your living room. Kids find the spinning motion totally mesmerizing.
Take a cheap white paper plate and draw a spiral starting from the outside edge and ending in the middle. Give your older kids scissors and tell them to cut along the line. Leave the center intact so you can draw a spooky, screaming ghost face right in the middle.
Punch a hole at the center and tie a piece of fishing line through it. Hang these ghouls from your ceiling fans or front porch rafters. They look incredible swaying in the autumn wind.
3. Painted Footprint Ghosts

Prepare yourself for giggles, because this craft involves ticklish little toes. Footprint crafts freeze a moment in time, creating a keepsake you will cherish forever. You will definitely want to look back at how tiny those little feet used to be.
Coat the bottom of your child’s foot with washable white tempera paint. Press their painted foot firmly onto a sheet of black cardstock. Pull their foot straight up to avoid smearing the shape.
Pro Crafting Tip
Keep a package of baby wipes exactly one inch away. Wipe that foot clean immediately before they run across your nice living room rug! Once the paint dries, flip the paper upside down and draw eyes on the heel.
4. Tissue Paper Lollipops
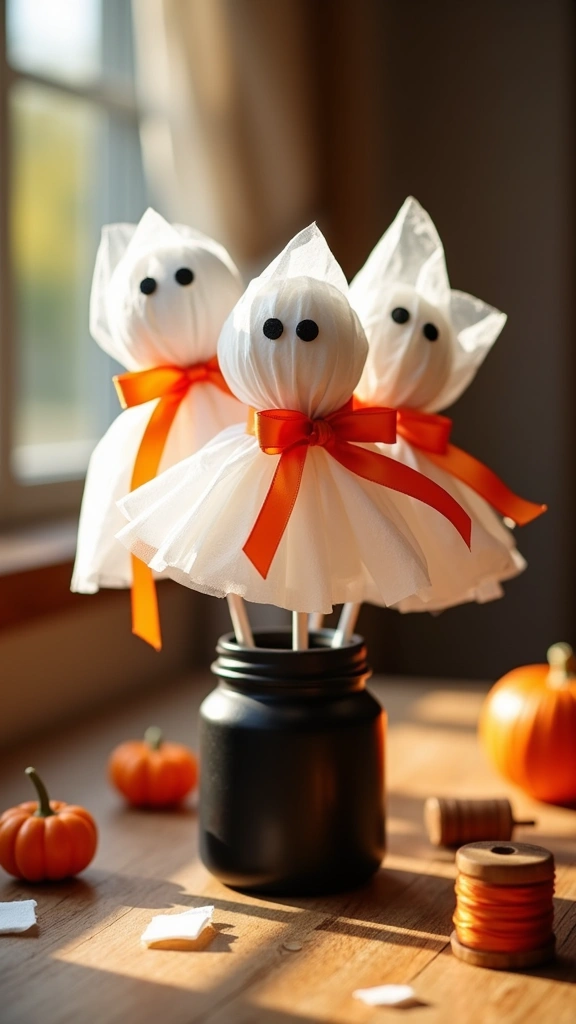
Need an easy treat for a classroom Halloween party? Tissue paper lollipop ghosts take about ten seconds to make, and kids absolutely devour them. They double as both a fun craft and a sugary snack.
Wrap a white tissue paper square over the top of a round lollipop. Cinch the paper tight right at the base of the candy, just where the stick starts. Tie a small piece of orange or black ribbon tightly around the neck to secure the paper.
Grab a black sharpie and dot two little eyes onto the head. You just created a tiny, edible phantom! Your kids can easily assemble twenty of these for their friends in a single afternoon.
5. Glowing Mason Jar Lanterns
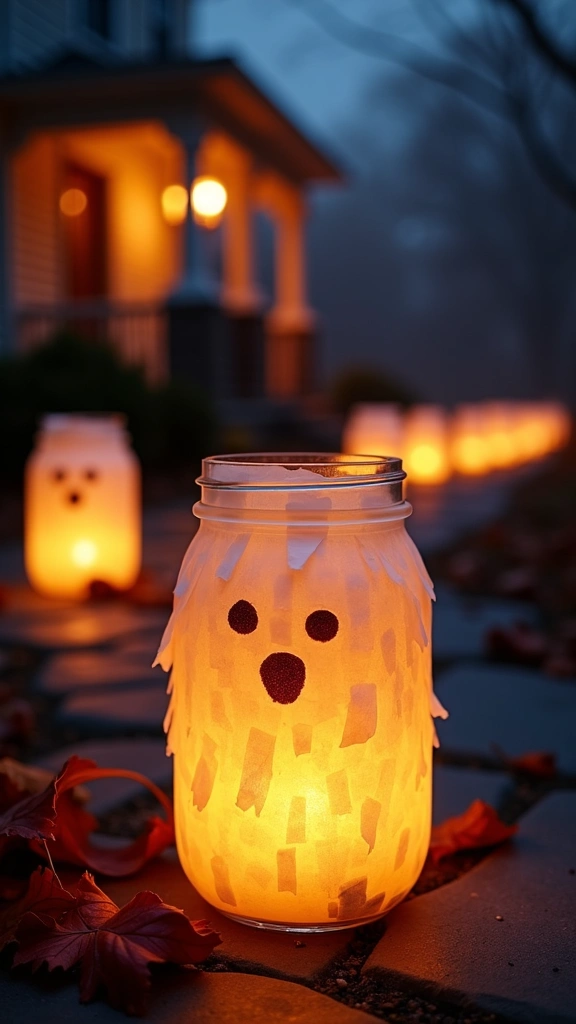
I adore lighting up the front walkway with homemade luminaries. These mason jar lanterns cast a spooky, flickering glow to guide trick-or-treaters right to your door. They look incredibly professional, but toddlers can easily make them.
Tear white tissue paper into random, jagged little squares. Brush Mod Podge all over a clean glass mason jar, and let your kids stick the tissue paper squares onto the wet glue. Seal the deal with one more layer of Mod Podge on top.
Lighting Your Lantern
Cut out black paper ovals for the eyes and mouth, and stick them right onto the wet jar. Drop a battery-operated LED tealight inside once the glue completely dries. NEVER use real candles with toddlers around!
6. Popsicle Stick Phantoms

Popsicle sticks hold a top-tier spot in the craft supply hall of fame. They provide a sturdy base for virtually any character you want to build. This quick project uses materials you probably already hide in your junk drawer.
Line up five popsicle sticks vertically, and glue one stick horizontally across the back to hold them together. Paint the entire wooden surface bright white. Wait patiently for the paint to dry—I know, patience is tough for a five-year-old.
Cut out little arms from white cardstock and attach them to the sides. Use a thick black marker to draw an exaggerated, howling mouth. Tie a string to the back, and you have a solid little hanging ornament.
7. Coffee Filter Apparitions
Do you drink way too much coffee just to survive parenting? Same here. Repurpose those unused coffee filters into lightweight, floaty little spirits.
Stack three or four coffee filters together to give your ghost some fluff and volume. Drape them over a small styrofoam ball, or even a crumpled piece of tin foil. Tie a piece of white string around the “neck” to form the round head.
Customizing Your Creations
Let the kids use markers to design silly, scary, or sleepy faces on their ghosts. The crinkly edges of the coffee filter look exactly like a trailing, tattered ghostly gown. Hang a whole fleet of them in a sunny window!
8. Toilet Paper Roll Ghouls

Recycling meets spooky season with this absolute classic. Stop tossing your empty toilet paper tubes into the recycling bin. Hoard them instead for this hilariously simple afternoon project.
Paint the cardboard tubes entirely white. If you lack the patience for paint drying, wrap them tightly in plain white printer paper instead. Tape the paper down securely at the back of the tube.
Draw wacky faces on the front. To make them fly, glue long strips of white crepe paper or toilet tissue to the inside bottom edge. Hold them up to a fan and watch the tentacles flutter.
9. Fluffy Yarn Tassel Ghosts

Yarn crafts feel incredibly cozy, even when you make Halloween monsters. Tassel ghosts add a chic, bohemian vibe to your seasonal decor. Honestly, I hang these on my mantle because they look shockingly stylish.
Wrap thick white yarn around a piece of cardboard about fifty times. Slide a short piece of yarn under the loops at the top and tie a tight knot. Cut the loops completely at the bottom so the yarn hangs straight down like a mop.
Tie another string about an inch down from the top knot to define the head. Glue two tiny black beads on the face for the creepiest little eyes. String several together to make a beautiful, spooky garland.
10. Puffy Paint Window Clings

Kids love peeling things off windows. Instead of buying those expensive gel clings from the store, whip up your own custom designs. You just need a bottle of white puffy fabric paint and some plastic wrap.
Tape a sheet of clear plastic wrap flat against your kitchen table. Hand your kids the white puffy paint bottle and let them squeeze out thick, solid ghost shapes directly onto the plastic. Ensure they make the shapes nice and thick so they peel easily later.
The Waiting Game
Use a toothpick to drop tiny amounts of black paint for the eyes. Now comes the hardest part: wait a full twenty-four hours for the paint to completely dry. Carefully peel them off the plastic and stick them right onto your glass windows :-O
11. Q-Tip Skeleton Ghosts
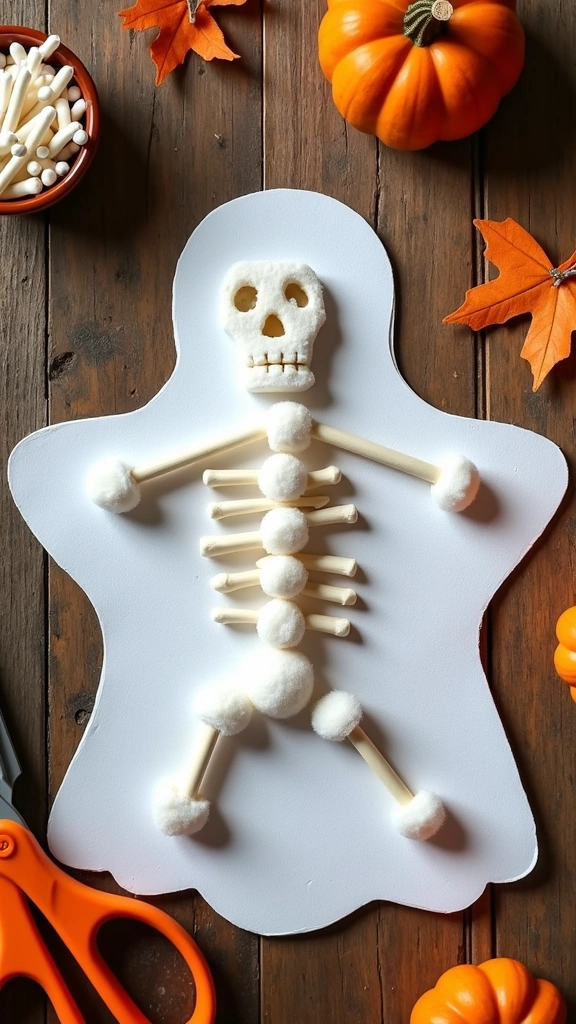
Mix a little anatomy lesson into your crafting session! Technically, a ghost does not have a skeleton, but kids do not care about logic. They just want to build something weird and creepy.
Cut out a simple white ghost silhouette from heavy paper. Have your kids glue white Q-tips onto the paper to represent ribs, arm bones, and leg bones. You can cut the Q-tips into smaller pieces to form tiny finger bones.
This tactile project teaches kids about basic human anatomy while they glue things together. They end up with a hybrid skeleton-ghost that looks delightfully bizarre on the fridge.
12. Milk Jug Luminaries
Do your kids drink a gallon of milk a day? FYI, those empty plastic jugs make the absolute best oversized yard decorations. Do not throw them out just yet!
Wash out a clean, empty plastic milk jug and remove the paper label. Draw massive, spooky eyes and a wide, screaming mouth on the side opposite the handle using a permanent marker. The plastic handles look exactly like strange little noses pointing backward.
Cut a small hole in the back of the jug and push a string of orange Halloween lights inside. Line up five or six glowing jugs along your driveway. They welcome trick-or-treaters with a bright, eco-friendly smile.
13. Handprint Cardboard Cutouts
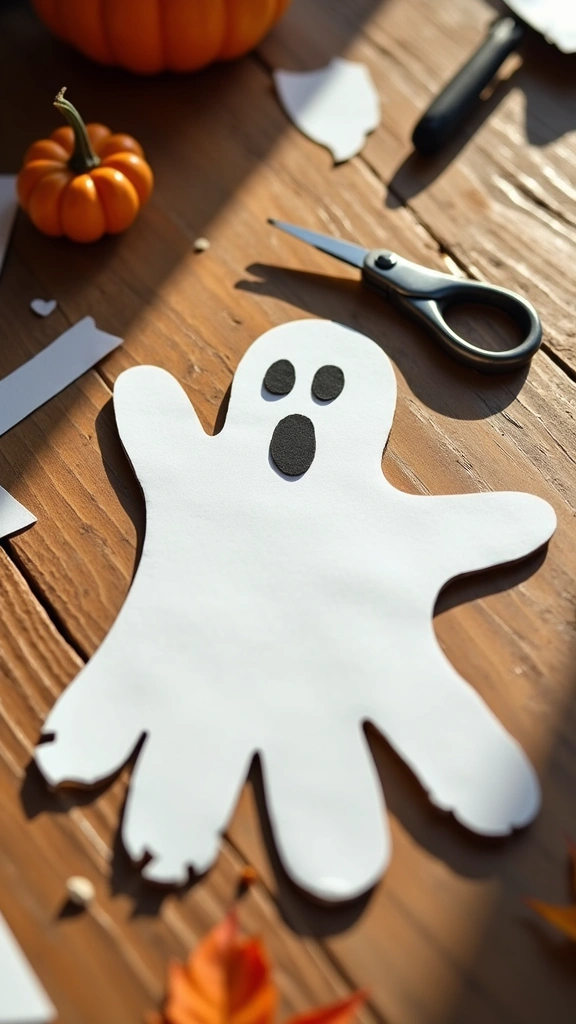
Remember earlier when we talked about footprint crafts? Handprint ghosts bring that same sentimental magic. Plus, tracing hands keeps kids quiet and focused for at least two whole minutes.
Trace your child’s hand onto a piece of sturdy white cardboard or foam board. Cut out the shape carefully with sharp scissors. Turn the handprint upside down so the fingers point toward the floor.
Bringing it to Life
Those little cardboard fingers suddenly look like trailing ghostly robes. Let your kids draw silly faces on the palm area. Tape a wooden skewer to the back and stick them into your front yard flower pots.
14. Floating Cheesecloth Specters
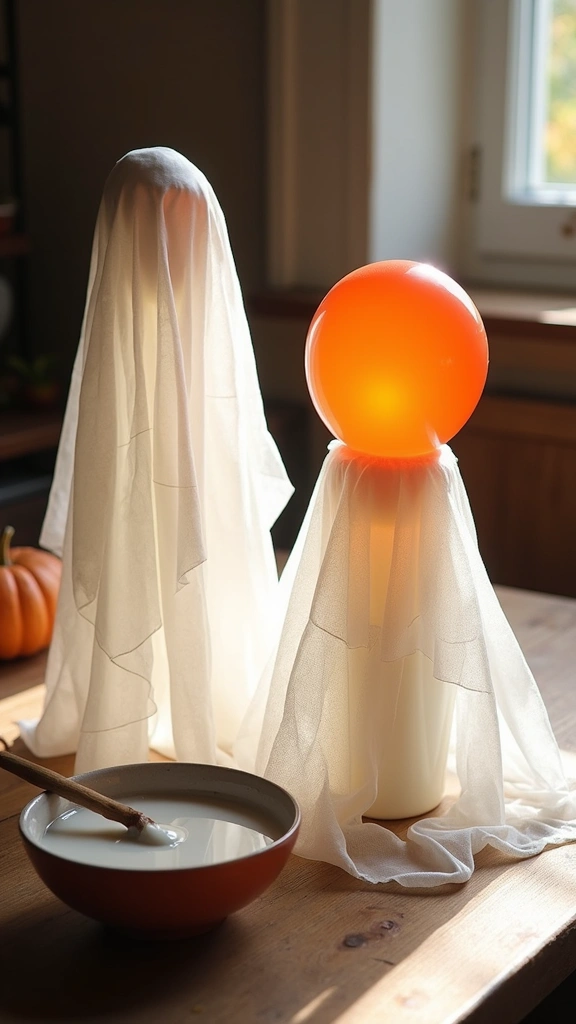
Okay, this project feels slightly more advanced, but the payoff blows every other craft out of the water. You create a rigid ghost that literally stands up entirely on its own. It looks like real magic!
Blow up a small balloon and balance it on top of a tall plastic cup. Mix equal parts white school glue and water in a large bowl. Dunk a large square of cheesecloth into the sticky mixture until it completely soaks.
Drape the wet cheesecloth over the balloon and let it dry overnight. Pop the balloon the next morning with a pin. The stiffened cheesecloth holds its shape perfectly, creating a hollow, freestanding ghost you can place right on your dining table.
15. Paper Bag Puppets

Turn craft time into an impromptu theater production. Paper bag puppets encourage imaginative play long after the glue dries. Give your kids a stage and watch their storytelling skills soar.
Lay a white paper lunch bag flat on the table, keeping the folded bottom flap facing up. Paint the entire bag stark white if you only have brown bags. Draw the ghost face directly on the square bottom flap.
Kids slide their little hands into the bag and move the flap up and down to make the ghost “talk.” Cut zig-zags along the bottom opening to look like ragged edges. Host a spooky puppet show right behind the living room couch.
16. Painted Rock Ghosts

Combine a nature walk with an art project for the ultimate autumn afternoon. Kids absolutely love hunting for the perfect smooth stones outside. TBH, hunting for the rocks takes up an hour, giving you some much-needed peace.
Wash the dirt off your chosen rocks and dry them completely. Paint the top half of each rock with thick, opaque white acrylic paint. You might need two coats to fully cover the dark gray stone underneath.
Use a fine-tipped black paint pen to outline the ghost and fill in the eyes. Hide these painted rocks around your neighborhood park for other kids to find. Spreading a little spooky joy makes the season even brighter!
17. Edible Marshmallow Ghosts

Let us finish strong with a craft you can actually eat. Edible crafts always win the popular vote in my household. Prepare for an epic sugar rush.
Take a jumbo marshmallow and push a lollipop stick firmly into the bottom. Melt a bowl of white chocolate chips in the microwave until smooth. Dip the marshmallow completely into the melted white chocolate and let the excess drip off.
The Final Touch
Place them upright on wax paper. Press mini chocolate chips into the wet coating to form the eyes and mouth. Eat them immediately, or let them harden to share with brave trick-or-treaters later!
Bring Your Spooky Creations to Life!
There you have it—seventeen incredibly fun, affordable, and easy ghost crafts to keep your kids entertained all October long. You do not need expensive kits or professional art skills to make Halloween magical. You just need a little creativity, some basic supplies, and a willingness to embrace the mess.
Which spooky project will your family tackle first? Do you lean toward the messy painted footprints, or the delicious marshmallow treats? Try picking one new craft each weekend leading up to the big night.
Show off your little monsters’ hard work! Display those twirling paper plates proudly and light up your driveway with those milk jug lanterns. Happy crafting, and have a wonderfully spooky Halloween!