Okay, let’s be real. You’re here because you’ve watched “Encanto” roughly 47 times and now you feel a strange, powerful urge to make a little clay Bruno. (We don’t talk about him, but we *do* craft him.) Or maybe you just love the tactile joy of squishing clay and want to merge it with your Disney obsession. Either way, you’ve hit the jackpot. This isn’t about perfect, museum-quality sculptures—it’s about having a blast and making something that sparks joy. From quick keychains to show-stopping centerpieces, these 15 Disney clay ideas are your ticket to a seriously fun craft afternoon. Ready to get your hands dirty?
1. Mickey Mouse Silhouette Keychain
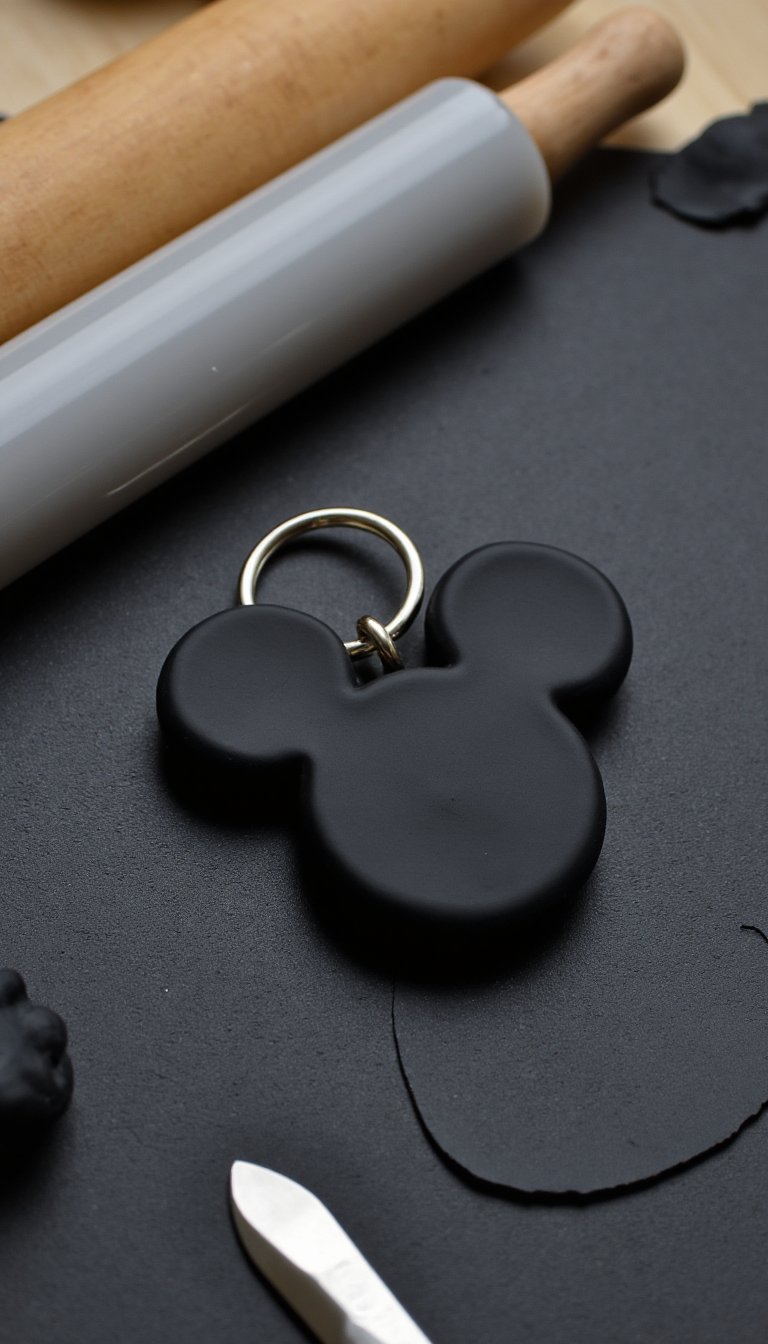
Start simple with the icon himself. This project is perfect for beginners and yields instant gratification. Roll out a smooth, flat circle of black polymer clay for the base. Then, create the famous three-circle silhouette (you know the one!) with smaller black circles and a teardrop shape for the head. Blend the edges gently to make it one seamless piece. Bake according to clay instructions, let it cool, and glue on a keychain loop. Suddenly, your keys are officially Disney-bound.
2. Minnie Mouse Bow Earrings
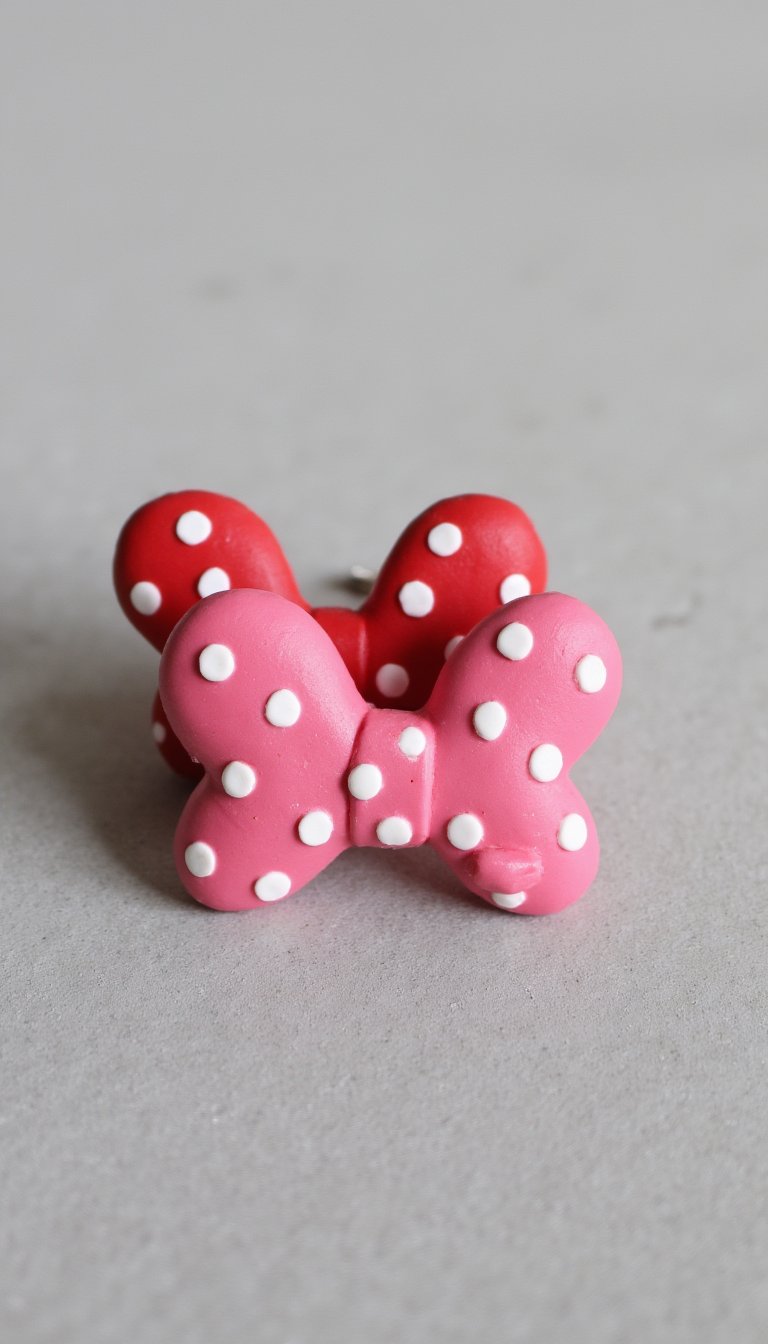
Why buy accessories when you can make utterly adorable, one-of-a-kind pairs? For these, grab some red or pink clay and shape two identical, plump bows. Use a toothpick or clay tool to imprint the classic polka dot pattern—white clay dots pressed in will do the trick. After baking, attach small jewelry posts or hooks with strong adhesive. They’re lightweight, cute, and a subtle nod to the style icon herself. Perfect for a day at the parks or just boosting your work-from-home vibe.
3. Simba’s Pride Rock Diorama
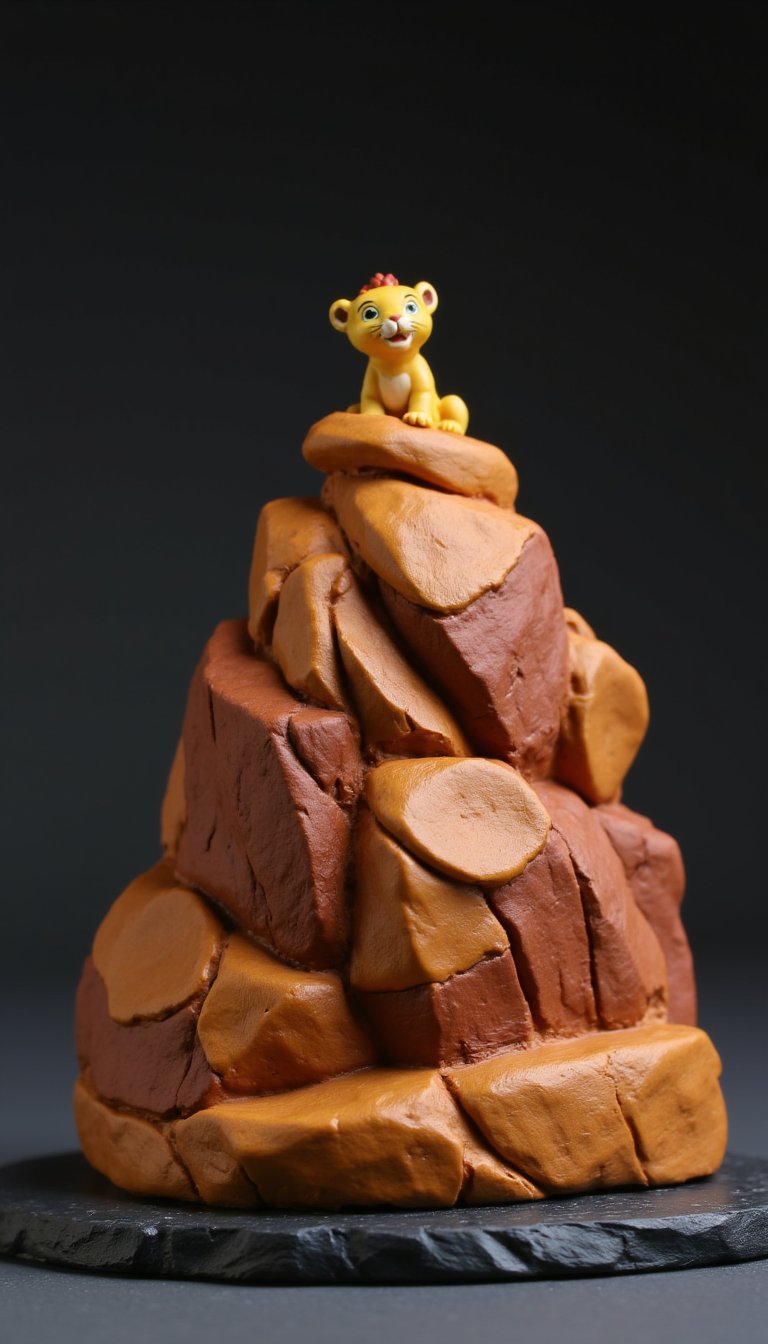
Level up your skills with a scene straight from the Circle of Life. Build a tiered, rocky base using brown and tan clays, texturing it with a tool or even a crumpled ball of foil. Then, craft a tiny Simba in his “I just can’t wait to be king” pose. The key here is layering and dry brushing with acrylic paints after baking to highlight the rocks and Simba’s fur. It’s a statement piece that deserves to be presented on a high place. (Just avoid any treacherous gorges.)
4. Elsa’s Frozen Ice Castle
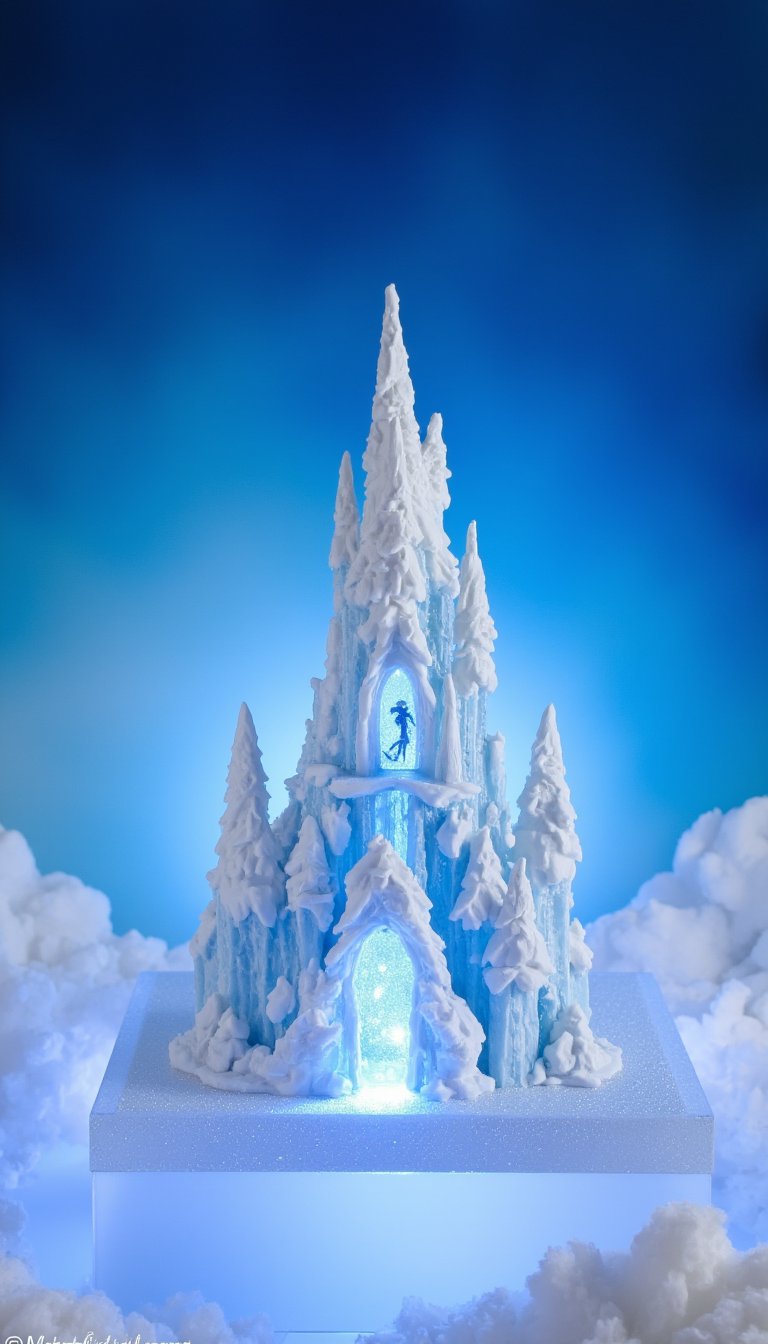
Let it go and embrace the sparkle! This idea lets you play with translucent and white polymer clays. Build upward with jagged, crystalline shards, stacking them to form spires. To get that magical frozen effect, mix in fine glitter with your translucent clay before shaping. A tiny LED tea light placed inside after baking makes it glow authentically. It’s a cooler winter project than building a snowman, and it won’t melt in the summer heat.
5. Stitch in a Hawaiian Lei
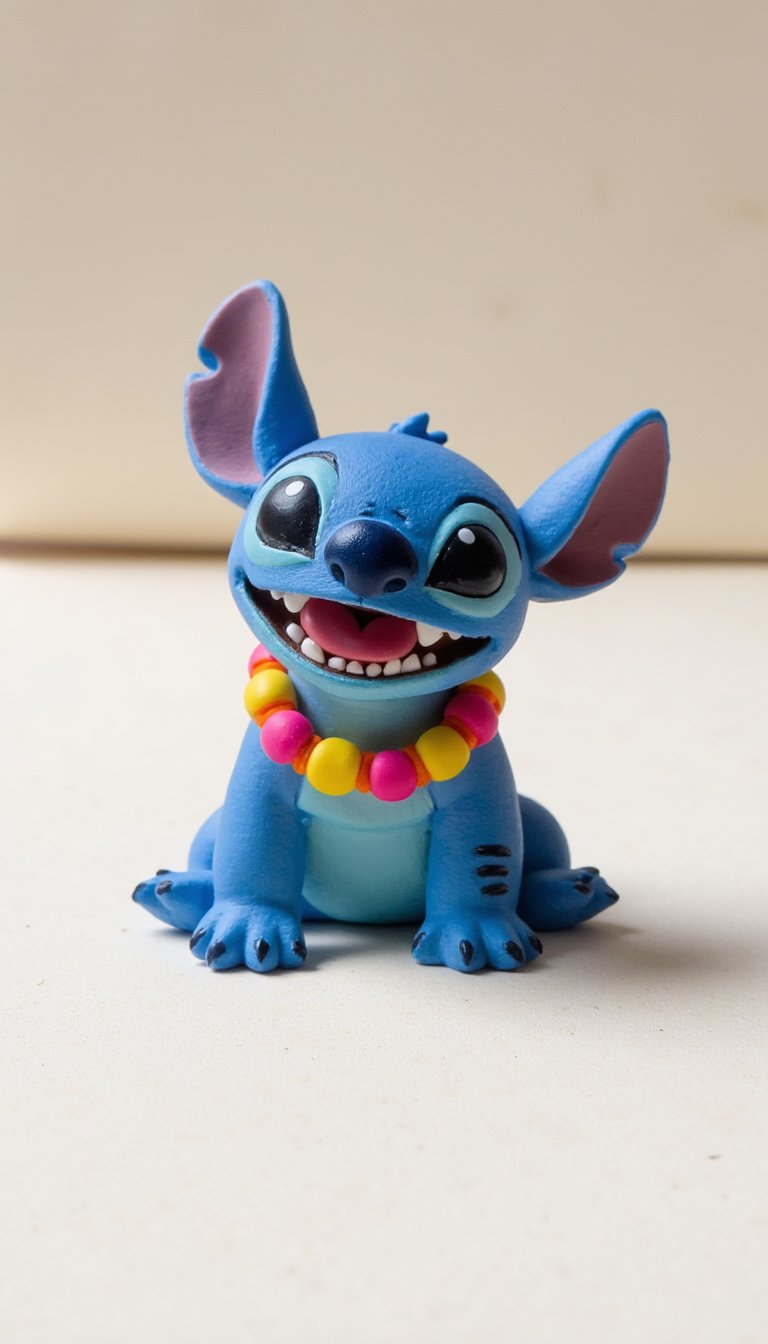
Capture Experiment 626 in his preferred state of relaxation. Shape his blue body, big ears, and those signature back spines. The real fun is crafting his little flower lei—use tiny dots of colorful clay. Focus on his expression; a goofy, open-mouthed smile is what makes him Stitch. This guy is so cute and small, he’ll look perfect on a shelf or desk, reminding you that ‘ohana means family.
6. Buzz Lightyear in Flight Pose
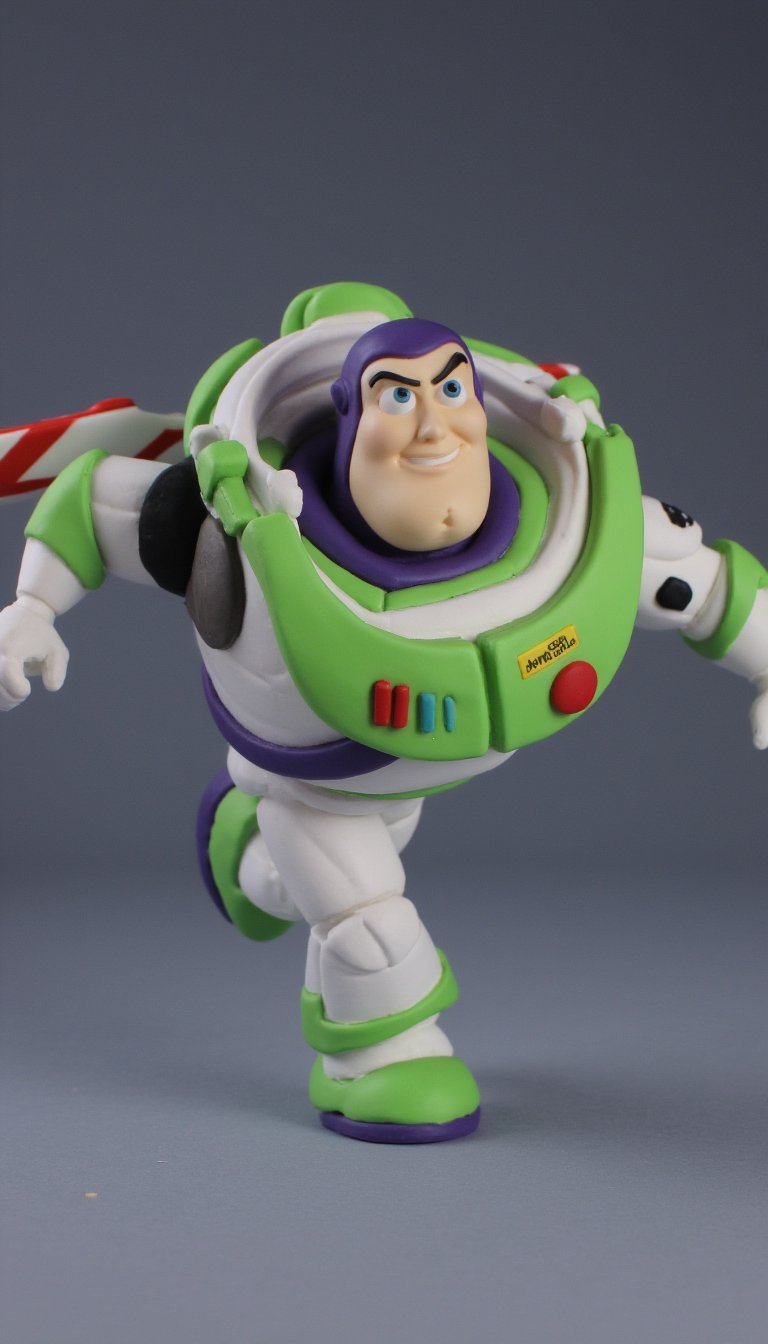
To infinity and beyond—or at least to your mantelpiece. Sculpting Buzz requires a bit more patience with details like his white and green armor, purple accents, and wing decals. Use a toothpick for fine lines and buttons. Support the figure while baking so his iconic flight pose holds. The payoff? A mini space ranger ready for action. Pro tip: a tiny dot of glow-in-the-dark paint on his laser looks awesome.
7. Ariel’s Glimmering Sea Shell
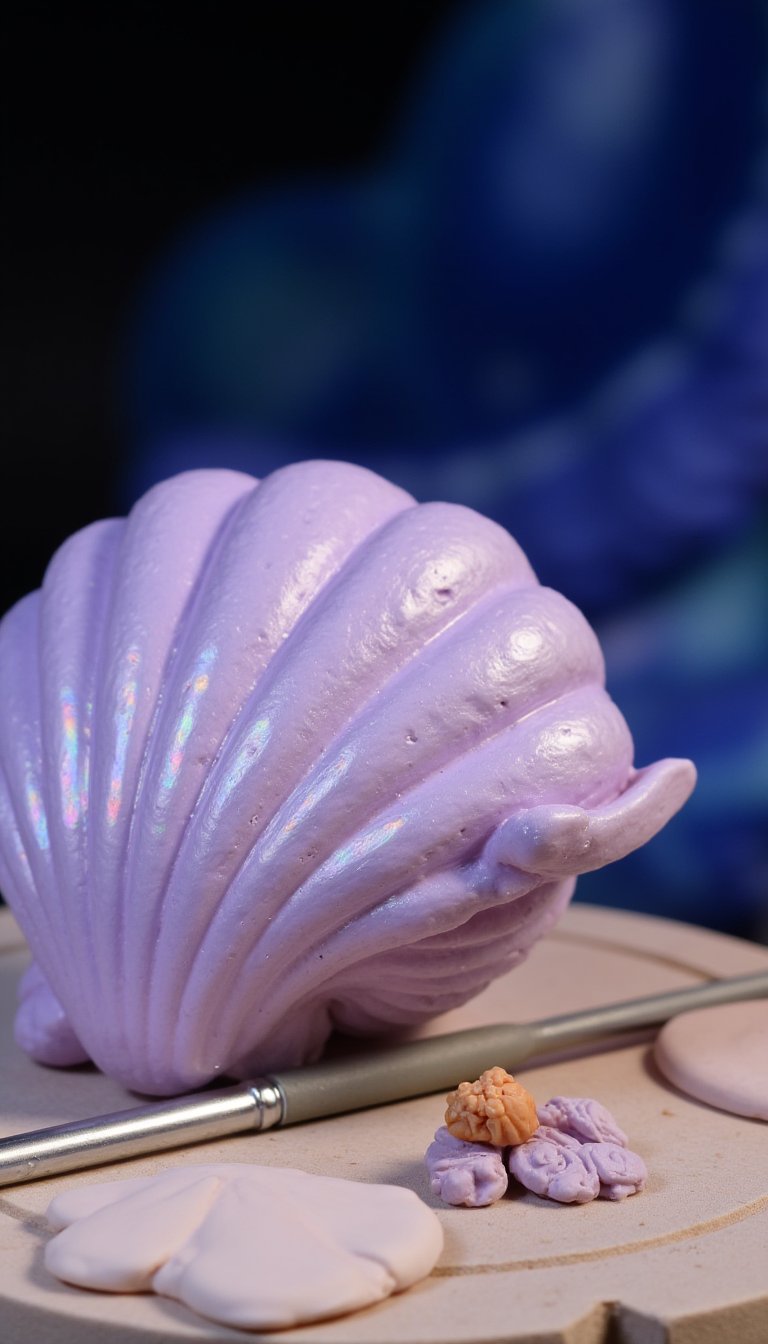
You want thingamabobs? How about a beautiful, pearlescent shell? Mix pearl or iridescent clay with a soft pink or lavender base. Shape a classic scallop shell, using a tool to create the grooves radiating from the hinge. After baking, add a wash of metallic acrylic paint to deepen the crevices and make the highlights pop. It’s a simple, elegant piece that whispers of dinglehoppers and mermaid dreams.
8. Cinderella’s Glass Slipper
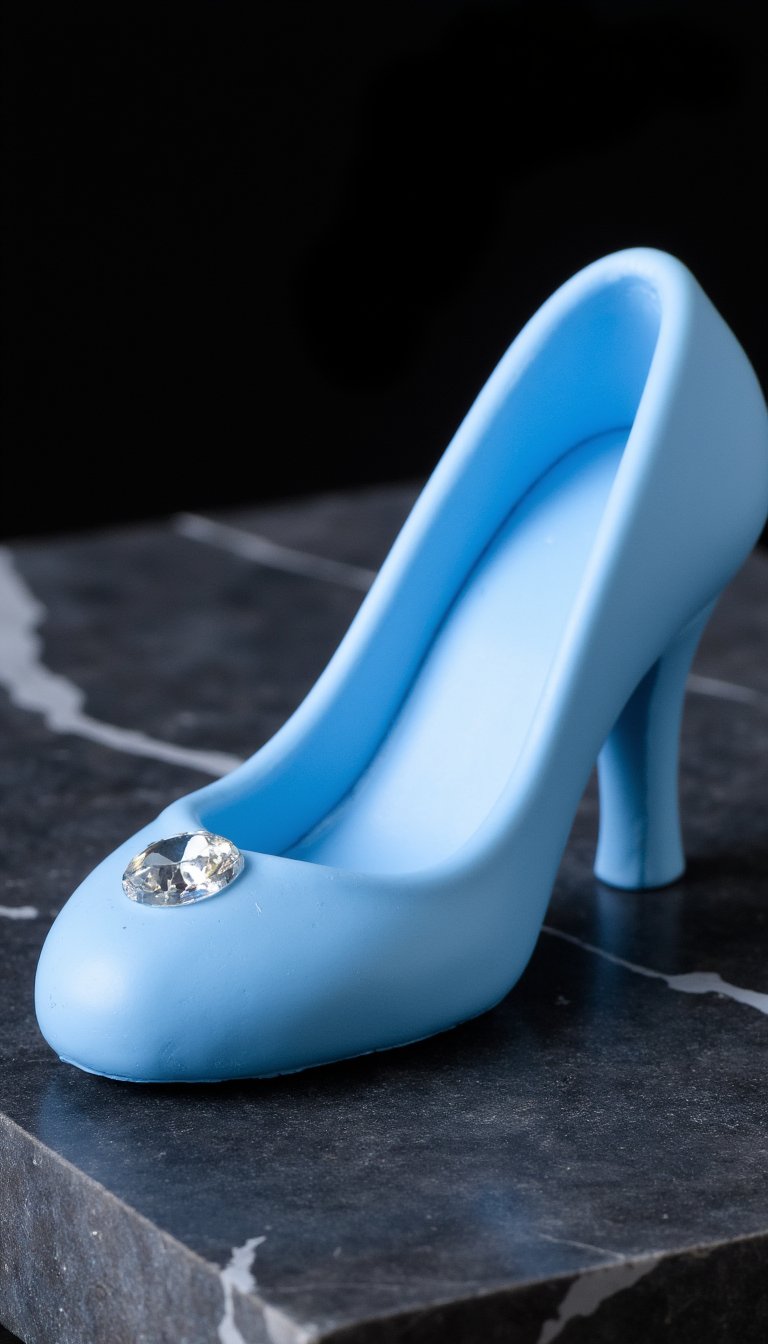
This idea is all about elegance. Shape a delicate slipper from translucent or light blue clay. The trick is making it look like glass—achieve this by sanding and buffing the baked clay to a high shine. Add a tiny “crystal” detail by pressing in a small rhinestone or a dot of silver clay for the heel. It’s a fragile-looking but sturdy little masterpiece that proves a single shoe can change everything.
9. Pascal the Chameleon from Tangled
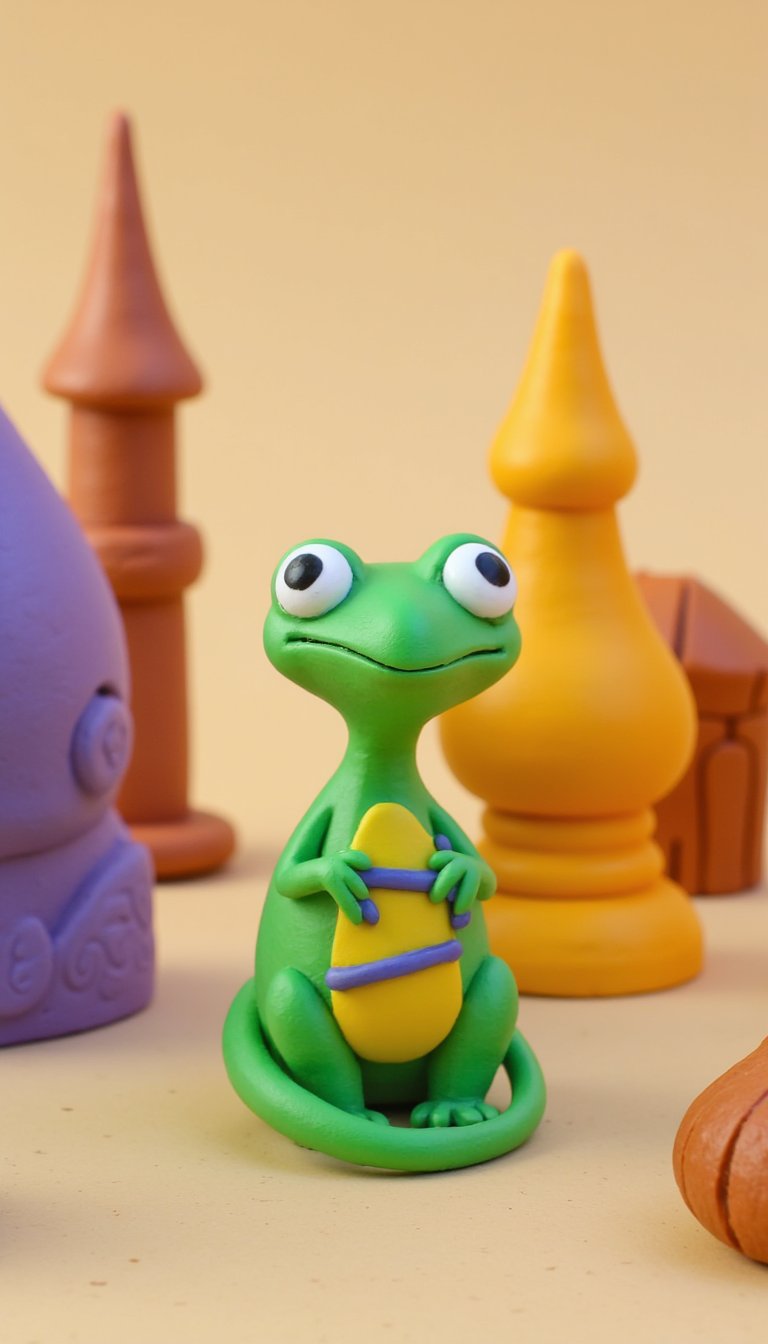
Pascal is the ultimate sidekick, and his changing colors make him a fun challenge. Start with a green base for his body and long tail, then add stripes or spots in brighter colors like red, yellow, or blue. Pay close attention to his eyes—they should be large, expressive, and placed on opposite sides of his head. He’s so small and charming, you might just make a whole series of him in different hues.
10. Olaf with a Removable Snow Cloud
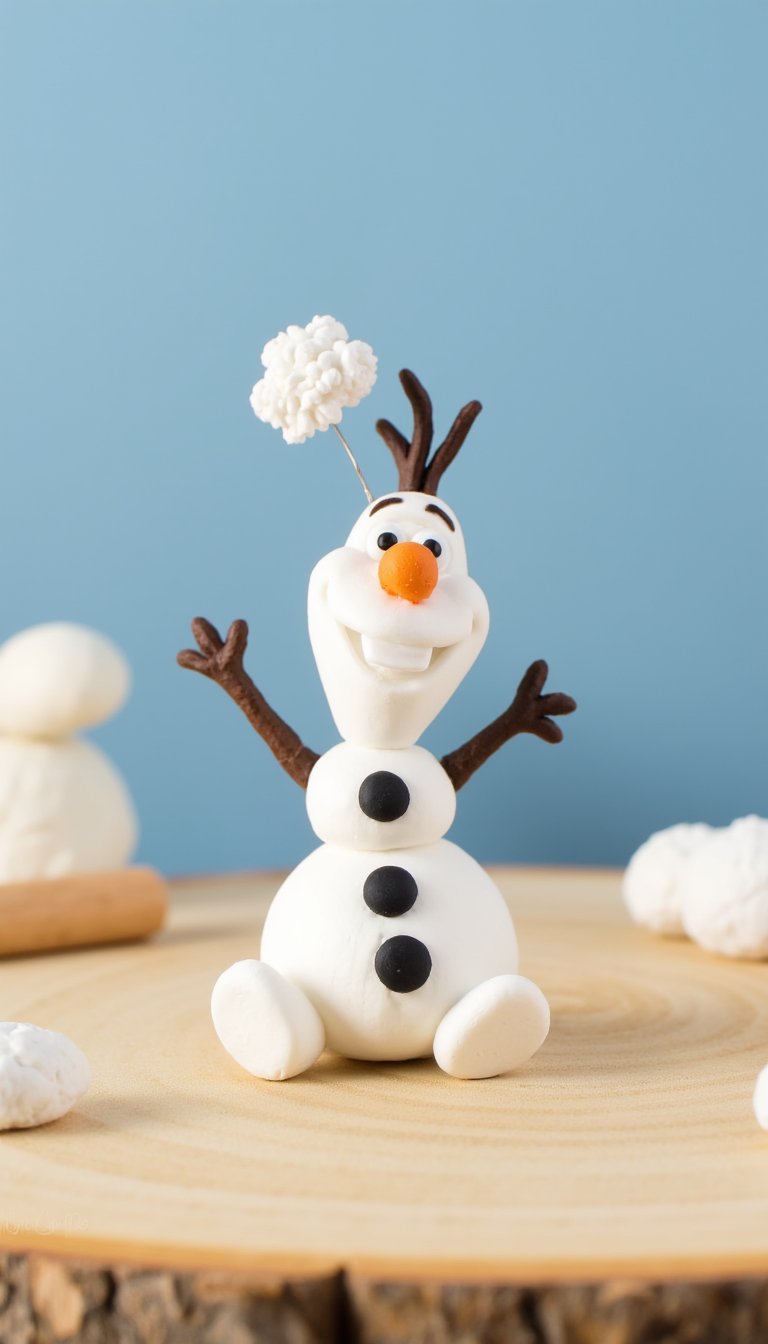
Some people are worth melting for, and this project is one of them. Sculpt Olaf’s three snowball body, stick arms, and carrot nose. For extra fun, create a tiny, fluffy cloud from white clay and attach it to a thin wire above his head. This interactive element lets you pose his personal summer flurry. His simple shapes are great for kids to help with, too. Just keep him away from actual heat sources!
11. 3D Mickey Mouse Clubhouse
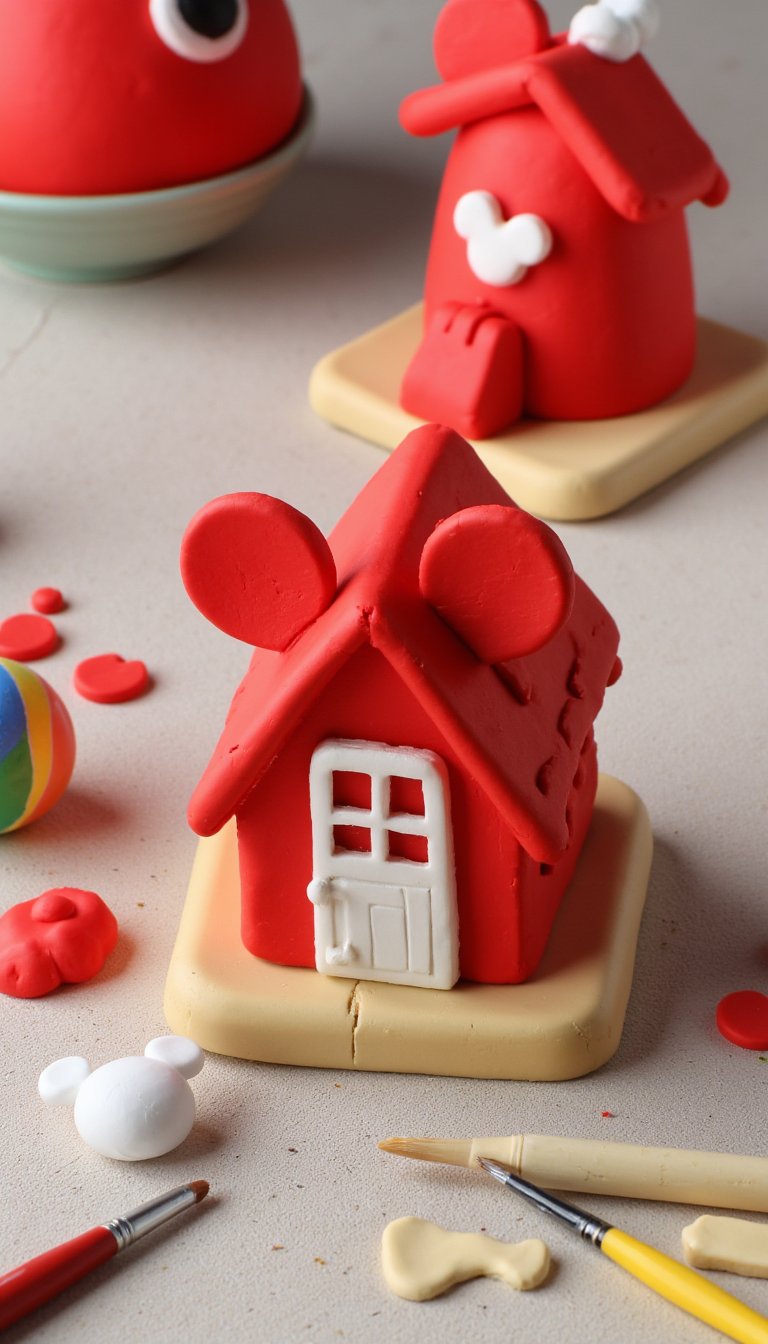
Hot dog! This is a fantastic group project or a deep dive for an afternoon. Build the iconic clubhouse shape with red clay, adding white details for the trim, doors, and that famous mouse-ear-shaped roof. Work in sections—walls, roof, base—and assemble after baking for stability. You can even make tiny tools (a Toodles!) out of clay to place nearby. It’s pure, nostalgic joy in 3D form.
12. DIY Disney Princess Tiara Set
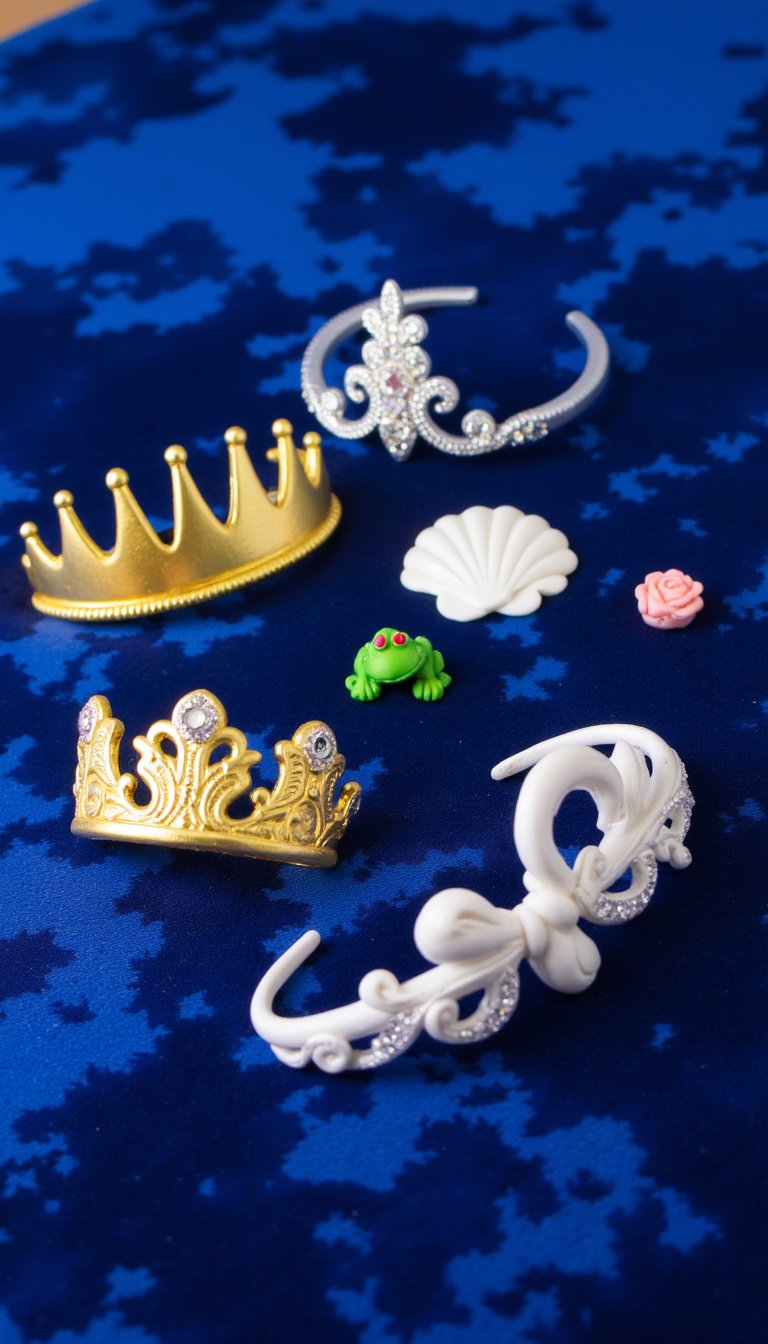
Who says you can’t have a crown for every day of the week? Craft miniature versions of iconic tiaras: Aurora’s sleek spikes, Belle’s golden elegance, or Ariel’s shell-inspired design. Use gold or silver metallic clay, or paint them after baking. Embed small beads or crystals for jewels. These make fantastic charms for bracelets, tree ornaments, or just tiny symbols of your favorite royal. Feeling extra? Sculpt a tiny rose or frog to accompany them.
13. The Toy Story Aliens (“The Claw!”)
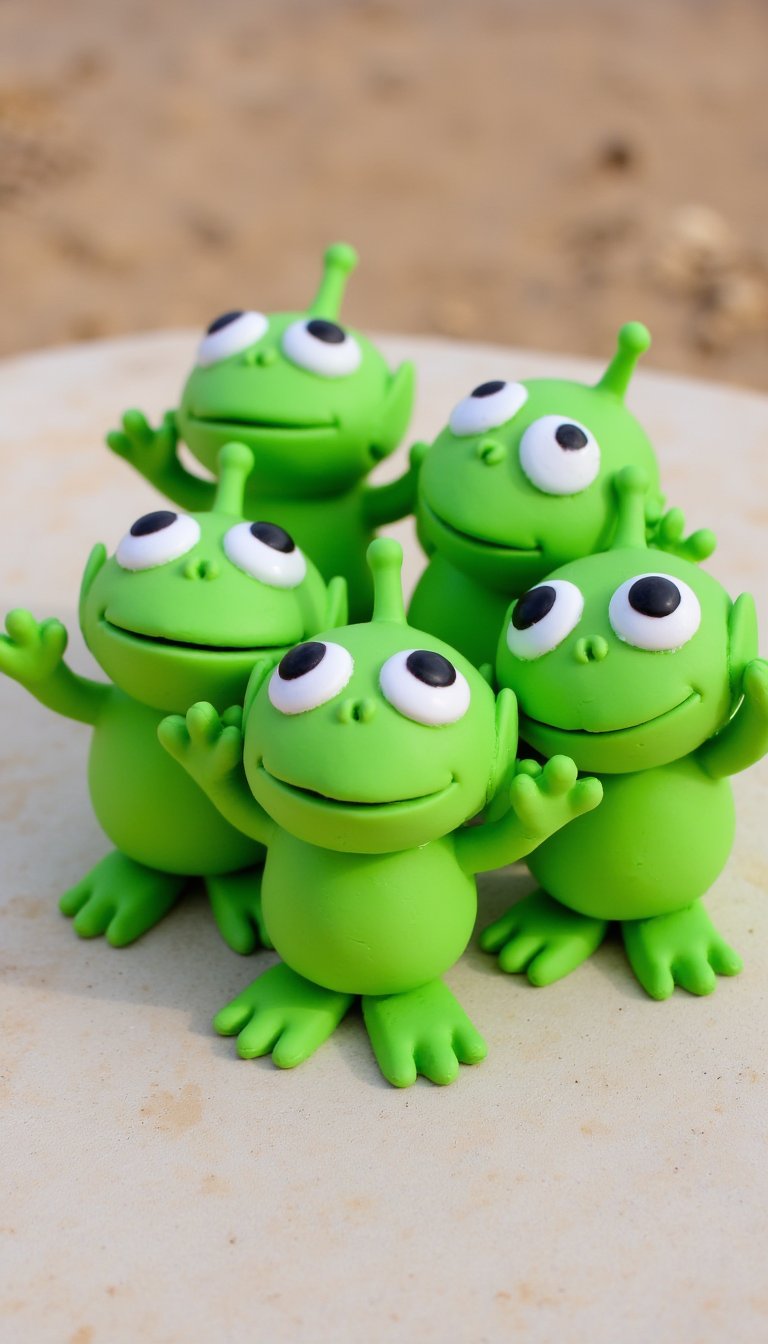
These little green guys are hilarious and incredibly easy to make. Shape three-fingered, oval bodies in bright green, then add the large, black eyes and simple mouths. The magic is in making a bunch—they’re a perfect bulk project. Pose them together, looking up in awe at an invisible claw (which you could also make from clay). They’re instant mood-boosters and a great way to use up clay scraps.
14. Beauty and the Beast’s Enchanted Rose
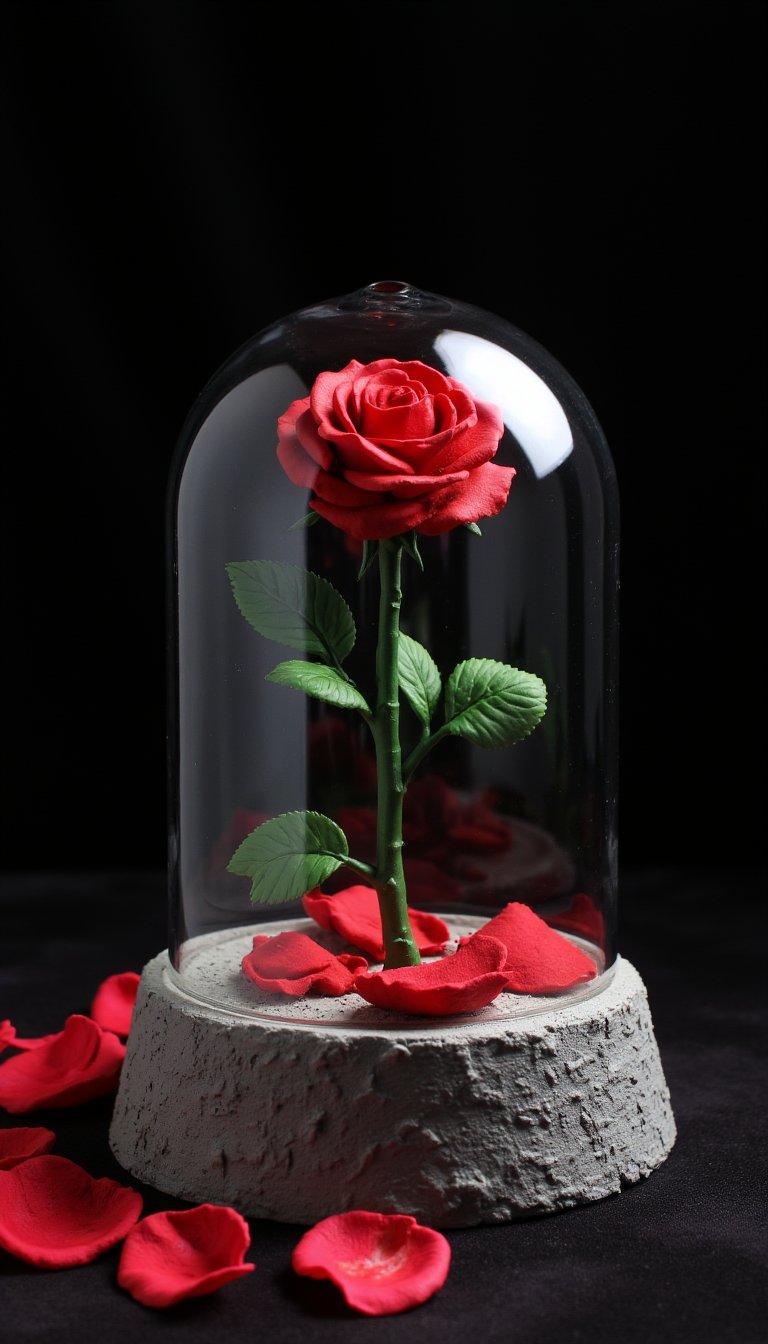
Capture the romance and the curse. Sculpt a deep red rose in bloom, with green leaves and thorns on the stem. The real showstopper is placing it under a dome—use a clear glass jar or a specially crafted clay bell. Add falling petals around the base from translucent clay to show the passage of time. This piece has major drama and makes a beautiful, symbolic centerpiece. Tale as old as time, right?
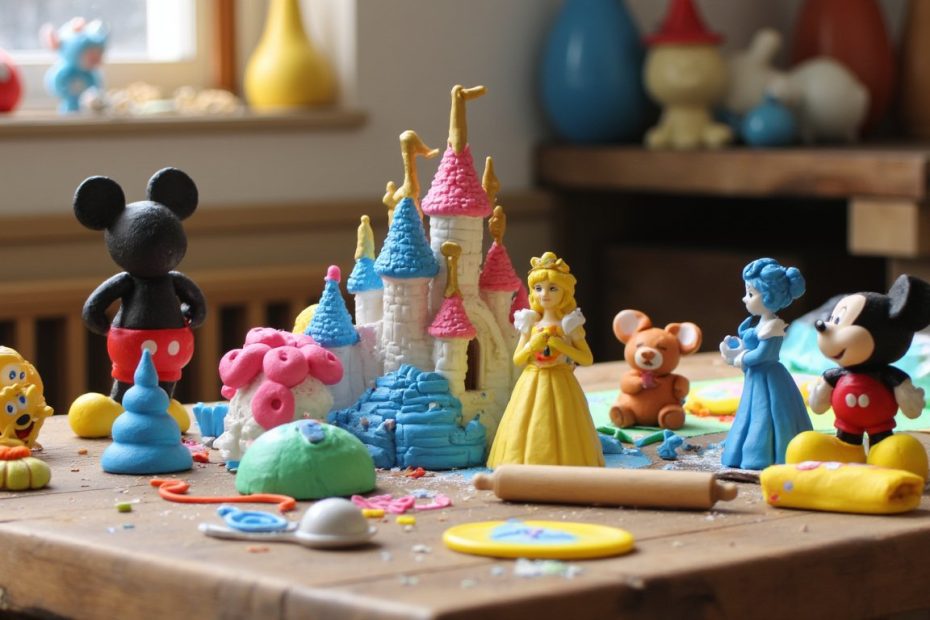
15. Iconic Disneyland Castle Replica
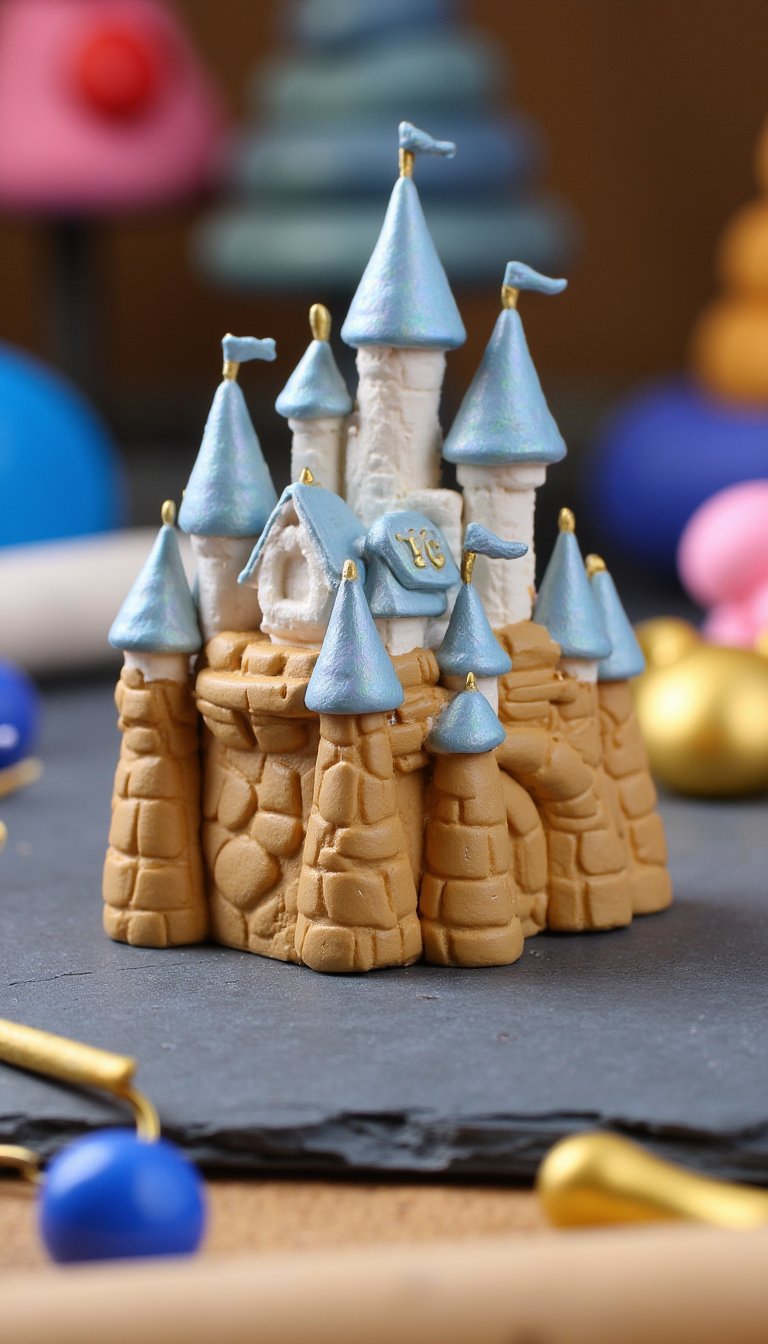
Go out with a bang and tackle the most iconic symbol of them all. Whether you choose Cinderella Castle or Sleeping Beauty Castle, the process is similar: build a sturdy base and work up, adding turrets, flags, and detailing. Reference a picture closely for the colors and architecture. This is an advanced project, so take your time and enjoy the process. When you’re done, you’ll have your own pocket-sized portal to the happiest place on earth.
And there you have it—15 Disney clay ideas that range from “I can do this in five minutes” to “I’m a crafting superhero.” The best part? There are no rules. Mix characters, create your own hybrids, or scale these ideas up or down. The real magic isn’t in achieving perfection; it’s in the playful process of making. So grab your clay, put on your favorite Disney soundtrack, and get creating. Who knows? You might just discover that the magic was in your hands all along. Now, if you’ll excuse me, I have a date with some clay and a need to make Heihei from Moana. Wish me luck 😉