Let’s be honest. Store-bought ornaments are lovely, but they don’t have a story. They don’t have that little fingerprint of glue or the slightly wobbly line of paint that makes something truly special. What if you could fill your tree with charming, one-of-a-kind creations that cost almost nothing and spark more joy than a perfect, mass-produced bauble? Grab that giant bag of popsicle sticks from the back of your craft closet, because we’re about to turn them into pure magic.
1. The Classic Rustic Snowflake
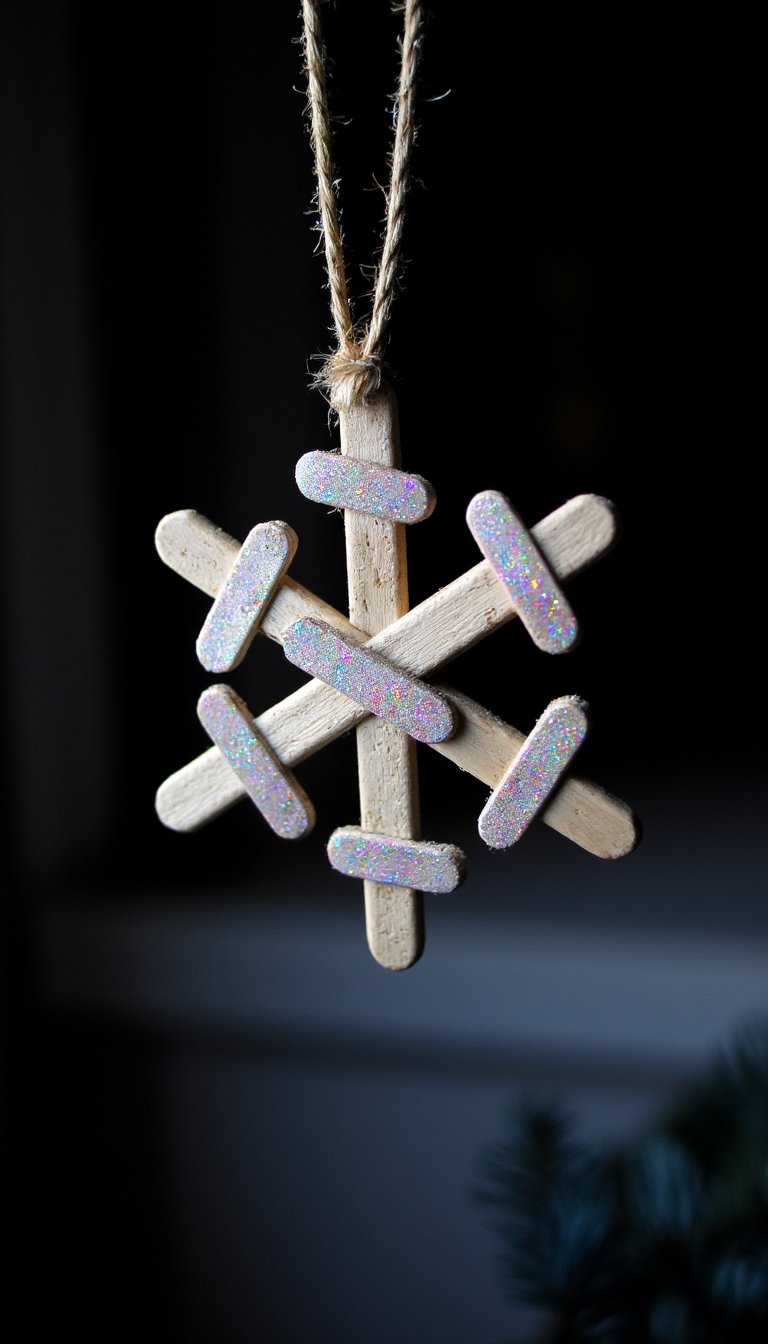
You can’t go wrong with a classic. This snowflake design is the perfect entry point into the world of popsicle stick ornaments. It teaches you the fundamental techniques of gluing and layering that you’ll use for almost every other project on this list.
How to Nail It:
Start by creating a simple asterisk shape with three sticks. Then, glue six half-sticks around the center points to form the iconic snowflake arms. A heavy-duty craft glue works best here. Once it’s dry, paint it white or leave it natural for a rustic vibe, and don’t forget a generous dusting of iridescent glitter before you seal it.
2. The Cozy Miniature Cabin
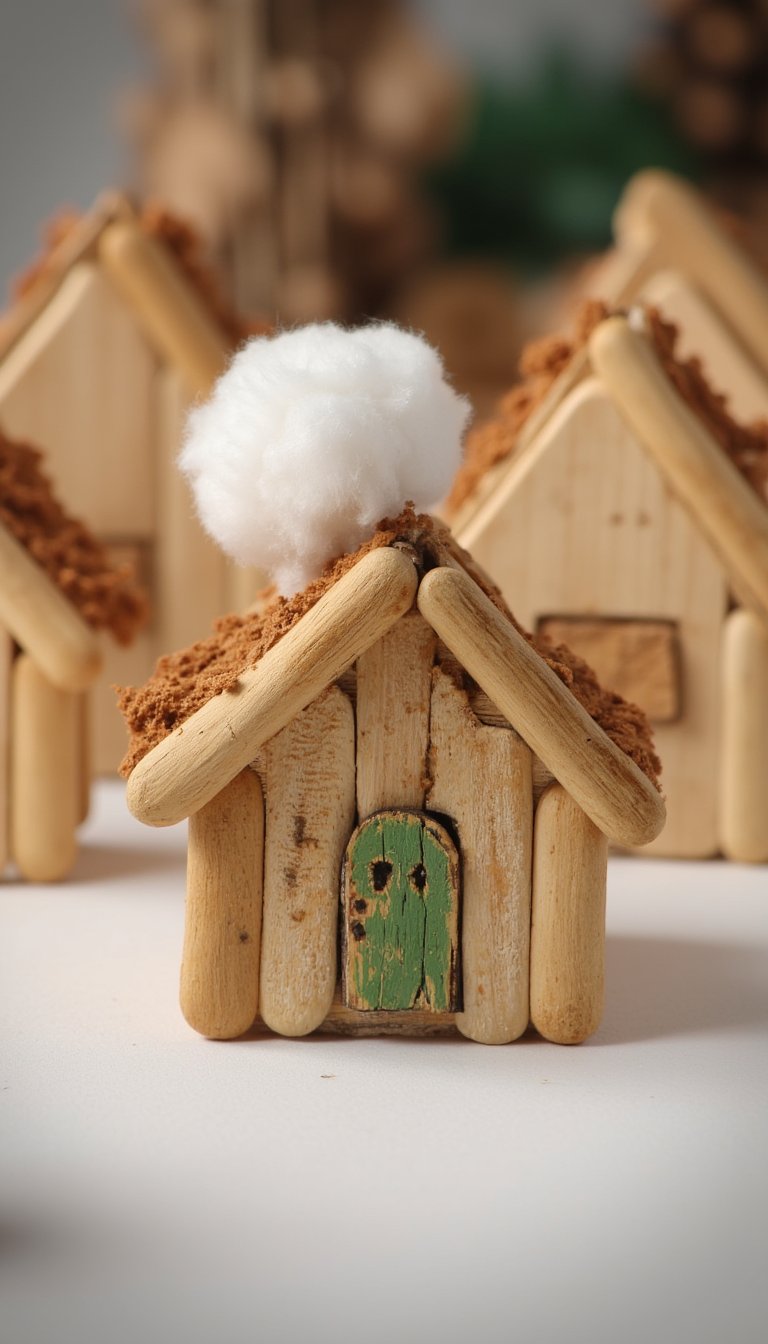
Want to add a little storybook charm to your branches? This tiny cabin is your answer. It looks intricate, but it’s surprisingly simple to build. It’s the perfect little hideaway for a miniature Santa or a tiny forest animal to call home.
How to Nail It:
Build a simple square frame for the walls and a triangle for the roof. Glue the roof on and then use smaller stick pieces to create a log cabin effect on the walls. Paint on a little door and some windows, and maybe even add a tiny cotton ball smoke puff coming from the chimney.
3. The Adorable Gingerbread Man
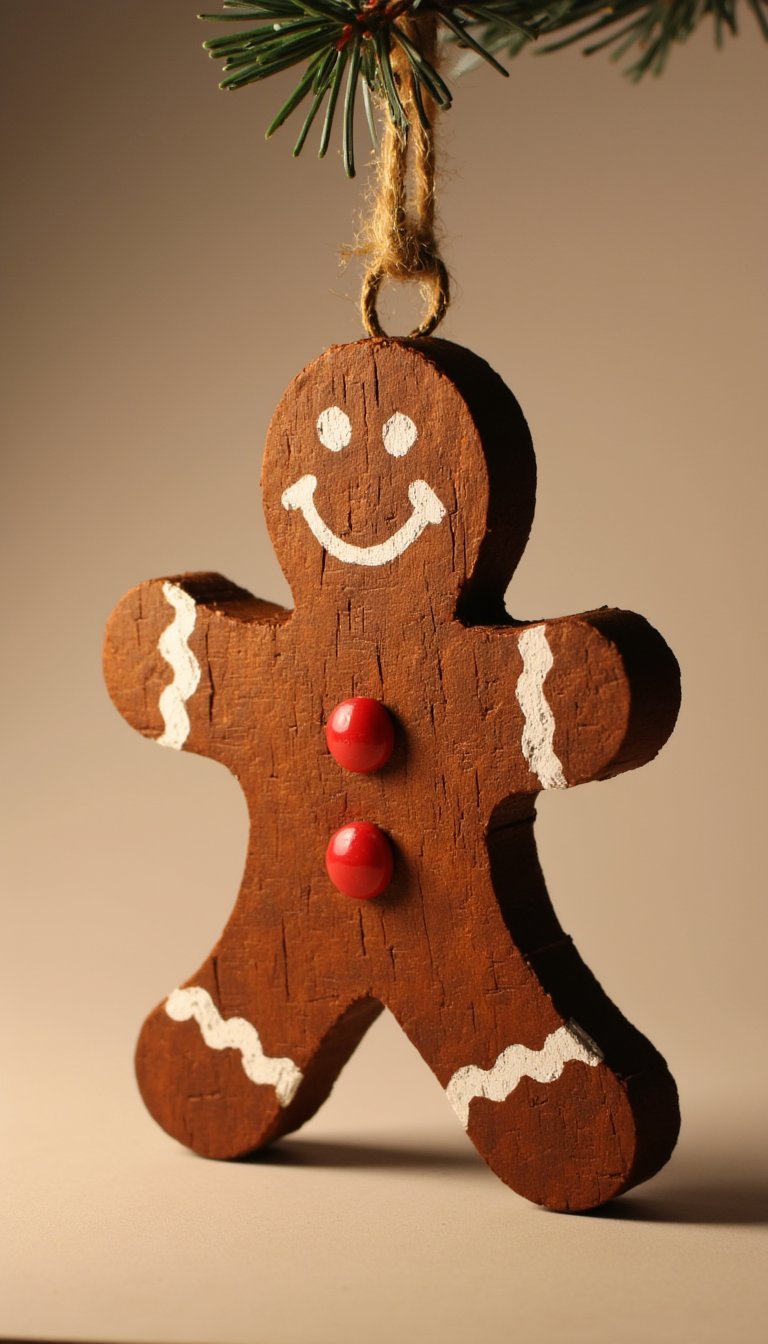
This little guy is just begging to be made. He’s cheerful, simple, and a huge hit with kids. Who needs a cookie when you can have a durable, forever-gingerbread man hanging on your tree?
How to Nail It:
Glue two full sticks together for the body. For the head, use a half-stick or a round wooden bead. Create the arms and legs with smaller stick pieces. Once assembled, paint him brown and add a happy face and colorful buttons with white and red paint.
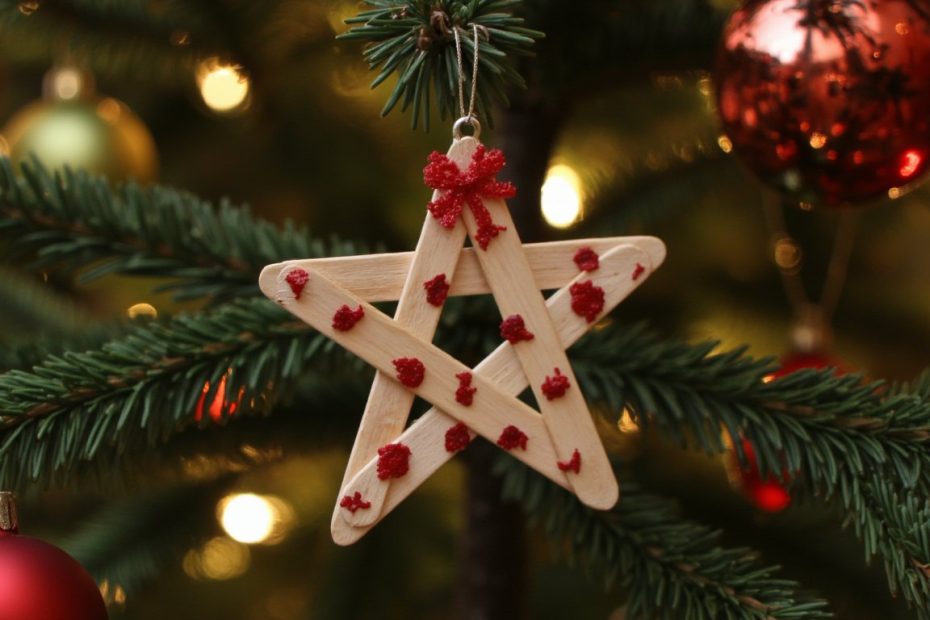
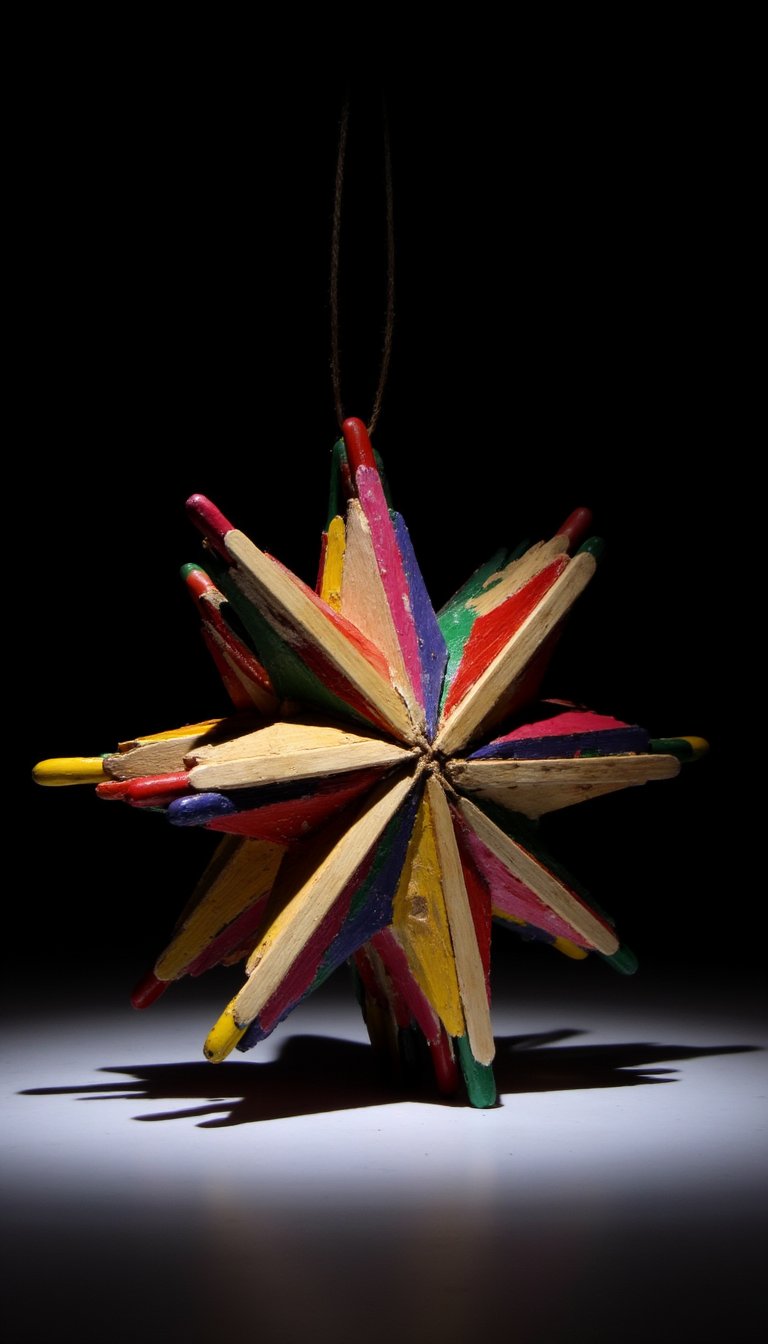
4. The Glamorous Glitter Star
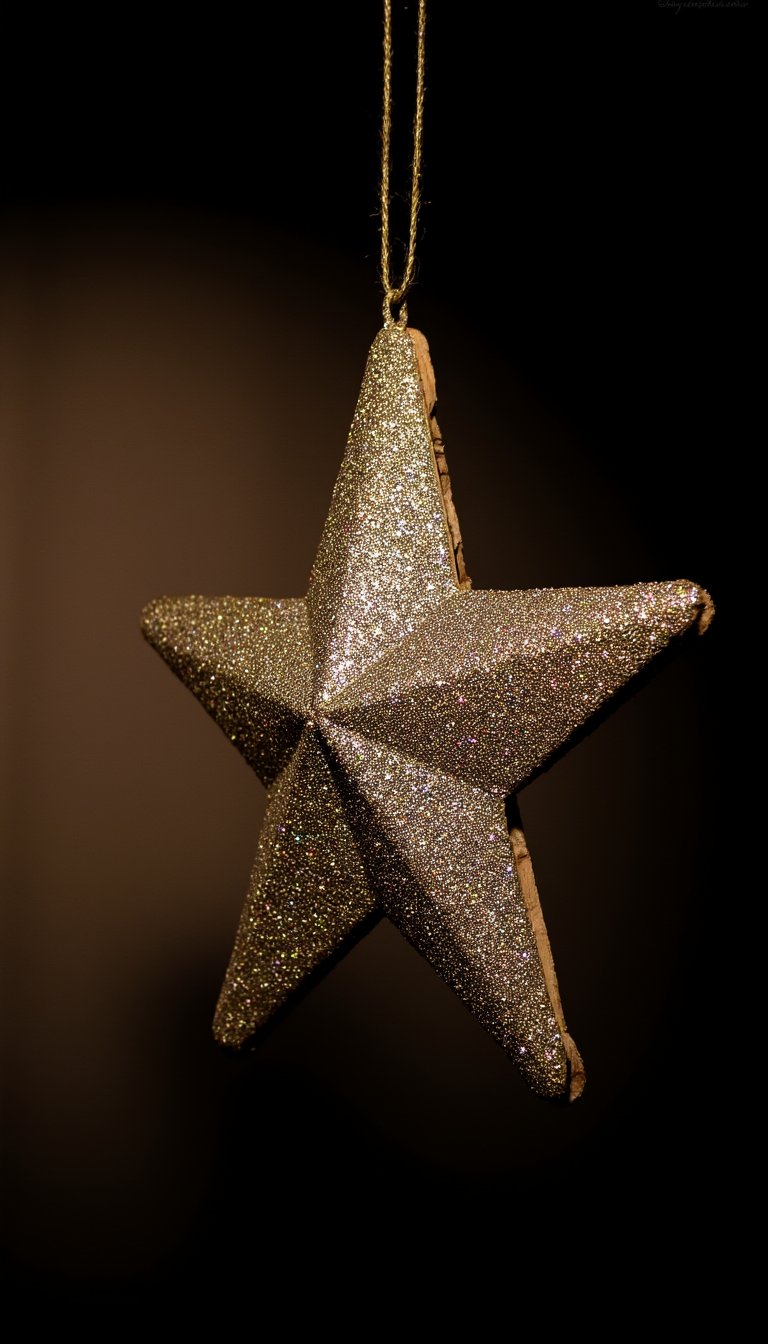
Sometimes, you need a little sparkle. This ornament proves that popsicle sticks can be downright glamorous. It catches the light beautifully and adds a touch of festive brilliance to any tree.
How to Nail It:
Form a star by layering and gluing five sticks at the center points. You might need to trim the ends at an angle to get a perfect fit. Then, slather the entire thing in glue and dunk it in gold or silver glitter. Shake off the excess, and you’ve got instant holiday glam.
5. The Whimsical Reindeer
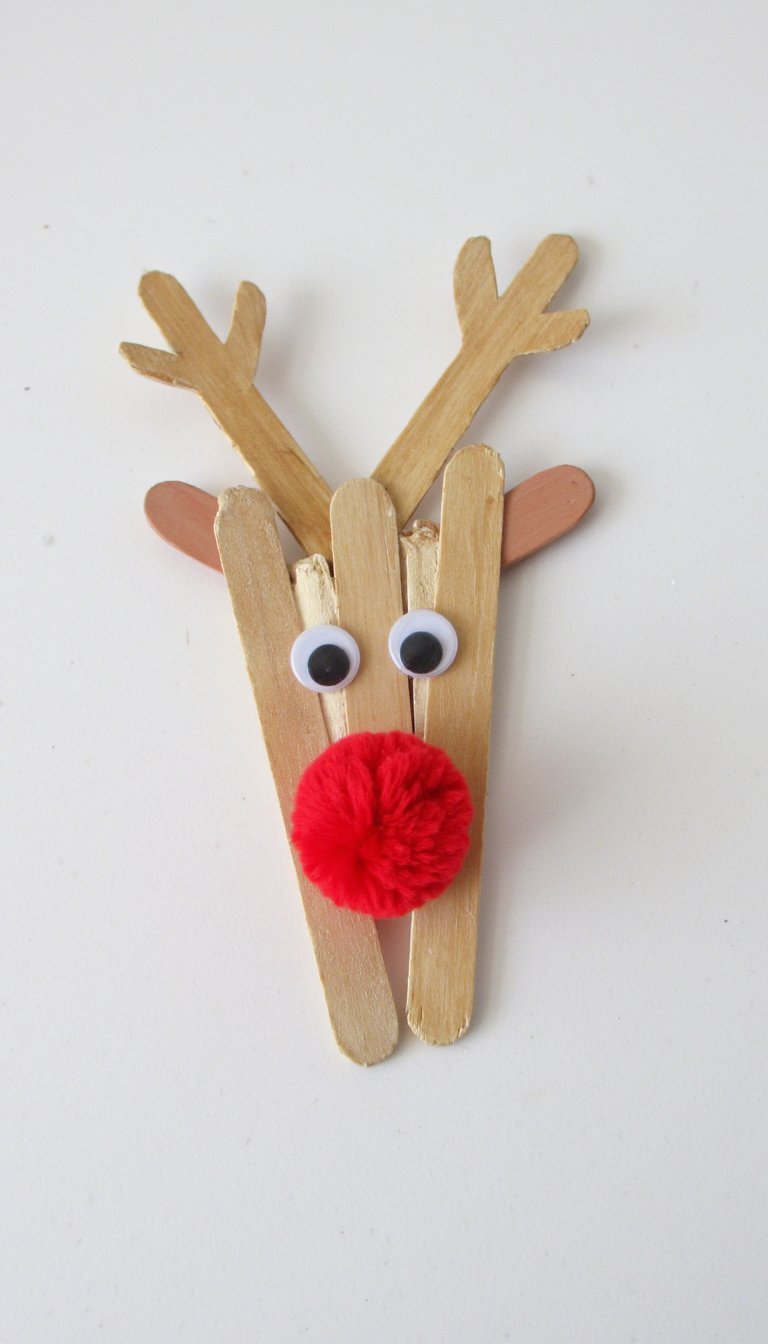
Rudolph, is that you? This reindeer is a festive must-have. With his googly eyes and red pom-pom nose, he’s full of personality and is guaranteed to make you smile every time you see him.
How to Nail It:
Use a vertical stick for the face and horizontal sticks for the antlers. Glue small stick pieces to the bottom of the face to create the body. The key is the accessories: two googly eyes and a bright red pom-pom for that famous shiny nose.
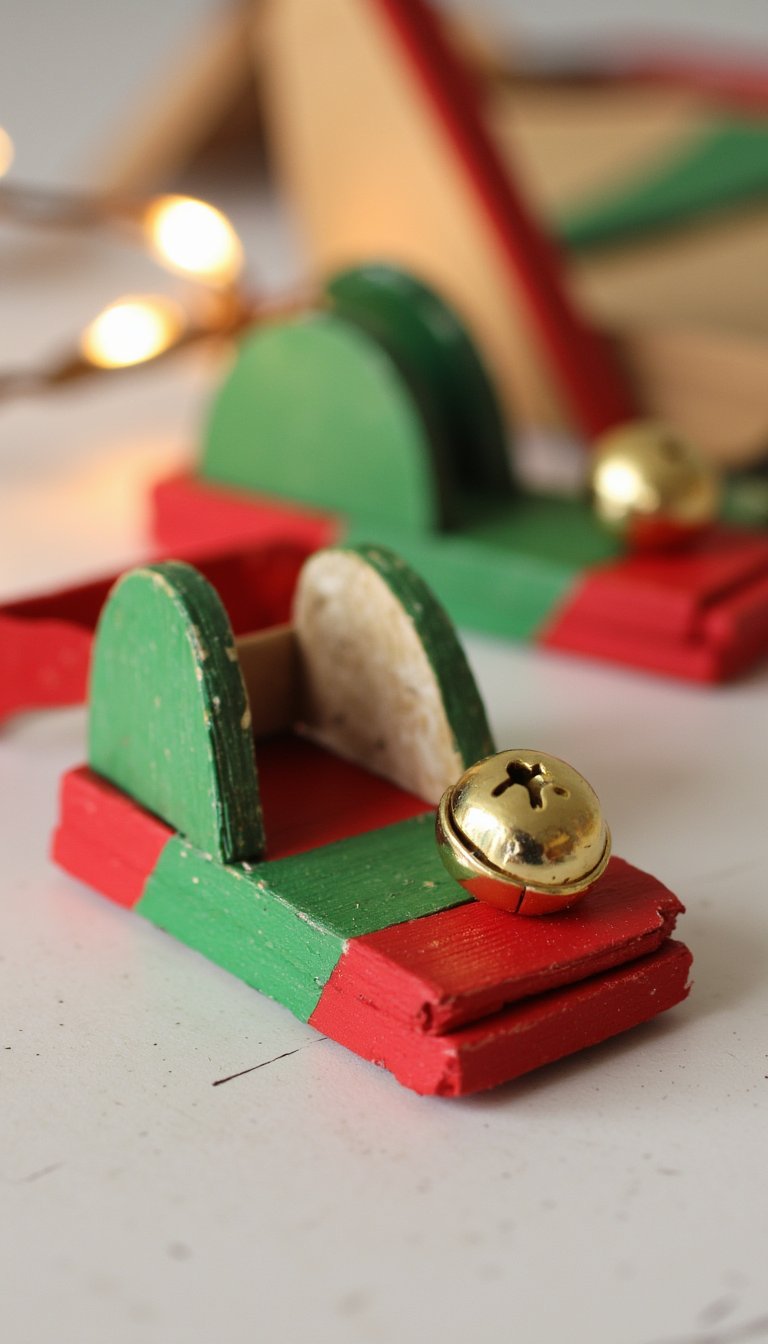
6. The Nostalgic Sled
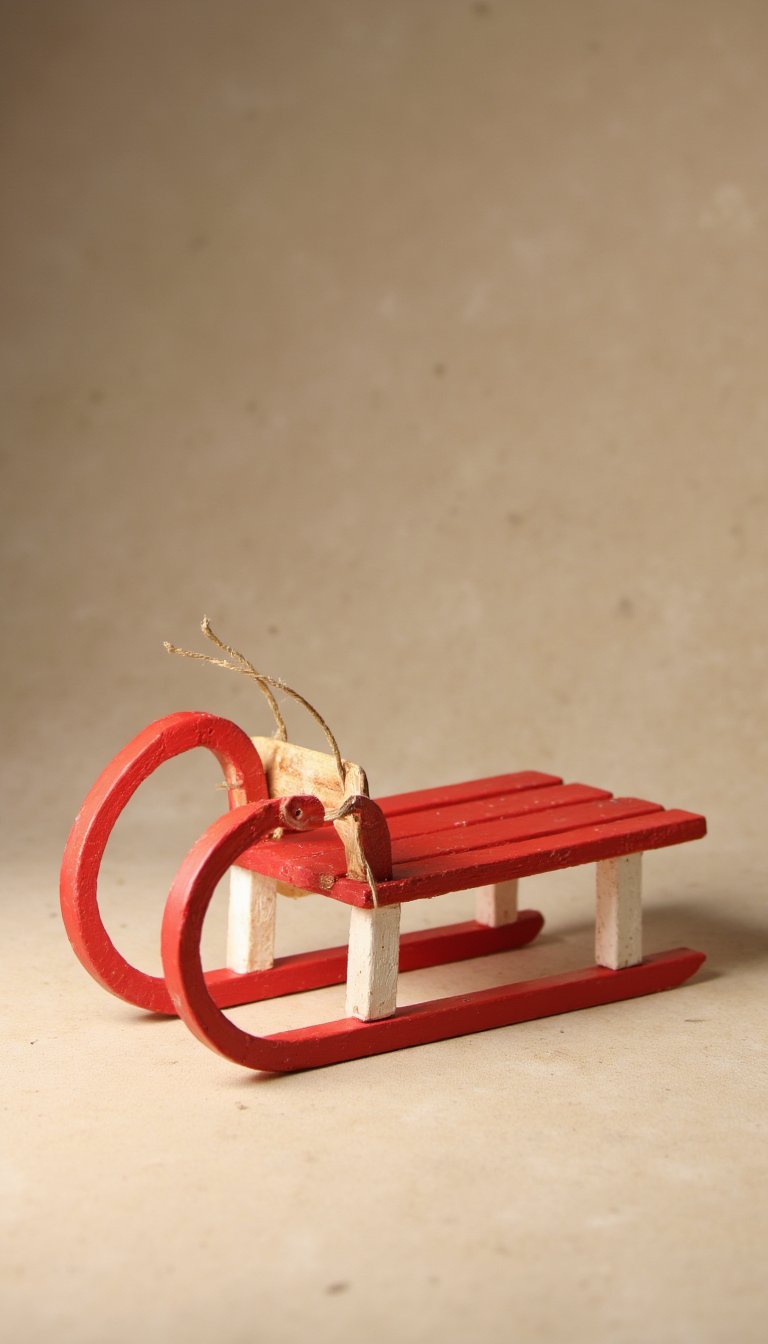
Remember that scene in every classic Christmas movie where the hero carries a beautiful wooden sled? Now you can have a miniature version. This ornament oozes vintage charm.
How to Nail It:
This one is all about the curved runners. Gently soak two sticks in warm water for about an hour to make them pliable, then bend and secure them until they dry. Glue crossbars between them for the sled bed. A little red and white paint completes the timeless look.
7. The Simple & Elegant Christmas Tree
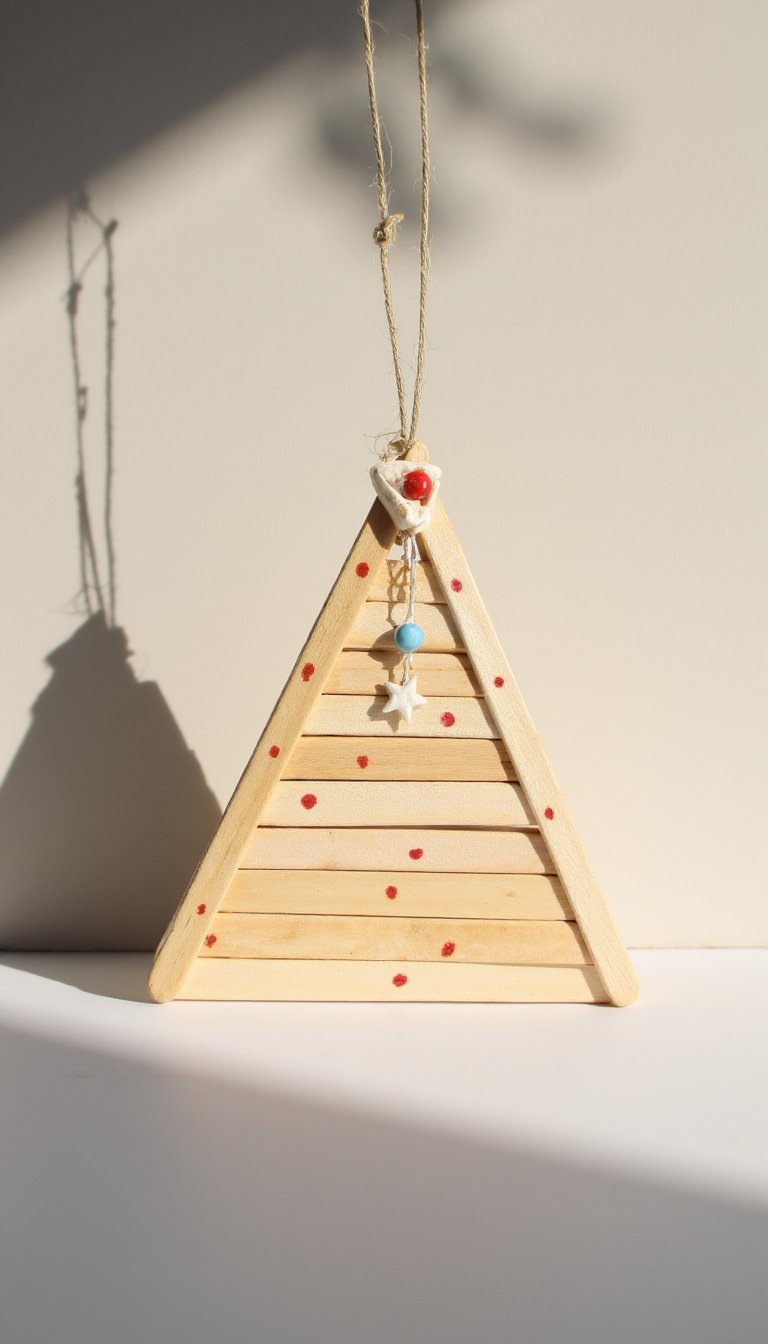
A tree on a tree? It’s meta, and it’s marvelous. This design is beautifully minimalist and lets the natural wood grain shine through, making it a perfect contrast to more colorful ornaments.
How to Nail It:
Cut several sticks into progressively smaller lengths. Glue them in a stacked triangle formation onto a single vertical “trunk” stick. Add a tiny star bead or a sequin to the top, and maybe a few dots of red paint for miniature ornaments.
8. The Jolly Snowman
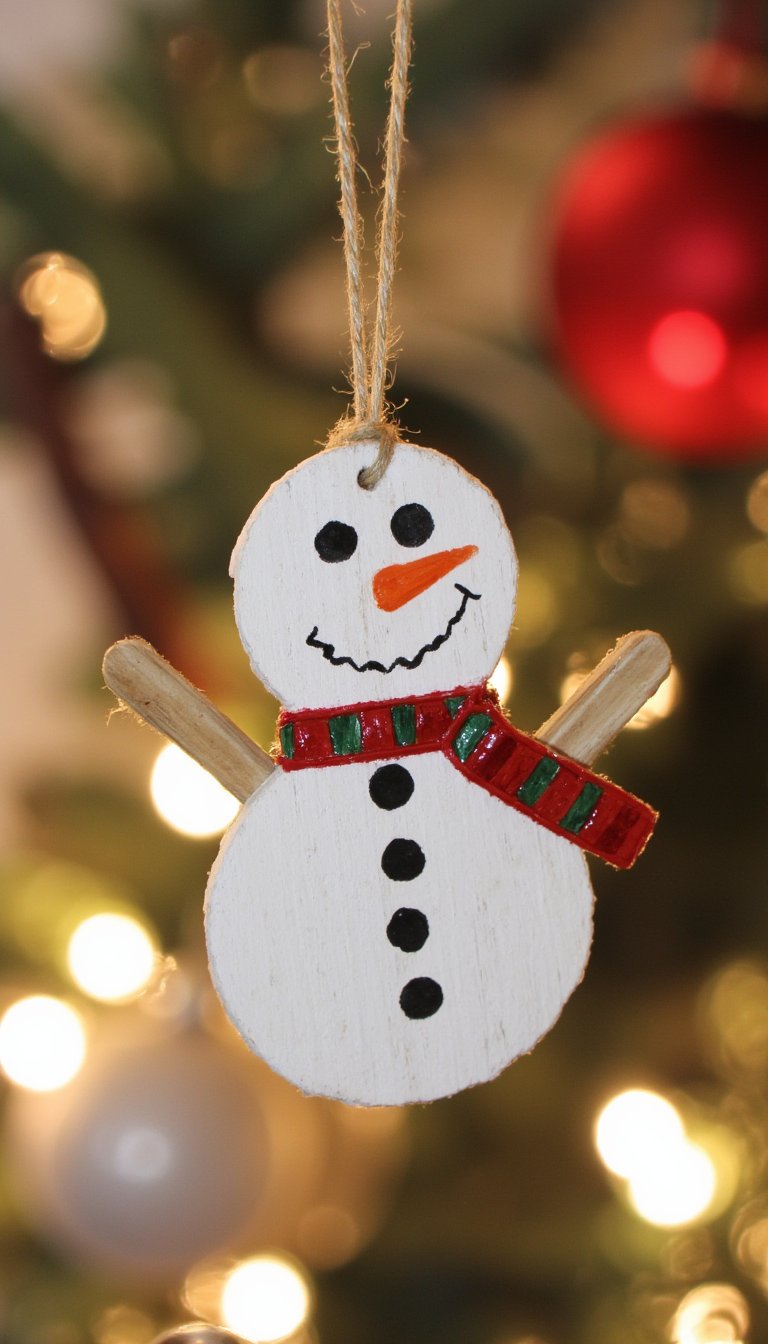
Frosty doesn’t have to melt! This popsicle stick version will last for seasons to come. He’s a round, cheerful fellow built from an unexpectedly angular material.
How to Nail It:
Glue three sticks together side-by-side. This will be your canvas. Paint on his classic three-ball body, a carrot nose, coal eyes and buttons, and a charming striped scarf. A small piece of felt makes for a perfect hat.
9. The Sturdy Picture Frame
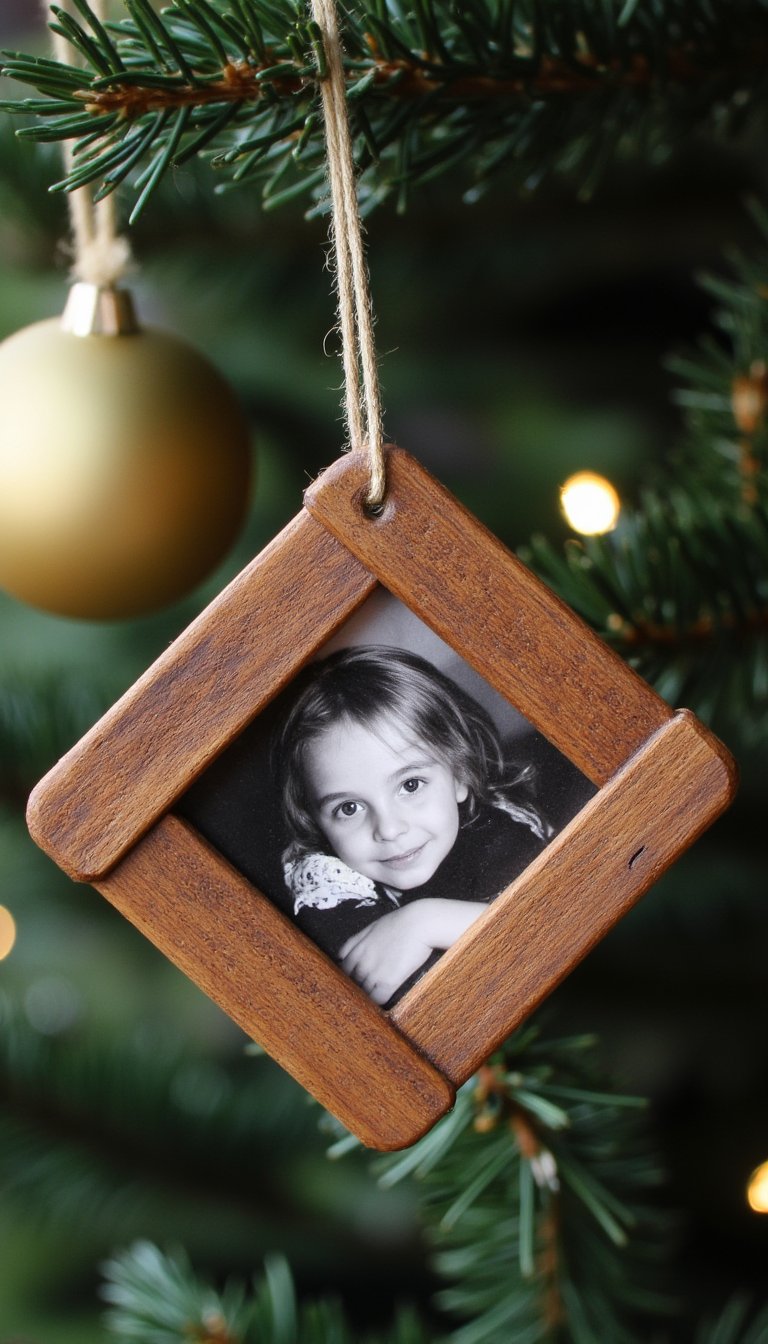
This might be the most meaningful ornament you’ll ever make. Turn your popsicle sticks into a tiny frame for a favorite family photo, your kid’s school picture, or a cute holiday snapshot.
How to Nail It:
Create a square frame by gluing sticks together at the ends. For a more finished look, you can miter the corners by cutting the ends at a 45-degree angle. Glue a piece of cardstock to the back to hold the photo, and add a loop of string for hanging.
10. The Mini Wreath
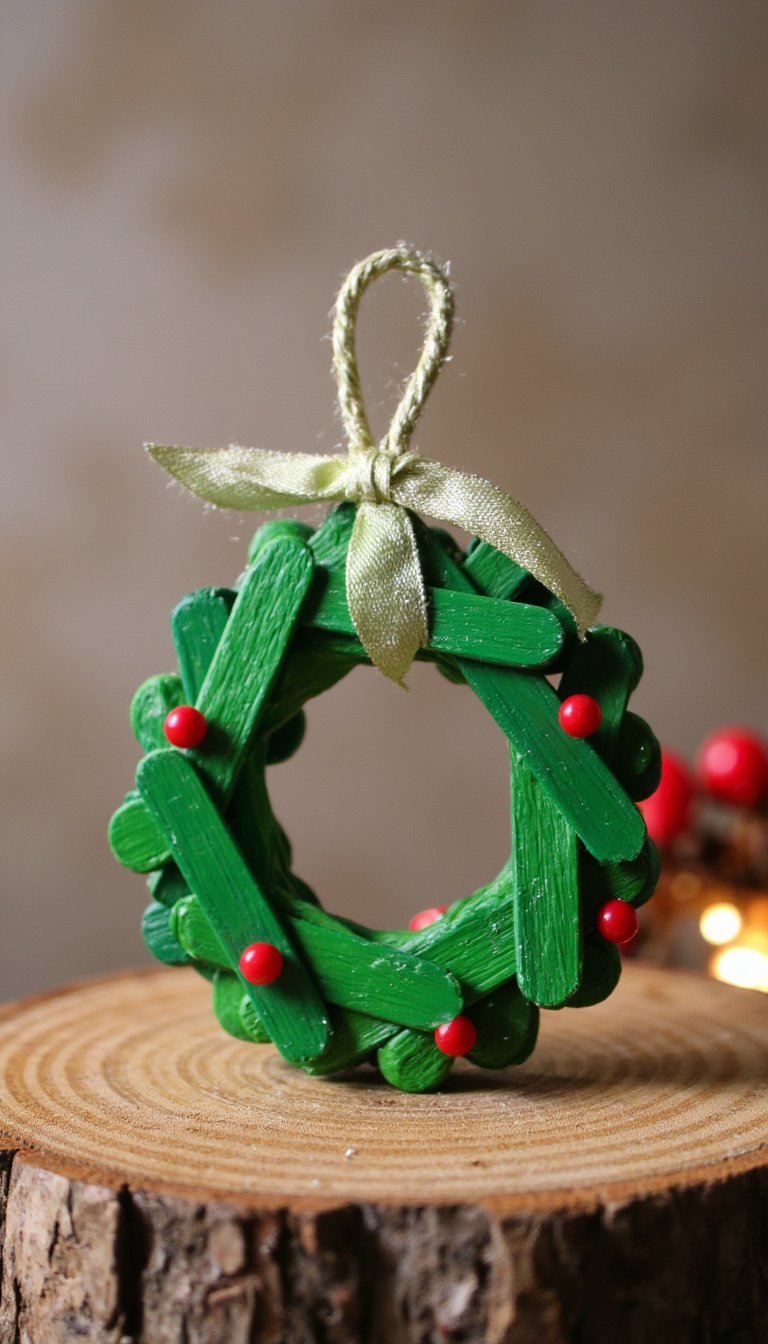
Why hang a wreath only on your door? These mini versions are adorable scattered throughout your tree. They add a traditional touch and are incredibly easy to customize.
How to Nail It:
Glue several popsicle sticks into a circle shape. You can leave the circle open or fill the center with more sticks. Paint it green, add tiny red berry beads or a bow, and you have a perfect, pint-sized holiday greeting.
11. The Angelic Tree Topper Alternative
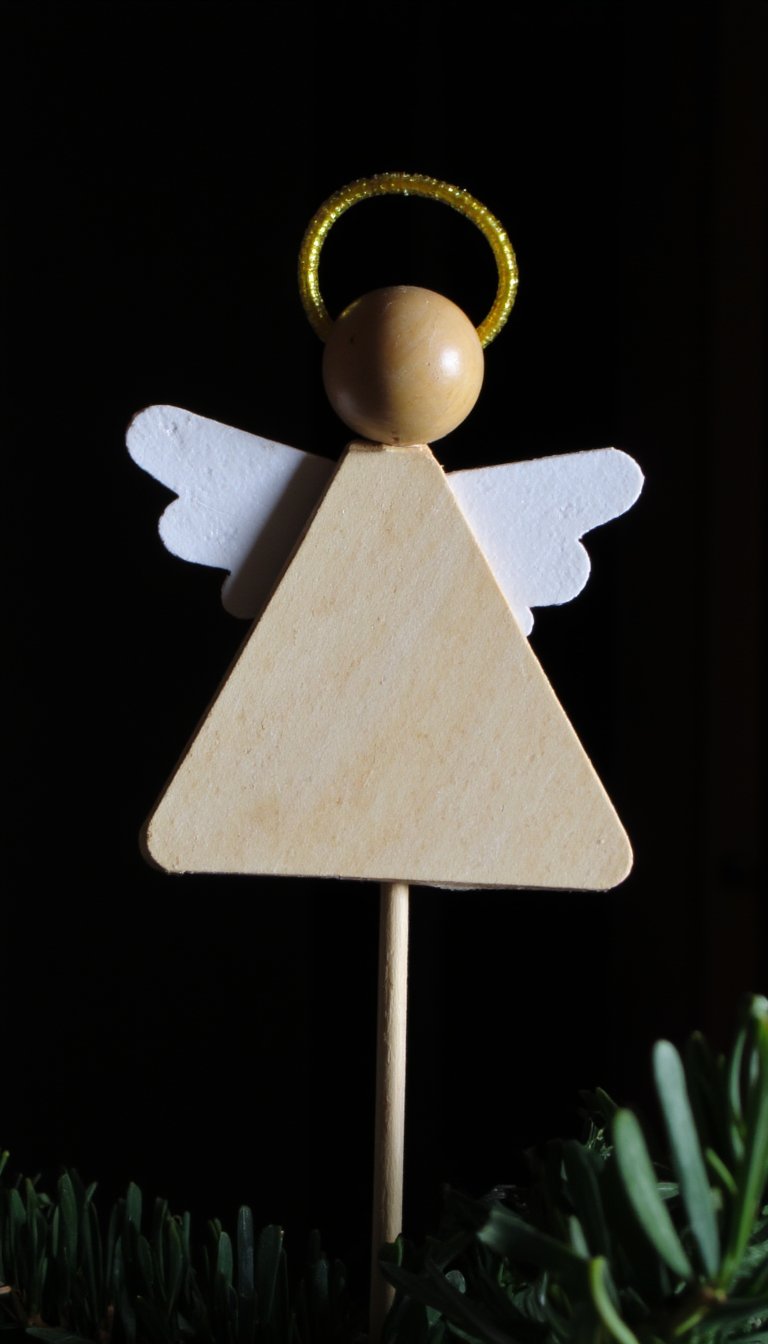
Not everyone wants a giant star on top of their tree. This delicate popsicle stick angel is a beautiful, lightweight, and handmade alternative that adds a touch of grace.
How to Nail It:
Use a wooden bead for the head. Create a triangle dress from three sticks and a simple wing shape from smaller pieces or even white felt glued to the back. A tiny gold pipe cleaner makes a perfect halo.
12. The Quirky Elf Shoes
How cute is this? A pair of tiny elf shoes hanging on your tree suggests that Santa’s helpers have been busy at your place. It’s a playful and unique ornament that sparks the imagination.
How to Nail It:
This requires a bit of creative gluing. Layer and overlap stick pieces to form the curved, pointy shape of the shoe. Paint them green and red and add a little gold jingle bell to the toe for an extra festive touch.
13. The Festive Ornament… Ornament
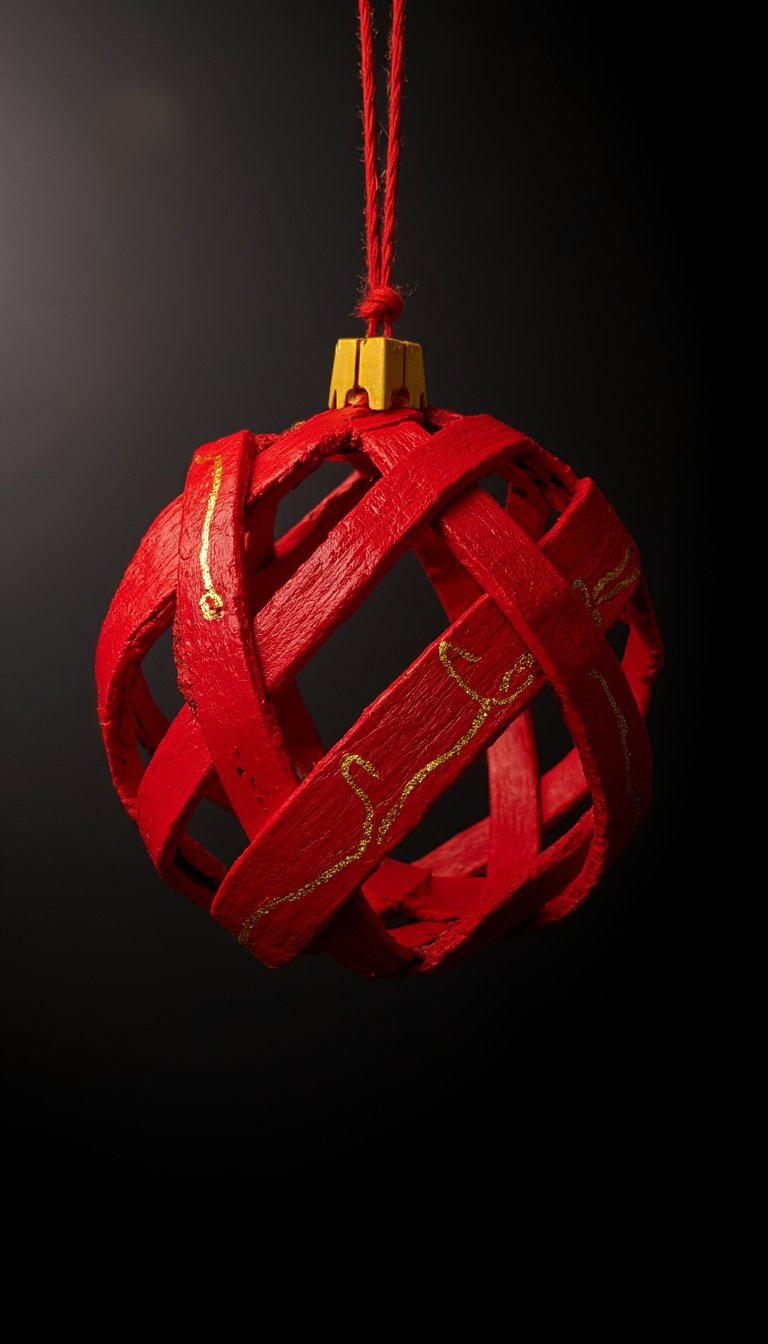
Let’s get meta again. This is a popsicle stick ornament of a classic round ball ornament. It’s a fun, self-referential craft that always gets a second look.
How to Nail It:
Build a circular frame and then criss-cross sticks inside it to create the “glass” effect of a bauble. Paint it in a solid, shiny color and add a white or gold painted squiggle on top to mimic the reflective light on a real ornament.
14. The “Stained Glass” Window
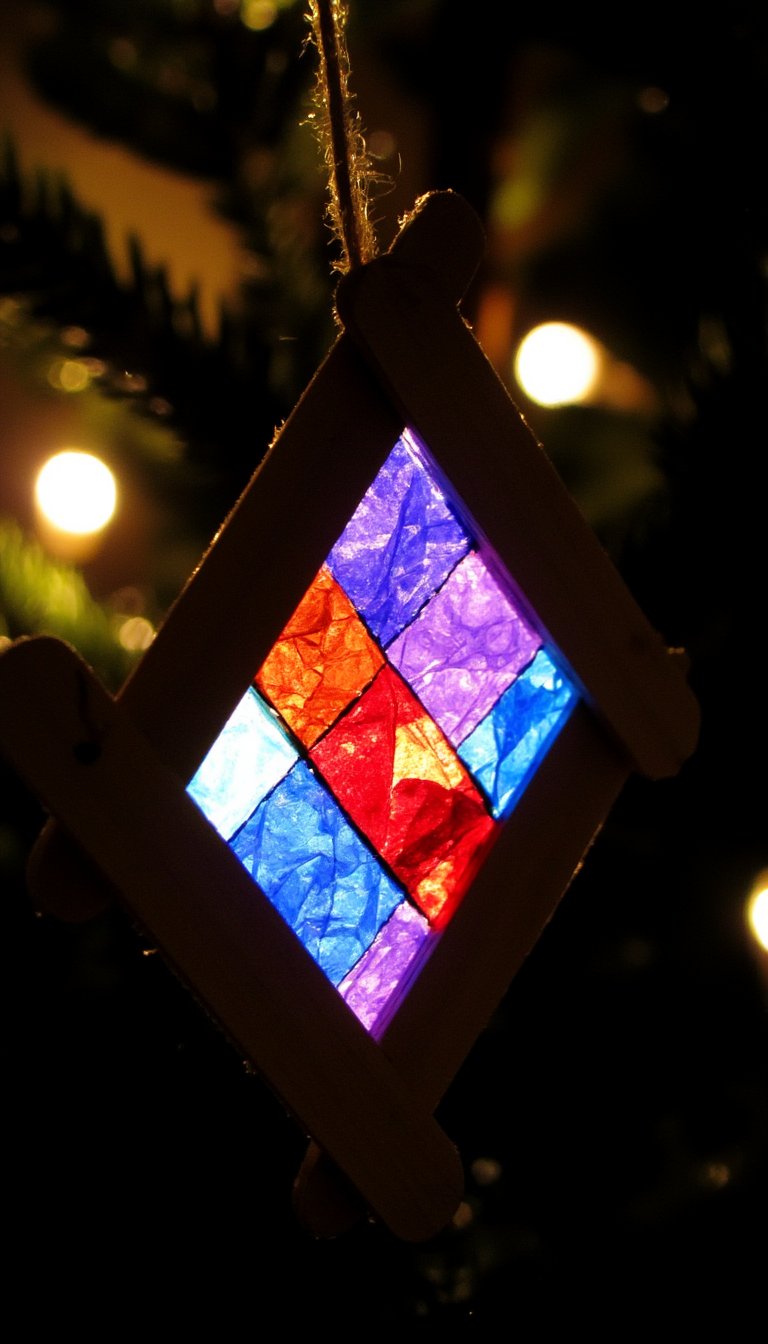
This one is pure magic when the tree lights hit it. By creating a frame and filling it with colorful tissue paper, you can mimic the look of a beautiful church window depicting a snowflake or a star.
How to Nail It:
Build a square or diamond frame. Cut a piece of clear contact paper slightly larger than the frame, stick it to the back, and then press small, colorful pieces of tissue paper onto the sticky surface. Trim the excess and you have a beautiful light-catcher.
15. The Jingle Bell Rocking Horse
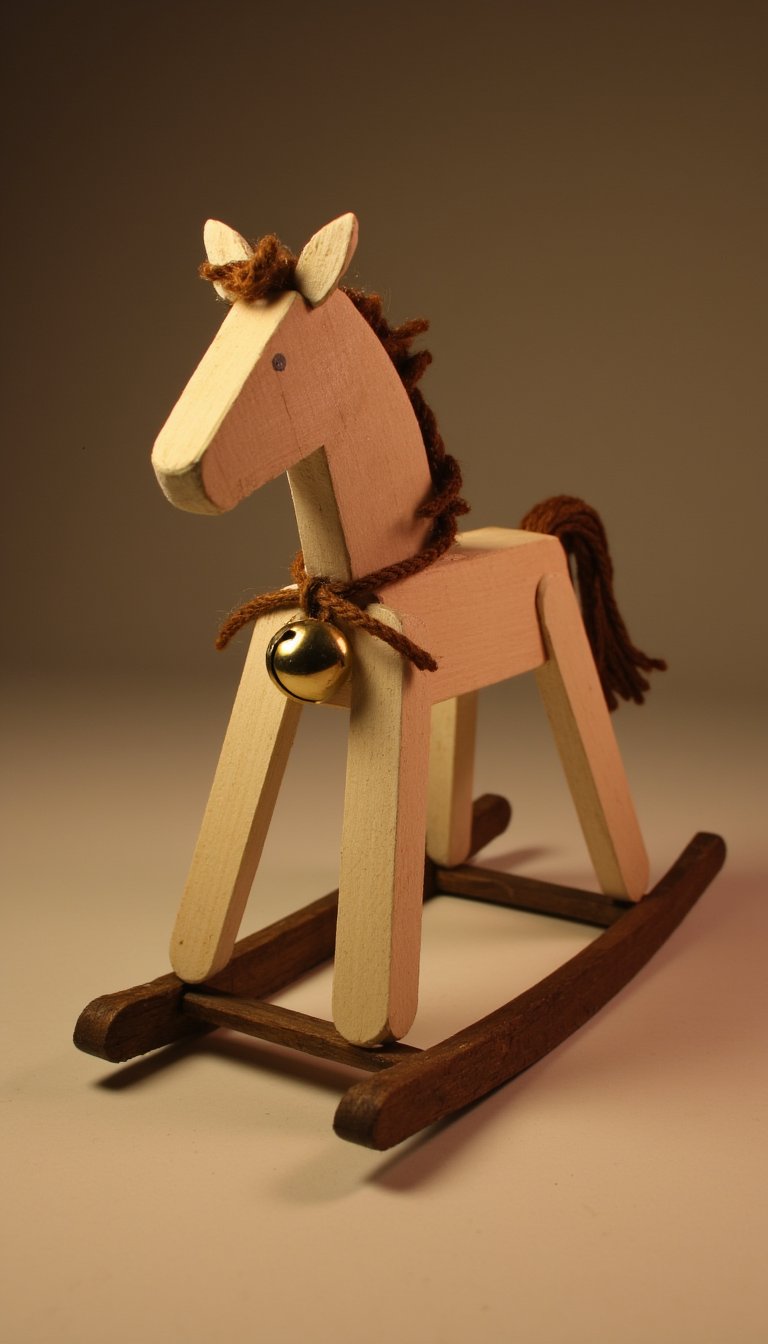
This ornament combines nostalgia with a delightful auditory element. The gentle rock and soft jingle make it a favorite for little ones and the young at heart.
How to Nail It:
Form the classic rocking horse shape with curved runners (use the soaking technique from the sled) and a stick for the body. Add a small stick for the head and a tiny piece of yarn for the mane. Don’t forget to tie a small jingle bell to the front!
16. The Cozy Mittens
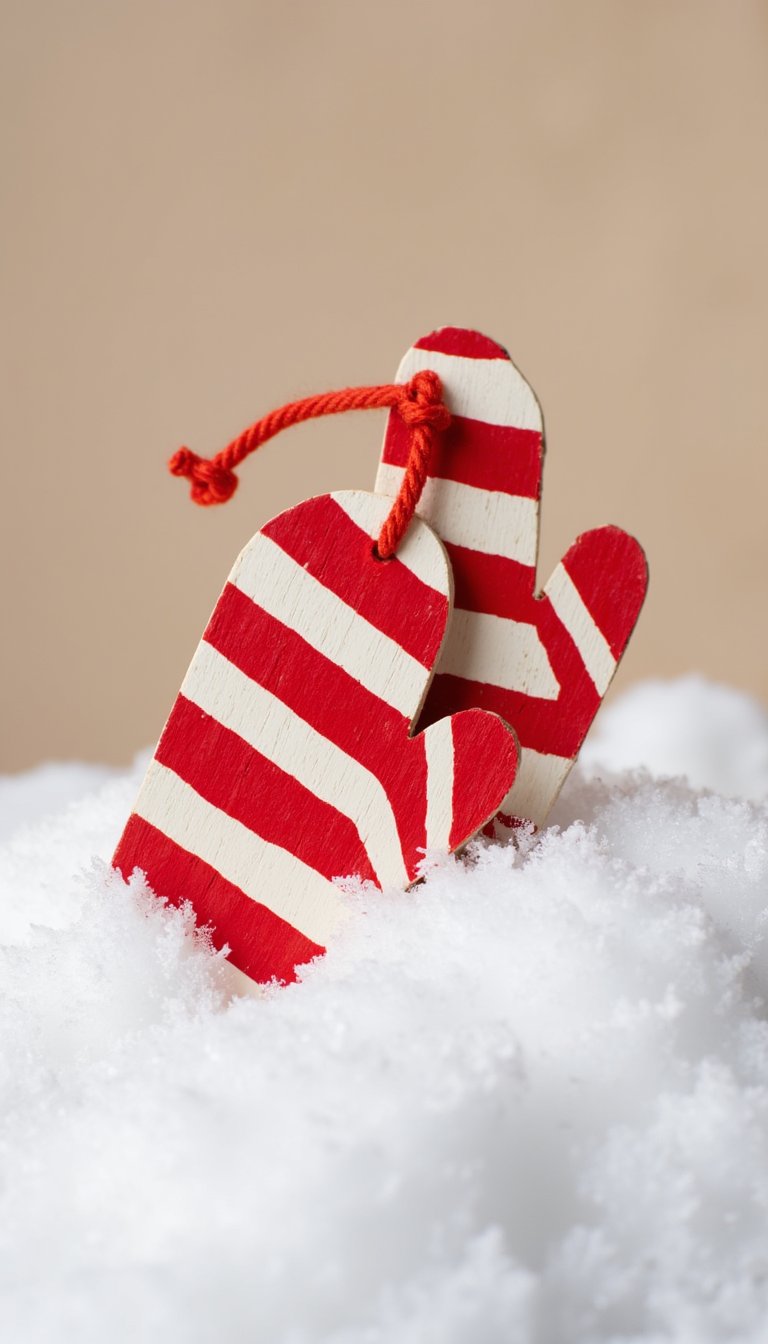
Is there anything more symbolic of winter fun than a pair of mittens? This set is incredibly simple to make, and you can create a whole “clothesline” of them on your tree.
How to Nail It:
Simply glue sticks together in the shape of a mitten. You’ll need two! Paint them in a fun, striped pattern and use a short piece of yarn to connect them, just like you’d hang them to dry.
17. The Geometric 3D Star
Ready to level up your crafting? This star has serious wow factor. Its three-dimensional design makes it look far more complex than it actually is, and it creates stunning shadows.
How to Nail It:
You’ll create two flat, layered stars just like in #4. Then, you’ll glue them together at an offset angle, forming a stunning 3D shape. It requires a bit of patience while the glue dries, but the result is absolutely worth it.
18. The Nutcracker Soldier
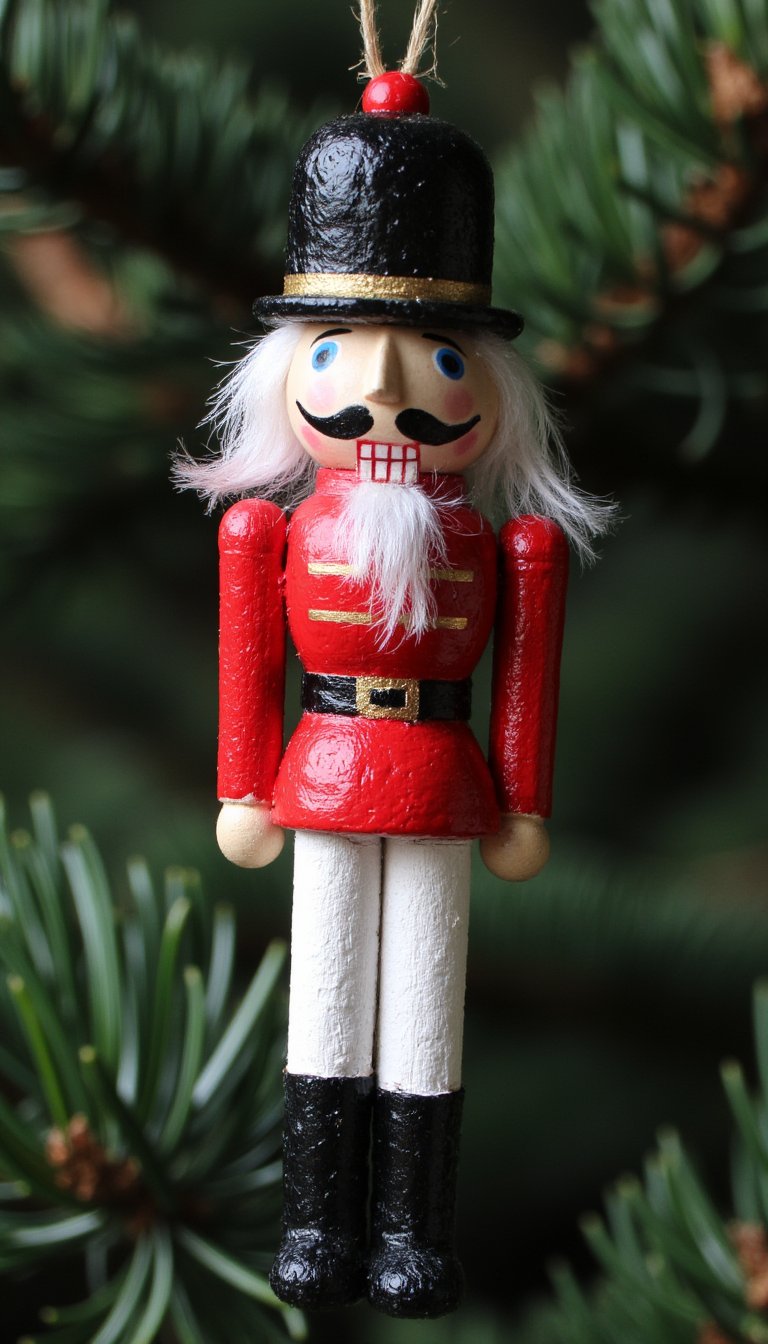
Standing tall and proud, this nutcracker brings a touch of ballet and tradition to your tree. His uniform is a perfect canvas for your painting skills.
How to Nail It:
Use a full stick for the body. Paint on his classic red soldier’s jacket, black boots, and white pants. A small wooden bead makes a great head, and you can paint on his stern face and impressive mustache with a fine-tipped brush.
19. The Personalised Initial
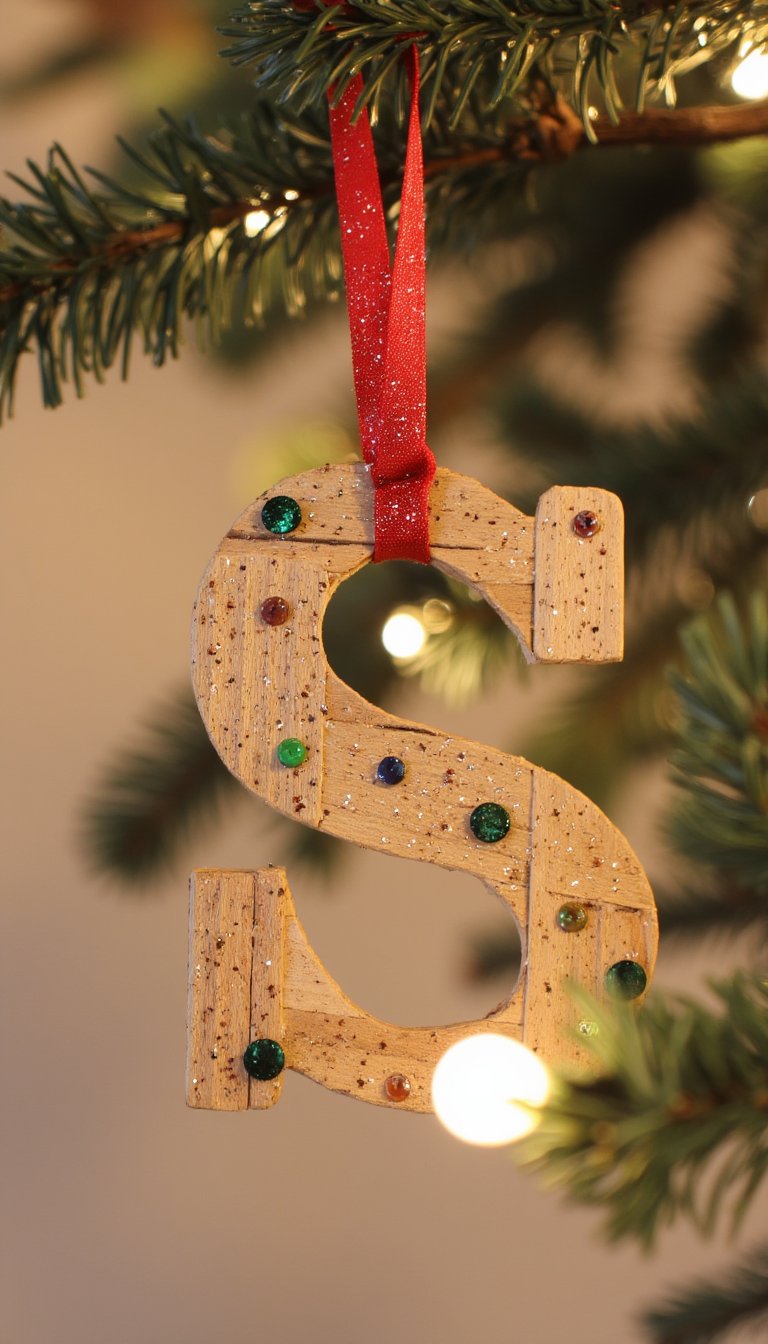
End your crafting session by making something uniquely yours. A popsicle stick initial is the perfect way to mark a gift or claim a special spot on the tree for each family member.
How to Nail It:
Break or cut sticks to form the letters of your choice. Glue them together and then decorate to your heart’s content. You can keep it simple with a monochrome paint job or go wild with patterns, sequins, and glitter. This is your signature piece.
And there you have it! 19 popsicle stick ornaments that prove you don’t need a big budget to have a beautiful and meaningful Christmas tree. Each one of these crafts holds more than just glue and paint; it holds the memory of the time you spent creating it. So, which one are you trying first? My money’s on the glitter star. 😉 Happy crafting!