
Halloween creeps up fast, doesn’t it? If you need quick, cheap, and ridiculously fun ways to entertain the kids this spooky season, look no further than your kitchen pantry. Grab a stack of cheap paper plates, some washable paint, and a handful of fuzzy pipe cleaners. You are about to transform everyday household items into adorable, creepy-crawly masterpieces. Let’s make some memories (and maybe a little mess) with these simple DIY projects.
These budget-friendly ideas will keep little hands busy while helping them build essential fine motor skills. Whether you need a rainy day activity or a classroom party project, these spider crafts fit the bill perfectly. Ready to get crafting? Grab your glue sticks, put on your favorite spooky playlist, and choose your favorite projects from our ultimate list below!
1. The Classic Googly Eye Spider

This project serves as the perfect starting point for toddlers and preschoolers. Start by painting a standard paper plate in pitch-black acrylic paint. Once dry, your little artist can glue on eight fuzzy pipe cleaner legs and a chaotic cluster of googly eyes. Why settle for just two eyes when you can add twenty? Pro-Tip: Use white school glue for easy clean-up, or hot glue (adults only!) for a faster hold.
Recommended Materials:
- Standard 9-inch paper plates
- Black washable tempera paint
- Black pipe cleaners
- Googly eyes in assorted sizes
2. Yarn-Woven Web Spider

Want to build fine motor skills while crafting? This clever design combines a paper plate rim web with a sneaky spider sitting right in the center. Punch holes around the edge of the plate, then let your child thread white yarn across the opening. They will love watching the web take shape. CRITICAL STEP: Tape the end of the yarn to a plastic needle or wrap it with tape to make threading easier for tiny fingers!
Threading Instructions:
- Cut the center out of the paper plate.
- Punch 10 to 12 holes around the inner rim.
- Tie a piece of white yarn to one hole.
- Thread the yarn back and forth through the holes to create a web pattern.
- Glue a paper spider to the center of the web.
3. Glowing Neon Paper Plate Spider

Who says Halloween decorations must be dark and gloomy? Turn off the lights and watch these neon spiders light up the room. Paint your paper plate with bright, glow-in-the-dark acrylic paint. Cut out neon green or hot pink legs from cardstock to complete the rave-ready look. IMO, these look amazing hanging from the bedroom ceiling under a blacklight!
4. Handprint Leg Spider

Preserve those tiny handprints forever with this sentimental keepsake craft. Instead of using pipe cleaners, use your child’s painted handprints as the spider’s legs. You will press four painted handprints on each side of the plate. It gets a little messy, but the adorable results are absolutely worth the extra soap and water. Parenting win: You now have a snapshot of their hand size this Halloween!
5. Glittery Glam Spider

Are you ready to embrace the glitter? This craft trades spooky vibes for pure, sparkling glamour. Cover your paper plate in metallic purple or orange glitter glue, then attach matching tinsel pipe cleaners for legs. Yes, you will find glitter on your floor until Thanksgiving. But your kids will talk about this shimmering spider for weeks!
6. Accordion-Legged Spider

Give your spiders some bounce with fun accordion-folded paper legs. Cut long strips of black and orange construction paper, then fold them back and forth. Glue these springy legs to the bottom of your painted plate. When the wind blows, these legs bounce up and down, giving the illusion of a walking spider. Kids love bouncing them around the living room!
7. Hanging Spiral Plate Spider

Do you want a decoration that spins in the breeze? Cut your paper plate in a spiral shape, starting from the outer edge and stopping at the center. Paint the plate black, add a spider face to the center coil, and attach dangling paper legs along the spiral. Hang it by a string from the ceiling. Watch it twist, stretch, and spin every time someone walks past!
8. Paper Plate Spider Basket

Combine crafting with utility by creating a DIY candy basket. Staple two paper plates together face-to-face, leaving the top third open for candy grabbing. Paint the plates, add eyes, and staple thick cardboard legs to the sides. Hook a pipe cleaner handle over the top. Now your little one has a lightweight, custom candy holder for trick-or-treating. FYI: It holds a surprising amount of chocolate!
9. Peek-a-Boo Spider Mask

Why just build a spider when you can become one? Cut two eye holes out of the center of a paper plate, then decorate it with paint, sequins, and fangs. Attach a wooden craft stick to the bottom so your child can hold it up to their face. This budget-friendly mask sparks instant imaginative play. Will they scare you? Absolutely.
10. Pom-Pom Textured Spider
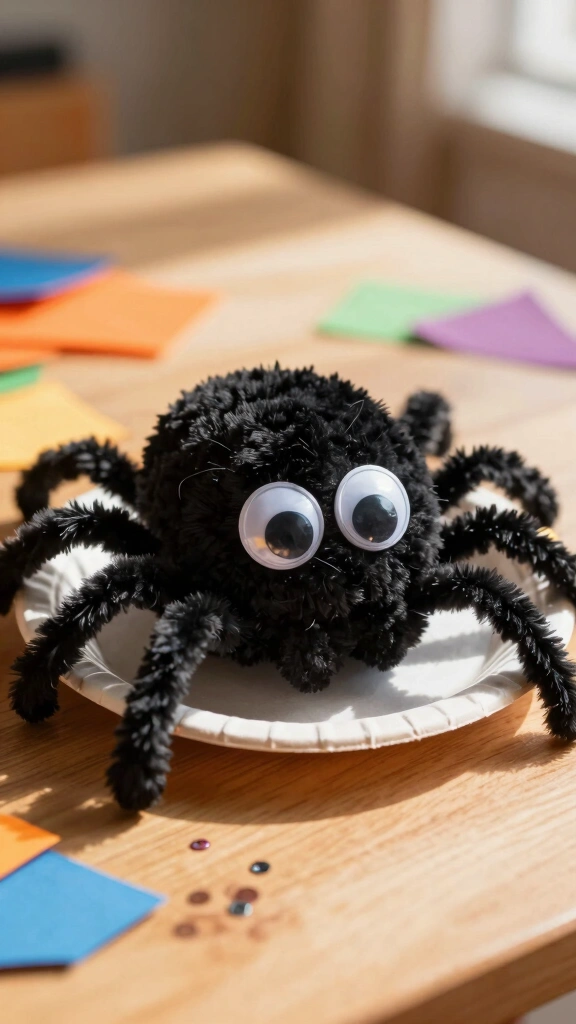
Sensory crafts provide great tactile development for younger toddlers. Coat your paper plate in school glue, then cover the entire surface with fluffy black pom-poms. The result is a soft, touchable spider that looks surprisingly realistic. Use giant googly eyes to peek through the fluff. TBH, this is the least scary spider you will ever see!
11. Recycled Bottle Cap Spider

Save your plastic bottle caps for this eco-friendly craft. Glue a collection of colorful bottle caps onto the paper plate to create a unique, mosaic-style spider body. This project teaches kids about recycling while letting them explore color patterns. Tip: Use a strong craft glue to secure the plastic to the plate, and pair them with recycled cardboard legs.
12. Metallic Foil Spider

Give your Halloween decorations a modern, metallic edge. Wrap a standard paper plate in kitchen aluminum foil, smoothing it down over the edges. Use permanent markers or acrylic paint to draw spooky features, and attach shiny silver pipe cleaners. The foil reflects your porch lights beautifully, making it an eye-catching outdoor decoration.
13. Moving Bobble-Head Spider

Add some action to your crafting session with a bobble-head mechanism. Cut a small paper spring from cardstock, then attach a smaller paper plate (or cup) as the head onto the main plate body. When you tap the table, the spider’s head wiggles and shakes. This interactive element keeps kids entertained long after the paint dries. It brings their spooky creation to life!
14. Pipe Cleaner and Bead Spider

Combine jewelry making with spooky crafting. Before attaching the pipe cleaner legs to your paper plate, let your kids thread orange, purple, and green plastic pony beads onto them. This step keeps kids focused and quiet for surprisingly long stretches. Once threaded, bend the pipe cleaners to secure the beads and glue them to the plate. The beaded legs add a wonderful texture and weight to the craft.
Why Beading is Great for Kids:
- Improves bilateral coordination.
- Strengthens finger muscles.
- Teaches color pattern recognition.
Wrapping Up Your Spooky Crafting Session
There you have it! With just a few cheap paper plates and some basic craft supplies, you can create a whole colony of spooky spiders. These crafts do not require a master’s degree in fine arts. They just require a little time, a bit of imagination, and a willingness to get your hands dirty. Which of these spider crafts will you build first?
Do not forget to hang these creations around the house. They look fantastic on front doors, taped to windows, or dangling from light fixtures. Enjoy the crafting process, cherish the giggles, and have a safe, happy, and spooky Halloween!