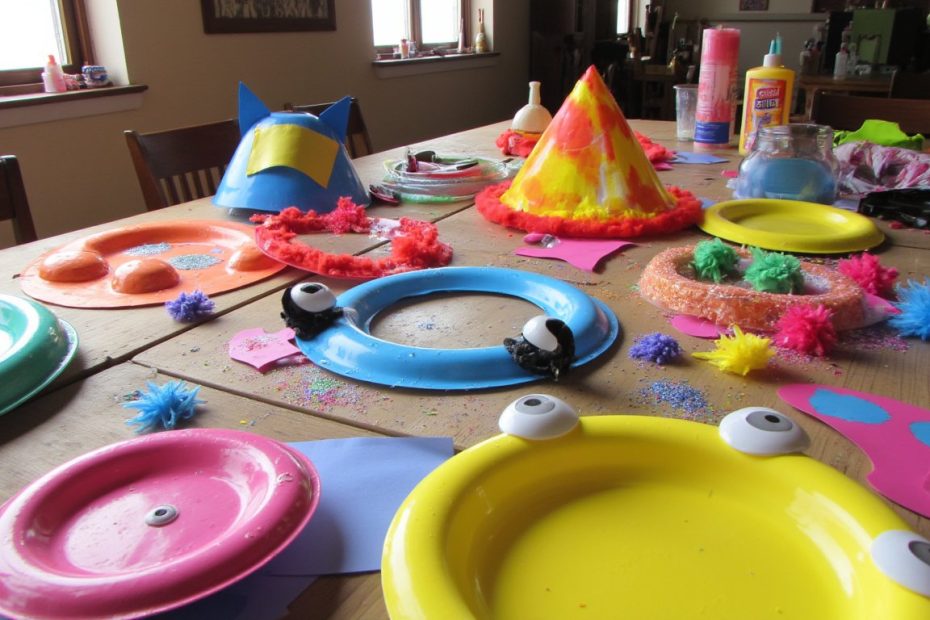
Let’s be real for a second. You have a pack of paper plates in the pantry, a kid (or three) buzzing with energy, and a desperate need for a simple, affordable activity. Sound familiar? You’re in the right place. Forget complex setups and expensive kits. With a little imagination, those humble paper plates can become a menagerie of animals, a gallery of masterpieces, and a portal to hours of creative play. This list is your ultimate cheat sheet for turning a boring afternoon into a crafting adventure. Ready to raid the craft drawer? Let’s go.
1. The Classic Paper Plate Lion

We’re starting with a roar! This craft is a perfect first project. Let your kids paint the center of the plate a sunny yellow. Now, the magic: cut slits all around the rim. Your little ones can practice their scissor skills here! Grab some yellow and orange yarn or strips of construction paper, and show them how to weave or glue it into the slits to create that iconic, fluffy mane. Googly eyes and a drawn-on nose and mouth complete this king of the jungle.
2. Whirling Rainbow Twirlers

Part craft, part toy, all awesome. Cut the paper plate into a spiral, starting from the outside edge and winding your way to the center. Now, hand over the paint, markers, or crayons and let your kids go wild decorating both sides. Attach a piece of string to the center, find a breezy spot, and watch their colorful creations dance and twirl. It’s a fantastic lesson in color, wind, and motion—and it buys you at least 20 minutes of quiet observation.
3. “Stained Glass” Window Hangings

Create beautiful, light-catching art without any glass! Cut a simple shape out of the center of the plate, leaving a sturdy rim. Stretch pieces of colorful tissue paper or cellophane over the hole and tape or glue them down on the back. Hang it in a sunny window and watch the light shine through. Try making butterflies, hearts, or geometric suncatchers. The effect is stunningly pretty.
4. Porthole to the Deep Sea

What’s lurking in the deep blue? Let your child decide! Paint the entire plate a rich ocean blue. Once it’s dry, cut out a circle from the center to create the porthole window. On a separate piece of paper, have them draw and color sea creatures—a smiling octopus, a grumpy shark, a school of fish. Glue that scene behind the porthole. Add some crinkled blue cellophane over the hole for a watery effect and tape on some “seaweed” made from green construction paper.
5. Jumbo Fruit Slices

Teach colors and healthy eating with a craft that’s almost good enough to eat. Fold a paper plate in half and cut it down the center line—now you have two perfect half-circles for fruit slices! Paint one half red for watermelon (add black seeds!), orange for an orange segment, or green for a lime. You can even use cotton balls painted pink for a grapefruit. Arrange them on a wall for a cheerful, summery decoration.
6. The Easy-Peasy Paper Plate UFO

Engage their interstellar curiosity. Turn one paper plate upside down—that’s your saucer. Glue a small bowl or half of a second, smaller plate on top for the cockpit. Let them decorate with foil, metallic markers, or glow-in-the-dark paint. Punch a hole in the top, thread some fishing line, and hang it from the ceiling. Add a little green alien peeking out the window for maximum cuteness.
7. Woven Paper Plate Dream Catchers

A fantastic fine motor skills activity with a beautiful result. Cut out the center of the plate, leaving a thick ring. Punch holes evenly around the inside of the ring. Give your child some yarn and a blunt needle (or just let them use their fingers) to weave a web across the circle. Decorate the bottom with beads and feathers. Hang it over their bed to catch all the good dreams (and keep them crafting).
8. Gigantic, Wearable Flower Crowns

Transform your little one into a garden fairy or a woodland sprite. Cut the center out of a plate, leaving a generous ring that will fit on their head. Now, help them cut simple petal shapes from other plates, paint them in bright colors, and glue them all around the crown. Add leaves, glitter, or pipe cleaner centers. This is pure dress-up gold and makes for adorable photos.
9. The “Feed the Monster” Game

Combine crafting with a fun learning game. Decorate a paper plate to look like a silly, friendly monster. Cut a big hole for its mouth. Now, create “food” from construction paper—letters, numbers, shapes, or color cards. Call out an item (“Feed the monster the triangle!”) and your child gets to “feed” the correct piece through the mouth. It’s a hit for toddlers and preschoolers.
10. Simple Split-Pin Animal Puppets
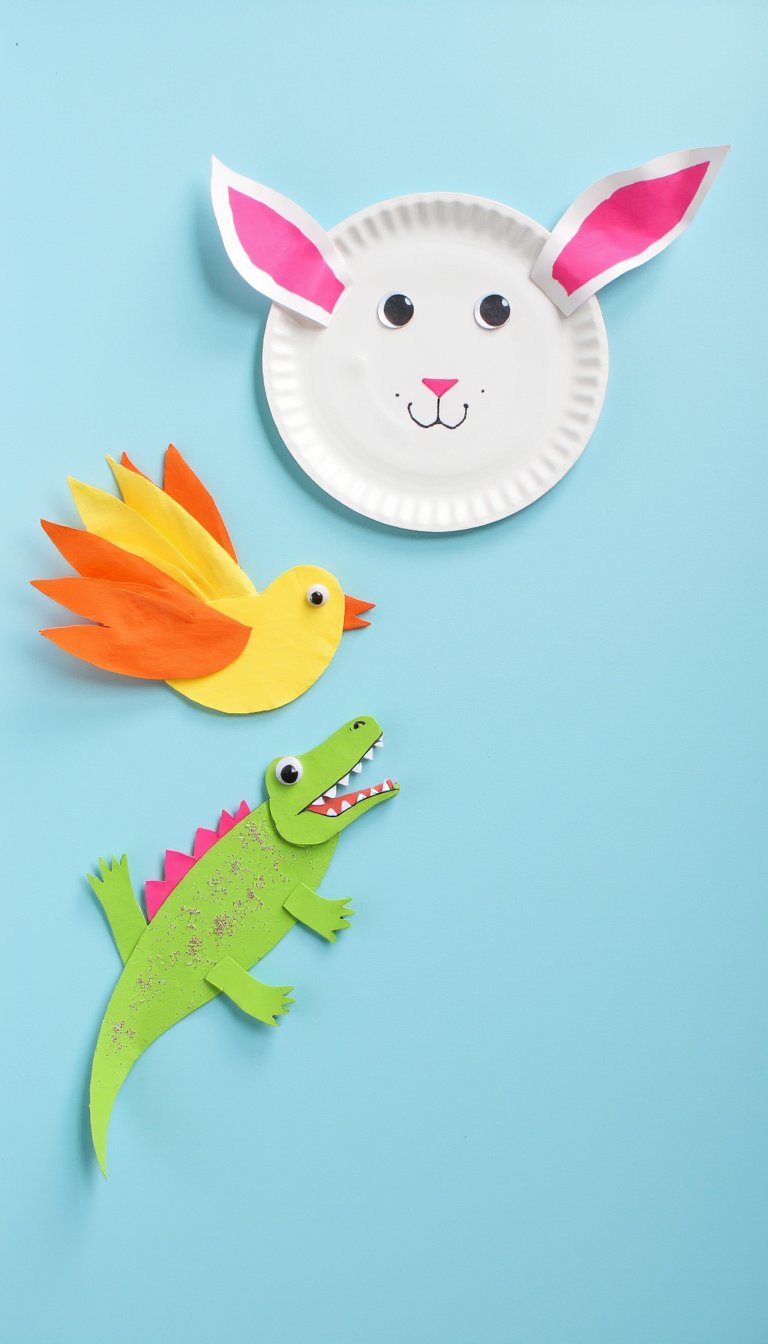
Add movement to the craft! Create an animal face on a full plate. Then, cut out separate pieces for moving parts—long ears for a rabbit, flapping wings for a bird, snapping jaws for an alligator. Attach these movable parts to the main plate using split pins (brads). Your child can now put on a puppet show, making the animal talk and move. The engineering is simple, but the play value is huge.
11. Paper Plate Marble Maze

STEM in a plate! Let your child design a maze on the back of a plate using markers. Then, glue down strips of cardboard, pool noodles cut in half, or even just rolled-up tape to create the walls of the maze. Tilt the plate to guide a marble from the start to the finish. They can test, redesign, and problem-solve—all while having a blast.
12. Coiled Paper Plate Snakes

No, they’re not scary—they’re adorable. Cut the plate in a spiral from the outside in, just like the twirler, but stop before you reach the very center, leaving a round “head.” Decorate the snake with patterns, stripes, or spots. Glue on a forked tongue made from red paper and add googly eyes. They can hang their colorful serpent from a door handle or wear it as a bracelet.
13. Textured Paper Plate Apples

Great for fall or a letter “A” theme. Paint the plate red, green, or yellow. For a super fun sensory element, glue on pieces of crumpled tissue paper, real dried beans, or even rolled balls of crepe paper to give the apple a cool, bumpy texture. Add a brown stem and a green leaf. So simple, but so effective.
14. Balancing Act Sea Turtles

Turn a plate into a majestic sea turtle. Paint the underside (the “bowl” part) green or blue. Cut out four flippers and a head from the rim of another plate or from construction paper, and glue them in place. The best part? Glue a small rock or a few coins to the very center of the plate’s underside. Now, your turtle has a weighted base and can rock gently without tipping over!
15. Dazzling Mosaic Art Plates

Got a pile of old magazines, torn construction paper, or even broken pasta? It’s mosaic time! Draw a simple outline on a plate—a heart, a star, a fish. Then, let your child tear or cut small pieces of colored paper and glue them down inside the shape, leaving small gaps between each piece. The final result is a beautiful, textured masterpiece.
16. The Ultimate Paper Plate Guitar

Rock on! Decorate a paper plate with markers or stickers. Stretch 4-6 rubber bands lengthwise around the plate; they should be tight enough to “twang.” Glue an empty paper towel roll to the back as the neck. Instant rockstar credentials. Warning: this craft may lead to impromptu concerts.
17. Polar Bear in a Snowstorm

A gorgeous winter craft. Paint the back of the plate a light blue for the sky. Tear and glue cotton balls all around the rim and along the bottom for snowy hills. For the bear, glue a small white bowl (or a ball of cotton) onto the scene for the body, and add a smaller cotton ball head. Draw on simple black eyes and a nose. Sprinkle the whole scene with iridescent glitter for falling snow.
18. Learn the Clock
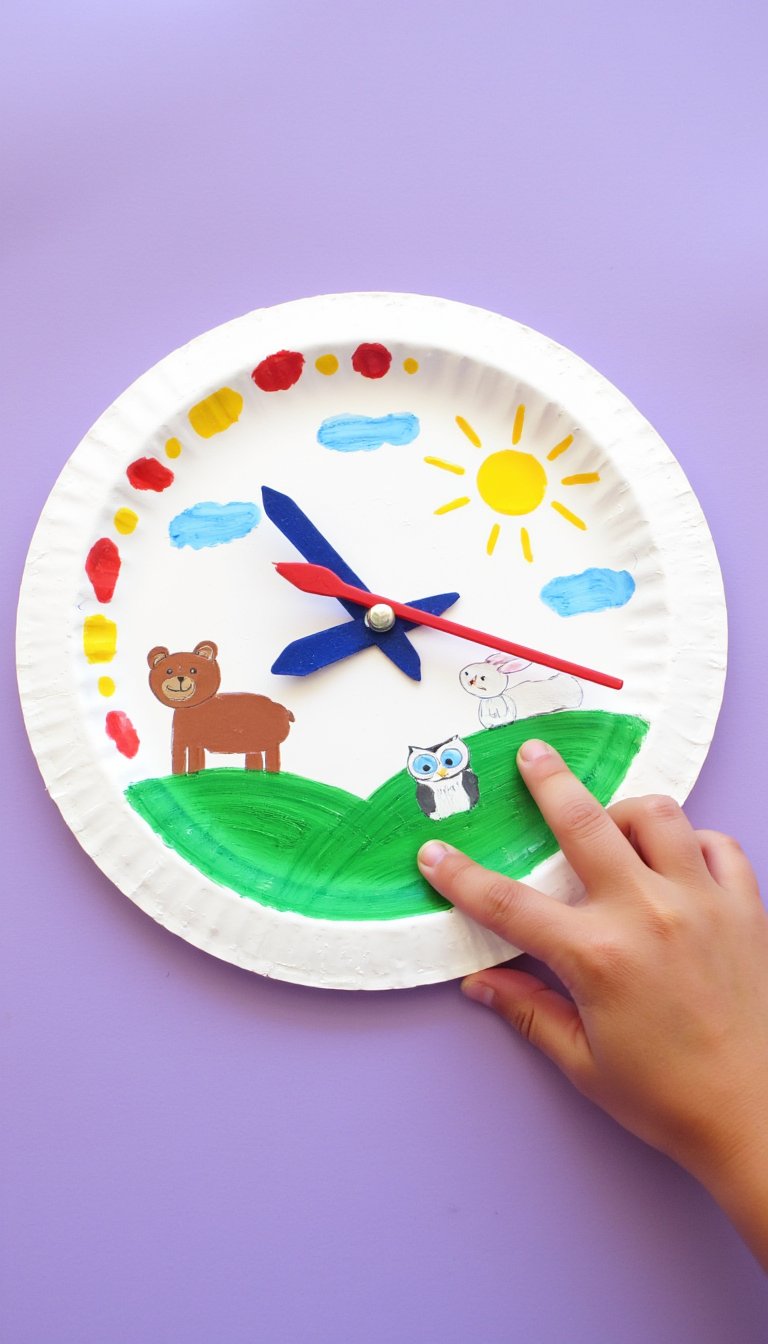
Make learning to tell time hands-on (pun intended). Write the numbers 1-12 around the rim of the plate. Poke a hole in the very center. Create two clock hands from stiff cardboard—one short (hour) and one long (minute). Attach them to the center with a split pin. You can move the hands to teach time, or let your child quiz you! Decorate the clock face with their favorite themes.
19. Paper Plate Tambourine
Take two plates and decorate the insides. Place a handful of dried beans, rice, or bells between them. Staple or glue the rims tightly together, leaving no gaps. Now, shake, rattle, and roll! You can also tie ribbons around the edges for extra flair. Congratulations, you’ve just formed a family band.
20. Flying Paper Plate Frisbees

Decorate two plates with bold, bright designs. Staple them together, rim to rim, for durability and better aerodynamics. Head outside and let them fly! They’re lighter and safer than real frisbees, perfect for indoor hallways on rainy days too.
21. “I Am Thankful” Thankful Turkey

A Thanksgiving classic with a purpose. The plate is the turkey’s body. Cut out feather shapes from colorful construction paper. On each feather, help your child write or draw something they are thankful for. Attach the feathers in a fan behind the plate. Add a face, feet, and a snood. It’s a meaningful decoration that focuses on gratitude.
22. Glow-in-the-Dlack Solar System

Paint a plate black or dark blue. Using glow-in-the-dark paint, let your child dot on planets and stars. You can use different-sized circular sponges for the planets. Hang it in their room, let it “charge” in the light, and then turn off the lights for a bedtime planetarium show. A quiet, educational wind-down activity.
23. The Hungry Caterpillar Segment

A perfect companion to the beloved book. Take three or four plates and line them up, slightly overlapping. Paint each one a different bright color, just like the caterpillar. Connect them with staples or brads so they wiggle. Add a face to the first plate and pipe cleaner antennae. It’s a colorful, long friend that can coil around their door!
24. Paper Plate Pinwheels

Cut four slits from the outer rim of the plate towards the center, stopping a few inches short. Decorate both sides. Now, gently pull every other corner towards the center and staple them together over the middle. Attach it to a straw or stick with a push pin (adult job!). Blow on it or run to make it spin.
25. Underwater Jellyfish

Turn the plate upside down to be the jellyfish’s bell. Paint it in swirly, watery colors. Cut long strands of crepe paper, ribbon, or yarn and glue them to the inside rim so they dangle down like tentacles. Add a silly smile and googly eyes to the “bell.” Hang them from the ceiling for an under-the-sea ceiling mobile.
26. Simple Shape Sorter

Take a couple of plates and cut different shapes out of the centers—a triangle, a square, a circle. Decorate the plates. Now, give your toddler the cut-out shapes (or blocks from a toy set) and let them match the shape to the correct hole. It’s a homemade educational toy in minutes.
27. Paper Plate Masks
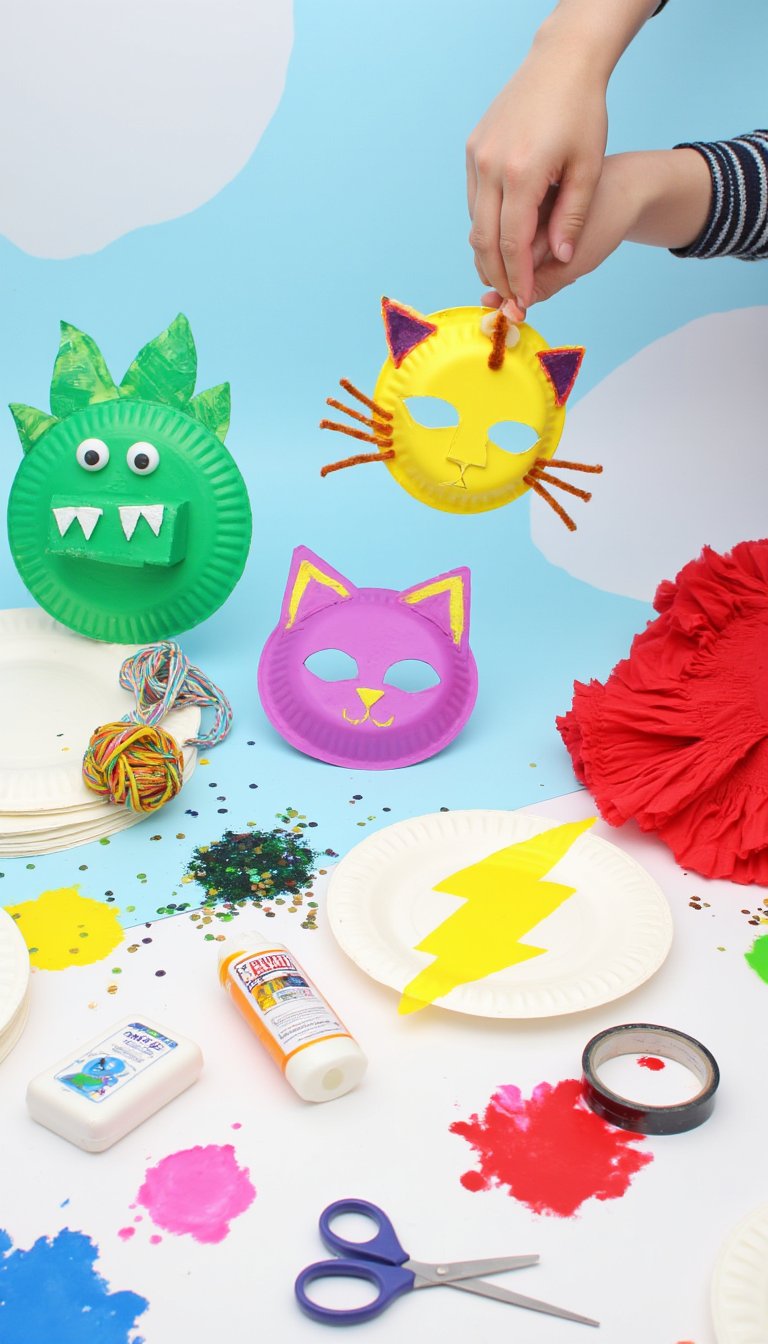
The possibilities are endless. Cut eye holes in a plate. Will it be a cat? A dinosaur? A superhero? Add ears, horns, scales, or a cape made from other plates or paper. Attach a popsicle stick to the bottom as a handle, or punch holes on the sides and tie on elastic. Instant transformation and imaginative play.
28. Counting and Stacking Rainbows

Cut several plates in half. Paint each half-arch a different color of the rainbow. Write a number on each one. Now, your child can stack them in numerical order to build a rainbow, or use them as counters with pom-poms or buttons. It’s colorful math.
29. The Collaborative Paper Plate Town

This is the grand finale. Use multiple plates to build an entire town. Stand plates up by making a simple fold at the bottom for a base. Decorate them as houses, a school, a fire station, a library. Add paper details like doors and windows. Use green plates for parks. Set them up on the floor with toy cars. This project can grow over days and involves planning, storytelling, and teamwork.
And there you have it—29 ways to turn a stack of paper plates into a childhood full of creative memories. The best part? None of these crafts require perfection. A wobbly lion has more character. A lopsided house has charm. The real magic isn’t in the final product, but in the focused time, the giggles, and the proud “I made this!” declaration. So the next time you hear “I’m bored,” you know exactly what to do. Grab those plates, embrace the mess, and let their imaginations run wild. What will you create first?