
October creeps closer every single day, bringing a crisp chill to the air and an undeniable urge to create something creepy. Retailers already shove generic, mass-produced plastic skeletons down our throats before the leaves even change color. Why waste money on cheap plastic decor when you possess the power to mold your own spooky masterpieces? Grab a fresh block of air-dry clay, roll up your sleeves, and prepare to get your hands gloriously dirty.
Air-dry clay remains the undisputed champion of accessible crafting because it requires absolutely zero baking, making it safe and fun for toddlers, teens, and seasoned artisans alike. You simply shape your vision, walk away for a day or two, and return to a solid canvas ready for vibrant acrylic paints. We compiled the ultimate list of 19 Spooktacular Halloween Air Dry Clay Ideas that guarantee a terrifyingly good time for everyone at your kitchen table. Do you have your sculpting tools ready?
1. Adorable Miniature Ghost Figurines
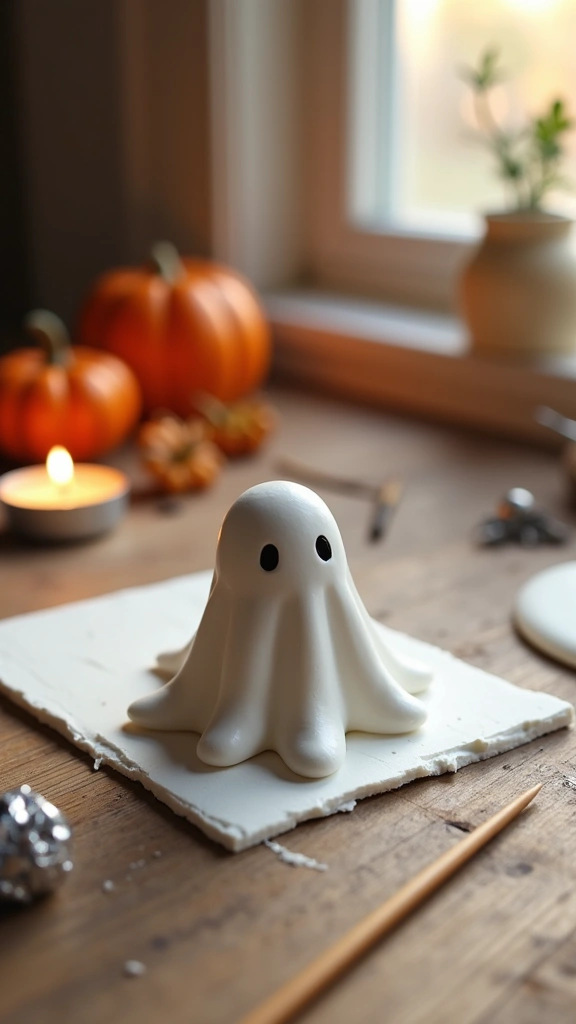
Start your spooky crafting journey with the easiest, most rewarding project on our list. Roll a small ball of aluminum foil to act as your base armature, saving you precious clay and speeding up the drying process. Drape a thin, circular sheet of air-dry clay over the foil ball to form a flowing, spectral body.
Perfecting the Details
Poke two tiny holes for eyes using a toothpick or a metal dotting tool. Gently fray the bottom edges with your fingers to create a tattered, floating effect that looks downright amazing on any fireplace mantle. Once the clay cures completely dry, brush your ghost with a matte white acrylic paint to give it a bone-chilling finish.
2. Rustic Pumpkin Trinket Dishes

Do you need a dedicated spot to drop your keys after a long night of haunting your neighborhood? Shape a handful of clay into a shallow bowl and sculpt the outer rim to mimic a pumpkin’s iconic ribbed texture. Add a tiny, twisting green stem near the top edge for that authentic autumn gourd look.
Sealing for Durability
Paint the dish a vibrant orange and add deep brown shading in the crevices to make the texture pop. Finish the project with a glossy, waterproof sealant to keep your Halloween trinket dish looking incredibly fresh year after year.
3. Creepy Crawly Spider Rings

Kids absolutely lose their minds over wearable, interactive crafts during the Halloween season. Roll a small oval for the spider body and carefully attach eight tiny clay noodles to the sides for legs. Press a blank metal ring base directly into the underside while the clay remains wet and pliable.
Adding the Creep Factor
Wait a full 24 hours for the arachnid to harden before applying your paint. Coat the spider in pitch black acrylic and dab two tiny, menacing red dots for eyes to maximize the undeniable creep factor!
4. Witch Hat Place Card Holders

Are you hosting a spooky dinner party or a gothic feast this October? Form small cones and press them onto flat clay circles to build miniature, crooked witch hats. Slice a thin, clean slit right across the top of the cone before the clay begins to set.
Setting the Table
Paint the hats midnight black and add a tiny silver buckle detail around the brim. Slide a piece of heavy cardstock featuring your guest’s name right into the top slit for a truly spellbinding table setting.
5. Glow-in-the-Dark Eyeball Pendants

Who doesn’t want a severed, glowing eyeball dangling from their neck on All Hallows’ Eve? Roll a perfect sphere and press a shallow indentation into the front to serve as the iris. Thread a metal eye-pin through the top while wet so you can easily hang it from a velvet choker later.
Painting the Iris
Paint the main sphere with glow-in-the-dark acrylics to ensure you stand out in the dark. Detail the iris with vibrant blues or greens, and use a microscopic brush to drag bloodshot red lines from the back of the eye toward the center.
6. Spooky Tombstone Plant Markers

Your beautiful autumn mums and gothic houseplants deserve a little Halloween flair too. Flatten thick rectangular slabs of clay and round off the top edges to mimic ancient, crumbling gravestones. Carve funny epitaphs or specific plant names directly into the wet clay using a sharp needle tool.
Weatherproofing Your Markers
Brush on varying shades of gray and dab a wet sponge over the surface to create a weathered stone texture. Seal these heavily with an outdoor waterproof varnish if you plan to stick them in damp potting soil.
7. Delicate Bat Wing Earrings
Want to wear your Halloween spirit to the office without violating a strict corporate dress code? Roll your clay paper-thin and use a craft knife to slice out tiny, scalloped bat wings. Poke a microscopic hole at the top peak of each wing to accommodate your metal jump rings.
Assembly and Wear
Paint them a sleek, glossy black or add a layer of iridescent purple glitter for a magical touch. Attach your sterling silver earring hooks for a subtle, gothic accessory that transitions perfectly from day to night.
8. Ghoulish Zombie Finger Bookmarks

Avid readers desperately need spooky accessories to match their thriller novels, IMO. Shape a long, flat cylinder and press horizontal wrinkles into the knuckles to create a highly realistic finger joint. Form a jagged, overgrown fingernail at the tip and flatten the entire back side completely.
Bringing the Undead to Life
Paint the whole finger a sickly, rotting green and add dark brown washes to the knuckles for depth. Slide this flat, undead digit between the pages of Stephen King’s latest novel to terrify your local book club.
9. Classic Candy Corn Keychains

You either love eating candy corn or you despise it with a fiery, burning passion. Luckily, absolutely everyone loves looking at its iconic color palette! Sculpt small, plump triangles and smooth the harsh edges so they look sweet and appetizing.
Painting the Stripes
Wait for the clay to dry completely before tackling the distinct color blocks. Paint the classic white tip, orange center, and yellow base, then attach a sturdy metal keychain ring to the top to carry the autumn vibes everywhere.
10. Haunted House Tealight Holders

Ready to tackle a slightly bigger architectural challenge? Roll out flat, even slabs of clay and cut out four jagged walls alongside two sloping roof panels. Carve crooked windows and a creepy, splintered front door before assembling the pieces using a thick clay paste.
Lighting Your Masterpiece
Paint the house in eerie grays and blacks, adding miniature clay vines crawling up the sides. Place an LED tealight inside to watch the windows flicker with ghostly life. Never use real candles inside air-dry clay, FYI—the extreme heat will ruin your hard work and pose a major fire hazard.
11. Black Cat Incense Burners

Nothing sets a moody, mystical October atmosphere quite like swirling incense smoke. Sculpt a sleek sitting black cat and carve out a small, shallow bowl shape exactly between its front paws to catch the falling ash. Poke a tiny, precise hole in the center of the bowl exactly the width of your favorite incense stick.
Setting the Mood
Paint the feline a deep, matte black and give it piercing, neon yellow eyes. Light up some earthy patchouli or dragon’s blood incense and watch the fragrant smoke curl beautifully around your new familiar.
12. Frankenstein Monster Magnets
Give your boring stainless steel refrigerator a monstrous, electrifying makeover. Shape a chunky, flat square for Frankie’s blocky head and attach two tiny cylinders to the lower sides for his iconic neck bolts. Use a fine sculpting tool to draw a jagged, stitched scar across his wide forehead.
Securing the Hardware
Paint his skin a vivid monster green and use stark black for his flat-top haircut. Superglue a heavy-duty neodymium magnet to the flat back once the clay completely cures to hold up all your heavy grocery lists.
13. Skeleton Bone Hair Clips

Do you need a quick, last-minute costume hack for a lazy Halloween party? Roll out small white logs of clay and shape the ends into typical, cartoonish dog-bone joints. Keep the back of the bone completely flat so it sits flush against a standard metal alligator hair clip.
Styling the Bones
Give the bones a quick wash of watered-down brown paint to make them look old and unearthed. Glue the dried bone securely to the metal clip and snap it right into a messy bun or a sleek ponytail!
14. Vampire Fangs Napkin Rings

Elevate your sophisticated gothic dinner party with this insanely simple, yet highly effective table hack. Roll a thick strip of clay into a sturdy circle large enough to comfortably hold a rolled cloth napkin. Sculpt two sharp triangles pointing downward from the top edge to mimic Dracula’s infamous bite.
Adding the Gore
Paint the main ring a bright, pearlescent white to resemble clean enamel. Carefully dab the sharp tips of the fangs with a glossy crimson red to look exactly like fresh, dripping blood.
15. Mummy Wrap Mason Jars

Stop throwing away your empty glass jars and upcycle them into glowing Egyptian horrors. Roll out extremely thin, long strips of air-dry clay and wrap them haphazardly around the glass exterior of a clean mason jar. Leave a small, deliberate gap near the top edge to glue on two frantic googly eyes.
Creating the Glow
Paint the clay strips a dirty, ancient beige to resemble aged linen bandages. Drop a bright orange or neon green LED fairy light strand inside the jar to watch your mummy glow fiercely from within!
16. Bubbling Cauldron Paperweights

Stop the brisk autumn breeze from blowing away your important office documents. Form a solid, heavy sphere of clay and flatten the absolute bottom so it sits perfectly still on your desk. Pinch the top edge outward to create the thick, curved rim of a classic witch’s cauldron.
Brewing the Potion
Roll dozens of tiny, varying-sized clay balls and stack them densely inside the rim to look like a bubbling, toxic brew. Paint the cauldron cast-iron black and color the bubbles a noxious, glowing fluorescent green.
17. Poison Apple Ornaments

Halloween trees definitely exist, and they desperately need your handmade, wicked ornaments! Sculpt a standard, plump apple shape and press a tiny twisted brown stem into the top indentation. Carve out a creepy, dripping skull face on one side, just like the Evil Queen’s infamous creation.
Painting the Poison
Paint the smooth skin of the apple a vibrant, tempting candy-apple red. Fill the deeply carved skull face with a toxic, glowing green acrylic to warn your guests of the danger lurking inside.
18. Jack-o’-Lantern Coasters

Protect your expensive coffee table from damaging hot apple cider rings this fall. Roll out a large slab of clay about a quarter-inch thick and use a round metal cookie cutter to stamp out perfect, uniform circles. Carve a uniquely terrifying or goofy jack-o’-lantern expression right into each coaster for a varied set.
Essential Waterproofing
Paint them bright orange and fill the carved faces with solid black. You absolutely must seal these heavily with a thick waterproof resin or polyurethane so sweaty glasses don’t turn your beautiful clay back to mush.
19. Ghoulish Garland Charms
String together the ultimate, customizable Halloween banner to drape across your fireplace or staircase. Use standard Halloween-themed cookie cutters to easily stamp out bats, cats, ghosts, and crescent moons from a flattened clay sheet. Poke a generous hole at the top of every single shape before you set them aside to dry.
Stringing It Together
Get the whole family involved in painting the different shapes with wild, festive patterns and glitter. Thread them onto a rustic jute twine or a thick black ribbon and hang your collective masterpiece for everyone to admire.
Ready to Get Your Hands Dirty?
Crafting with air-dry clay offers an incredibly therapeutic, budget-friendly way to celebrate the spooky season without relying on big-box store decorations. The beauty of this forgiving medium lies in its absolute simplicity; if you mess up a shape, you just add a drop of water, smash it up, and start entirely over! Remember to practice patience during the curing process, as thick pieces take a full two days to dry completely.
Whether you choose to sculpt a tiny glowing eyeball pendant or engineer an entire haunted house luminary, you inject your personal, creative spirit directly into your holiday decor. Gather your favorite acrylic paints, clear off the kitchen table, and let your darkest, most creative imagination run totally wild. Happy haunting, and even happier crafting!