
Okay, let’s be real. You need an activity. Something that doesn’t involve a screen, won’t create a glitter apocalypse you’ll find in July, and might actually hold their attention for more than seven minutes. Sound familiar? I’ve been there, knee-deep in craft supply chaos. That’s why I pulled together this ultimate list of flower crafts for kids. Whether you’ve got a toddler who loves to smoosh paint or a tween wanting a cool room decor project, there’s a blooming idea here for everyone. Let’s get those little hands busy and make something beautiful.
1. Coffee Filter Watercolor Blooms

This classic is a winner for a reason. It’s cheap, easy, and the results are always stunning. Give each kid a few flat coffee filters and some washable markers. Let them go wild coloring designs—dots, stripes, swirls.
Then comes the magic. Use a spray bottle to lightly mist the filters with water or let them carefully touch the colored filter to a shallow dish of water. Watch the colors bleed and blend into gorgeous, tie-dye-like petals. Once dry, pinch the center and secure with a pipe cleaner for an instant, vibrant bouquet. Pro tip: Do this over a baking sheet for easy clean-up!
2. Egg Carton Tulips

Upcycling at its most charming! Cut the individual cups from a cardboard egg carton. Let the kids paint them in whatever wild tulip colors they dream up—rainbow tulips? Absolutely.
Once dry, poke a small hole in the bottom of each cup. Thread a green pipe cleaner through for the stem, knotting or taping it inside to secure. Fluff and shape the egg carton petals, and you’ve got a cheerful, 3D flower craft that never wilts.
3. Nature Walk Collage Flowers
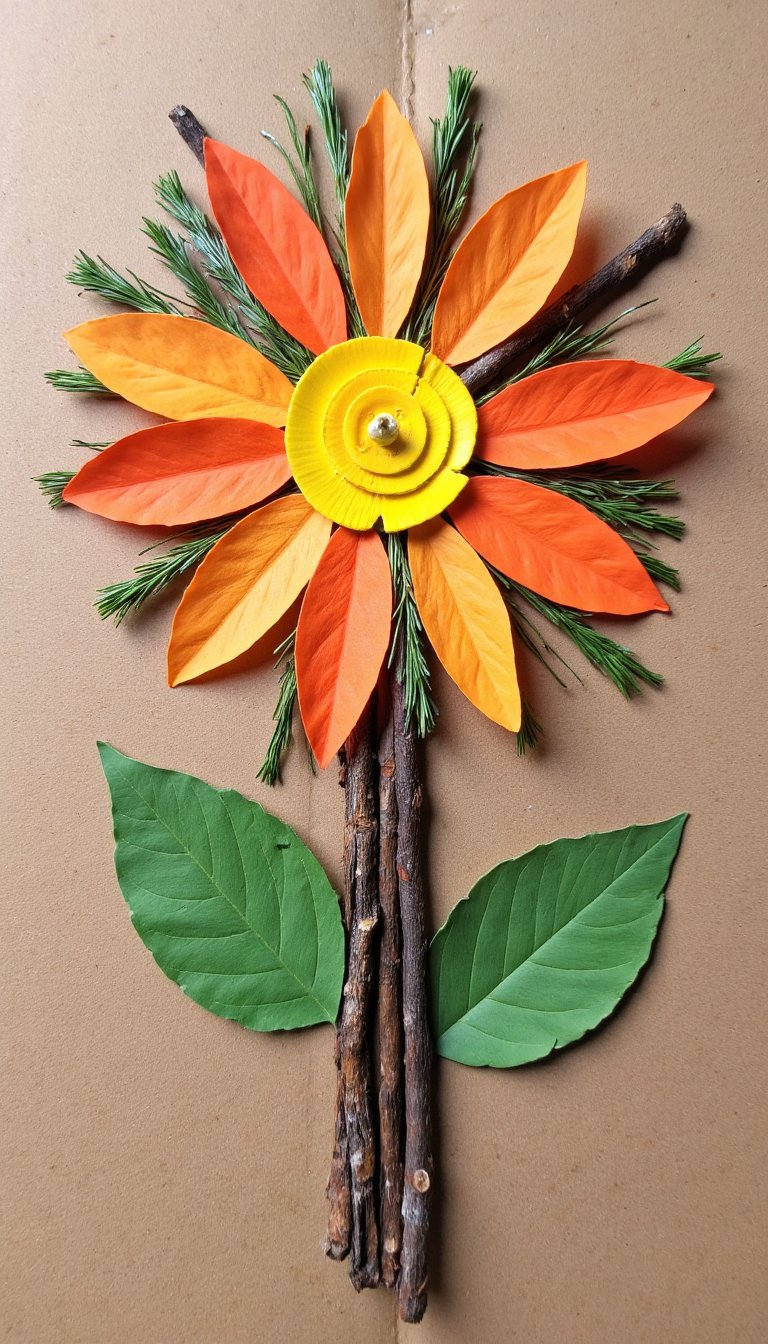
Combine fresh air and art with this one. First, go on a scavenger hunt in your yard or a park. Collect small leaves for petals, twigs for stems, blades of grass, and maybe some tiny pebbles or seeds for centers.
Back inside, use strong glue or Mod Podge to arrange your natural treasures into flower shapes on heavy paper or cardboard. This project connects kids to the textures and shapes of real plants, making it a perfect spring or summer activity.
4. Bubble Wrap Printed Garden

Who doesn’t love popping bubble wrap? First, let them get that urge out of the way (mostly). Cut small squares of bubble wrap and wrap them around the bottom of a small cup or jar, bubble-side out.
Dip the bubbly end into paint and stamp it onto paper to create perfect, textured flower heads. Add painted stems and leaves afterward. It’s a fantastic sensory activity for little ones and creates a really cool, repetitive print effect.
5. Paper Plate Sunflower

This is a fantastic group craft or a solo project with big, satisfying results. Paint a paper plate yellow (or glue on yellow tissue paper squares for a mosaic effect). Once dry, glue real sunflower seeds, dyed pasta, or brown pom poms to the center.
Cut and glue green paper leaves to the back. Want to make it really stand out? Attake a craft stick to the back as a stem and “plant” it in a decorated pot. It’s a bright, happy piece of art that demands to be displayed on the fridge.
6. Fingerprint Flower Bouquet
Minimal mess, maximum cuteness. Draw simple stems and leaves with marker or crayon on a piece of paper. Then, let kids dip their fingertips into washable paint and create clusters of prints along the stems to form flowers.
Use different colors for a mixed bouquet. After the paint dries, they can add tiny details with a marker—little dots in the centers, or lines on the leaves. This is one of those flower crafts for kids that becomes a cherished keepsake. Trust me, you’ll want to save it.
7. Pasta Petal Flowers

Raid the pantry for this textural craft. Use wagon wheel pasta for big blooms, bowties for petals, or rotini for interesting centers. Dye the pasta first by shaking it in a bag with a bit of vinegar and food coloring, or let kids paint the pieces directly.
Then, glue the pasta pieces onto construction paper to build unique, dimensional flowers. The different shapes encourage creative thinking—what kind of flower could a piece of macaroni be?
8. Cupcake Liner Poppies
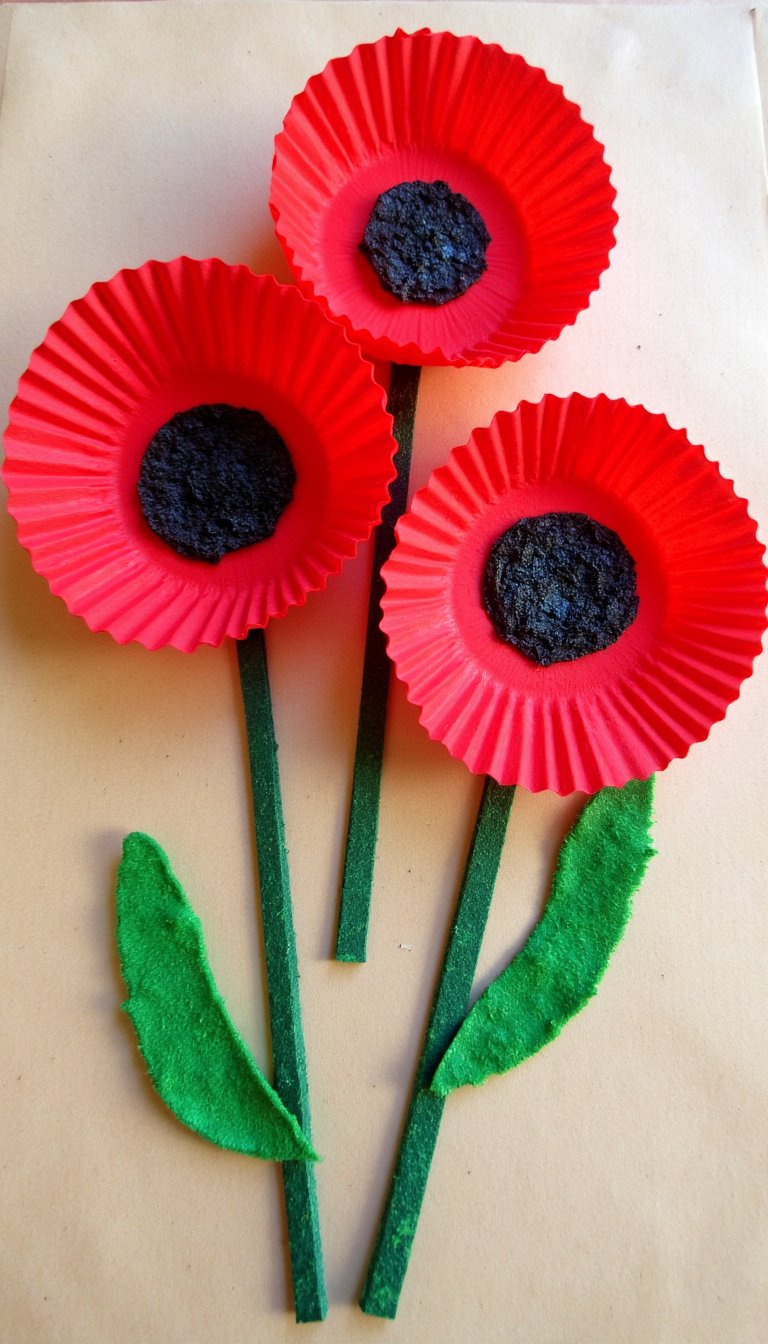
This is elegantly simple. Flatten a red or orange cupcake liner and glue it to paper. Layer a smaller black liner in the center. Use a black marker to add lots of tiny dots in the black center to give it that authentic, textured poppy look.
Paint or draw on a long, slender stem and fuzzy, jagged leaves. It’s a quick craft with a powerful result, perfect for talking about different flower varieties.
9. Lego Flower Stamp Art

If your kids are Lego fans, this will blow their minds. Use the flat, round Lego pieces (the ones with a single stud) as stamps. Dip the stud end into paint and stamp circles to form flower centers.
Then, use the side of a 2×4 or 2×2 brick, dip it in paint, and stamp around the center to create petals. It’s a genius way to merge building and painting, and it creates super cool geometric flowers.
10. Tissue Paper Bleeding Hearts

This craft has a beautiful, translucent effect. Draw a simple heart-shaped flower outline on white paper or cardstock. Tear small pieces of pink, red, and white tissue paper (the kind that bleeds color).
Brush the inside of your drawn heart lightly with water, then place the tissue paper pieces onto the wet area. The color will bleed onto the paper. Once dry, peel the tissue paper off to reveal a soft, watercolor-style flower. It feels like magic.
11. Pool Noodle Rose Stamps

Got an old pool noodle hanging around? Slice off a one-inch thick section. Now, starting from the outside edge, cut a continuous spiral into the piece, about an inch wide, until you reach the center hole.
Then, starting from the outside end, roll the spiral up tightly to form a rose shape. Secure the end with a rubber band or tape. Dip the flat bottom of this noodle stamp into paint and press onto paper for a perfect, textured rose print. So clever, right?
12. Button Bloom Wall Art

Dig out that mismatched button jar! Draw or paint simple flower stems on a small canvas or sturdy cardboard. Then, let kids arrange and glue buttons along the stems to create unique, tactile blossoms.
Mix and match sizes and colors for a whimsical, shabby-chic look. This is a great fine motor skill activity and the finished product looks professional enough to hang in their bedroom or give as a gift.
13. Celery Stamp Roses
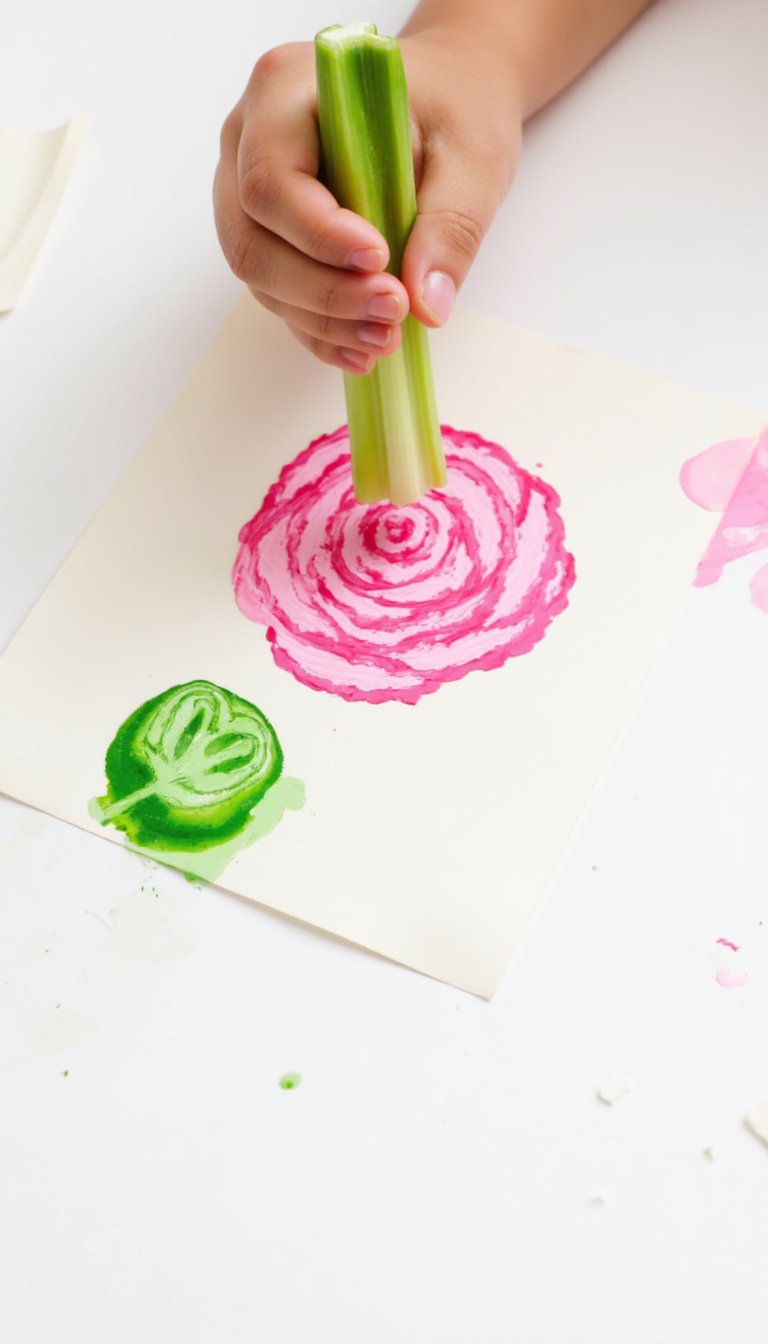
Your kitchen is a craft supply goldmine. Cut the bottom end off a bunch of celery—about two inches up. What you’re left with looks like a little rose already!
Dry it off, dip it in pink, red, or purple paint, and stamp away. The natural, layered pattern of the celery stalk creates a perfect rose shape. Add green paint for leaves using a brush or a green pepper stamp. Who knew veggies were so artistic?
14. Paper Straw Daffodils

Cut yellow paper straws into varying lengths (about 1-2 inches). Fan out about 5-6 pieces and glue them together at one end to form the trumpet of the daffodil. Glue this onto a yellow or white paper circle for the back petal base.
Attach the flower to a green pipe cleaner or straw stem, and add a long, thin paper leaf. These look incredibly cheerful and are a great way to learn about specific flower anatomy.
15. Pine Cone Roses

For a rustic, beautiful craft, collect small, tight pine cones. They already have a perfect rose-like shape. Kids can paint them in traditional rose colors or go wild with metallics and sparkles.
Once dry, hot glue (with adult help) or use strong craft glue to attach them to sturdy twigs for stems. Arrange a few in a vase for a stunning, permanent centerpiece. This is one of the most rewarding flower crafts for older kids who want a more mature result.
16. Q-Tip Pointillism Daisies
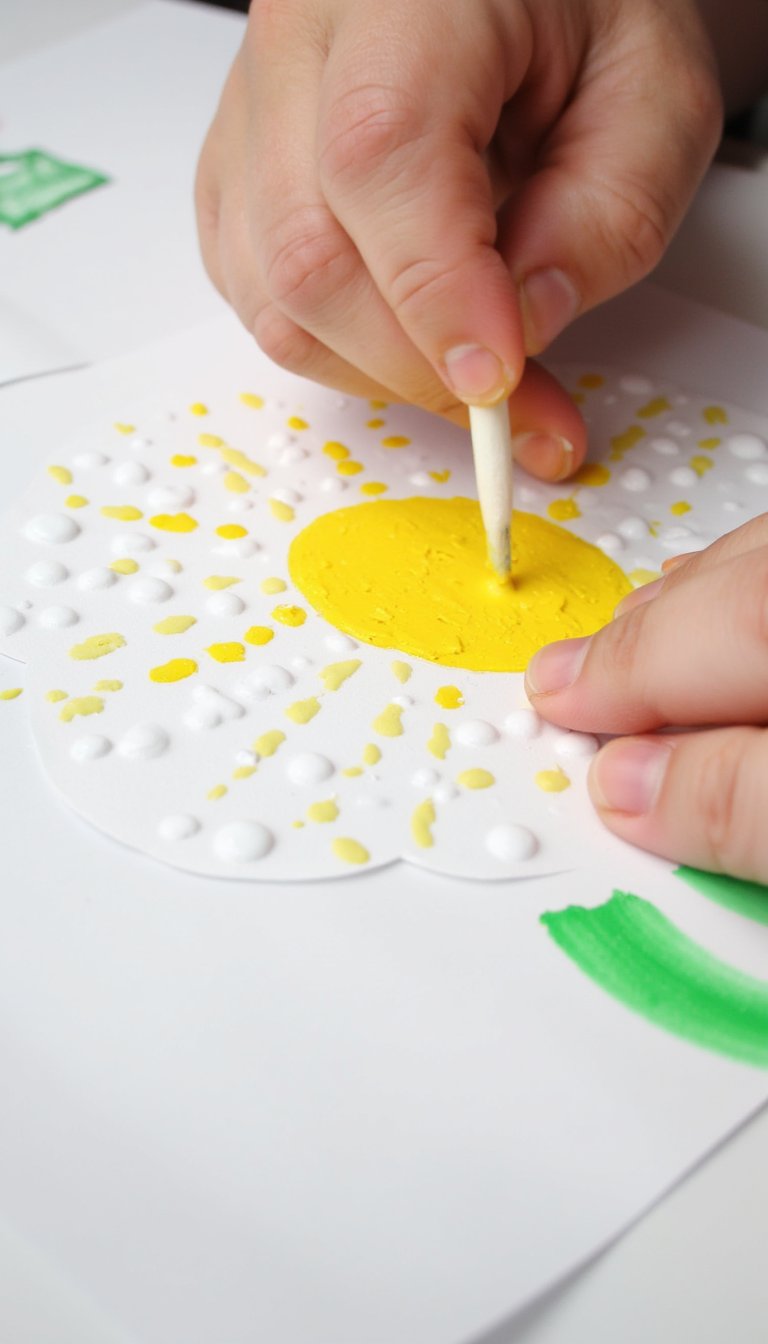
Introduce kids to a famous art technique! Draw a simple daisy outline. Instead of coloring it in, use q-tips as brushes. Dip a q-tip in paint and use small dots to fill in the petals and center.
It requires patience but the effect is gorgeous and textured. Use different colors for a field of flowers or stick to a classic white and yellow scheme. It’s a quiet, focused activity perfect for a rainy afternoon.
17. Toilet Roll Stamp Flowers
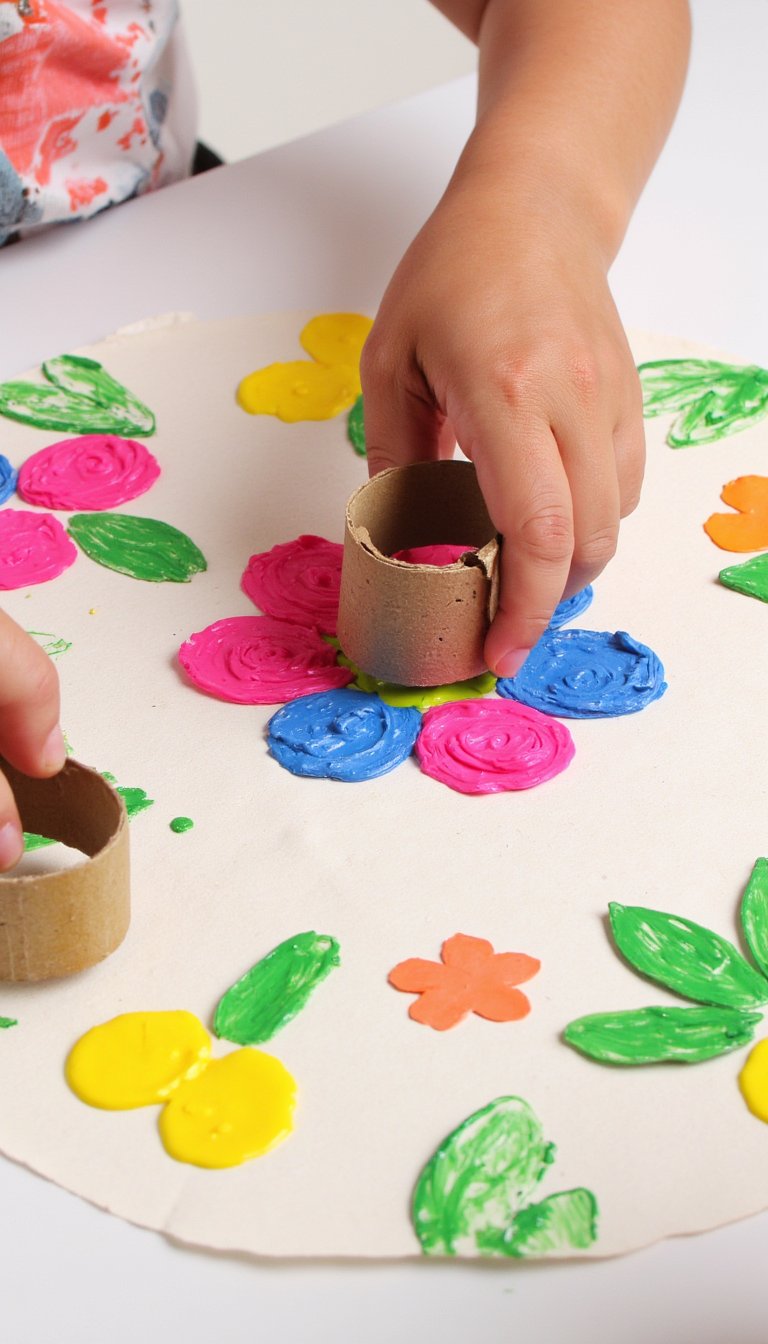
Don’t toss those cardboard tubes! Flatten one slightly and cut it into half-inch rings. Bend these rings into petal shapes—hearts, ovals, or teardrops.
Dip the flat edge into paint and stamp around a central point to build your flower. You can use different shaped rings on the same flower for variety. It’s amazing how versatile a simple cardboard tube can be.
18. Chalk Pastel Blossoms

For a soft, dreamy look, break out the chalk pastels. Let kids draw simple flower shapes on dark construction paper. The colors will really pop.
Then, show them how to use their fingertip to smudge and blend the colors outward from the center, creating a soft, glowing effect. A quick spritz of hairspray (away from the kids!) will seal the chalk so it doesn’t smudge later. Messy but magnificent.
19. Beaded Pipe Cleaner Posies

This is a fantastic travel or waiting-room craft. Give kids green pipe cleaners for stems and an assortment of colorful beads. They can thread beads onto smaller pipe cleaners, then twist them into loops or petal shapes and attach to the stem.
It builds fine motor skills and the results are cute, durable little flowers they can make into jewelry, keychains, or pencil toppers.
20. Leaf Print Hydrangeas

Find a small leaf with a nice vein pattern (like from a birch or rose bush). Paint the back (veiny side) of the leaf with purple, blue, or pink paint.
Press it onto paper, then lift. Repeat this process dozens of times, clustering the leaf prints tightly together to form the full, rounded shape of a hydrangea bloom. Add a simple stem at the bottom. The natural print is so detailed and beautiful.
21. Yarn-Wrapped Flowers

Cut simple flower shapes out of sturdy cardboard. Punch a hole near the bottom for the stem later. Then, let kids wrap colorful yarn around and around each petal, securing the ends with a dab of glue.
They can use different colors for each petal or do the whole flower in one. Once wrapped, thread a green pipe cleaner through the hole for a stem. The texture is so cozy and inviting.
22. Paper Bag Sunflowers
Take a small brown paper lunch bag and cut strips from the open end down to about two inches from the bottom. Twist the bottom to form the base.
Then, twist each individual strip to form a petal. Fluff it out! Paint the twisted center brown and the petals yellow. It creates a giant, dramatic sunflower that’s perfect for a play or as a photo backdrop.
23. Salt Dough Flower Magnets

Mix up a batch of salt dough (1 cup flour, 1/2 cup salt, 1/2 cup water). Roll it out and use cookie cutters or a knife to cut out flower shapes. Bake at a low temp until hard.
Once cool, let the kids paint their flowers in vibrant colors. Glue a small magnet to the back. Now you have a functional, adorable craft that brightens up the fridge. These make wonderful gifts for grandparents, too.
24. Fork-Tulip Painting
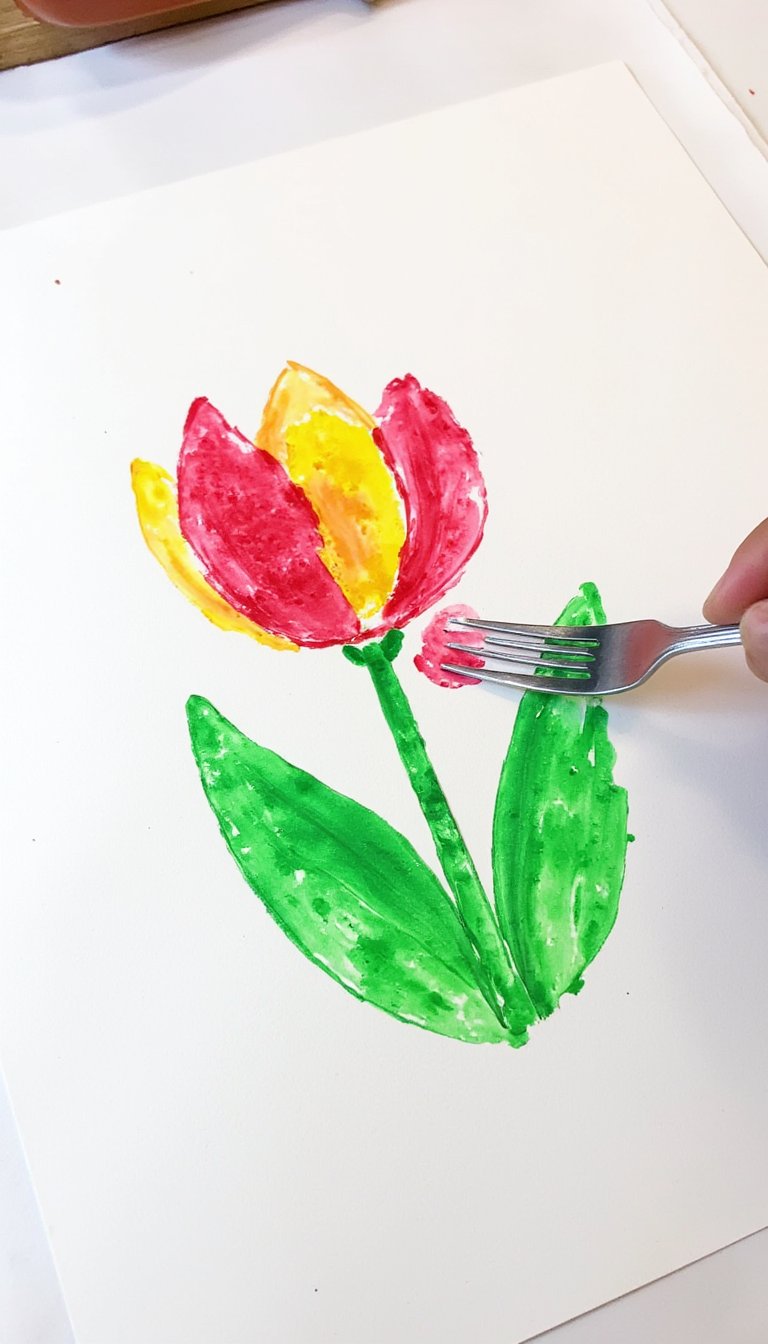
Yes, you read that right. Dip the pronged end of a plastic fork into paint. Press it onto paper at an angle, with the handle pointing down as the stem. You’ll get a perfect, layered tulip print with just one press.
Use different fork sizes and colors to create a whole spring garden in minutes. It’s the ultimate low-prep, high-reward craft. Sometimes the simplest ideas are the best.
25. Crayon Shaving Suncatchers

Adult help needed for the first step! Use a pencil sharpener to make piles of crayon shavings. Place a flower-shaped cookie cutter on a sheet of wax paper. Fill the inside of the cutter with the colorful shavings.
Carefully place another sheet of wax paper on top and an adult can use a warm iron (on low, over a towel) to melt the shavings. Once cool, peel off the wax paper and you have a stunning, stained-glass style suncatcher.
26. Paper Chain Daisy Garland

Combine crafting and simple paper chains. Cut white paper into strips. Form each strip into a loop and glue it, but before you close the final loop, interlink it with the previous one to form the chain—these are your petals.
After making a chain of 5-6 loops (one flower), attach it to a long green paper chain stem. Add a yellow paper circle center. Make a whole string of them for a gorgeous spring party decoration.
27. Rock Garden Markers

Head outside and find smooth, flat rocks. Wash and dry them. Then, using acrylic paints or permanent markers, paint a simple flower on one side of each rock.
On the other side, write the name of a flower or herb you have planted in your garden. These make adorable, weather-resistant garden markers that add a personal touch to your backyard or patio pots. A craft that’s actually useful? Yes, please.
And there you have it—27 ways to turn an ordinary day into a blooming good time. The best part about these flower crafts for kids? It’s not really about the final product (though you will get some fridge-worthy masterpieces). It’s about the time spent together, the little hands learning to create, and the confidence that grows when they make something from nothing. So grab some paper, glue, and whatever else you have lying around. Your next craft adventure is right here. Now, which one are you trying first? 😊