
Okay, let’s be real. You want to create those magical, messy, “look what I made, Mommy!” Easter memories, but the thought of another basic egg dye kit makes you yawn. You’re craving something more creative, something that actually holds their attention for more than three minutes. I get it. That’s why I’ve rounded up these 14 Easter painting ideas for kids that go way beyond the carton. We’re talking texture, giggles, and fridge-worthy masterpieces. Ready to make a glorious, colorful mess?
1. Fork-Tastic Easter Chicks

Who needs a fancy brush when you have a fork? This idea is a total crowd-pleaser and perfect for little hands that struggle with fine details. Dip the back of a plastic fork in yellow paint and press it onto paper to create the perfect fluffy chick body. It’s instant gratification! Then, let them add googly eyes, an orange triangle beak, and little orange feet with a brush or their finger. The quirky texture from the fork tines makes these chicks irresistibly cute. It’s a fantastic way to use an everyday object in a new, creative way.
2. Bubble Wrap Easter Eggs
Pop, pop, paint! Unleash the sensory joy of bubble wrap with this brilliantly simple printmaking project. Cut a piece of bubble wrap into an egg shape and secure it to a cardboard backing with tape (this is the adult prep part). Let the kids go wild painting directly onto the bubble wrap with multiple colors. Then, press a sheet of paper firmly on top, rub, and reveal a stunning, textured Easter egg print. The surprise reveal is half the fun, and every single print turns out uniquely beautiful. Pro tip: Use the small-bubble wrap for a finer, more detailed pattern.
3. Q-Tip Dotty Easter Eggs

This is the ultimate low-mess, high-focus painting activity. Simply draw or print out simple egg outlines on sturdy paper. Then, arm your artists with a bunch of cotton swabs (Q-tips) and small plates of various colored paints. Show them how to dip and dot to create patterns, lines, and polka dots. It’s amazing for developing fine motor skills and color recognition. The best part? You can easily guide the activity for toddlers (“let’s make a purple line of dots!”) or let older kids design intricate, pointillist-style masterpieces.
4. Puffy Paint Sheep
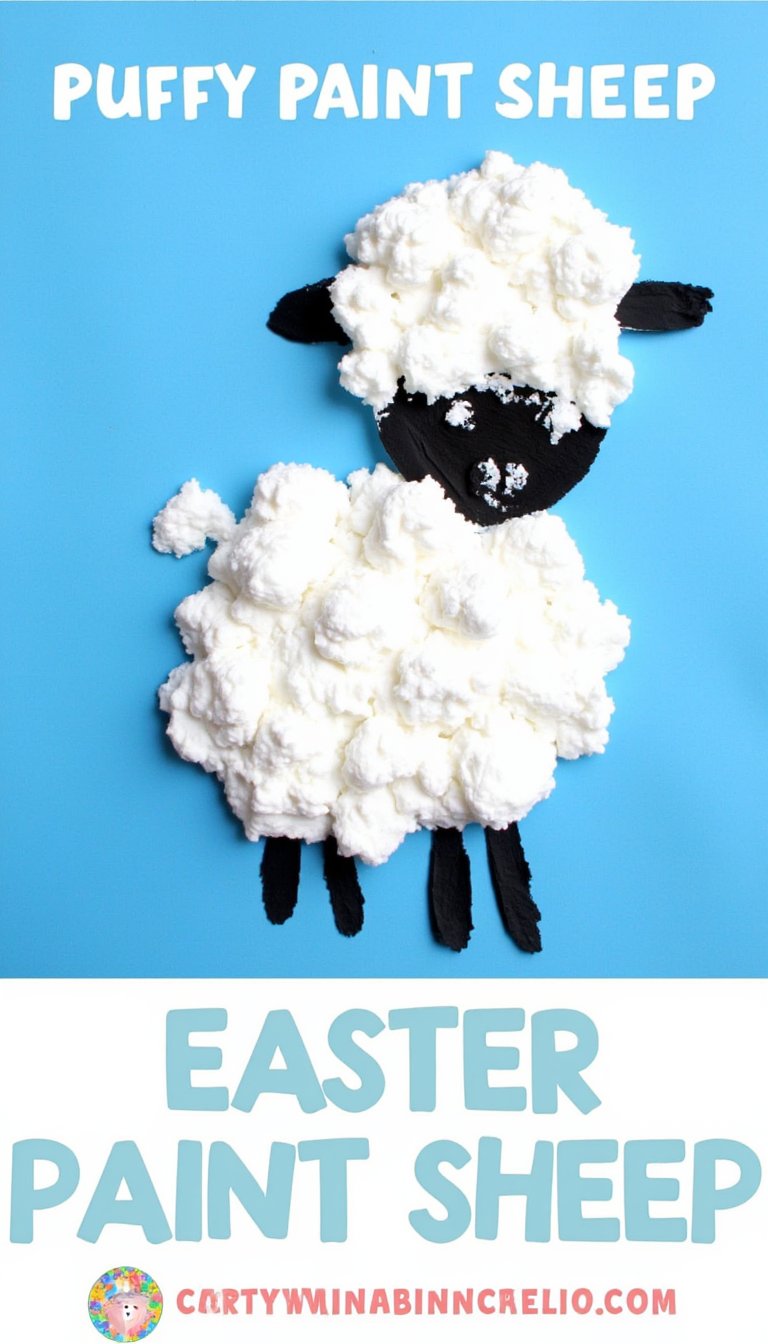
Bring the fluffy farmyard to life with this tactile painting idea. Start by having the kids paint a simple sheep head and legs with black paint on blue paper. Now for the magic: mix equal parts white school glue and shaving cream to create a wonderfully puffy, cloud-like paint. Let them use a spoon or their fingers to glob the puffy paint onto the sheep’s body. The texture is incredible! As it dries, it retains a fun, 3D fluffy effect. It smells fun, feels amazing, and creates the most adorable Easter scene. Just maybe do this one right before bath time.
5. Celery Stamp Roses
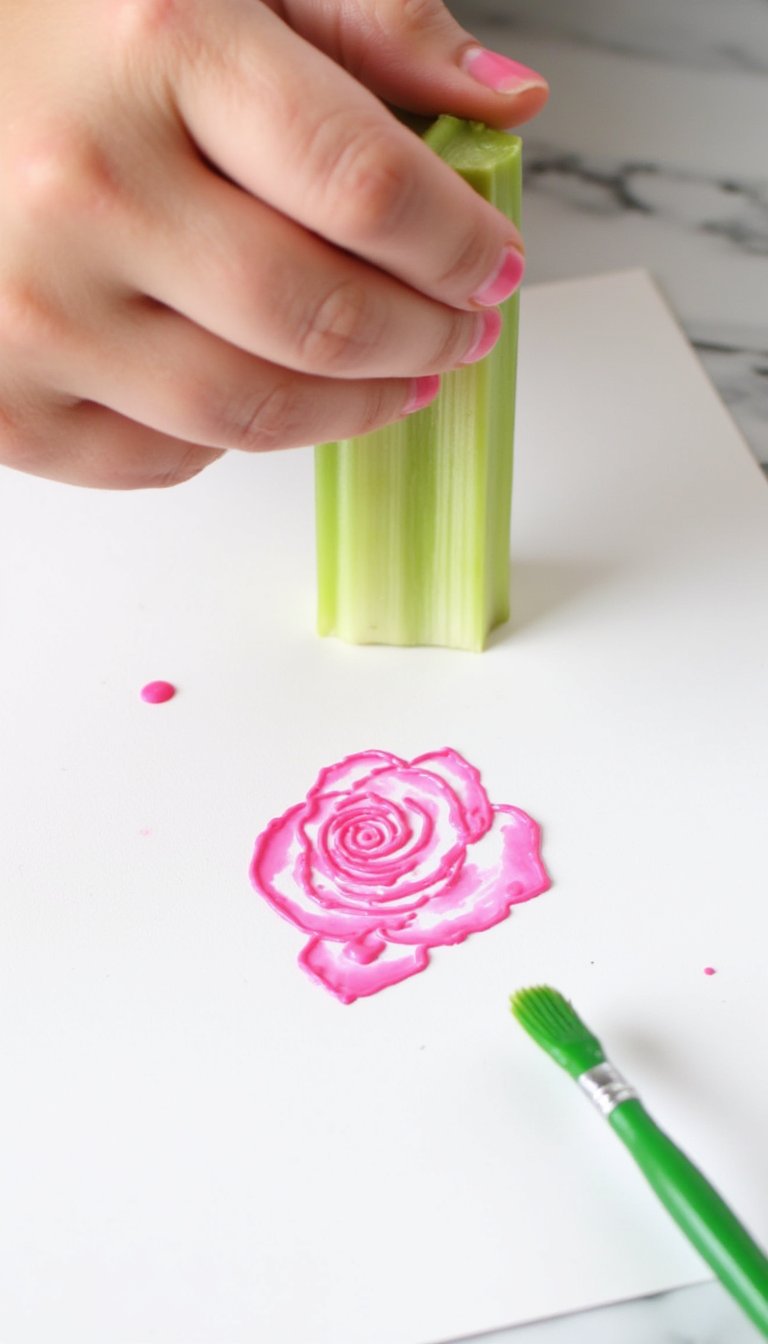
This one always gets a “whoa, cool!” reaction. Take a bunch of celery and chop off the base so you have a tight cluster of stalks. Tie it with a rubber band to keep it together. Dip this unique stamp into pink, red, or purple paint and press it onto paper. Instantly, you have a perfect rose shape! Kids can create beautiful Easter bouquets or decorate the corners of an Easter card. It’s a stunning lesson in how nature can be our best art tool. Use green paint and a brush to add stems and leaves to complete the floral picture.
6. Easter Egg Rock Painting

Take the painting party outdoors! Go on a rock-hunting adventure first to find smooth, egg-shaped stones. Wash and dry them, then let the painting begin. Acrylic paints or paint pens work best for vibrant, lasting color on rocks. Kids can turn them into ladybugs, bunnies, or simply decorate them like classic Easter eggs. Once they’re dry, you can hide them in the garden for a permanent, cute Easter scavenger hunt or use them as cheerful paperweights. It’s art that lasts beyond the holiday.
7. Bleeding Tissue Paper Easter Eggs

For a “wow” factor with minimal actual painting, this technique is unbeatable. Tear or cut colorful bleeding tissue paper (not all tissue paper works—you need the kind that bleeds) into small pieces. Arrange them on a white paper egg shape, then use a paintbrush to lightly dab water over each piece. Watch as the color magically bleeds onto the paper! Once it’s completely dry, peel off the now-colorless tissue paper scraps to reveal a stunning, watercolor-like masterpiece. It’s less about control and more about enjoying the beautiful, unpredictable results.
8. Handprint Easter Lilies

Create a keepsake you’ll treasure forever. Paint your child’s hand white (palm and fingers). Carefully press it onto a piece of black or dark blue paper with the fingers closed and the heel of the hand at the bottom. When you lift the hand, the print will look like a beautiful lily! Add a yellow dot in the center for the stamen and use green paint to draw a stem and leaves. Frame it, and you have a personalized piece of Easter art that captures the size of their little hand right now. Get the whole family in on it for a bouquet!
9. Marbleized Shaving Cream Eggs
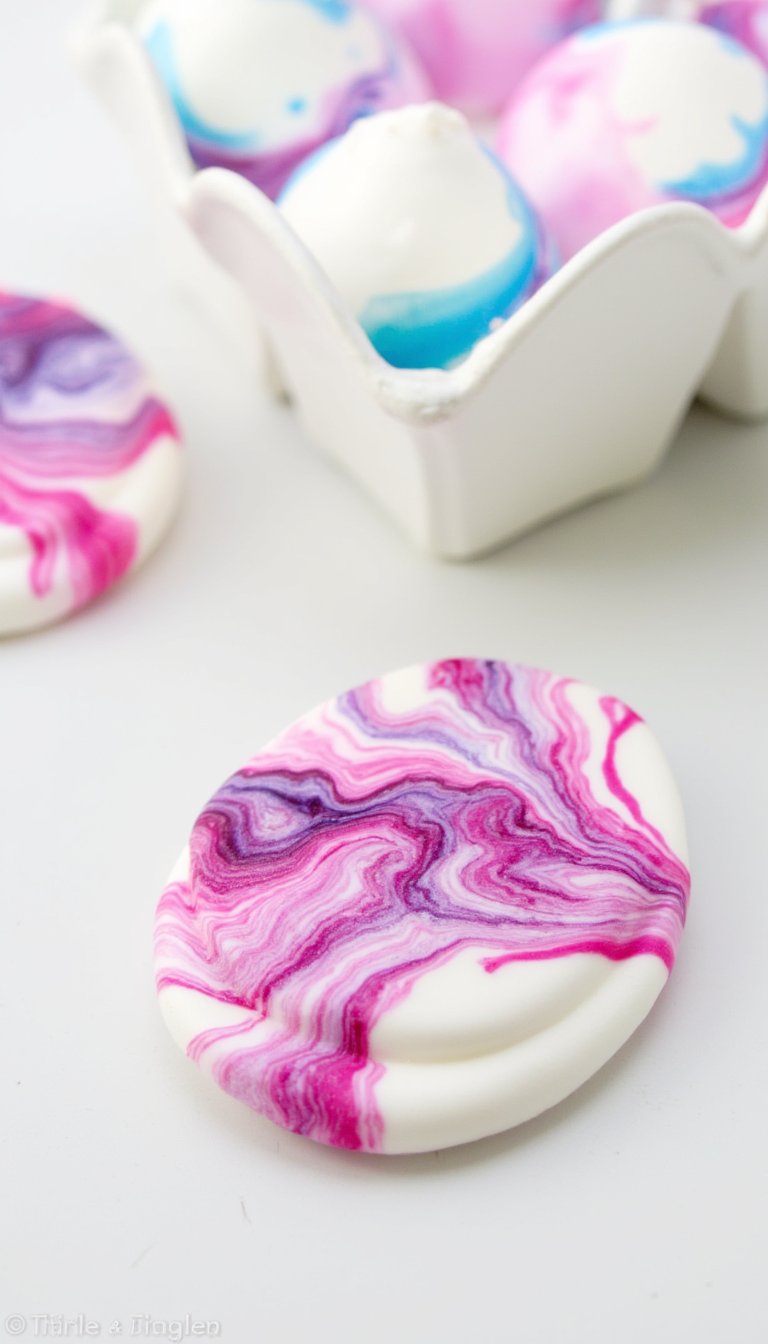
This is sensory play and art combined, and it creates stunning, professional-looking results. Spray a layer of shaving cream in a tray and smooth it out. Let kids drop liquid watercolor or food coloring dots all over it. Then, use a toothpick to swirl the colors gently into a marbled pattern. Press a cardstock egg cut-out into the cream, press down, lift, and use a squeegee (an old gift card works) to scrape off the excess shaving cream. Underneath? A gorgeous, one-of-a-kind marbleized egg. The cleanup is part of the fun—just more sensory play!
10. Potato Stamp Bunnies
Back to basics with a classic that never fails. Cut a potato in half and carve a simple bunny silhouette or profile into the flat surface (adult job). Pat the stamp dry, then let the kids dip it into paint and hop it all over their paper! They can create a whole family of bunnies in different colors. Use a smaller potato to stamp a tail, or add details with a marker after the paint dries. It’s a fantastic introduction to printmaking and a great way to use up those sprouting spuds in the pantry.
11. Resist Art Easter Scenes
Unleash the magic of the “reveal” with this simple technique. Give kids a white crayon or a candle and have them draw secret Easter designs—eggs, bunnies, zig-zags—on white paper. To them, it will seem almost invisible. Then, let them paint over the entire paper with watery liquid watercolors. Like magic, their hidden drawings will resist the paint and pop right out! It feels like a art trick, and it teaches a wonderful lesson about wax resist. Use pastel watercolors for the perfect soft, Easter look.
12. Paper Plate Easter Baskets
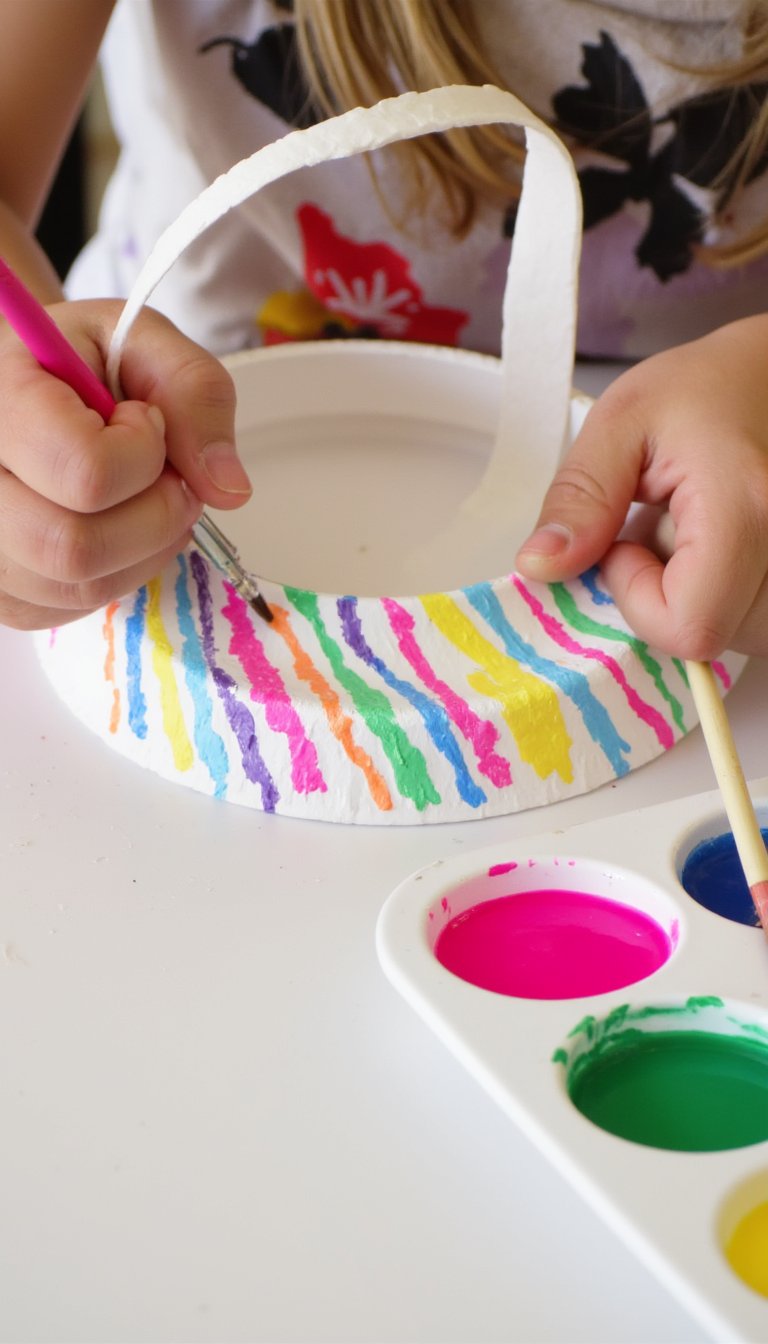
Why paint flat when you can paint something you can actually use? Grab a paper plate and cut it in half. Staple or tape the curved edges together to form a basket shape, leaving the flat edge as the top. Now, let the kids paint the outside however they like—stripes, dots, a mix of colors. Punch two holes at the top and add a pipe cleaner or ribbon handle. Once it’s dry, they can fill their very own, self-decorated basket with shredded paper grass and their other painted Easter creations. Functional art for the win!
13. Splatter Paint Easter Eggs

Channel your inner Jackson Pollock for some gloriously messy, energetic fun. This one is best done outside or in a very well-protected area (I’m talking drop cloths and old clothes). Lay down large egg cut-outs from poster board or cardstock. Dilute some acrylic or tempera paint slightly. Then, give kids old toothbrushes, fly swatters, or even just stiff brushes. Let them dip, flick, and splatter to their hearts’ content! The dynamic, energetic patterns they create are full of life and movement. It’s pure, unbridled creative joy.
14. Salt Painted Easter Eggs

This science-meets-art project creates a sparkling, crystalline texture. First, use white glue to draw designs or write names on a dark piece of construction paper (egg shape is perfect). Immediately, while the glue is still wet, pour a generous amount of table salt over it, then shake off the excess. You’ll have a raised salt line. Now, using a *very* wet paintbrush, gently touch the tip to the salt lines with watercolor paint. Watch in amazement as the color travels along the salt like magic! The result is a vibrant, textured piece that shimmers in the light.
So there you have it—14 ways to turn “I’m bored” into “Look what I can do!” this Easter. The real magic isn’t in the perfect final product (though their fridge gallery will be impressive). It’s in the giggles during the fork painting, the “whoa” during the shaving cream reveal, and the proud smile when they show off their handprint lily. My advice? Pick a couple that speak to you, embrace the beautiful chaos, and focus on the fun. These are the messy, colorful memories your kids will actually remember. Happy painting!