
Let’s be honest. The best part of the holiday season isn’t the presents (okay, maybe it’s a close second). It’s that warm, fuzzy feeling you get from creating something beautiful with your own two hands. And what’s more accessible, affordable, and downright fun than a stack of paper and a bit of creativity? Forget the stress of crowded malls and dive into these 27 Christmas paper crafts. I’ve included clear instructions for each one, so you can get your hands messy and make your home look like a Pinterest board come to life.
1. Quilled Paper Christmas Tree Ornaments

These aren’t your average paper cutouts. Quilling involves rolling thin strips of paper into intricate shapes. The result? Stunning, delicate ornaments that look like heirlooms. You can create simple coils, teardrops, and marquise shapes to form trees, snowflakes, or even tiny reindeer.
Instructions:
Start with a quilling tool and 1/8-inch paper strips. Roll strips tightly, then let them loosen slightly before gluing the end. Pinch the coils into different shapes and assemble them on a cardboard ornament base. Finish with a dab of glitter glue for a frosty sparkle.
2. 3D Paper Snowflakes

Move over, boring cut-out snowflakes. These 3D versions add incredible depth and drama to any room. Hang them from your ceiling or in a window, and watch how they catch the light. They’re surprisingly easy to make, requiring mostly folding, cutting, and stapling.
Instructions:
Fold six squares of paper into quarters and then into a triangle. Make several parallel cuts along the non-folded edges. Unfold the paper, and staple the innermost points of each piece together. Continue stapling the subsequent points to form a half-sphere, then join two halves to create the full 3D snowflake.
3. Paper Gingerbread Houses

Love the look of a gingerbread house but lack the architectural confidence (or the patience to keep the walls from collapsing)? A paper version is your answer. You get all the charm with none of the icing-related frustration. Plus, it lasts for years!
Instructions:
Find a free gingerbread house template online and print it onto cardstock. Carefully cut out all the pieces, score along the fold lines, and use a hot glue gun for a strong bond. Decorate with markers, glitter, and even small candy-shaped paper cutouts.
4. Paper Chain Garlands with a Twist

This is the classic grade-school craft, but we’re leveling it up. Instead of simple loops, try using patterned scrapbook paper, varying the widths of the strips, or even cutting the strips into shapes like holly leaves or candy canes before linking them.
Instructions:
Cut your chosen paper into strips. Form your first loop and secure it with glue or a stapler. Thread your next strip through the first loop before sealing it, and repeat! To make a shaped garland, cut your strips, then use scissors to trim the edges into points or curves before linking.
5. Origami Christmas Stars

There’s something magical about creating a perfect shape from a single sheet of paper, no scissors or glue required. Origami stars, or “lucky stars,” are tiny, puffy, and utterly delightful. Fill a clear vase with them for a modern, minimalist centerpiece.
Instructions:
Start with a long, thin strip of paper. Tie a loose knot at one end, then gently flatten it into a pentagon. Fold the long tail around and around the pentagon, tucking the end into a pocket. Use your fingernail to pinch the edges of the pentagon and “puff” the star into shape.
6. Kirigami Pop-Up Christmas Cards

Kirigami is like origami’s cool cousin—you get to use scissors! A few strategic folds and cuts can create a stunning 3D scene that pops up when the recipient opens the card. It’s a guaranteed showstopper.
Instructions:
Fold a piece of cardstock in half. On the fold, draw a simple shape, like half a Christmas tree. Cut along the lines, but don’t cut the fold. Open the card and push the cut shape through to the inside, then refold the card so the tree stands up. Decorate the front and inside.
7. Paper Plate Luminaries

Don’t underestimate the humble paper plate. When you fold two plates together and punch out designs, they transform into gorgeous, soft-glowing luminaries. They are a super safe craft to do with kids, using battery-operated tea lights.
Instructions:
Take two sturdy paper plates and cut out the center circle from both, leaving just the rims. Place the rims together and use a hole punch or a push pin to create patterns like stars or dots. Staple or glue the rims together on three sides, pop in a light, and staple the final side shut.
8. Rolled Paper Christmas Wreath

This craft is a fantastic way to use up old magazines, catalogs, or even sheet music. By rolling paper into tight cones, you can build a beautiful, textural wreath that’s full of character and completely unique to you.
Instructions:
Cut your paper into rectangles. Roll each one tightly into a cone shape and secure the tip with glue. Take a cardboard wreath form and start hot-gluing the cones around it, layer by layer, until the form is completely covered. Add a bow for a final festive touch.
9. Paper Bag Christmas Trees

Looking for a rustic, charming centerpiece? Grab some brown paper lunch bags. With a little folding and fluffing, you can create a forest of adorable mini trees that look straight out of a cozy winter cabin.
Instructions:
Lay a paper bag flat and cut thin strips from the open end down to about an inch from the bottom. Roll the bag into a cylinder and secure it with tape. Fluff the strips outward to form the tree’s branches. You can leave them natural or give them a light spray with green paint.
10. Honeycomb Paper Ornaments

You know those amazing honeycomb balls that expand? You can make your own! They create an incredible visual impact and are surprisingly simple, relying on a clever folding and gluing technique. People will ask you where you bought them.
Instructions:
Cut out multiple identical ornament shapes (like circles or bells) from tissue paper. Fold each one in half. Glue them together along the fold lines, stacking one on top of the other, making sure the glue doesn’t seep into the folded areas. Once dry, the first and last pieces will pull apart to expand the ornament.
11. Paper Straw Christmas Trees

Got a bunch of paper straws left over from a party? Put them to work! By cutting them into decreasing lengths, you can assemble a modern, geometric tree that looks fantastic on a mantel or shelf.
Instructions:
Gather green paper straws. Cut them into graduated lengths. Arrange them in order from longest to shortest, with the longest at the bottom. Thread a needle with strong thread and carefully string the straws through their centers, creating a tree shape. Tie a knot at the top to hang.
12. Mosaic Paper Gift Tags

Turn your scrap paper pile into something beautiful. These mosaic-style gift tags add a personal, artsy touch to any present. They’re also a great way to keep little hands busy while you wrap.
Instructions:
Cut a tag shape from cardstock. Then, cut or tear various colored papers into small, irregular pieces. Glue these pieces onto the tag, leaving small gaps between them like grout. Once dry, you can seal it with a layer of Mod Podge for a finished look.
13. Paper Cone Christmas Elves

These little guys are just too cute for words. A simple paper cone forms the body, and with a few extra details, you have a whole family of cheerful elves to guard your Christmas village.
Instructions:
Roll a piece of colored paper into a cone and glue it secure. This is the body. Add a small red pom-pom for the nose, googly eyes, and draw on a smile. Cut out hands from skin-toned paper and a hat from another color. Glue them all in place, and don’t forget a little black paper belt!
14. Scrapbook Paper Baubles

Why buy ornaments when you can make stunning ones that match your decor perfectly? Using beautiful scrapbook paper, you can create elegant baubles that look far more complex than they are.
Instructions:
Find a template for a 3D ornament (often made of several identical “petal” shapes). Trace and cut the petals from your chosen paper. Score and fold each petal along the marked lines, then glue the tabs together to assemble the sphere. Add a string for hanging.
15. Paper Leaf Garlands

Not everything has to be red and green. A garland made from muted, earthy-toned paper leaves brings a touch of sophisticated, woodland charm to your holiday decorating. It’s perfect for a nature-themed tree.
Instructions:
Cut leaf shapes from various shades of kraft, gold, and cream paper. Use a scoring tool to add a vein detail down the center of each leaf. Punch a hole at the base of each leaf and string them onto jute twine or yarn, spacing them out evenly.
16. Paper Weaving Stockings

This craft combines color and texture for a beautiful result. Paper weaving is a relaxing, almost meditative process, and the finished mini stockings make adorable ornaments or gift card holders.
Instructions:
Cut a stocking shape from cardstock, but don’t cut out the center. Instead, cut vertical slits in the center area. Weave thin strips of contrasting paper over and under these slits. Once the weaving is complete, glue a backing piece of paper to secure everything and trim the edges.
17. Paper Roll Characters

Save those toilet paper rolls! With a little paint and paper, you can create an entire cast of Christmas characters. This is a classic for a reason—it’s cheap, easy, and wildly fun.
Instructions:
Paint your paper roll in the base color for your character (e.g., white for a snowman). Cut out details from construction paper: a hat, scarf, eyes, and buttons for a snowman; antlers and a red nose for a reindeer. Glue everything on, and you’re done!
18. Paper Poinsettia Flowers

Real poinsettias can be fussy, and the leaves drop everywhere. A paper version is forever beautiful. Create them in traditional red and green or mix it up with blue, gold, or silver for a modern twist.
Instructions:
Cut several tear-drop shapes in different sizes from red paper. These are your petals. Cut smaller, jagged shapes from yellow paper for the center. Layer the petals, gluing them together at the base, and curl the tips outward with your fingers. Glue the yellow centers in place.
19. Paper Christmas Cracker Favors

No British-inspired Christmas table is complete without crackers! Making your own allows you to fill them with personalized treats and jokes, making them a wonderful activity for Christmas dinner.
Instructions:
Take a cardboard tube and cover it with festive paper. Fill it with a small toy, a joke, and a paper crown. Gather the paper at both ends of the tube and tie it tightly with ribbon. To open, two people pull on either end—the “snap” is built into the store-bought version, but you can add a fun noise maker inside.
20. Paper Mache Ornaments

Get gloriously messy with this one! Paper mache creates a sturdy, lightweight base that you can paint and decorate to your heart’s content. Make custom shapes that you can’t find in any store.
Instructions:
Blow up a small balloon or use a Styrofoam ball as a base. Tear newspaper into strips, dip them in a paste of water and flour, and layer them over the base. Let it dry completely, pop the balloon if used, then paint and decorate with glitter, sequins, and ribbon.
21. Paper Lanterns with Holiday Scenes

Create a soft, warm glow by turning simple paper lanterns into miniature winter wonderlands. This craft is all about the silhouette, creating a beautiful shadow effect when lit from within.
Instructions:
Take a pre-made paper lantern or make a simple cube from cardstock. Cut out festive shapes—like trees, reindeer, or stars—from black paper. Glue these silhouettes onto the outside of the lantern. Place a battery-operated tea light inside and watch the scene come to life.
22. Paper Corner Bookmark Greetings

Combine a useful gift with a holiday greeting. These corner bookmarks are quick to make and are a delightful little surprise to tuck into a Christmas card for the bookworm in your life.
Instructions:
Fold a square of paper into a triangle. Fold the two side points down to meet the bottom point, forming a square. Tuck these points into the pocket you’ve created. Now, decorate this base to look like Santa’s face, a reindeer, or a gingerbread man.
23. Paper Ribbon Wall Hanging

This boho-chic decoration makes a huge statement. By twisting, folding, and looping different types of paper “ribbon,” you can create a textured wall piece that’s both modern and festive.
Instructions:
Cut long strips of various papers—tissue, crepe, cardstock. Attach them to a dowel rod or a sturdy branch using string or glue. Then, get creative! Fold some strips accordion-style, curl others with scissors, and leave some straight. Layer them to create a full, cascading effect.
24. Paper Christmas Card Holder
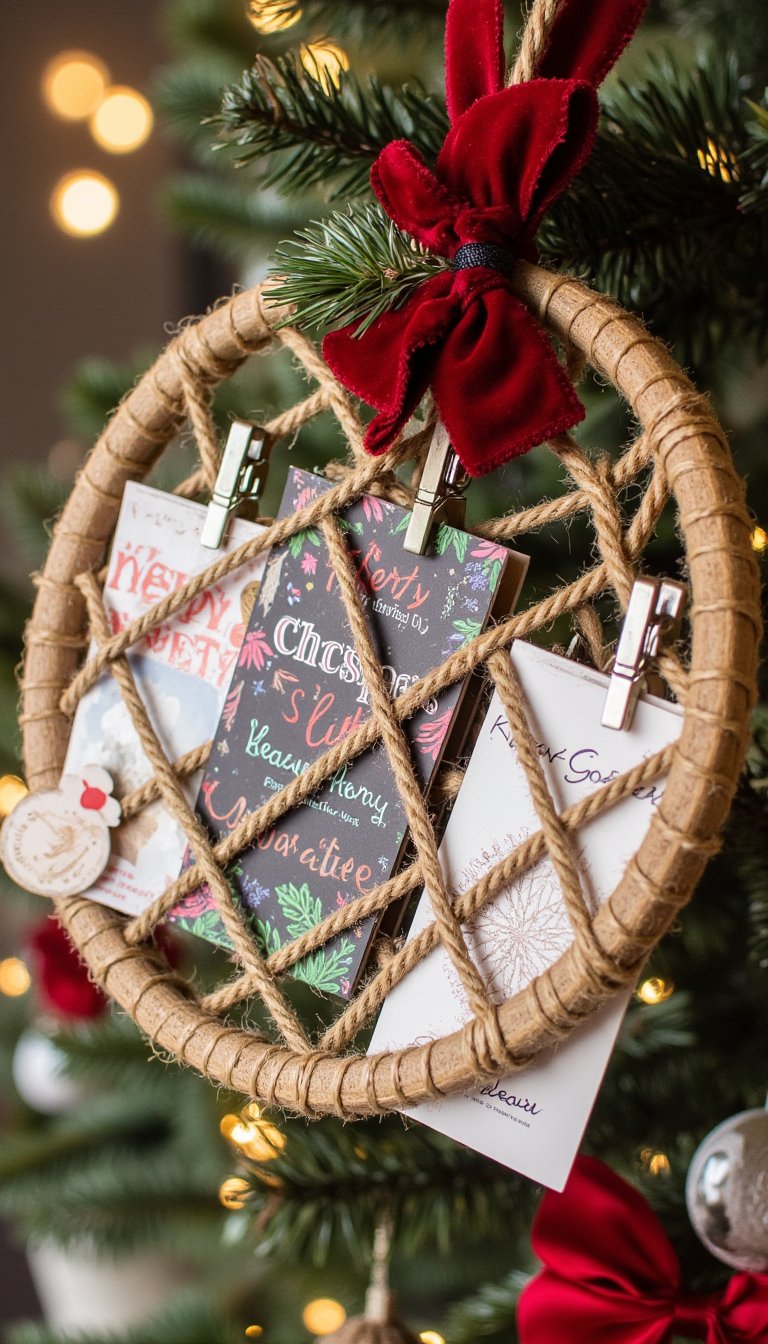
Tired of tape on your walls? Craft a beautiful, dedicated display for all those holiday cards you receive. This project turns a functional item into a piece of decor.
Instructions:
Take a large embroidery hoop or create a large frame from cardboard. Wrap it with ribbon or twine, crisscrossing it to create a web. Use mini clothespins to clip the Christmas cards onto the strings. Decorate the frame itself with greenery or a bow.
25. Paper Bead Jewelry

This is a fantastic “stash-buster” craft. Transform colorful magazine pages or leftover wrapping paper into beautiful, unique beads. They make wonderful, personalized gifts for friends and family.
Instructions:
Cut long, thin triangles from your paper. Starting at the wide end, tightly roll the paper around a skewer, securing the tip with a bit of glue. Once the bead is formed and the glue is dry, slide it off the skewer and seal it with a layer of Mod Podge for durability. String them to make a necklace or bracelet.
26. Paper Himmeli Geometric Ornaments

Himmeli is a traditional Finnish mobile made from straws, but we’re giving it a paper twist. These geometric ornaments are super trendy and add a cool, modern touch to a traditional tree.
Instructions:
Cut paper straws into equal lengths. Thread a needle with fishing line and string the straws together in a geometric pattern, like a tetrahedron (a pyramid with a triangular base) or a cube. Tie the fishing line securely to close the shape and leave a loop for hanging.
27. Paper Silhouette Art

Create a beautiful, framable piece of art with just two colors of paper. The high contrast of a silhouette against a bright background is always striking and elegant.
Instructions:
Choose a festive silhouette,