
Let’s be real: you have cardboard boxes piling up somewhere in your house right now. Maybe in the garage, or that awkward closet, or precariously stacked by the front door. Every online order, grocery delivery, and impulse buy brings another one. But before you break them down for recycling (or, let’s be honest, shove them deeper into the pile), what if I told you that pile of cardboard is a free, abundant craft supply? That’s right. We’re going to turn your perceived trash into treasure with 29 absolutely brilliant cardboard crafts DIY projects.
1. The “Why-Didn’t-I-Think-of-That” Cardboard Play Kitchen
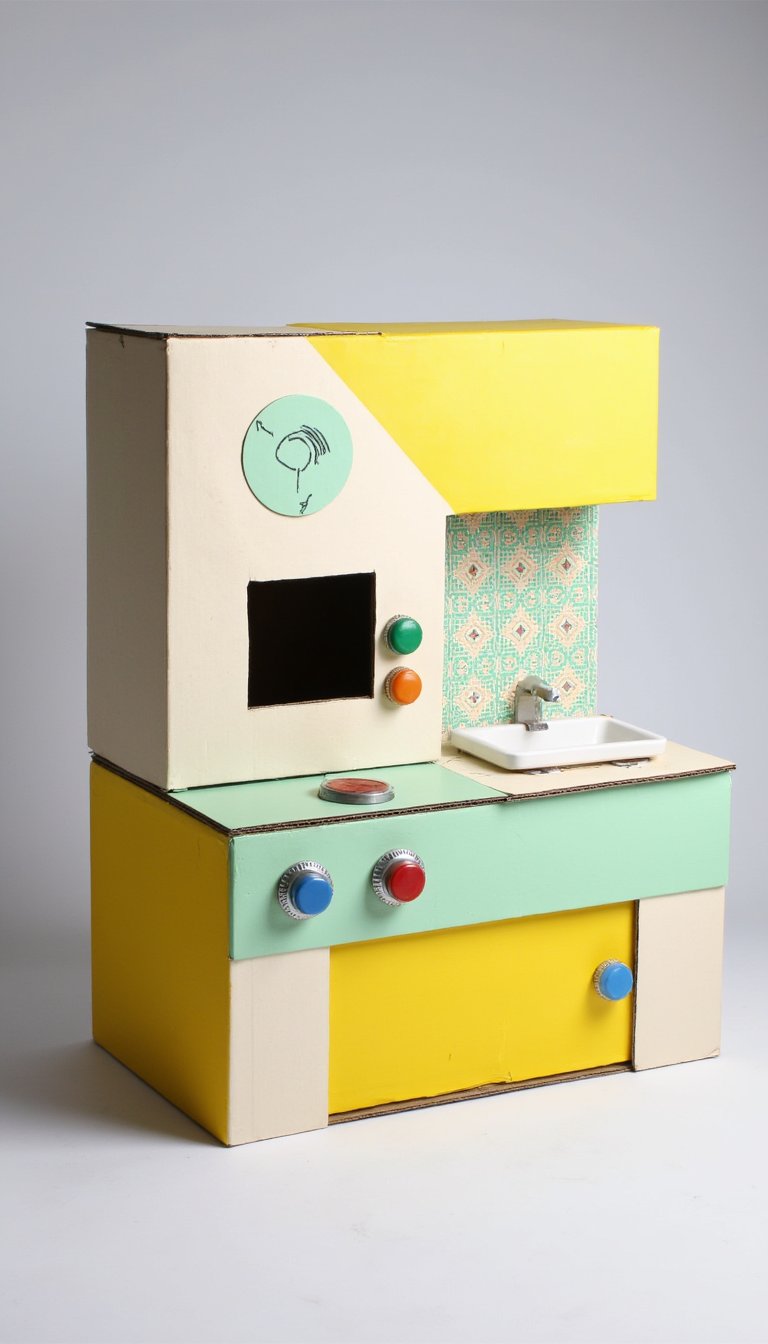
Forget spending hundreds on a wooden play kitchen. A large appliance box is your new best friend. Cut out a window for a pretend oven, attach a smaller box for a sink, and use bottle caps for stove knobs. A little paint and some peel-and-stick vinyl for a “backsplash” makes this a weekend project your kids will remember forever.
2. Geometric Cardboard Wall Art That Looks Expensive

Channel your inner modern artist. Cut identical squares or triangles from sturdy cardboard, then notch the edges so they slot together into a 3D honeycomb or abstract pattern. Paint them in a cohesive, muted color palette (think matte black, sage green, and cream) and mount them on a blank wall. Instant gallery wall that cost you zero dollars.
3. A Fully Functional Cardboard Cat Scratcher Lounge

Your cat loves boxes. Your cat also loves to scratch things you paid for. Combine the two! Cut a thick cardboard panel into long strips, roll them tightly into circles, and glue them side-by-side into a bed or a curved lounger. It’s a satisfying craft and it saves your couch. Everyone wins.
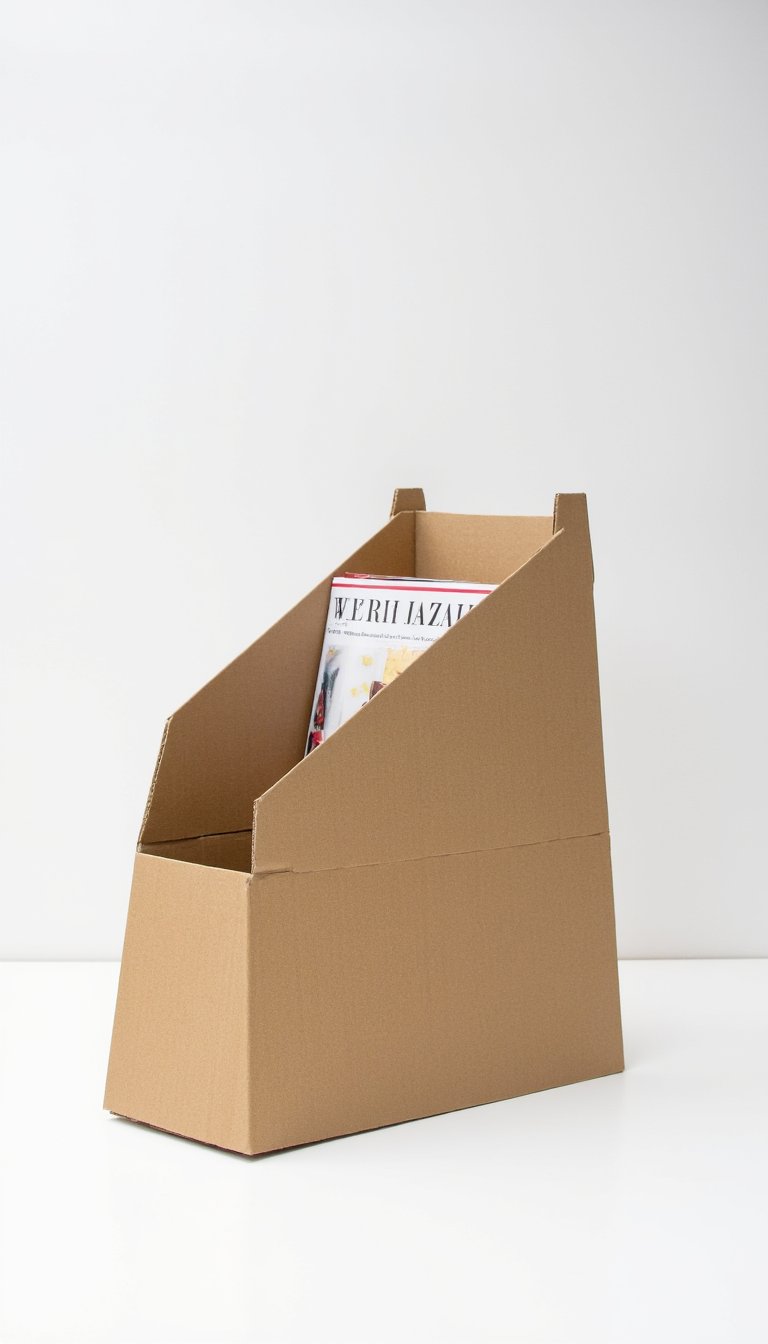
4. No-Tools-Needed Cardboard Magazine Holder

Tame that pile of magazines or notebooks in 10 minutes flat. Take a sturdy flap from a box, fold it into a tall triangle or a sleek rectangle, and secure the edges with hot glue or strong tape. Wrap it in leftover gift wrap or fabric scraps for a custom look that matches your office vibe.
5. A Whimsical Cardboard Castle for Stuffed Animals

Give your child’s favorite stuffies the palace they deserve. Stack and tape smaller boxes to create turrets. Cut crenellated tops and drawbridge doors. Let the kids go wild with paint, markers, and glitter. It’s a cardboard crafts DIY project that fuels hours of imaginative play.
6. A Chic Cardboard Jewelry Organizer with Drawers

Those little gift boxes are perfect for this. Glue them together in a staggered arrangement, creating small drawers and cubbies. Cover the whole structure in velvet or a pretty adhesive paper. Use small knobs or beads as drawer pulls. You just organized your baubles with style and sustainability.
7. A Life-Sized Cardboard Race Car or Spaceship

Got a big moving box? You’ve got a vehicle. Cut out a seat, add a steering wheel (a paper plate works), and paint on the details. Add headlights, racing stripes, or rocket boosters. This is the ultimate “wow” project that makes you the coolest parent, aunt, or uncle on the block.
8. Shadowbox Frames for Your Tiny Treasures

Turn a shallow box lid into a display case. Cut the backdrop from pretty scrapbook paper or paint a scene. Use hot glue to secure tiny trinkets—seashells, pressed flowers, vintage brooches—inside. A layer of clear plastic from packaging makes a perfect “glass” front.
9. A Surprisingly Sturdy Cardboard Laptop Stand

Improve your WFH ergonomics for free. Measure your laptop and design a simple, angled stand with notched supports. Use multiple layers of corrugated cardboard glued together for incredible strength. It’s lightweight, portable, and you can decorate it however you want.
10. Kid-Friendly Cardboard Marble Run

STEM learning disguised as fun? Yes, please. Attach large cardboard panels to a wall or the inside of a box. Use toilet paper tubes, cut-open tubes, and cardboard ramps to create a path. Tape them down securely and let the marble races begin. Testing and redesigning is half the fun.
11. A Modern Cardboard Pendant Light Shade

Safety First!
This is for LED bulbs only, as they stay cool. Create a geometric frame (like a diamond or cube) using cardboard strips. Cover the frame with vellum paper or perforate the cardboard itself to create a beautiful, diffused light pattern. It’s an instant conversation starter.
12. A Cozy Cardboard Cat Cave (They’ll Actually Use)

Take a medium box, turn it upside down, and cut a cat-sized archway. Line the entire interior with an old, soft sweater or fleece blanket, gluing it in place. The cardboard provides structure, the fabric provides coziness. It’s basically a luxury suite for your feline overlord.
13. A Giant Cardboard Tic-Tac-Toe Board for the Garden

Perfect for summer gatherings! Cut a large square from a box and paint the grid. Use smooth, flat stones painted with Xs and Os as your game pieces. It’s weather-resistant enough for an afternoon and can be easily stored or recycled after.
14. Custom Cardboard Dividers for Messy Drawers

Utensil drawer a mess? Junk drawer stressing you out? Measure your drawer and create a simple grid system with strips of cardboard. Slot them together like a puzzle. It’s a free, custom organization system you can adjust anytime.
15. A “Fauxdenza” Cardboard Media Console (Seriously)

Need a sleek TV stand on a “absolutely nothing” budget? Stack and glue multiple large boxes together to form a solid block. Cut out a space for media components. Apply several coats of joint compound or plaster to create a smooth, hard surface, then paint. From afar? It looks like concrete or modern wood.
16. Cardboard Animal Masks for Playtime

Lions, tigers, and bears—all from your recycling bin. Sketch an animal face on cardboard, cut it out, and cut eye holes. Attach a paint stirrer as a handle or elastic string to wear it. This is a classic cardboard craft that never gets old.
17. A Minimalist Cardboard Magazine Rack
Fold a single, large piece of cardboard into a sleek, angled rack. The beauty is in the simple, origami-like construction. No glue needed if you notch and slot it correctly. It’s functional sculpture for your living room.
18. A Delicate Cardboard Mobile for the Nursery

Cut out lightweight shapes—stars, clouds, moons, or whales—from thin cardboard. Paint them in soft colors and hang them at different lengths from an embroidery hoop or branch. The gentle movement captivates little ones and adds a handmade touch to the room.
19. A Practical Cardboard Tool Organizer
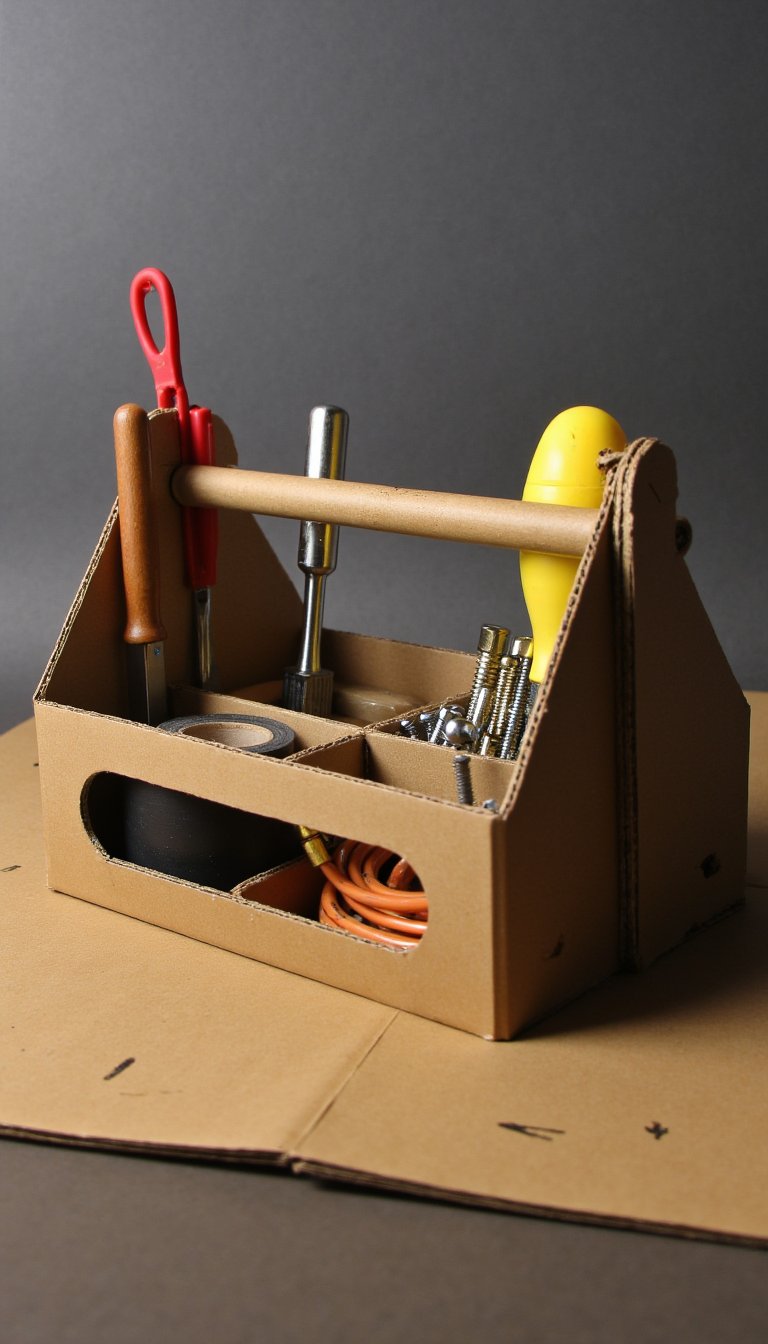
Tired of digging through a tangled toolbox? Create a custom insert for your toolbox or a standalone caddy. Make slots for screwdrivers, compartments for nails and screws, and loops for tape and wire. Label everything. Your future self will thank you during the next DIY crisis.
20. A Cardboard Playhouse “Fort” Kit

Pre-cut various shapes—doors, windows, battlements, even a pretend flower box—from cardboard. Let the kids use tape and their imagination to assemble a new fort structure each time. It’s a reusable creative kit that beats any store-bought toy.
21. Statement Cardboard Earrings

Lightweight, customizable, and shockingly chic. Cut small, interesting shapes, layer them for dimension, and paint or wrap them in metallic leaf. Seal with a clear varnish and attach earring posts. You’ll get compliments, and when someone asks where they’re from, you can smirk and say, “Oh, just a little DIY project.”
22. A Collapsible Cardboard Puppet Theater

Cut a large stage opening in a big, flat piece of cardboard. Decorate the front with curtains drawn on with marker. Use a box cutter to create slits on the sides so you can slide in smaller cardboard pieces as backdrops (a forest, a castle, outer space!). It folds flat for easy storage. Cue the sock puppets!
23. A Custom Cardboard Cable Management Box

Hide that unsightly tangle of power strips and chargers. Find a box that fits the space, cut a hole in the back for the main cord and smaller notches on the sides for device cables. Decorate it to match your furniture. Out of sight, out of mind.
24. A Sturdy Cardboard Bookshelf for Kids’ Books
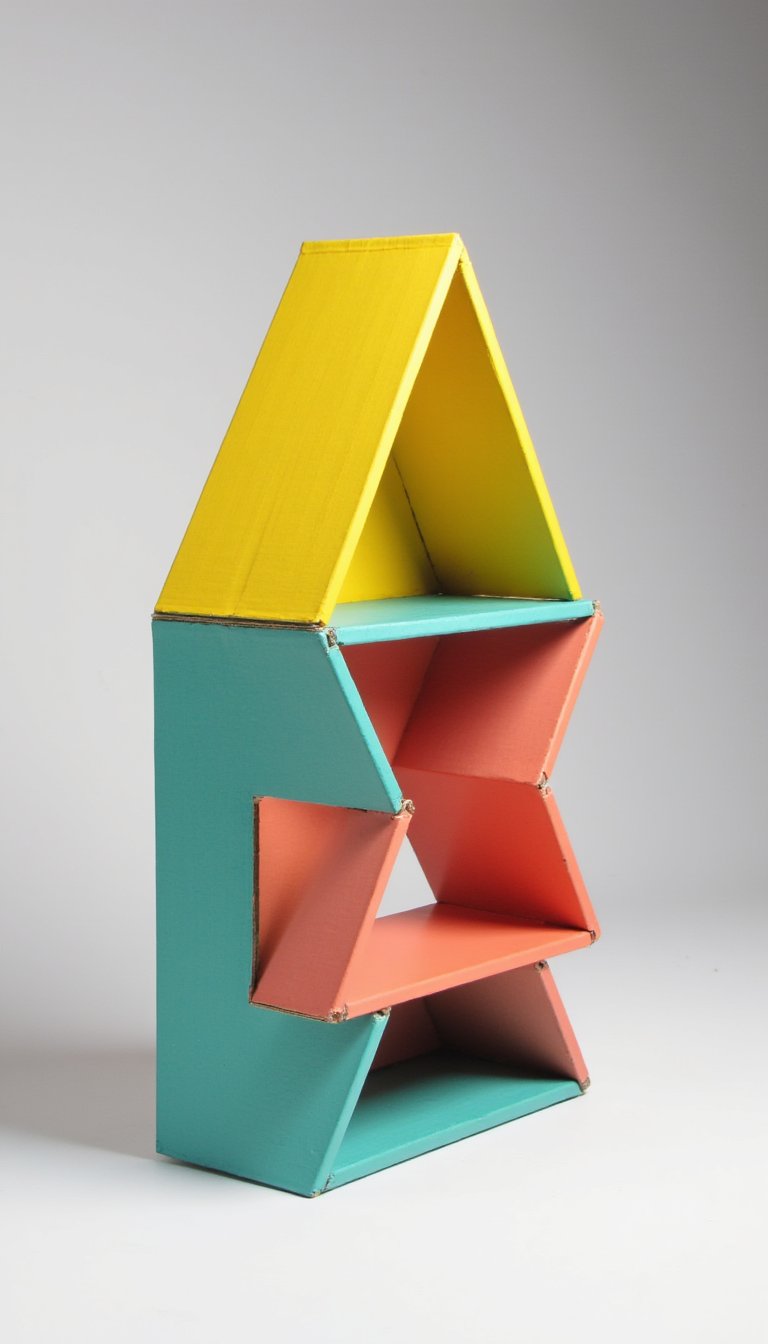
Use the “triangle” or “zigzag” shelf design. Create a series of connected cardboard triangles that form a stable, accordion-like structure. It’s surprisingly strong for lightweight picture books and makes a colorful display when painted.
25. A Cardboard Cityscape for Toy Cars

Grab all your box scraps. Cut them into buildings of different heights. Draw on windows, doors, and signs. Arrange them on a large cardboard base to create a personalized play mat. Add roads with chalk or marker. Instant metropolis.
26. A Festive Cardboard Wreath for Any Season
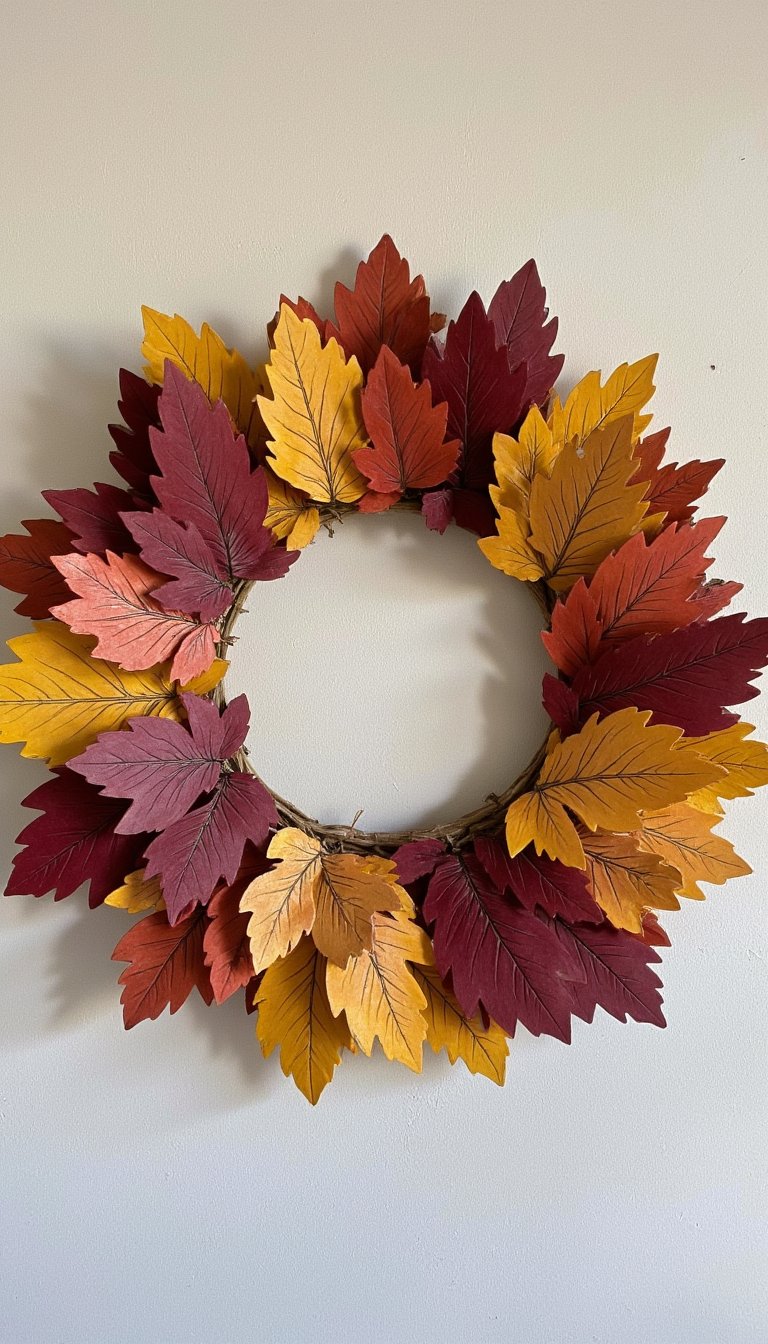
Cut a bunch of identical leaves, feathers, or snowflake shapes from cardboard. Layer and glue them in a circular pattern onto a cardboard ring base. Paint, spray, or dip-dye them for a gorgeous, textural decoration you can use year-round.
27. A Simple Cardboard Plant Pot Holder

Protect your surfaces from water rings. Measure your pot, then create a short, open-top box that fits snugly around the nursery pot. Wrap it in twine for a boho look or paint a geometric pattern. It lifts your plant game instantly.
28. A “Floating” Cardboard Wall Shelf
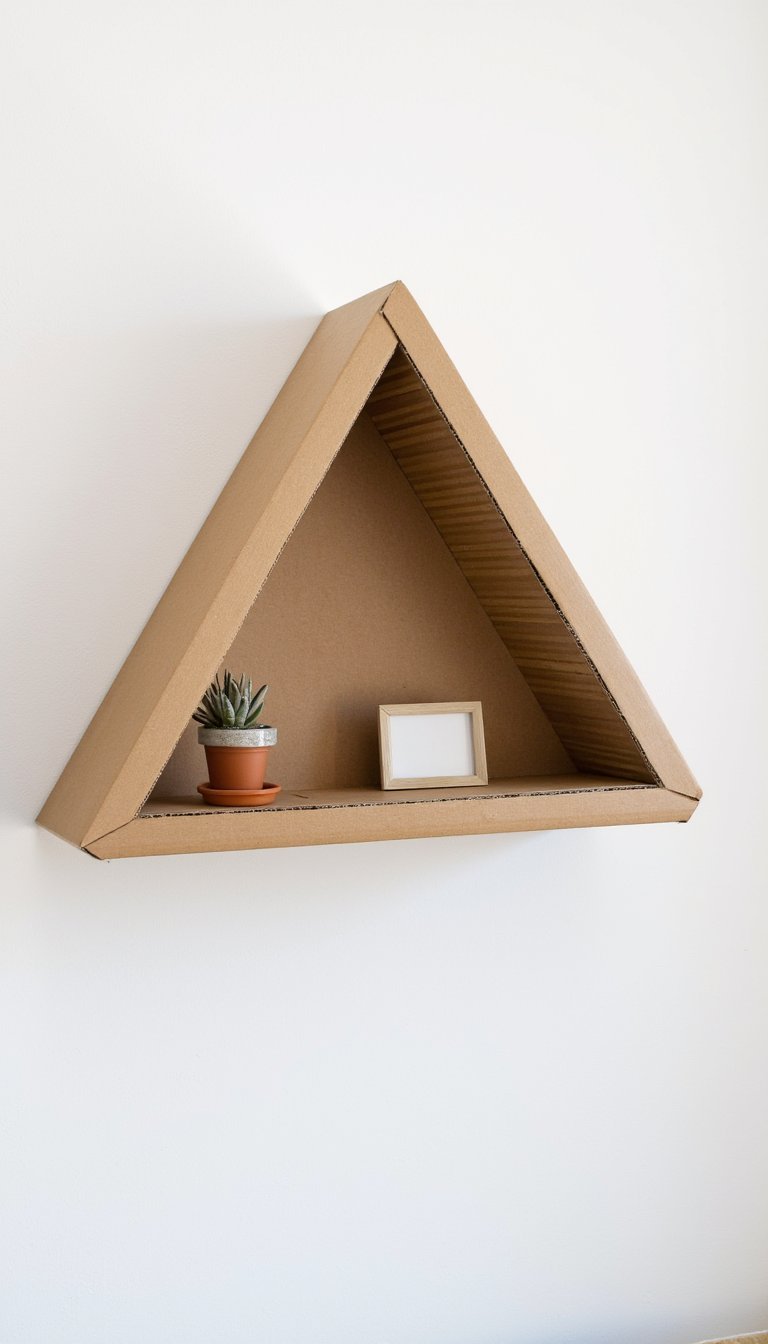
Create a hollow triangular or rectangular bracket from multiple cardboard layers. Glue it to the back of a shelf piece cut from a very flat, double-thick cardboard panel. Mount the bracket directly to the wall—it will look like the shelf is magically attached. Only use it for very light items like a small frame or a single air plant.
29. A Personal Time Capsule Box

Find a special, sturdy box. Decorate the outside with photos, drawings, and words that represent “now.” Fill it with letters to your future self, small mementos, and today’s newspaper. Seal it with tape and write a date to open it. This might be the most meaningful cardboard craft of all.
So, what’s your cardboard pile looking like now? Less like trash and more like pure potential, I hope. The magic of these 29 cardboard crafts DIY ideas isn’t just in saving money (though that’s a huge perk). It’s in the problem-solving, the creativity, and the simple joy of making something with your own hands. You’re not just crafting; you’re rethinking what “useful” and “beautiful” can be. You’re giving packaging a second life and creating memories in the process. So grab a box, a utility knife, and some glue. Your next masterpiece is waiting, and it’s probably sitting in your recycling bin. Happy crafting! 😊