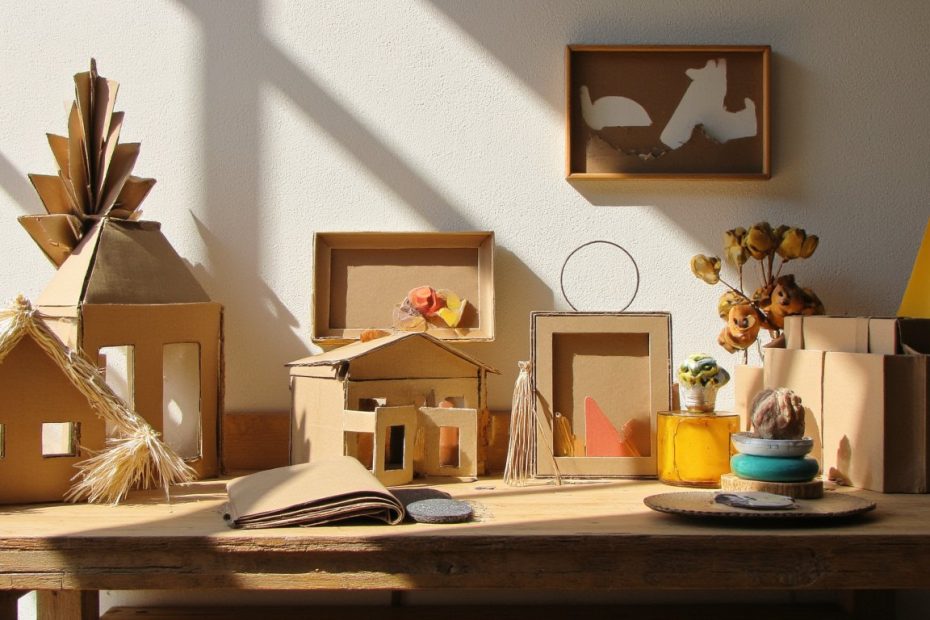
Let’s be honest: we all have a cardboard box graveyard. It’s in the garage, the spare room, or that one awkward kitchen corner. You tell yourself you’ll recycle them “soon,” but what if you could turn that pile of potential into stunning, one-of-a-kind home decor? No fancy tools or arts degree required. I’m talking about breathing new life into those humble boxes with a little creativity and a hot glue gun. Ready to see your trash in a whole new light? Here are 29 brilliant cardboard crafts decoration projects that will make your home look like a Pinterest board come to life.
1. Geometric Wall Sculpture
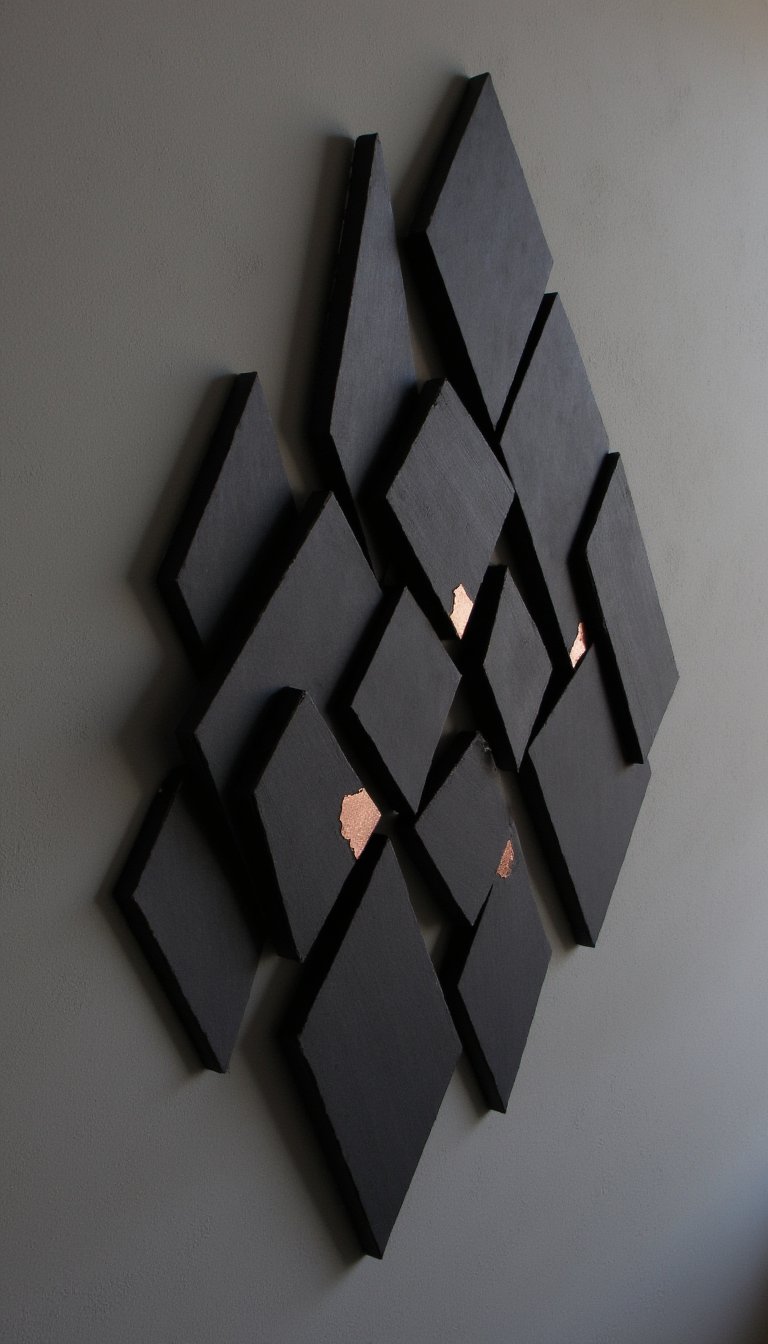
This project makes a massive statement for practically zero dollars. Cut identical triangles, hexagons, or diamonds from sturdy cardboard. Play with depth by layering them with spacers. Paint them in a monochrome palette for a modern look or go wild with metallic accents. Mount them in a cluster on your wall, and prepare for everyone to ask where you bought it.
2. Faux Wainscoting Panels

Dream of architectural detail but rent your place? Cardboard is your secret weapon. Cut panels to fit the lower half of your wall, score lines to create a raised panel effect, and secure them with strong adhesive. A coat of semi-gloss paint (try a bold navy or classic white) creates convincing, lightweight wainscoting that you can take with you when you leave.
3. The Statement Sunburst Mirror
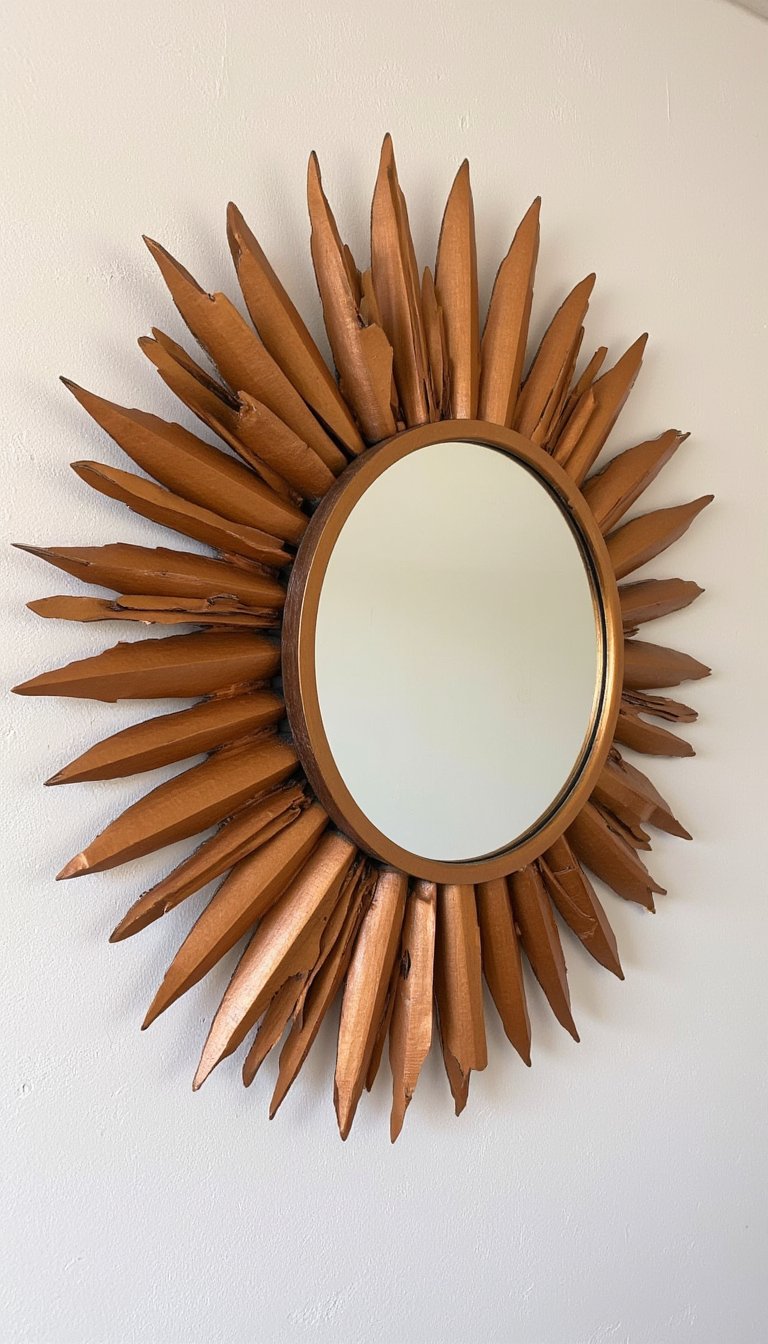
Skip the expensive home store version. Cut a circular base and long, tapered rays from cardboard. Glue the rays around the back of the base, layering them for a full, radiant effect. Spray paint it gold or copper, then hot-glue a cheap round mirror to the center. Instant glamour for your entryway or above the dresser.
4. 3D Floral Wall Art
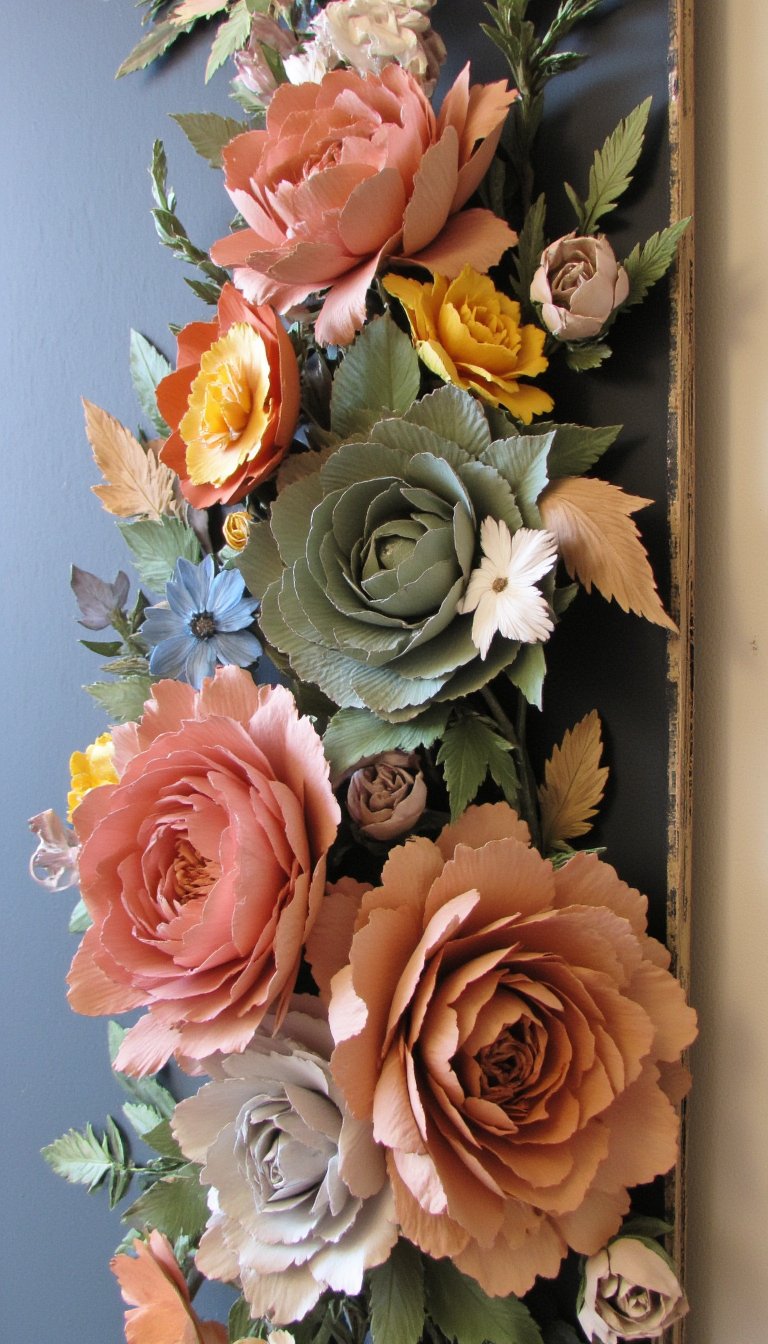
This is where you get to channel your inner artist. Draw and cut out various flower and leaf shapes in multiple sizes. Use a pencil or dowel to curl the petals for dimension, then layer and glue the pieces onto a painted cardboard canvas. The shadow play alone is worth the effort.
5. Chic Magazine Files & Desk Organizers
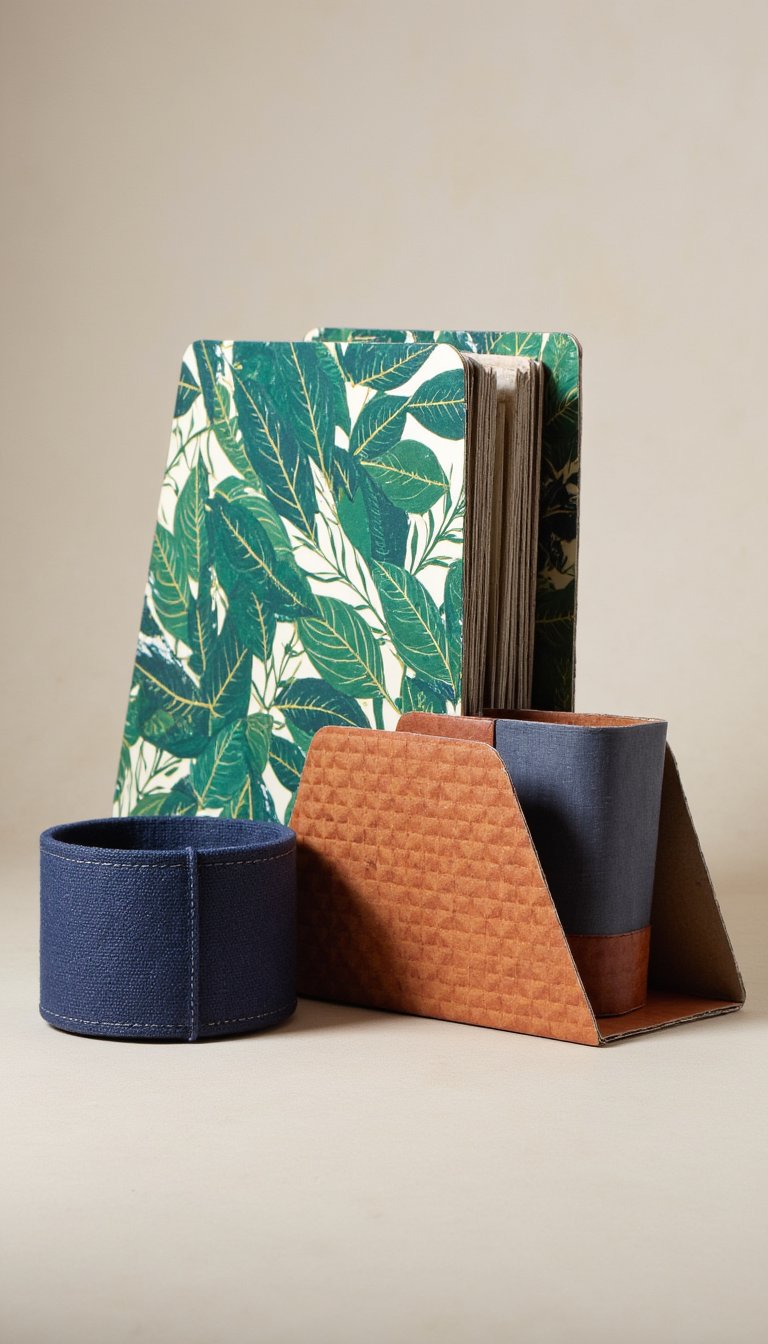
Declutter in style. Measure and construct simple boxes or trapezoid-shaped files. The magic is in the finish: wrap them in leftover wallpaper, decorative contact paper, or fabric remnants. You get a perfectly coordinated desk set that actually makes paperwork look appealing. Okay, almost.
6. DIY Floating Shelves

For lightweight decor only! Triple-layer cardboard strips to create incredibly strong “boards.” Box them in to create a hollow shelf shape. Prime and paint them to match your wall, then use hidden bracket systems to mount them. They’re perfect for displaying small plants, framed photos, or your favorite knick-knacks.
7. Kid’s Room Castle or Playhouse

The ultimate weekend project that creates core memories. Use large appliance boxes as your base. Cut out windows, draw brick patterns, add cardboard tube turrets, and let the kids go to town painting it. It’s a temporary fortress of fun that recycles beautifully afterward.
8. Intricate Laser-Cut Style Lampshade

You can achieve that boho, patterned light effect with patience and an X-Acto knife. Sketch a geometric or mandala pattern on a sheet of cardboard, carefully cut it out, and roll it into a cylinder to fit over a simple lamp base. When the light turns on, the shadows dance across your room.
9. Decorative Corbels and Brackets

Add a touch of vintage charm under shelves or cabinets. Find a corbel design you love, print it, trace it onto thick cardboard (layer it for strength!), and cut it out. Sand the edges smooth, prime, and paint with a faux wood grain or a crisp matte color. Glue them in place for instant character.
10. Miniature Shadow Box Gallery

Create a grid of small, deep frames from cardboard. Paint the interiors contrasting colors. Use them to display tiny treasures: sea shells from that beach trip, a favorite pendant, or dried flowers. Hang them together for a conversation-starting gallery wall.
11. Festive Holiday Wreath

Seasonal decor doesn’t have to cost a fortune. Cut a ring from a large box, then cut dozens of leaf or feather shapes. Glue them on in overlapping layers, starting from the outer ring and working in. Spray paint it gold for New Years, use muted tones for fall, or go classic green and red.
12. Custom Photo Frame Matting

Found the perfect frame but the mat is the wrong color or size? Cut a new one from pristine white or black cardboard. For extra flair, use a ruler and craft knife to cut a delicate geometric border *within* the mat opening. It elevates a simple print to gallery-level presentation.
13. Bohemian Room Divider Screen

Connect three or four large, sturdy cardboard panels with fabric hinges. Now you have a blank canvas! Cover the panels with peel-and-stick wallpaper, fabric, or a collage of vintage postcards. It’s a perfect way to hide a cluttered corner or define a small space.
14. Jewelry Organizer with Hooks
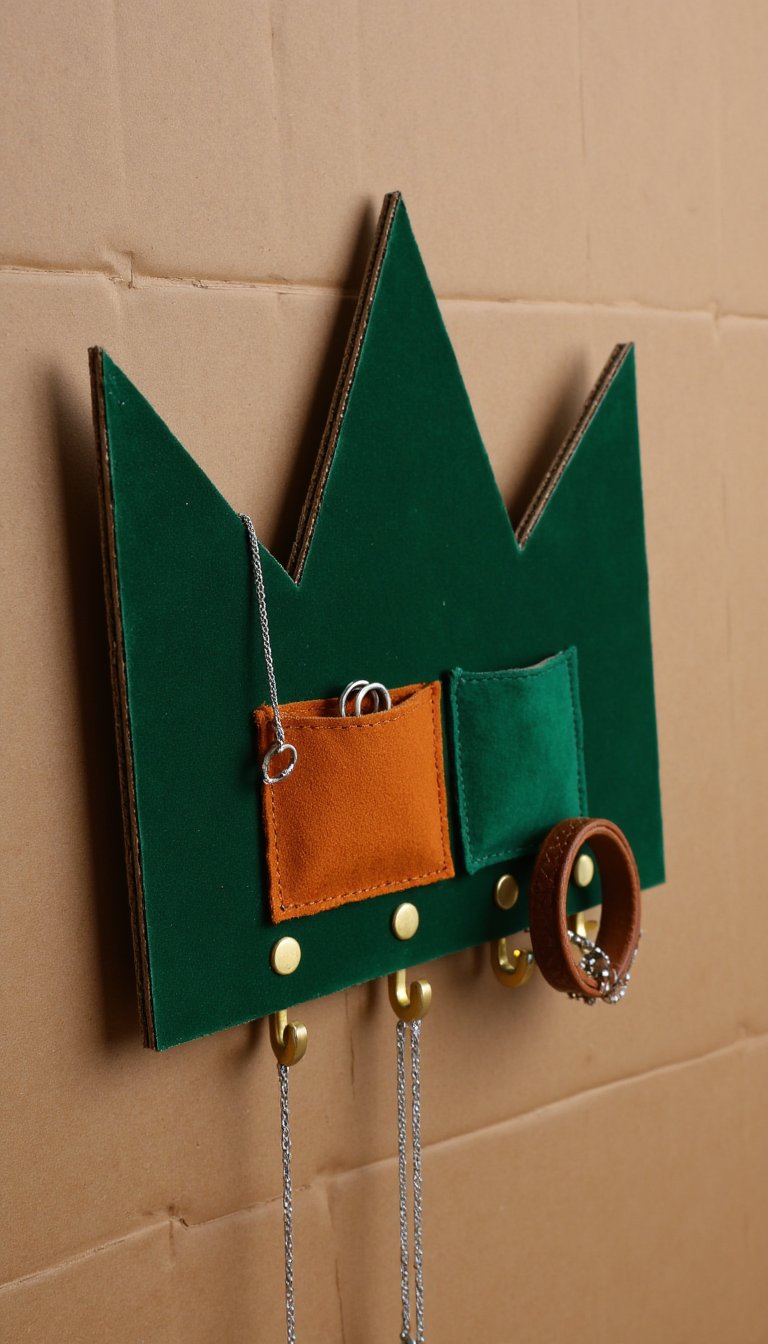
Cut a fun shape—a crown, a giant pearl, a simple rectangle—and cover it with velvet or felt. Screw in small decorative knobs or hooks for necklaces and bracelets. Add a few stitched pockets for rings. Hang it on your wall and finally untangle that jewelry box mess.
15. Faux Vintage Ceiling Tiles

This one is a showstopper. Source intricate designs from public domain “tin ceiling” patterns. Transfer them to cardboard, use a ballpoint pen to deeply emboss the lines, then dry-brush with metallic paint. Adhesive them to a plain ceiling medallion or even the top of a dull coffee table for a vintage touch.
16. Modern Cardboard Side Table

Engineer your way to cool furniture. Cut dozens of identical circles or hexagons. Glue them together into a solid, stable column for the base, and a wider, flat stack for the top. Sand the edges, apply several coats of clear polyurethane for durability, and you have a unique, sculptural accent table.
17. Wall-Mounted Animal Heads

A quirky, cruelty-free alternative to taxidermy. Find a simple profile silhouette of a deer, rhino, or fox. Cut the shape from multiple layers of cardboard for a 3D effect, glue together, and paint. Mount it on a painted wooden plaque. Instant whimsy for a nursery or office.
18. Decorative Cake Stands & Tiered Trays

Hostess on a budget? Create! Glue a sturdy cardboard circle to a cardboard tube (from wrapping paper) for a classic stand. For a tiered tray, connect different sized circles with shorter tubes. Seal thoroughly with Mod Podge, then paint or cover with decorative paper. Use for desserts, jewelry, or vanity items.
19. Punched Tin Lantern Effect
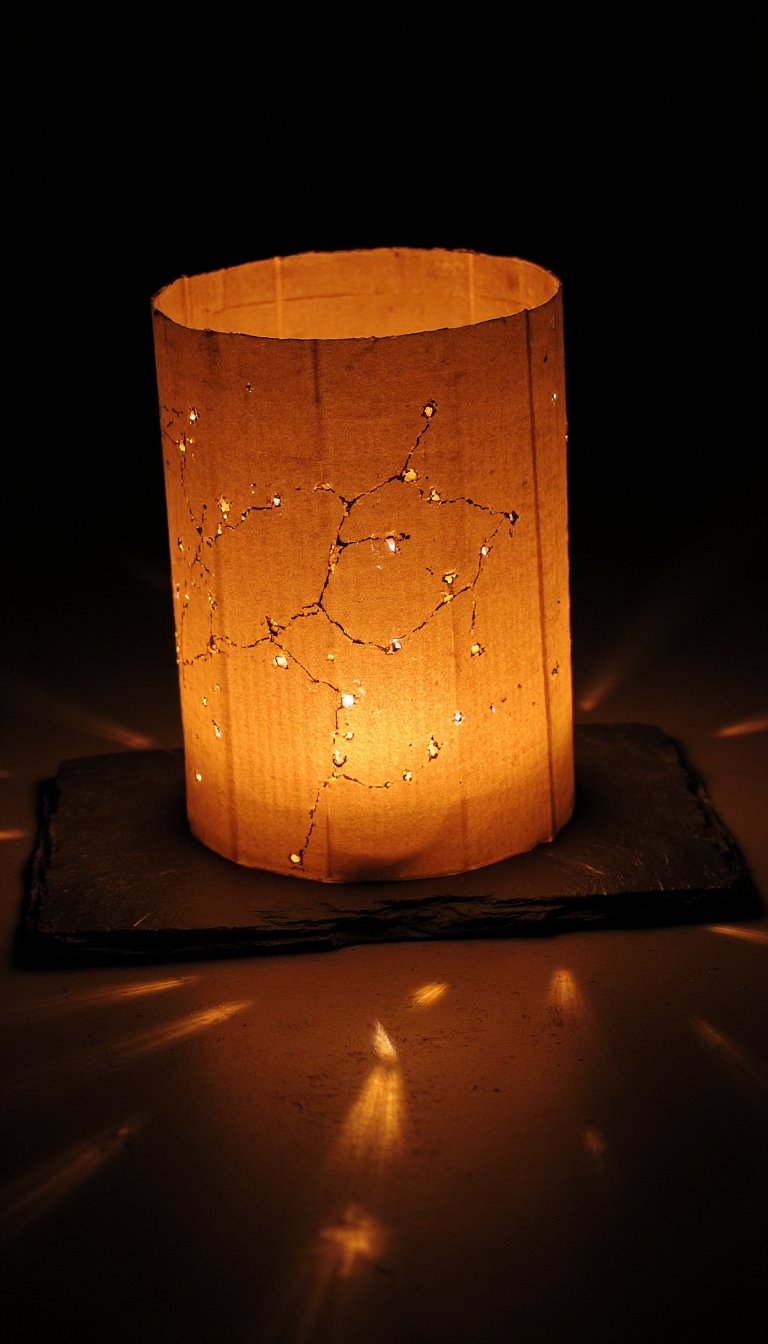
Create beautiful patterns of light. Take a cardboard cylinder or box, draw a design, and use a nail or awl to punch holes close together along the lines. Place a battery-operated tea light inside. At night, the pinpricks of light create a magical, starry effect.
20. Kids’ Art Display “Clothesline”
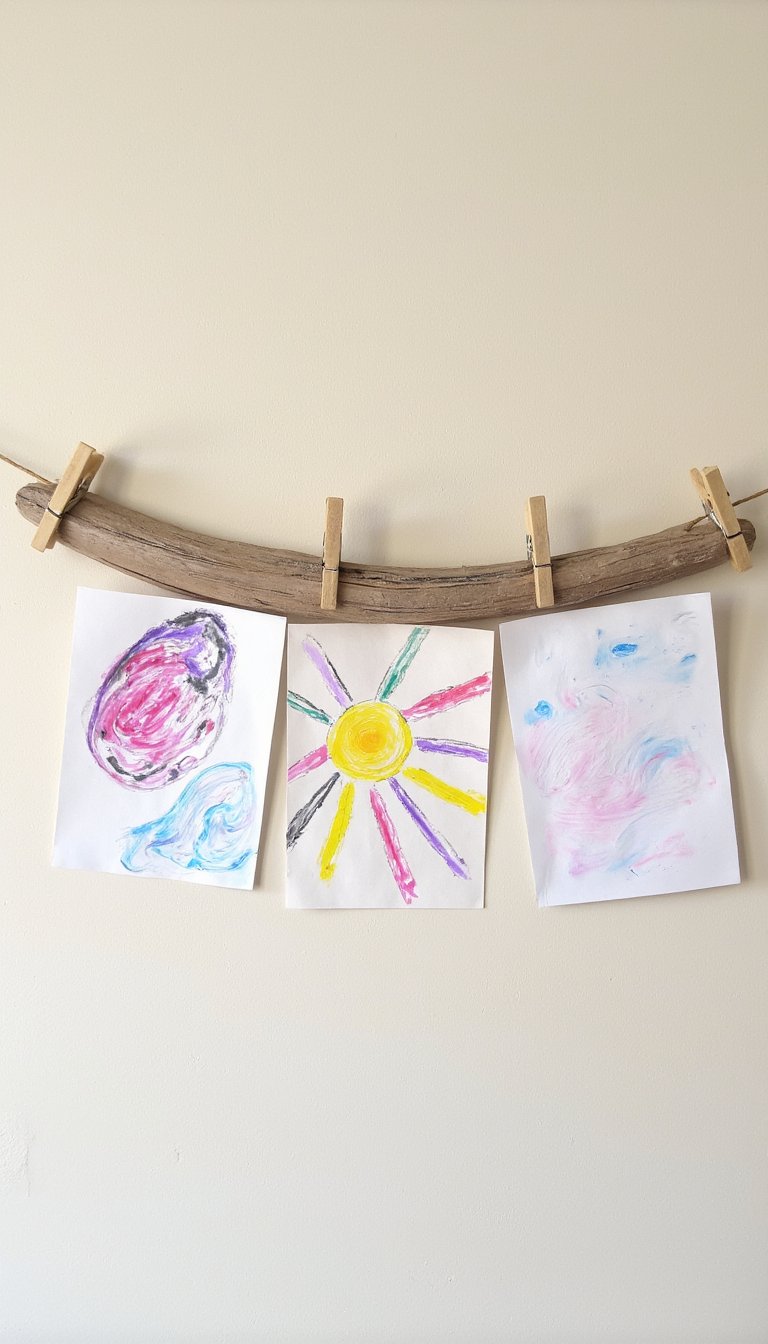
Give the fridge a break. Cut a long, wavy shape from cardboard and paint it to look like a piece of wood. Attach mini clothespins along it with hot glue. Hang it on the wall and use the clothespins to rotate your child’s latest masterpieces. It organizes the chaos adorably.
21. Chic Window Valance Cornice
Frame your windows with drama. Build a simple, shallow box to fit the width of your window. Cover it in a bold fabric or paint it a contrasting color. Mount it directly to the wall above the window frame. It hides curtain hardware and makes your ceilings look higher.
22. Abstract Layered Wall Hanging

Think of this as low-relief sculpture. Cut organic, free-form shapes in various sizes. Paint each layer a slightly different shade within the same color family. Glue them together at the centers, leaving the edges free to cast shadows. Suspend it from the wall with a discreet hook.
23. Personalized Gift Toppers & Ornaments

Cut out small initials, stars, or hearts. Decorate them with fine-line markers, washi tape, or glitter. Punch a hole, add a string, and you have a custom gift tag that doubles as an ornament. It’s the thoughtful, handmade touch that people remember.
24. Faux Moroccan Lattice Screen

Create an exotic pattern (look up “Moroccan trellis” for inspiration) and carefully cut it from a large sheet of cardboard with a sharp blade. Paint it a vibrant color like cobalt blue or emerald green. Place it in front of a plain window or use it as a headboard backdrop for instant global flair.
25. Desktop Pencil Holder Cactus Garden

This is as cute as it is functional. Cut cactus and succulent shapes from cardboard. Roll some into cylinders for the pots. Paint everything in bright, playful colors. Glue the “cacti” into the “pots” and use them to hold pens, brushes, and makeup brushes. No watering required. 😉
26. Reversible Seasonal Art

Make a sturdy cardboard canvas and paint/découpage one design on the front (e.g., a spring bouquet) and another on the back (a cozy winter scene). Add small picture hanger loops to both top edges. You can flip your main wall art with the seasons without putting new holes in the wall.
27. Entryway Key & Mail Organizer

Stop losing your keys! Design a wall-mounted piece with compartments. Include hooks on the bottom, a slotted shelf for mail, and a small shallow box for sunglasses. Cover it in a fun, wipeable contact paper. Mount it right by the door and reclaim your sanity every morning.
28. Giant Playful Wall Clock

Cut a huge circle (use a string and pencil compass). Paint a clean, minimalist face or get artistic with numbers. The key is a quality, separate clock movement kit (you can buy these online for under $10). Install it in the center, and you have a functional piece of oversized wall art.
29. Illuminated Marquee Letter or Number

Celebrate your initial or a special date. Cut a thick, block-style letter from multiple cardboard layers. Carve out holes for battery-operated fairy lights to poke through from the back. Seal the edges, paint it, and push the lights through. It creates a warm, cozy glow perfect for a bedroom or wedding decor.
See? That cardboard pile isn’t trash—it’s a free, limitless supply of creative potential. The best part of these cardboard crafts decoration ideas isn’t just the money you save (though that’s pretty sweet). It’s the satisfaction of looking at a beautiful corner of your home and knowing, “I made that from a box my cat once sat in.” So grab that box cutter, put on some good music, and start creating. Your dream decor is literally waiting in the recycling bin.