
Okay, let’s be real. You’ve got a toddler, a rainy afternoon, and a desperate need for an activity that doesn’t involve screen time or a major meltdown. Sound familiar? I’ve been there, knee-deep in crayons and glitter, searching for that magical project that holds their attention for more than three minutes. That’s where these butterfly crafts swoop in to save the day. They’re simple, they’re beautiful, and they tap into a toddler’s natural wonder. So, let’s ditch the stress and get ready to create a whole flutter of fun.
1. The Classic Coffee Filter Butterfly

This is the ultimate starter craft. It’s cheap, it’s colorful, and the process is half the fun. Give your toddler some washable markers and let them go to town coloring a white coffee filter. The more color, the better! Then, watch their eyes widen as you (or they can help!) spray the filter with a little water from a spray bottle. The colors will bleed and blend into a beautiful watercolor effect. Once it’s dry, just pinch the center, wrap a pipe cleaner around it for the body and antennae, and boom—you have a butterfly.
2. Clothespin & Pasta Wings

Got some dried pasta shapes? You’ve got butterfly wings. This craft is fantastic for fine motor skills. Let your toddler glue bow-tie pasta (farfalle, which is literally Italian for “butterflies”!) to each side of a wooden clothespin. Once the glue dries, they can paint the entire creation. The clothespin acts as the perfect body and gives little fingers something sturdy to hold onto while they decorate.
3. Handprint Butterfly Keepsake
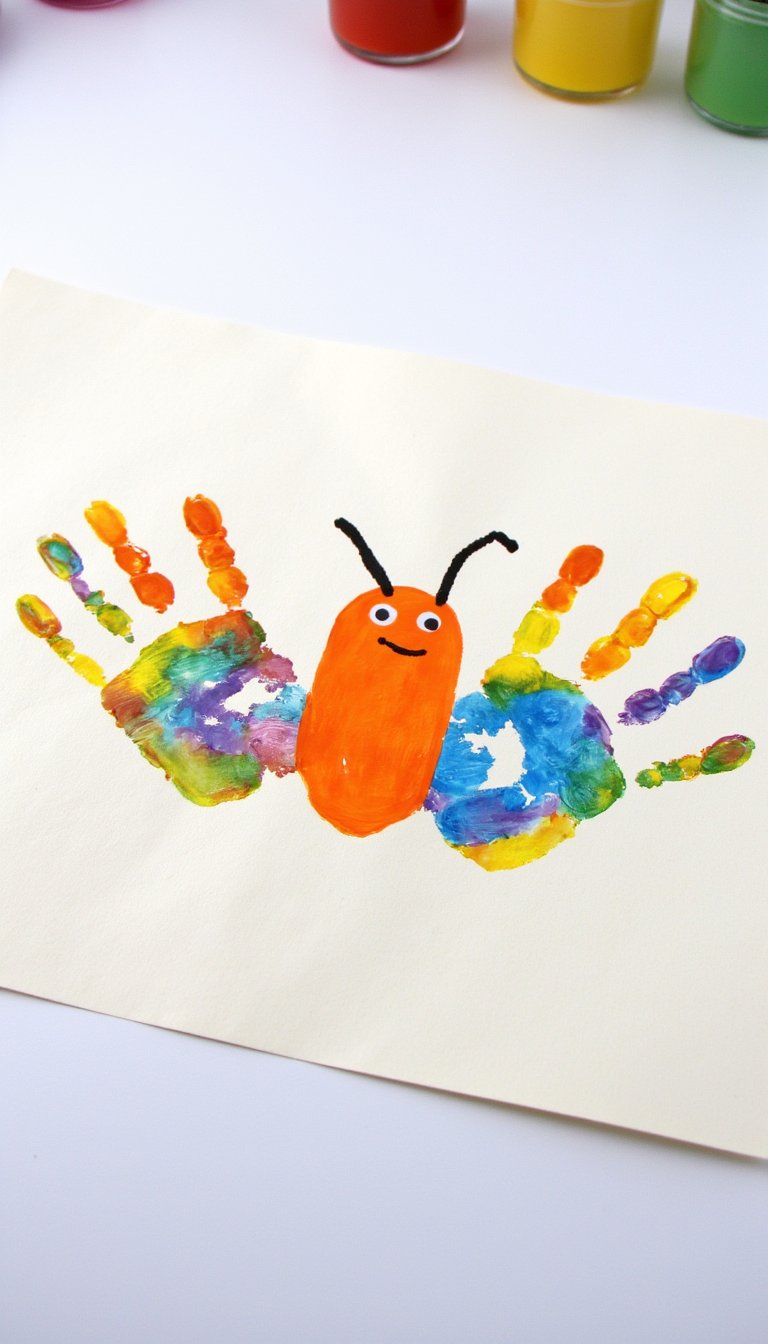
Warning: This one might make you a little emotional. Paint your toddler’s palms (but not their fingers) with their favorite color. Press them onto paper with the heels of their hands touching. The two handprints become the symmetrical wings. After it dries, add a body, antennae, and a smile. Date it on the back. You’ll cherish this personalized butterfly craft for toddlers long after their hands have grown.
4. Bubble Wrap Stamp Wings

Who knew packaging material could be so artistic? Cut a butterfly wing shape out of cardboard. Let your toddler paint directly onto a sheet of bubble wrap, then press the cardboard wing onto it to create a fantastic textured print. Make two, let them dry, and attach them to a craft stick body. The popping sound of the bubble wrap is an added sensory bonus!
5. Paper Plate Swirl Butterfly

This one is gloriously messy in the best way. Squirt two or three colors of washable paint in dollops onto a paper plate. Give your toddler a marble or a small ball, place the plate in a cardboard box, and let them tilt the box to roll the marble through the paint. The swirling paths create stunning, unique wings. Cut the plate into a butterfly shape once it’s dry.
6. Nature Collage Butterfly

Take your craft time outside! Go on a “treasure hunt” to collect small leaves, flower petals, and blades of grass. On a piece of paper, draw a simple butterfly outline. Then, let your toddler glue their natural treasures inside the lines to fill the wings. It’s a wonderful way to connect art with the outdoors.
7. Toilet Paper Roll Butterfly

The humble toilet paper roll is a crafting MVP. Flatten the top third of the roll on both sides to create the top wings, and the bottom third for the lower wings. Your toddler can then paint the entire structure. Add googly eyes and pipe cleaner antennae poking out the top. It stands up on its own, making it a perfect shelf decoration.
8. Sticker Resist Butterfly

This craft has a fun reveal. Place a few stickers (shapes, letters, or just circles) on a piece of white paper in the shape of butterfly wings. Let your toddler paint over the entire paper with watercolors. Once the paint is completely dry, peel off the stickers. The clean white shapes left behind create a beautiful resist effect. Draw a body in the center to connect the wings.
9. Pasta Shell Butterfly

Another pasta-tastic idea! Use large shell pasta for the wings. Your toddler can paint them, or you can dye them ahead of time with food coloring and vinegar. Glue four shells together (two large on top, two smaller below) and add a pom-pom or a piece of pasta for the body. It’s a cute, 3D butterfly craft that feels fancy but is so simple.
10. Chalk & Glue Outline

Draw a simple butterfly outline with a thick line of white school glue. Let the glue dry completely until it’s clear and raised. This part requires patience, but it’s worth it. Then, give your toddler some colorful chalk pastels and show them how to rub the chalk over the paper. The color will stick to the paper but not the glue outline, making the butterfly magically appear.
11. Footprint Butterfly Family

Why stop at hands? This is a hilarious one to get the whole family in on. Paint the bottom of your toddler’s foot and make a print. Rotate the paper 180 degrees and make a second print with the heel touching the first heel. You now have a heart-shaped set of wings! Make a big one with your foot and a tiny one with a baby sibling’s foot for a whole flutter.
12. Magnetic Butterfly Puppet

Add some play to your craft. Decorate a small paper butterfly, then tape a magnet to the back. On a craft stick, tape another magnet. Your toddler can now make the butterfly “fly” and dance by moving the stick underneath the paper. It’s instant imaginative play fuel.
13. Tissue Paper Stained Glass

Cut a butterfly shape out of black construction paper to create a sturdy frame. Cut out the inside of the wings, leaving about an inch border. Then, let your toddler tear and crumple small pieces of colorful tissue paper and glue them to a sheet of clear contact paper. Place the black frame on top, seal with another sheet of contact paper, and trim. Hang it in a window for a beautiful light catcher.
14. Sponge Stamp Symmetry

This is a sneaky lesson in symmetry. Cut a simple sponge into a wing shape. Let your toddler dip it in paint and stamp one side of a folded piece of paper. Then, while the paint is still wet, fold the paper and press down. Open it up to reveal a perfectly symmetrical butterfly! Just add a body down the center fold line.
15. Puzzle Piece Butterfly

Got a puzzle with missing pieces? Don’t throw it out! Upcycle those lonely pieces into art. Let your toddler glue assorted puzzle pieces onto cardstock in the shape of butterfly wings. They can paint over the whole thing in a single color for a unified look, or leave them multicolored for a quirky, textured bug.
16. Fly Swatter Splat Butterfly

This is pure, unadulterated toddler joy. Yes, you read that right. Dip a clean fly swatter into a shallow plate of washable paint. Let your toddler “splat” it onto a large piece of paper. Make two prints side-by-side. The splat pattern makes for wild, abstract wings. The cleanup is worth the giggles, I promise.
17. Leaf Rubbing Wings

A classic technique for a new purpose. Place a few flat leaves under a sheet of paper. Give your toddler the side of a peeled crayon and show them how to rub over the paper to reveal the leaf’s veins and shape. Cut out the leaf rubbings into wing shapes and attach them to a clothespin or paper body.
18. Yarn-Wrapped Butterfly

Excellent for building those little hand muscles. Cut a butterfly shape from sturdy cardboard. Punch holes around the edges. Tape the end of a piece of colorful yarn to the back and let your toddler “sew” by wrapping the yarn through the holes in any pattern they like. The finished product is tactile and lovely.
19. Dot Sticker Wings

No glue, no mess, just fine motor practice. Draw a simple butterfly outline. Give your toddler sheets of colorful dot stickers (the kind you use for garage sales) and let them fill the wings by placing the stickers inside the lines. It’s shockingly engaging and creates a cool pointillist effect.
20. Paper Bag Butterfly Puppet

Craft and play, combined. Decorate a small paper lunch bag with wings, eyes, and antennae. The bottom flap of the bag becomes the butterfly’s mouth. Your toddler can slip their hand inside to make it talk and fly around the room. Instant puppet show!
21. Ice Cube Paint Melts

A sensory science experiment disguised as art. Freeze washable paint mixed with water in an ice cube tray (with a popsicle stick in each for a handle). On a hot day, let your toddler swirl the melting paint cubes over butterfly-shaped paper. The colors will blend and melt in the most beautiful, cool way. It’s process art at its finest.
And there you have it—21 ways to turn an ordinary day into a butterfly-filled adventure. The best part? It’s not about perfect results. It’s about the sticky fingers, the concentrated frowns, the proud “I did it!” declarations, and the joy of making something together. So, pick one that speaks to you, embrace the beautiful chaos, and get crafting. Your little caterpillar is ready to transform into an artist. Now, which one will you try first? 😊