
Okay, preschool teachers and craft-loving parents, raise your hand if you’ve ever stared at a pile of coffee filters and googly eyes and thought, “There has to be more.” We all have. The classic butterfly craft is a rite of passage, but what if we told you the world of preschool butterfly crafts is so much bigger and more brilliant? We’ve gathered 19 of the most engaging, skill-building, and downright beautiful butterfly crafts for preschool that will have your little caterpillars (see what we did there?) fluttering with excitement. No more boring cut-and-paste—let’s get those tiny hands creating magic.
1. The Classic Coffee Filter Watercolor Butterfly

We’re starting with a classic for a reason: it’s pure, simple magic. Give each child a white coffee filter and let them go wild with washable markers. Then, watch their eyes light up as they spray it with a water bottle or carefully dip it into a shallow tray of water. The colors bleed and blend into a stunning, unique pattern every single time. Once dry, pinch the center with a clothespin or pipe cleaner to form the wings and body. It’s a fantastic lesson in color mixing and capillary action, disguised as pure fun.
2. Clothespin & Pasta Butterfly

This craft is a powerhouse for fine motor skill development. Let your preschoolers paint or dye different types of pasta—bow ties, wheels, shells—in vibrant colors. Once dry, they can glue their colorful pasta pieces onto a clothespin to create the wings. Add googly eyes and pipe cleaner antennae to the clothespin head. The best part? The clothespin acts as a functional clip, so their butterfly can “land” on artwork, curtains, or a special card for grandma.
3. Paper Plate Symmetry Painting

This one teaches a core scientific concept in the most hands-on way: symmetry. Fold a paper plate in half and cut it into a butterfly shape (do this step for them). Open it up and let kids dab paint on only one side of the fold. Then, fold it back and press! When they open it, they reveal a perfectly symmetrical paint blot. It’s a “wow” moment every time and a concrete way to understand that butterfly wings are mirror images.
4. Nature Walk Collage Butterfly

Take your craft time outdoors! Go on a nature walk and collect small, lightweight treasures: fallen petals, tiny leaves, blades of grass, and small seeds. Back inside, provide a butterfly outline cut from cardstock or contact paper. Let the children arrange and glue their natural materials onto the outline to create a beautiful, textured butterfly. This craft connects art to the natural world and encourages observation.
5. Bubble Wrap Stamp Wings

Who doesn’t love popping bubble wrap? First, let them get the popping urge out (mostly). Then, cut a piece of bubble wrap and wrap it around a rolling pin or a small cardboard tube. Let kids roll it in a tray of paint, then roll it onto a pre-cut butterfly wing shape. The result is a fantastic, dotty texture that looks like scales. Pair two stamped wings with a craft stick body, and you have a masterpiece.
6. Toilet Paper Roll Monarch

Upcycle those cardboard tubes into something majestic. Flatten the top third of the tube to create the butterfly’s head and antennae shape. Then, let the kids paint the tube body black. For the iconic orange and black wings, you can provide pre-cut shapes or have them glue on orange tissue paper and add black markings with paint or marker. It’s a great opportunity to talk about the famous Monarch butterfly migration.
7. Footprint & Handprint Butterfly Keepsake

Get ready for the cutest keepsake ever. Paint the bottom of a child’s foot (or both for a bigger butterfly) and press it onto paper with the heels together. The footprints become the wings. Once dry, add a handprint on either side of the “body” with fingers spread to be the antennae. Add a face, and you have an adorable, personal piece of art that parents will treasure forever. Pro tip: Use washable paint and have wipes ready!
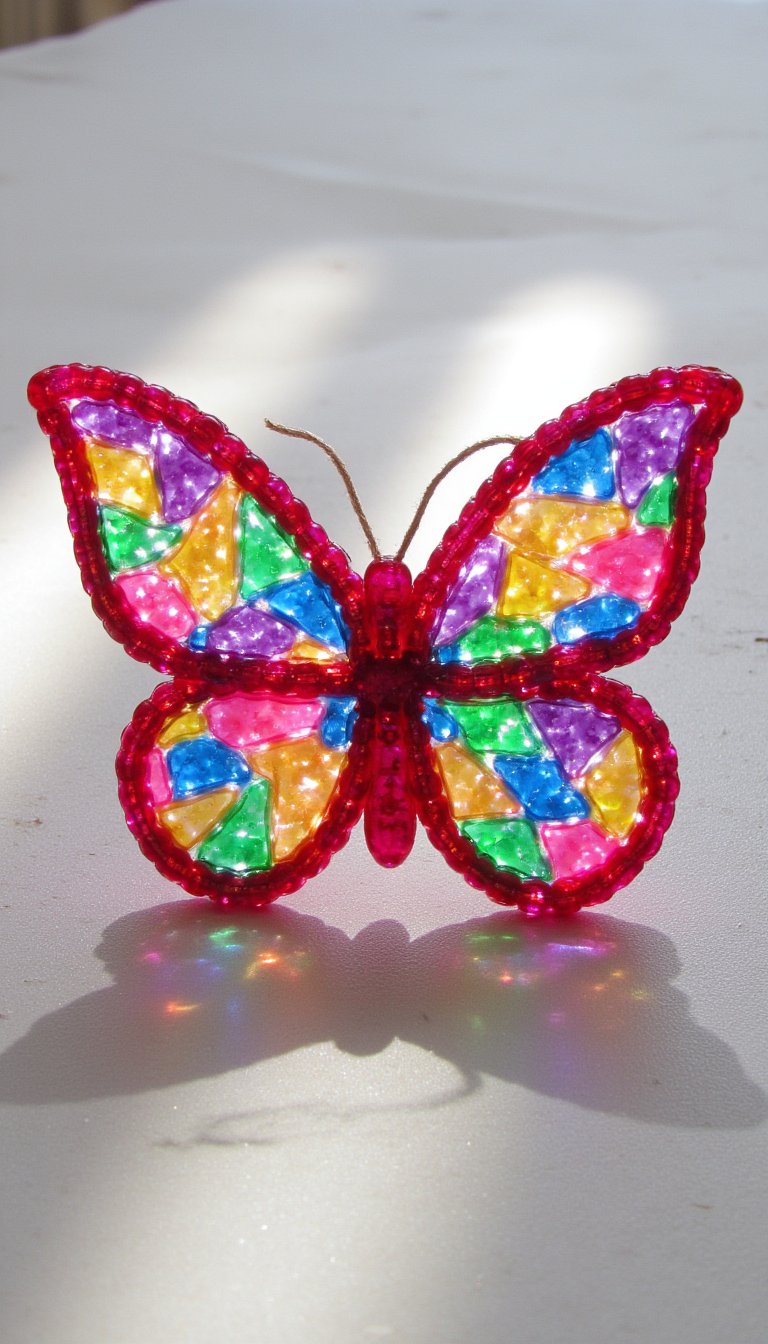
8. Contact Paper Stained Glass Butterfly

This no-mess craft is perfect for younger preschoolers. Cut a butterfly shape out of the center of a piece of construction paper to create a frame. Peel the backing off a piece of clear contact paper and tape it, sticky-side up, to the table. Place the frame on top. Then, let kids stick small pieces of tissue paper, cellophane, or even leaves onto the sticky surface. Seal it with another piece of contact paper and hang it in a window. The sunlight shining through is breathtaking.
9. Sponge-Painted Swallowtail

Cut simple sponge shapes—triangles, circles, ovals—and clip them with clothespins to make handles. Provide large butterfly outlines and a few colors of paint. Demonstrate dabbing the sponge to create prints, not smears. Kids can layer colors and shapes to fill their butterfly wings with beautiful, textured patterns. This method is less messy than finger painting and gives a really professional, pointillism-style result.
10. Butterfly Life Cycle Necklace

Craft meets science lesson! Create or have the kids paint four beads: a white bead (egg), a green bead (caterpillar), a brown bead (chrysalis), and a colorful bead (butterfly). String them in order onto a piece of yarn or a shoelace. As they string each bead, talk about that stage of the life cycle. They get to wear their learning home, which makes explaining it to their family a breeze.
11. Mosaic Butterfly with Torn Paper

No scissors needed! This activity is all about tearing, which is excellent for building hand strength. Provide sheets of colored construction paper, tissue paper, or old magazines. Let the children tear the paper into small pieces. Then, they can glue these pieces onto a butterfly template, filling in the spaces like a mosaic. The irregular shapes create a wonderful, abstract effect and it’s wonderfully inclusive for all skill levels.
12. Flyable Popsicle Stick Butterfly

This butterfly can actually fly! Glue two large popsicle sticks in an “X” to form the wings. Let kids decorate them with markers, stickers, or gems. Then, attach a third, full-length popsicle stick down the center as the body. Glue a small pom-pom at the top for a head. Finally, tape a long piece of ribbon or curling ribbon to the bottom. Kids can run with it and watch their butterfly “fly” behind them on the ribbon tail.
13. Suncatcher with Pony Beads
Warning: This one requires adult supervision for the melting step, but the result is worth it. Have children fill a metal butterfly-shaped cookie cutter (placed on parchment paper) with colorful plastic pony beads. An adult then bakes it in a toaster oven or regular oven at low heat until the beads just melt together. Once cooled, pop it out, add a string, and hang it. The sun shines through the translucent beads beautifully.
14. Paper Bag Puppet Butterfly

Add some dramatic play to craft time! Use a standard lunch-sized paper bag. The bottom flap becomes the butterfly’s head. Kids can decorate the main body of the bag (the wings) with any method they like—crayons, collage, paint. Glue on antennae and eyes to the flap. Once dry, they can slip their hand inside and make their butterfly talk, fly, and tell stories. It’s a craft that keeps on giving.
15. Chalk Pastel Smudge Wings

Time to get a little messy in the best way. Draw a simple butterfly outline on black construction paper. Let kids color in the wings heavily with bright chalk pastels. Then, show them how to use their finger to smudge and blend the colors outward. The black paper makes the vibrant chalks pop, and the smudging creates a soft, ethereal, dreamlike effect. A quick spritz of hairspray (by an adult) will set the chalk.
16. LEGO or Duplo Printed Wings

Incorporate beloved building blocks into art! Use the bumpy sides of LEGO or Duplo bricks as stamps. Dip them in paint and press them onto paper in patterns to create butterfly wings. You can use different sized bricks to make different dot patterns. It’s a fantastic way to combine construction play with 2D art and explore patterns and repetition.
17. CD/DVD Shiny Butterfly

Got old CDs or DVDs? They make the most incredible, iridescent butterfly wings. Carefully break the disc (place it in a paper bag and hit with a hammer—adults only!). Kids can then glue the shiny pieces onto a cardboard butterfly cutout. The rainbow reflections are mesmerizing. Add a pipe cleaner body and antennae. It’s a stellar lesson in upcycling and light reflection.
18. Butterfly Sensory Bottle

This isn’t just a craft; it’s a calming tool. Fill a clear plastic water bottle 3/4 full with water. Add a few spoonfuls of glitter, tiny butterfly confetti, and small beads. Top it off with clear glue or baby oil to slow down the fall of the glitter. Superglue the lid on securely. Kids can shake it and watch the butterfly “storm” swirl and settle. It’s magical and great for quiet time.
19. Collaborative Giant Wall Butterfly

End your butterfly unit with a bang. Draw a massive butterfly outline on a large piece of butcher paper. Let every child in the class contribute to decorating one section. They can paint, color, stamp, or collage their assigned spot. When you put it all together, you have a stunning, collaborative piece that represents the whole class’s creativity. Hang it proudly in the hallway for everyone to see.
So, there you have it—19 ways to transform your preschool classroom or kitchen table into a butterfly conservatory. From messy painting to thoughtful collages, each of these butterfly crafts for preschool targets essential skills: fine motor development, color recognition, sensory exploration, and basic science concepts. The real magic isn’t just in the final product (though they will be gorgeous), but in the process of creating together. Now, which one will you try first? Your little artists are ready to spread their wings. Let’s get crafting!