Is your kitchen table perpetually covered in glitter and glue sticks? Do your kids see a coffee filter and immediately think “wings”? Mine too. There’s something magical about butterfly crafts that captures every child’s imagination. They’re a perfect blend of science, art, and pure, whimsical fun. So, if you’re ready to turn a rainy afternoon into a kaleidoscope of creativity, you’ve landed in the right spot. We’ve gathered 27 of the best, most engaging butterfly crafts for kids of all ages. No fancy supplies needed—just a dash of enthusiasm and a willingness to embrace a little (okay, a lot of) colorful mess.
1. The Classic Coffee Filter Butterfly
This is the O.G. of butterfly crafts, and for good reason. It’s cheap, easy, and the results are always stunning. Let your kids go wild with washable markers on a plain white coffee filter, then spritz it with water from a spray bottle. Watch the colors bleed and blend into a beautiful watercolor effect. Once it’s dry, pinch the center with a clothespin, add googly eyes and pipe cleaner antennae, and voilà! Instant magic. Pro tip: Use a binder clip for smaller hands instead of a clothespin.
2. Pasta Butterfly Life Cycle
Combine crafting with a sneaky science lesson! This one is brilliant for visual learners. Grab four different pasta shapes: orzo or small shells for the eggs, rotini for the caterpillar, shell pasta for the chrysalis, and bowtie pasta for the butterfly. Let the kids paint and glue each piece onto a paper plate labeled with the stages. It’s a hands-on way to understand metamorphosis that sticks way better than any textbook diagram.
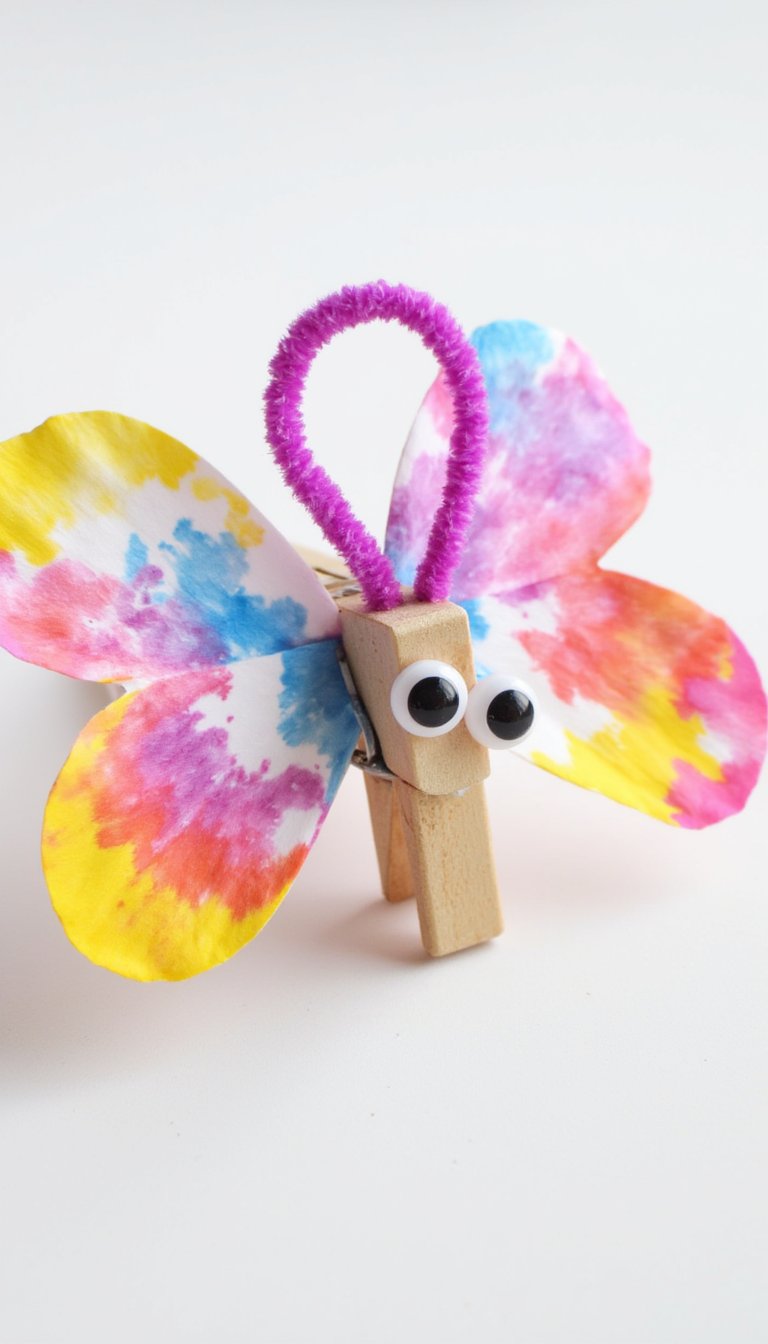
3. Clothespin & Tissue Paper Butterflies
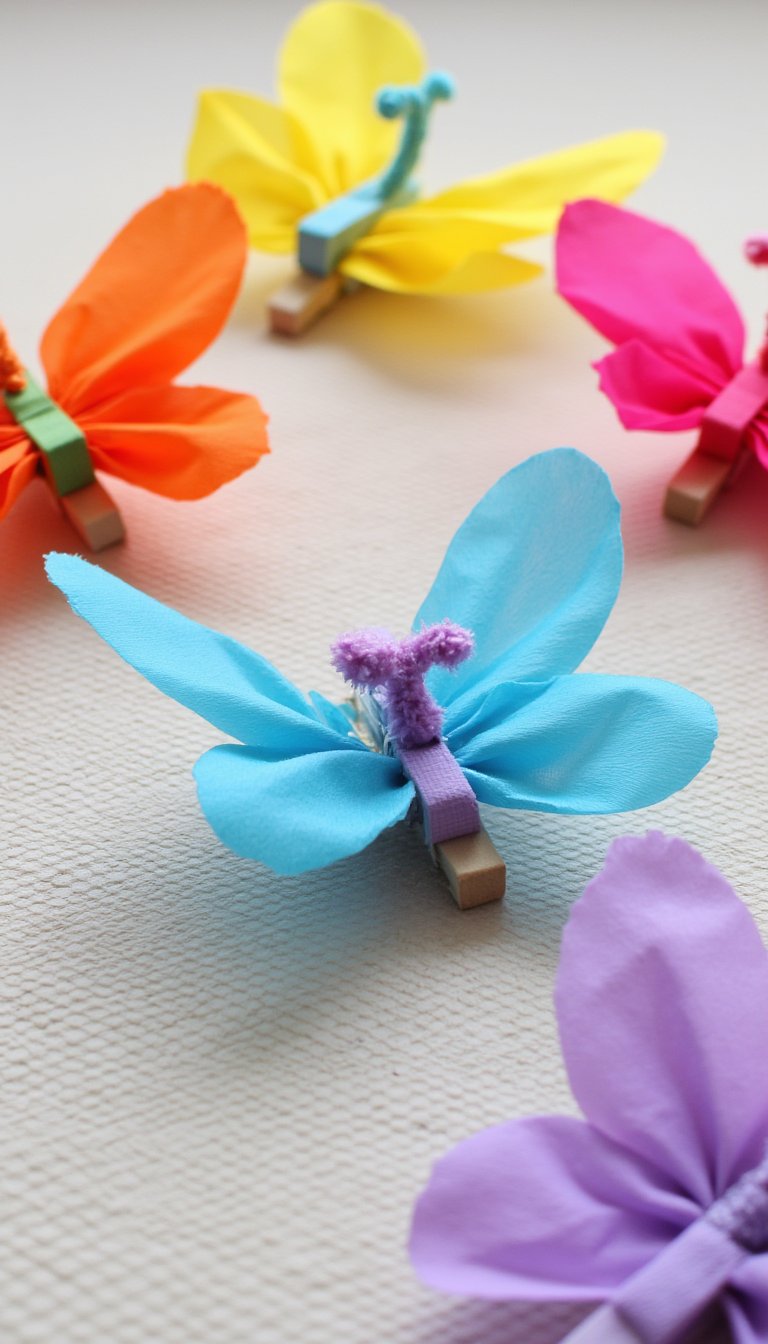
Got a stash of old clothespins? Transform them into delicate butterflies. Cut simple wing shapes from colorful tissue paper or even patterned napkins. Glue the wings to the sides of the clothespin, then let your child decorate the “body” with paint, markers, or washi tape. Add tiny pom-poms or sequins for extra flair. These make adorable bookmarks, gift toppers, or fridge magnets with a little magnet glued on the back.
4. Toilet Paper Roll Stamp Butterflies
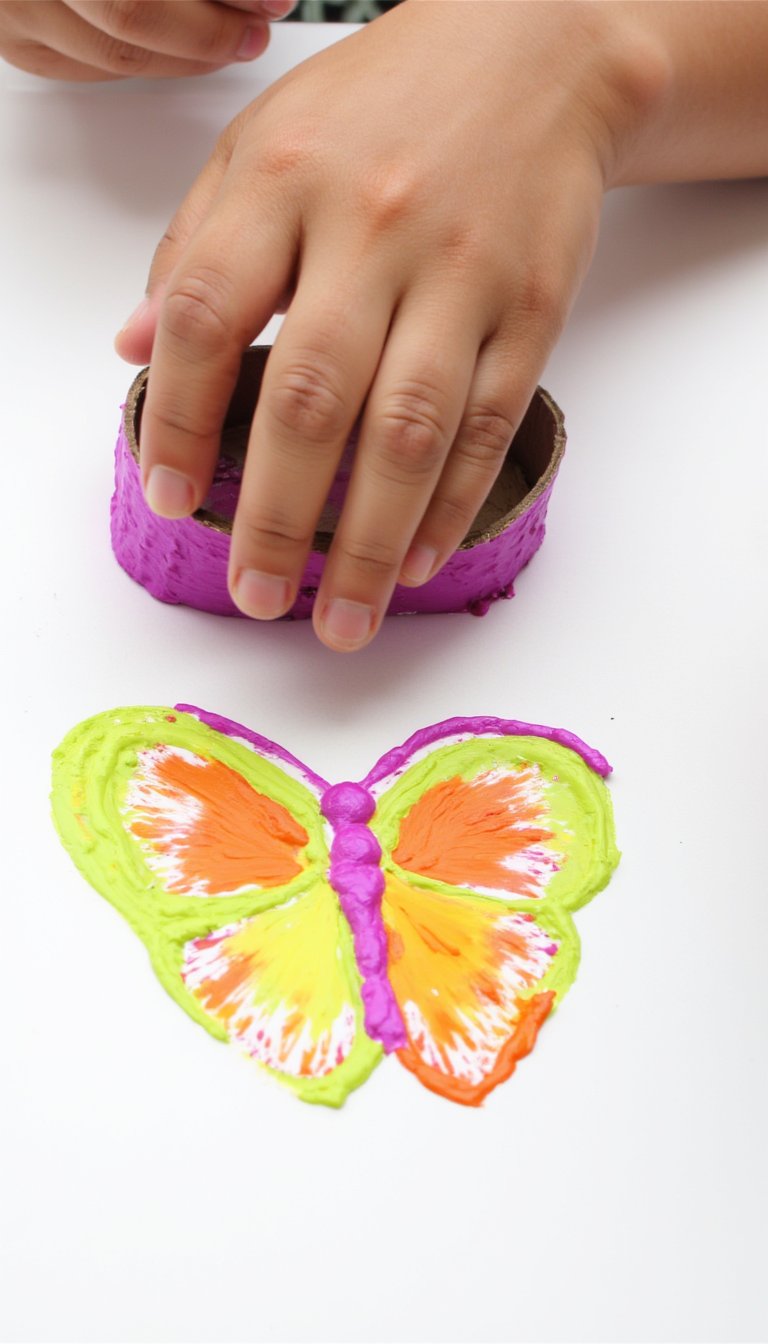
Don’t toss those cardboard tubes! Flatten one end to create a heart shape, then secure it with a piece of tape. You’ve just made a perfect butterfly stamp. Dip it in paint and stamp onto paper to create symmetrical wings. Once the paint dries, the kids can draw in the body, antennae, and decorate the wings. It’s a fantastic introduction to symmetry and printmaking, all with recycled materials.
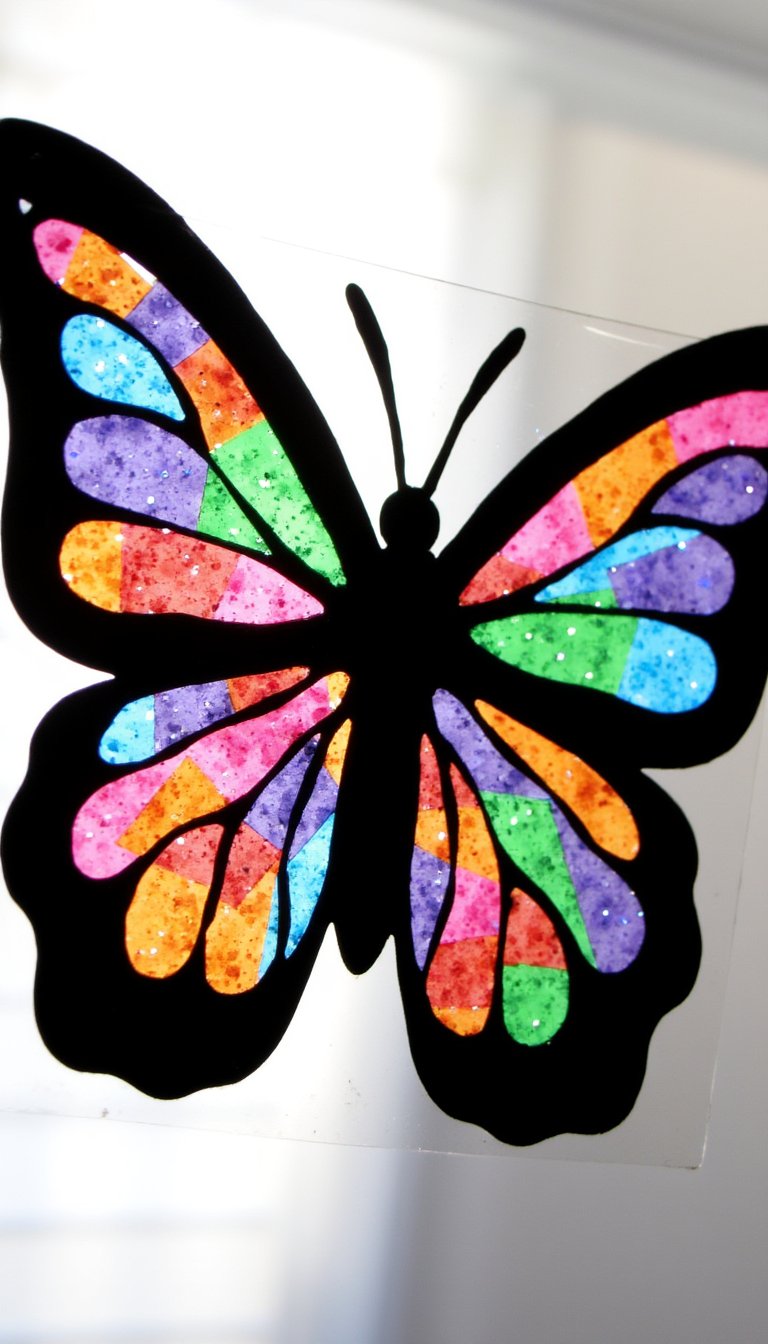
5. Stained Glass Butterfly Window Clings
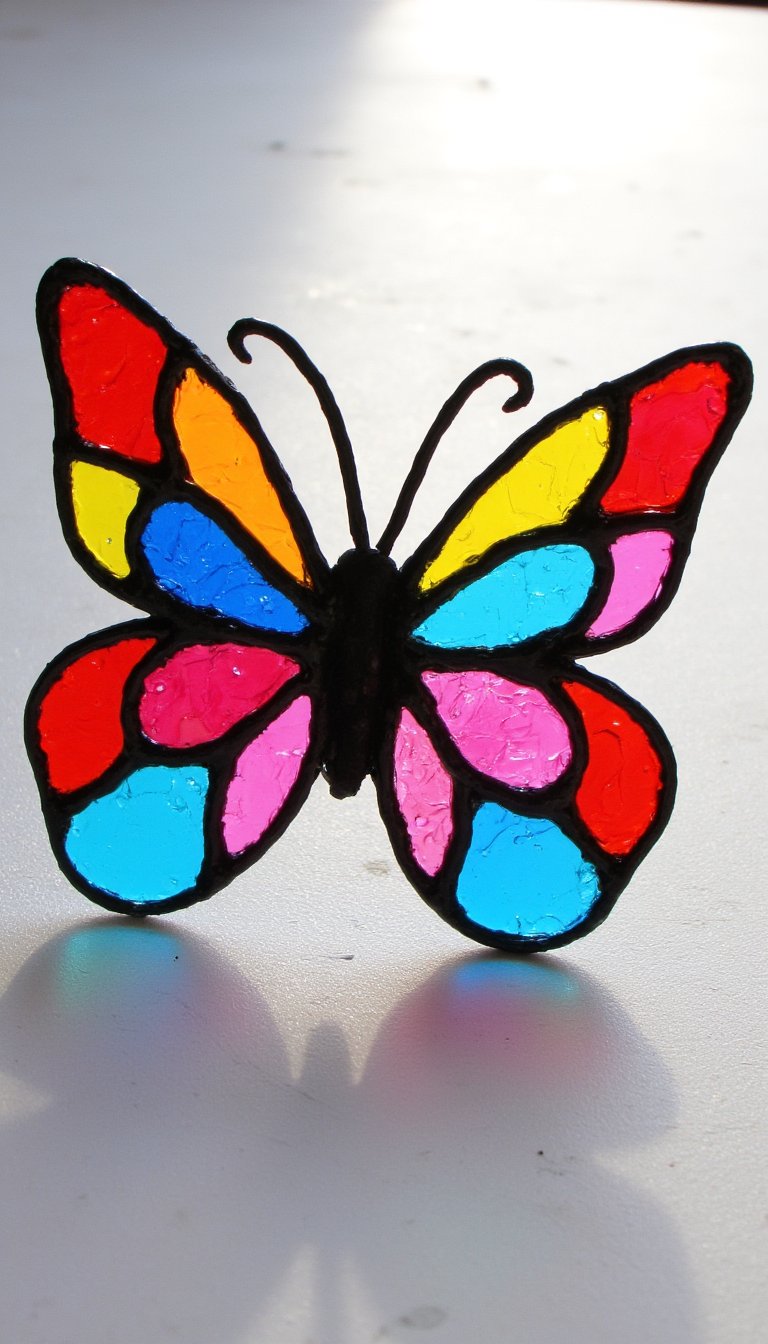
Bring some color to your windows! Use black puffy paint or a sharpie to draw a butterfly outline on a sheet protector or wax paper. Fill the sections with drips of liquid food coloring mixed with a tiny bit of glue, or use colored tissue paper pieces. Let it dry completely, then peel your “stained glass” creation off and stick it to the window. The sunlight shining through is absolutely breathtaking.
6. Paper Plate Swirling Marble Butterfly
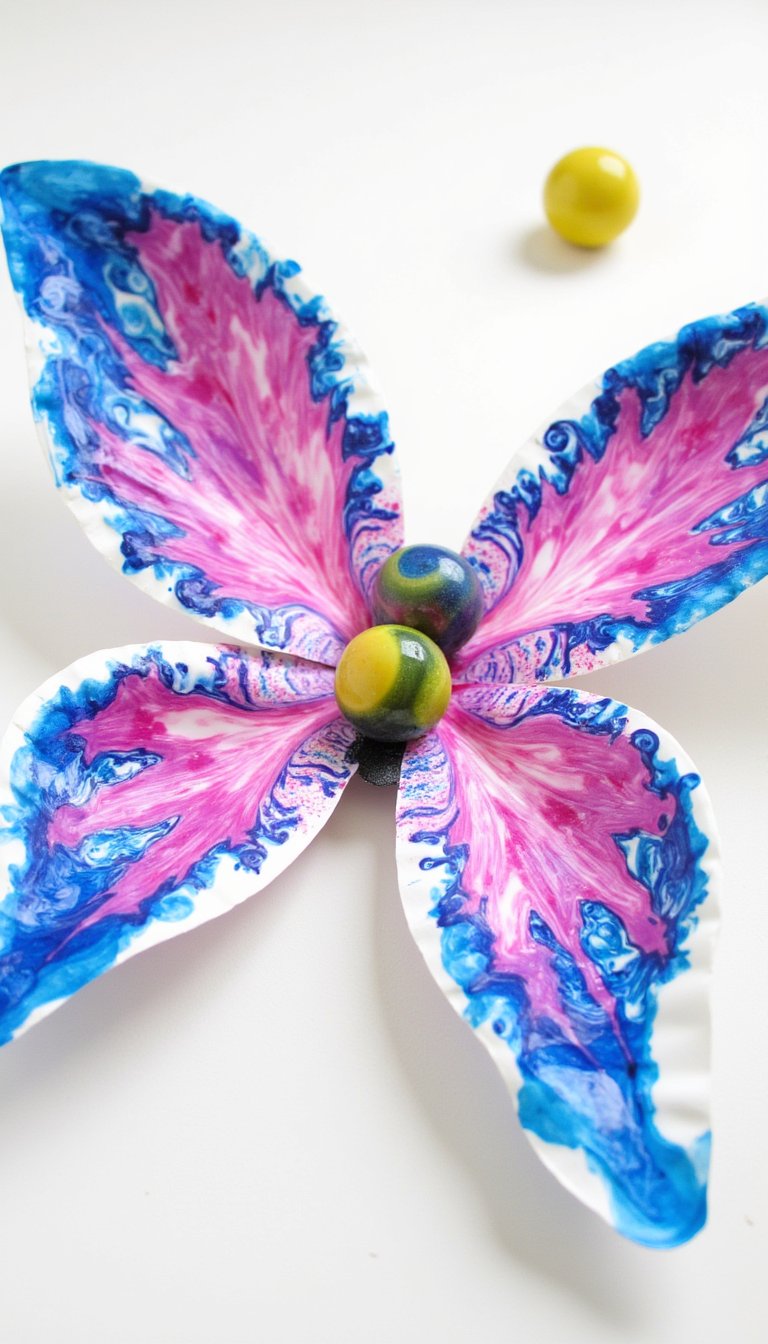
This one is gloriously messy. Cut a paper plate into a butterfly shape. Drop dollops of different colored liquid tempera paint onto the wings. Add a few marbles, then let your child tilt and shake the plate in a shallow box to roll the marbles through the paint. The swirling, marbled patterns you create are uniquely beautiful every single time. It’s process art at its finest.
7. Nature Walk Butterfly Collage
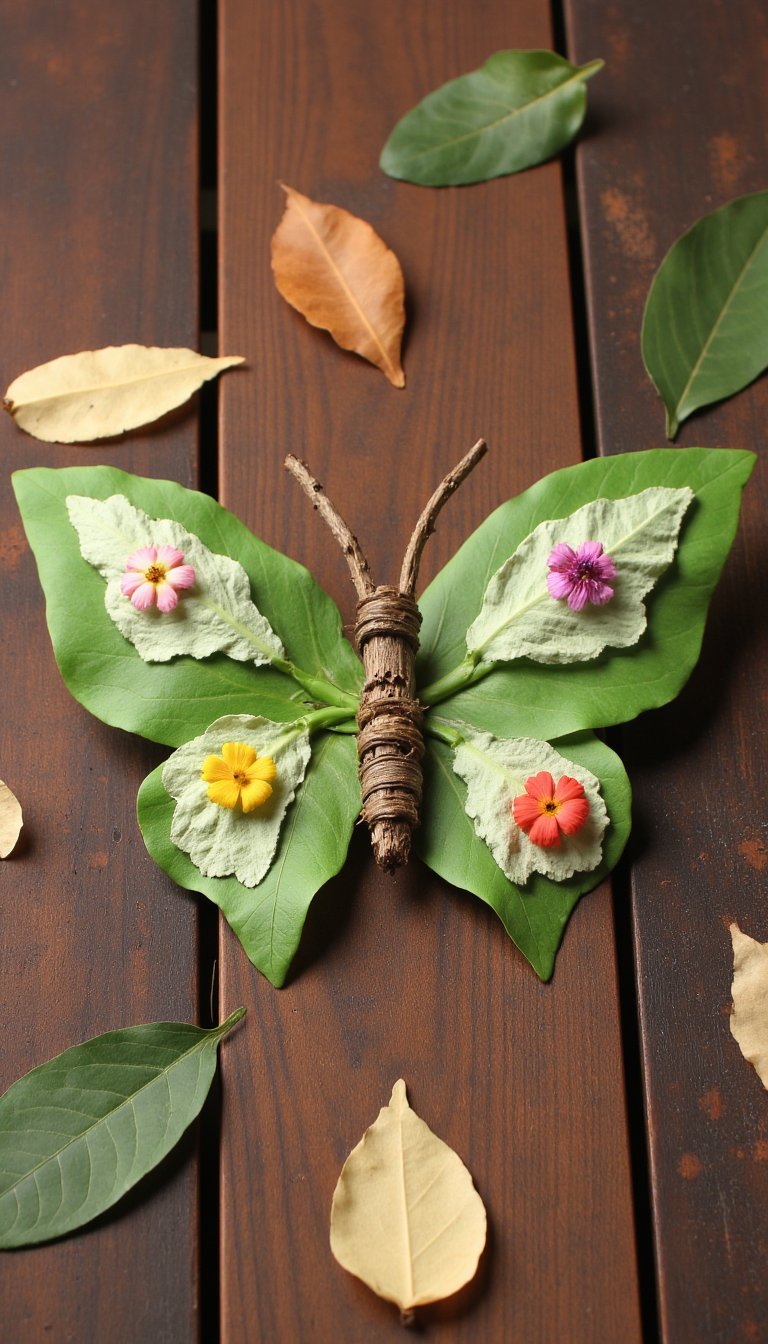
Take the crafting outdoors! Go on a nature walk and collect small, flat treasures: leaves, flower petals, thin twigs, and interesting seeds. Back home, use a sturdy piece of cardboard as your base. Arrange the leaves as wings, a twig as the body, and petals for decoration. Glue everything down to create a beautiful, ephemeral piece of natural art. It connects kids to patterns they see in real butterflies.
8. Bubble Wrap Print Wings
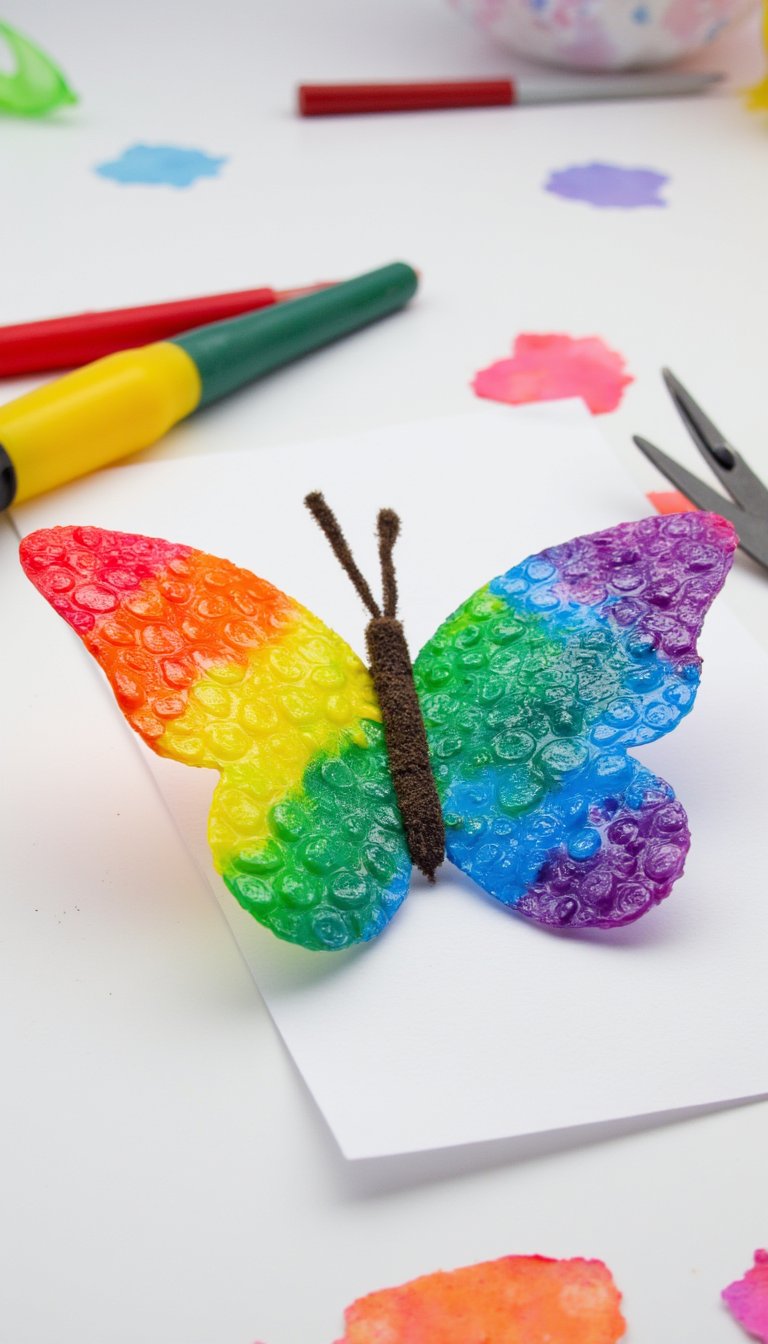
Who knew packaging material could be so artistic? Cut a piece of bubble wrap and let your child paint directly onto the bubbles. Press it onto a pre-cut butterfly shape (cardstock works well), smooth it out, and peel it back to reveal a fantastic textured print. The small bubbles create a perfect scale-like pattern. You can even use different colors on the same wrap for a multi-hued effect.
9. Popsicle Stick Puzzle Butterflies
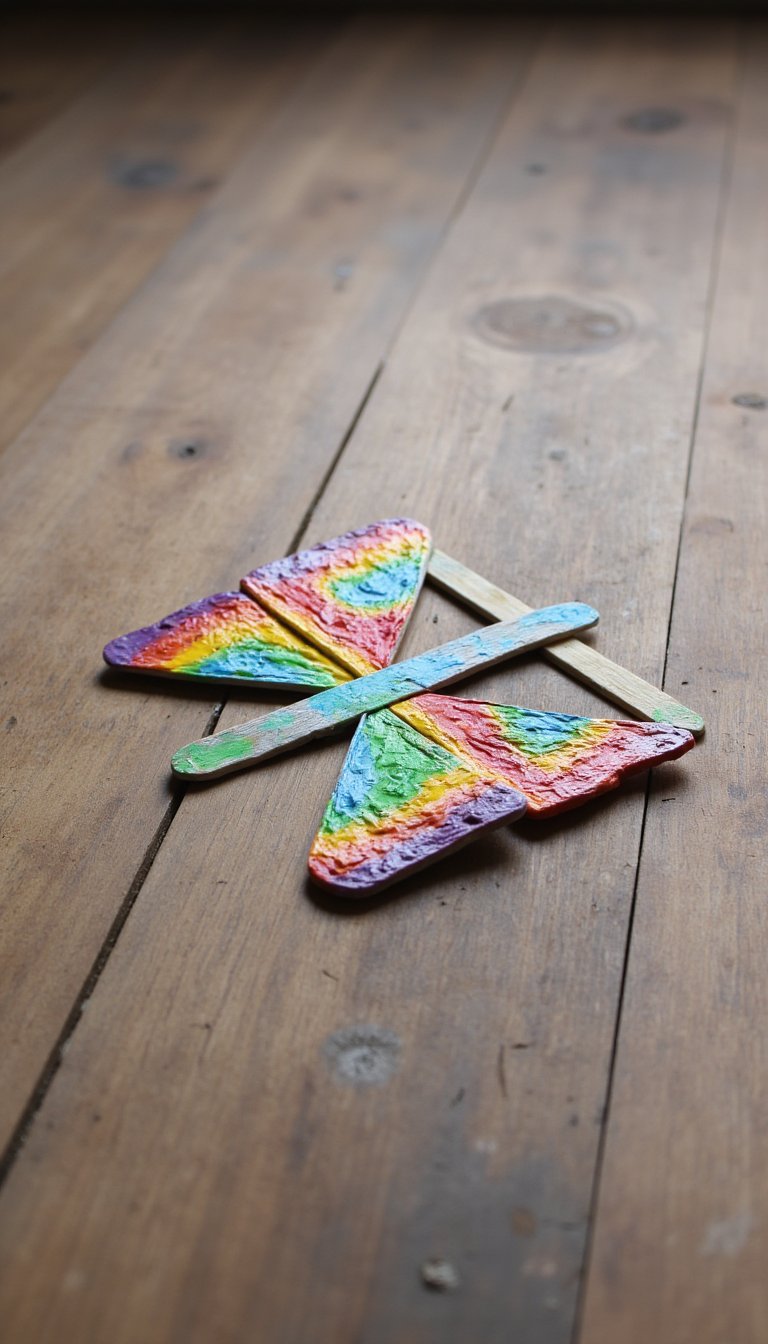
Line up 6-8 wide popsicle sticks side-by-side on a piece of painter’s tape. Draw or paint a butterfly picture across all the sticks. Once it’s completely dry, remove the tape and mix up the sticks! Now your child has a homemade puzzle. This craft doubles as a toy and is great for developing problem-solving skills. You can also write numbers or letters on the back for an extra learning twist.
10. Salt Dough Butterfly Ornaments
Mix up a batch of simple salt dough (flour, salt, water), roll it out, and use cookie cutters to create butterfly shapes. Don’t forget to poke a hole at the top for hanging! After baking and cooling, the real fun begins: painting and glittering. These make cherished keepsakes, holiday ornaments, or sweet gifts for grandparents. They have a lovely, rustic weight to them.
11. Fork-Painted Symmetrical Butterflies
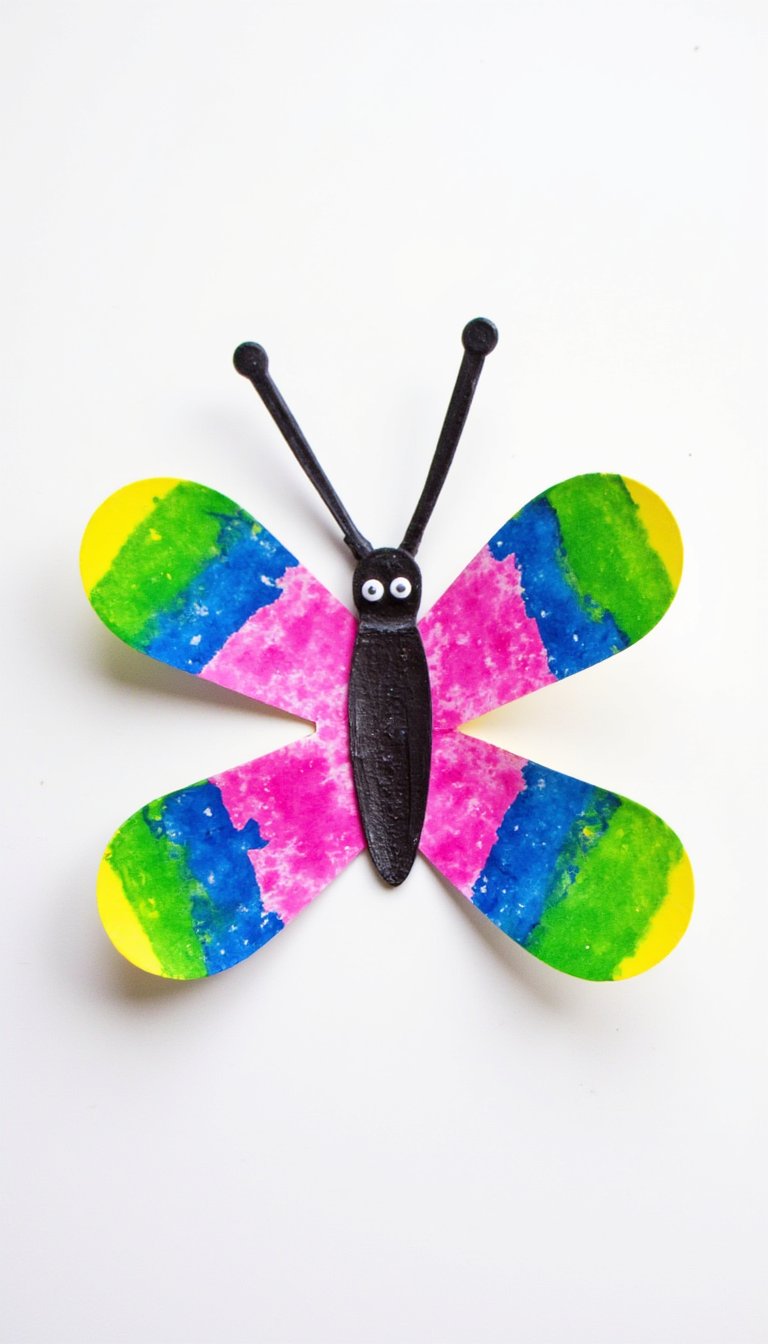
Put those plastic forks to work! Fold a piece of paper in half, then open it up. On one side, have your child dip a fork in paint and stamp it in a wing pattern. While the paint is still wet, fold the paper and press down to transfer the print to the other side, creating a perfectly symmetrical butterfly. It’s a mind-blowing “wow” moment for little ones when they open it up.
12. Chromatography Coffee Filter Wings
This is a craft and a science experiment in one. Use black washable markers (not permanent!) to draw thick circles or patterns in the center of a coffee filter. Carefully place the tip in a shallow cup of water and watch as the water travels up, separating the black ink into its hidden rainbow of colors. Once dry, shape into butterfly wings. It teaches capillary action in the coolest way possible.
13. LEGO Butterfly Stamp
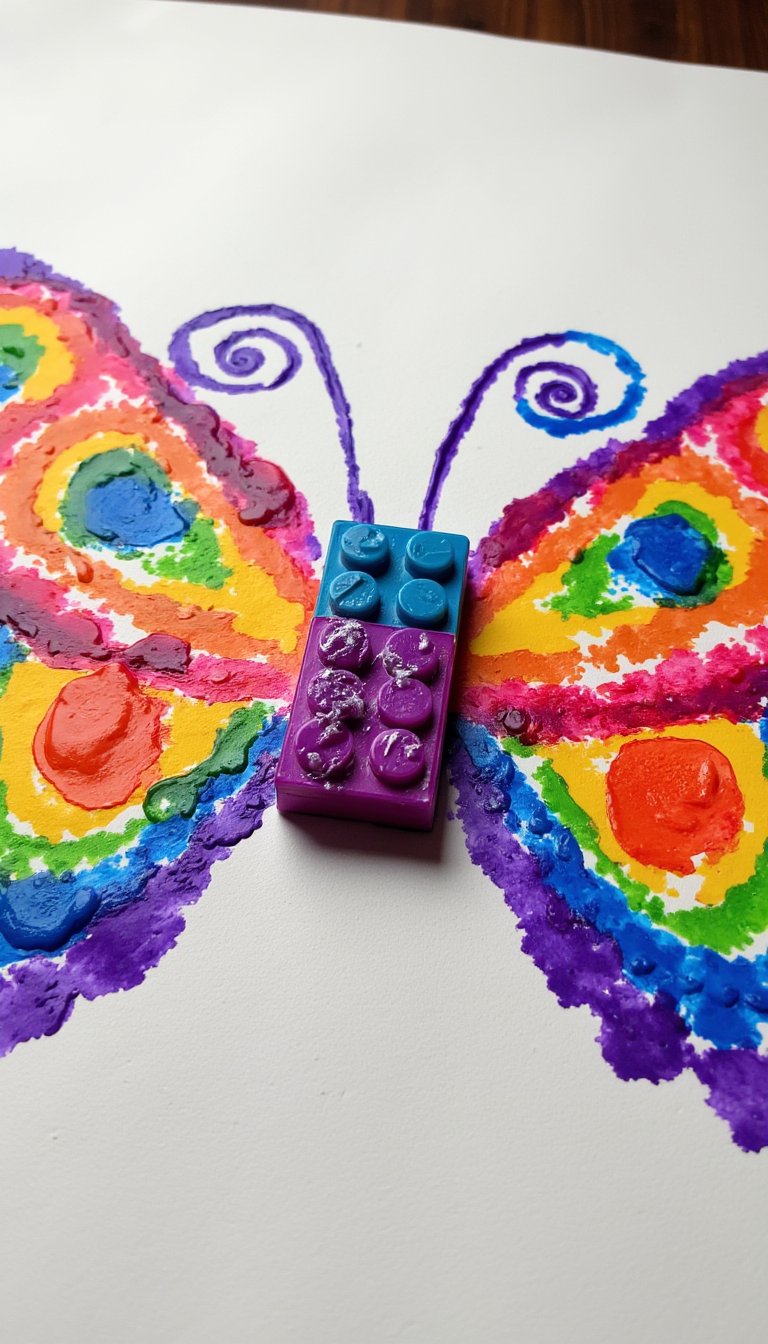
Raid the LEGO bin! A 2×4 brick makes a fantastic stamp for a butterfly body. Smaller bricks or plates can create wing patterns. Dip the LEGO pieces in paint and stamp away on paper to build your butterfly. This is perfect for kids who love building and offers a great, structured way to explore printing and patterns. Cleanup is a breeze—just soak the bricks in water.
14. Paper Bag Butterfly Puppets
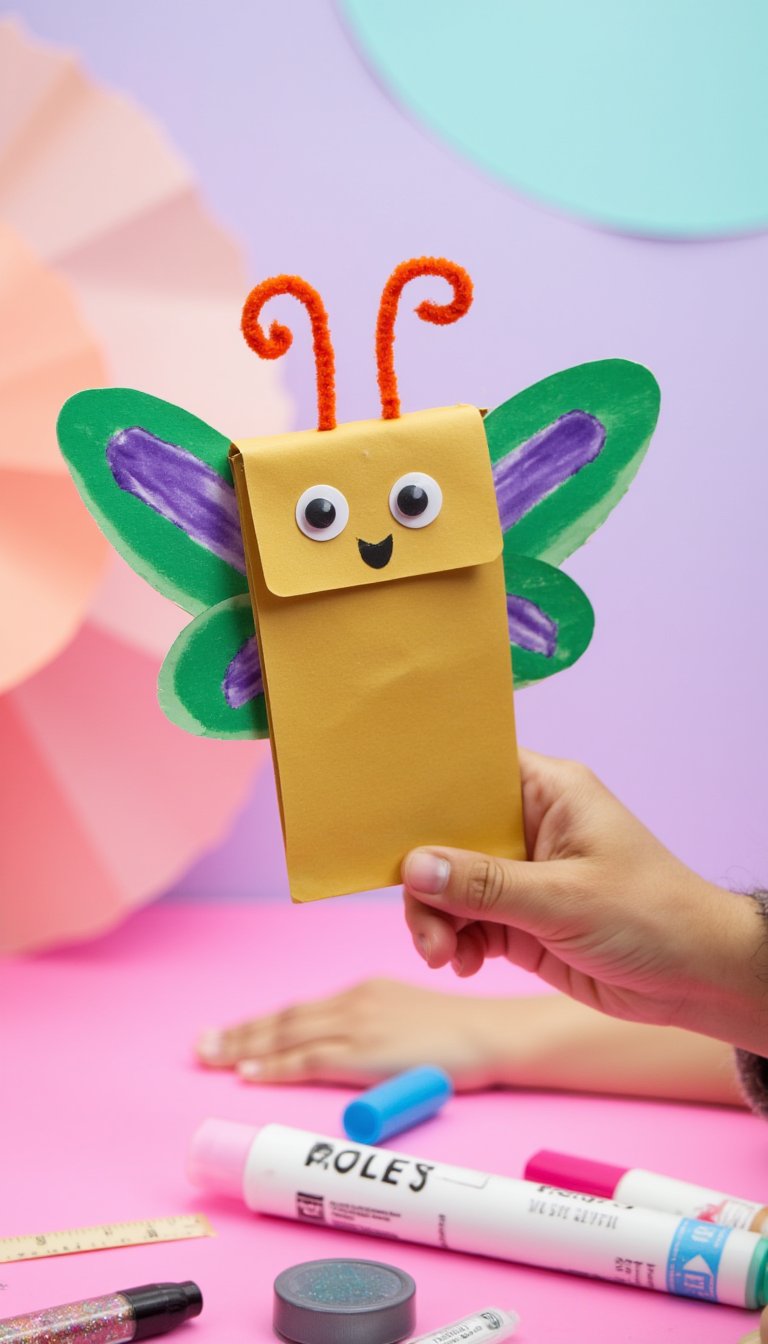
Craft meets imaginative play. Decorate a small paper lunch bag with wings, eyes, and antennae. The bottom flap of the bag becomes the moving mouth! Kids can put on a puppet show about a butterfly’s journey, act out the life cycle, or just have their new friend “fly” around the room. It encourages storytelling and fine motor skills as they operate the puppet.
15. Melted Bead Suncatchers
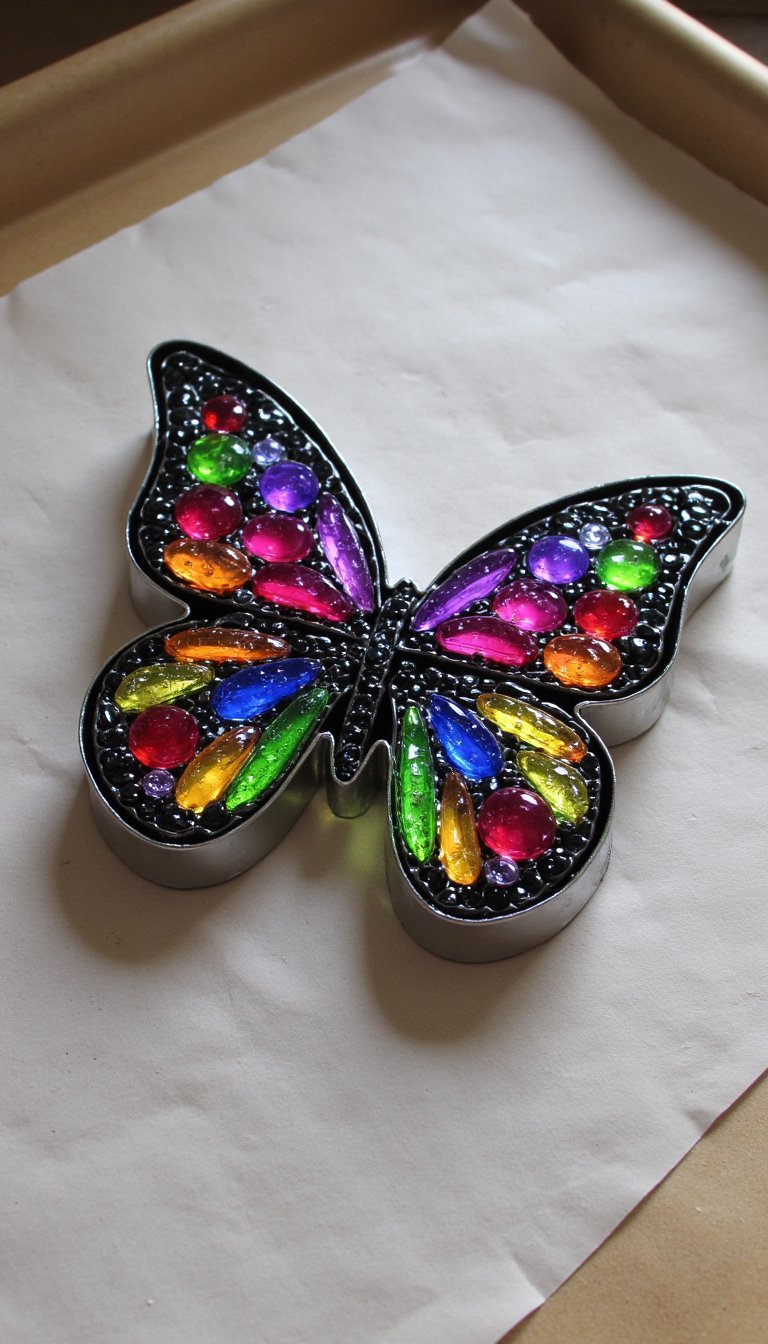
Adult supervision required for this one! Arrange colorful plastic pony beads in a metal butterfly-shaped cookie cutter on a parchment-lined baking sheet. Bake in a low oven until melted, let cool completely, and pop out your stunning, jewel-toned suncatcher. Drill a small hole to add a string. The translucent colors catch the light beautifully, and kids love choosing the bead combinations.
16. Handprint & Footprint Butterflies
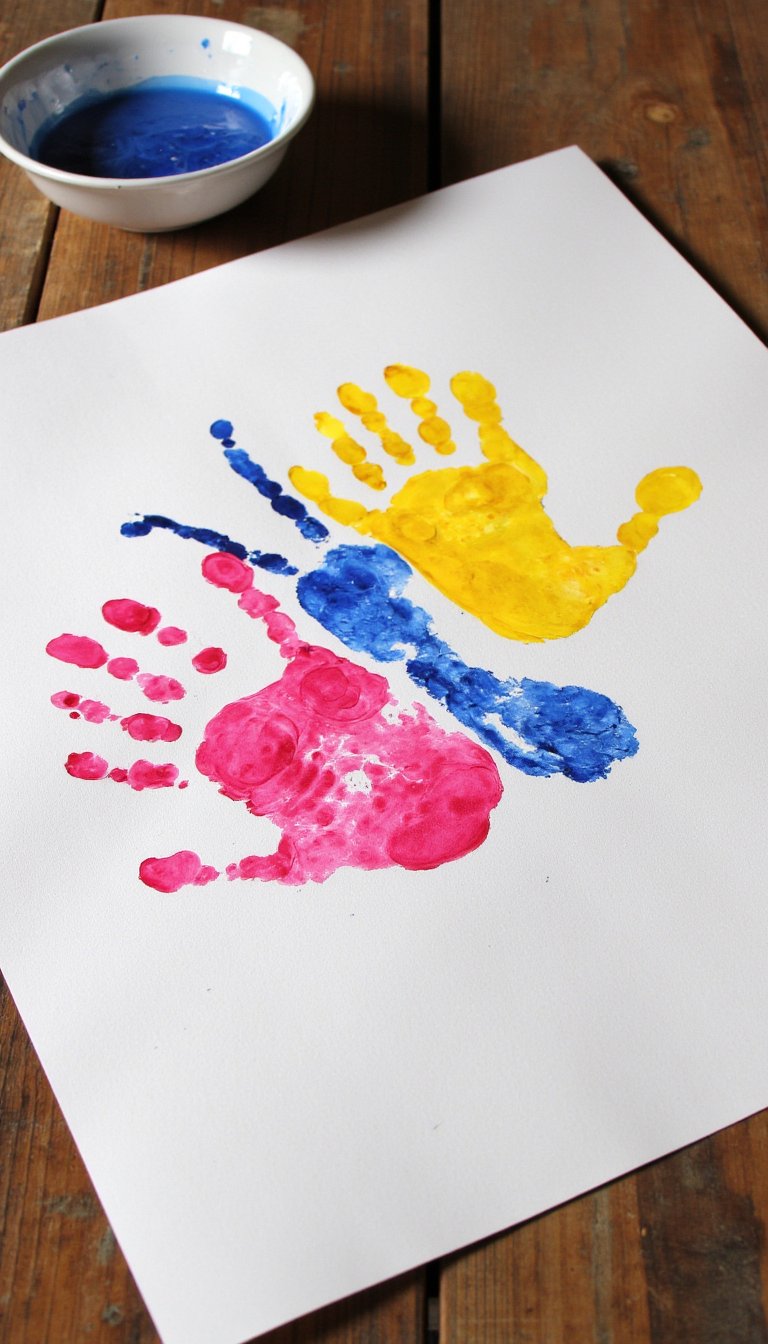
Create the ultimate keepsake. Paint your child’s hands and press them onto paper with the heels of the hands together—these are the wings. Then, paint one foot and press it below, toes down, to form the body and head. Add antennae. It’s a messy, wonderful way to capture their size in a piece of art you’ll treasure forever. Date it on the back!
17. Egg Carton Caterpillar & Butterfly
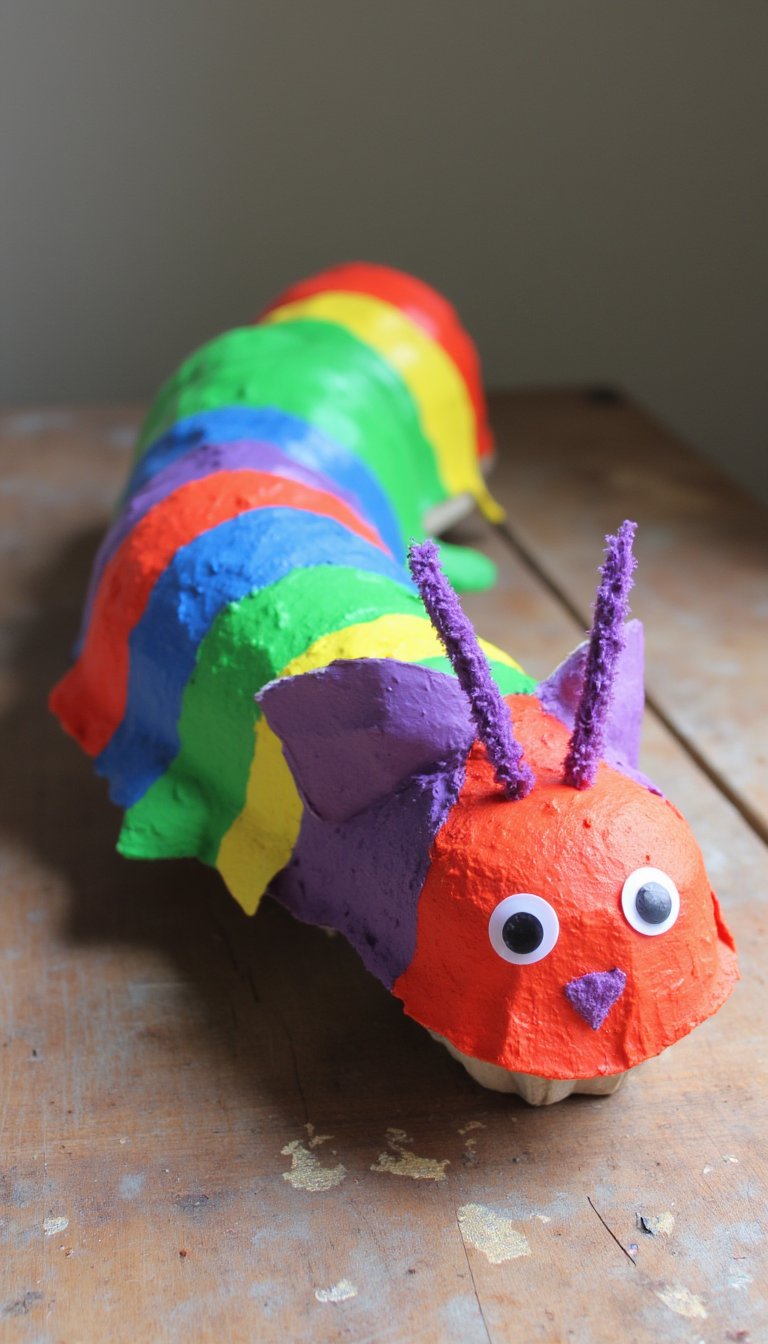
Show the full story! Cut a section of an egg carton, let your child paint it, and add googly eyes to make a caterpillar. For the butterfly, use the bumpy lid of the carton as a stamp for textured wings, or cut and paint individual cups to glue onto a paper butterfly. Display them together to complete the metamorphosis tale. Recycling has never looked so cute.
18. Q-Tip Pointillism Butterflies
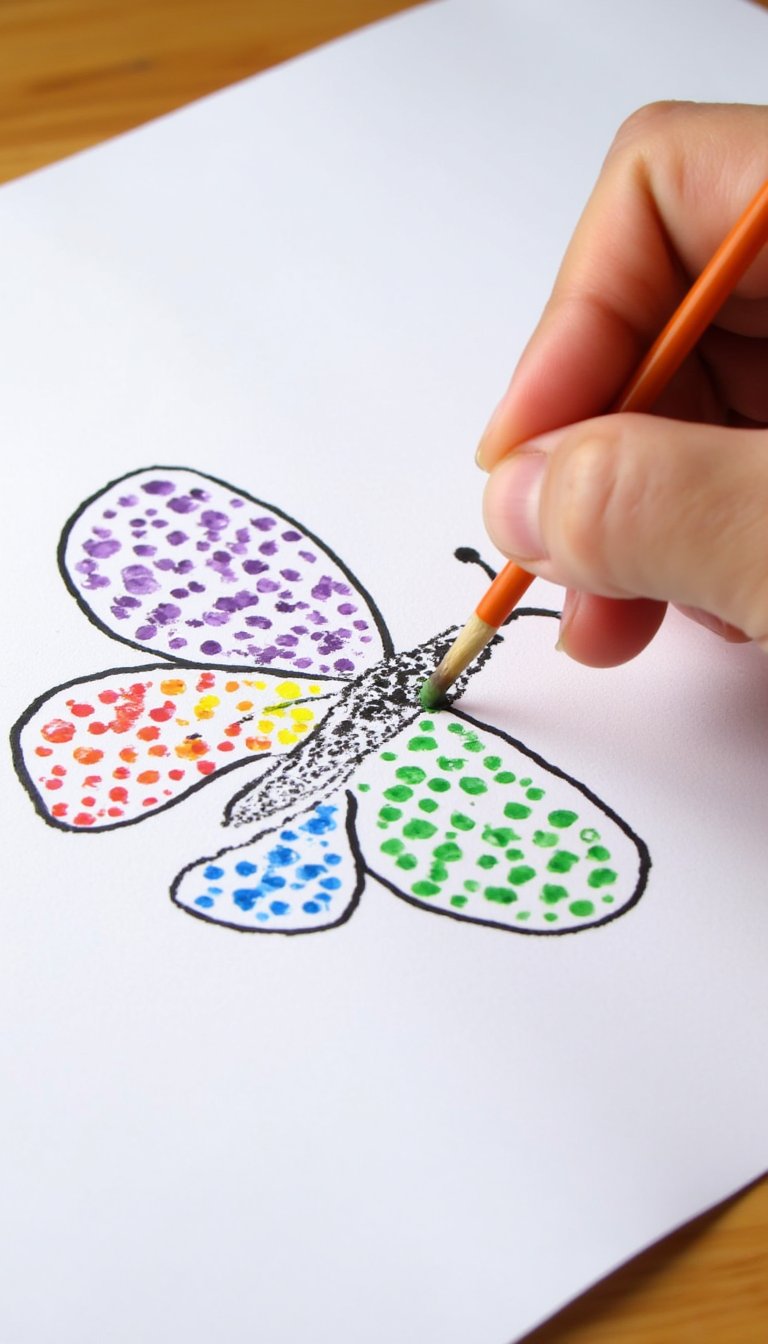
A quiet, focused craft that builds fine motor control. Draw a simple butterfly outline on paper. Using q-tips as brushes, have your child dip them in paint and fill the wings with tiny dots. They can create patterns, gradients, or just a joyful explosion of color. This technique, inspired by artist Georges Seurat, is surprisingly meditative for kids.
19. Paper Chain Caterpillar to Butterfly
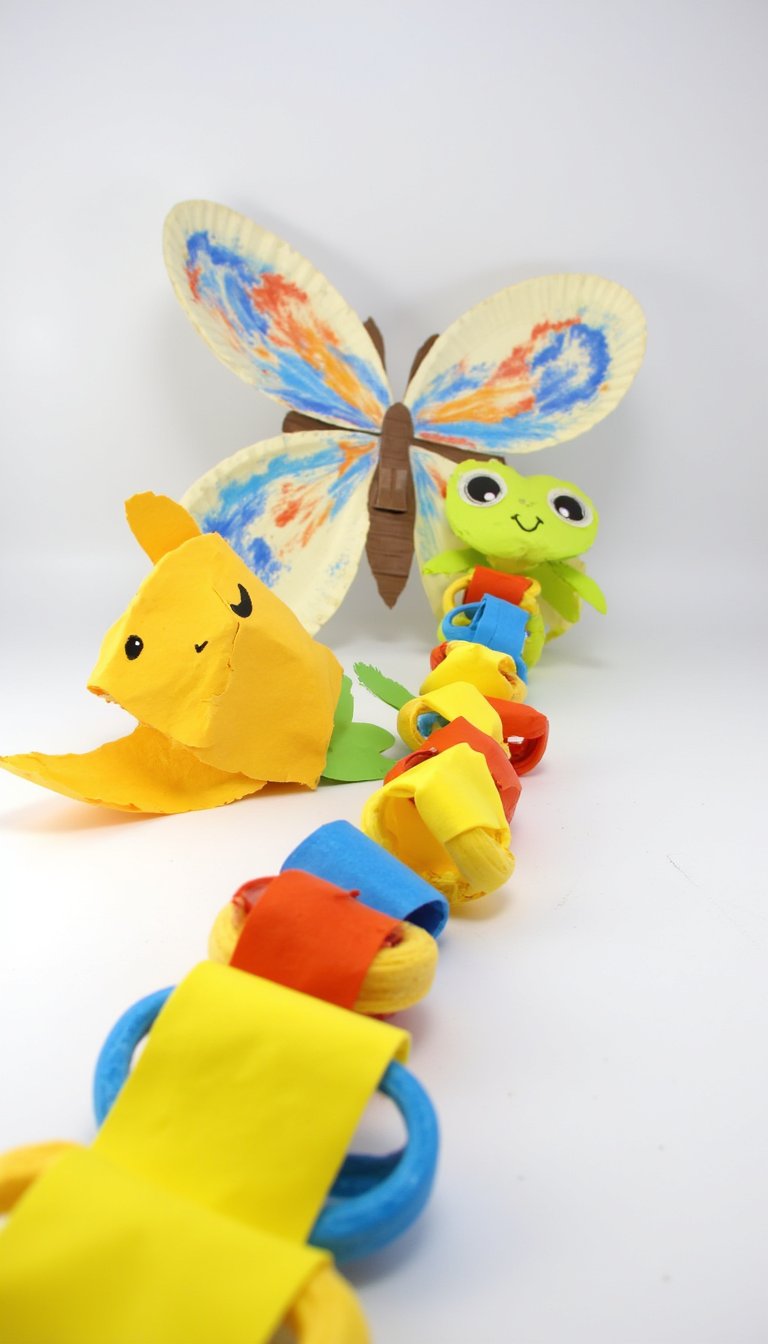
A craft that moves! Make a long, colorful paper chain for the caterpillar. Then, create a large, beautiful butterfly from construction paper or painted paper plates. Attach the butterfly to the end of the caterpillar chain and hang it from the ceiling. With a breeze or a gentle push, the butterfly will look like it’s emerging. It’s a dynamic decoration that illustrates growth.
20. Butterfly Suncatcher with Contact Paper
No glue, no mess? Yes, please! Cut a butterfly frame from black construction paper. Tape a piece of clear contact paper, sticky-side up, to the back. Let your child fill the inside with tissue paper squares, sequins, glitter, and lightweight nature items. Seal it with another piece of contact paper and trim. Hang it in a window for a dazzling display.
21. Rock Painting: Garden Butterflies
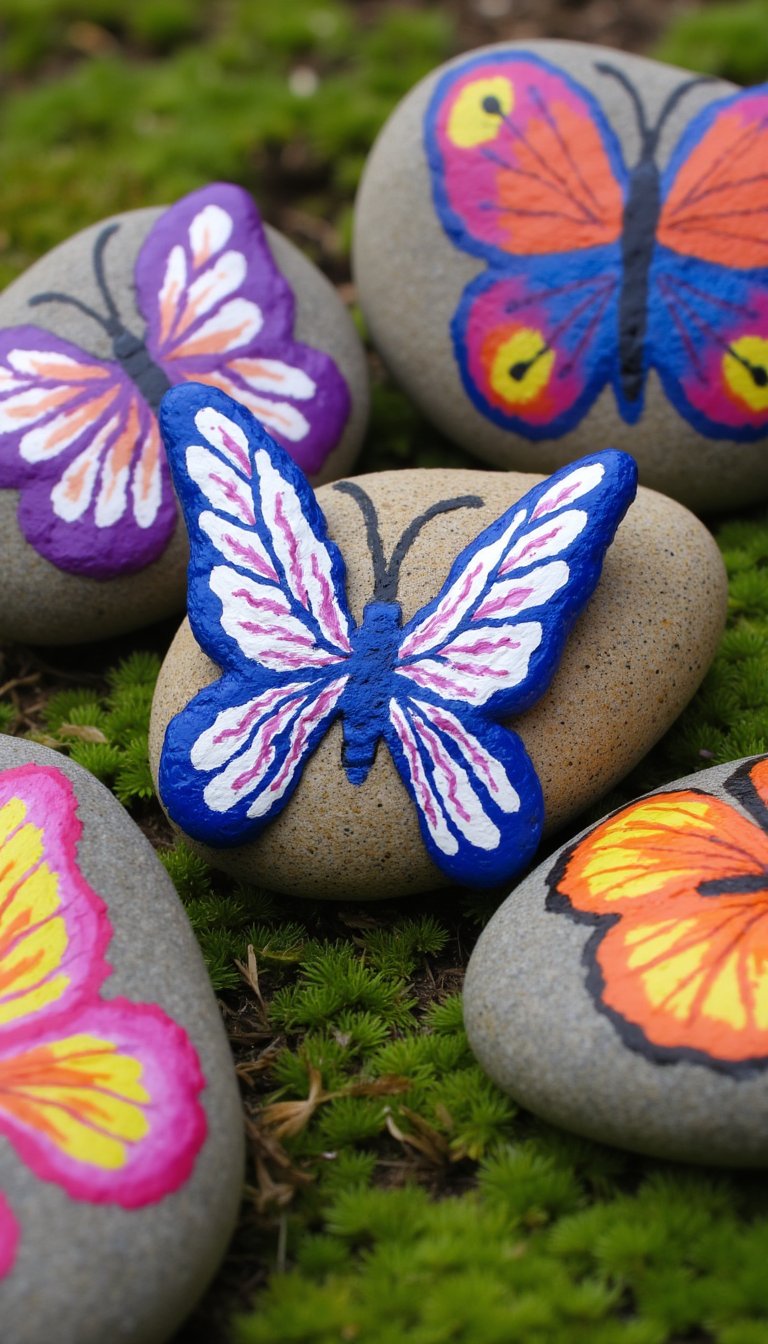
Find some smooth, flat rocks on your next walk. After a good wash and dry, paint them with bright butterfly designs. Use acrylic paints or sharpies for vibrant colors. Seal them with a clear outdoor mod podge and place them in your garden or flower bed. They add a permanent splash of whimsy to your outdoor space and make great paperweights, too.
22. Yarn-Wrapped Butterfly Wings
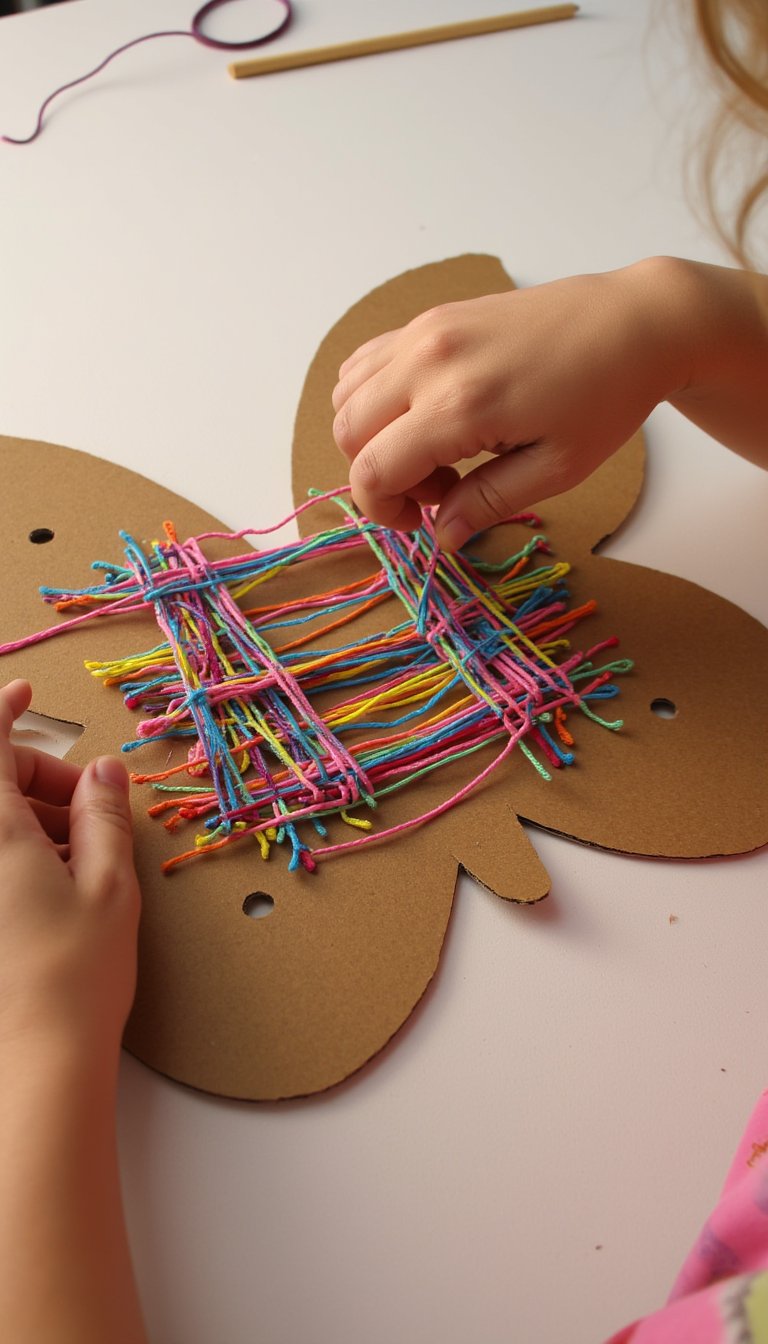
Excellent for building hand strength and coordination. Cut a butterfly shape from sturdy cardboard. Punch holes around the edges. Let your child wrap colorful yarn around and through the holes, creating a web of color across the wings. They can experiment with patterns or just go freestyle. The textured result is incredibly tactile and satisfying.
23. Magazine Collage Butterfly
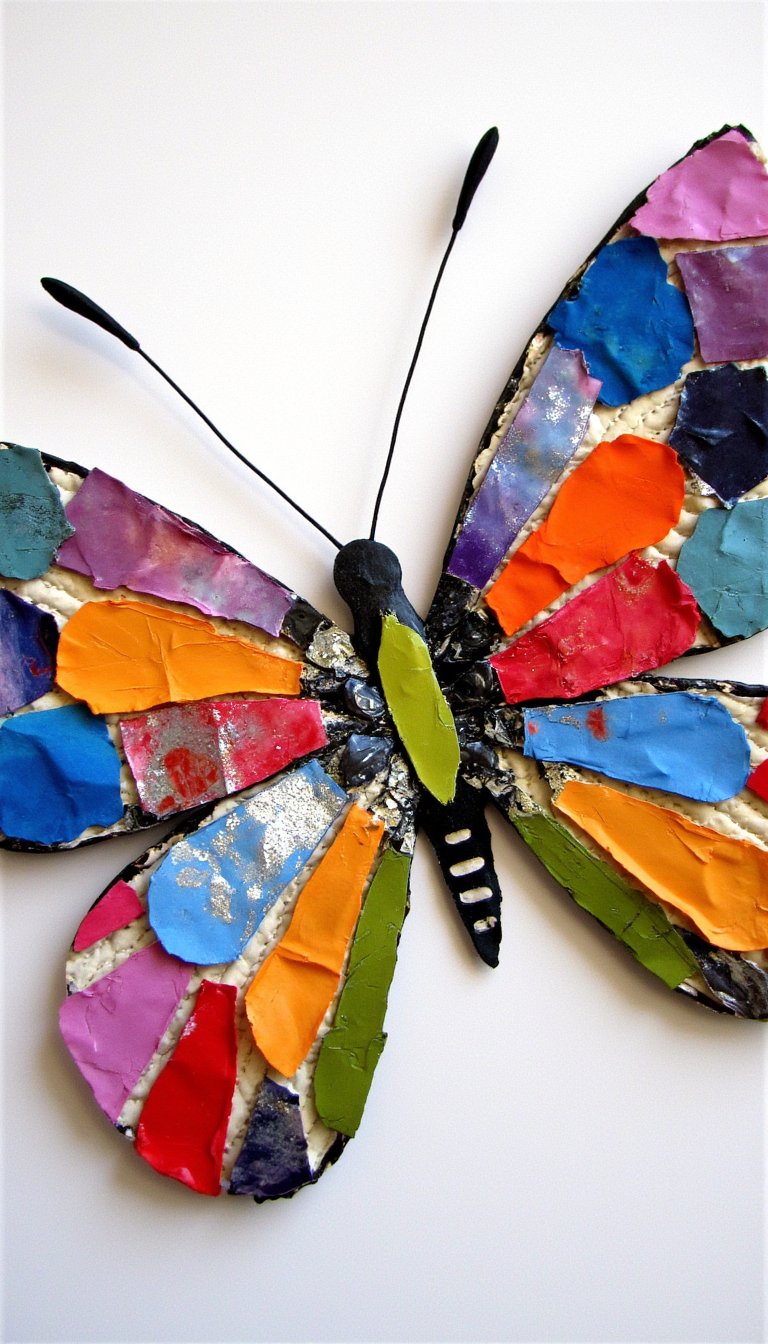
Recycle old magazines in the most colorful way. Hunt for pages with blocks of vibrant colors—think ads, photos, and illustrations. Tear or cut them into small pieces. Then, glue these pieces onto a butterfly template, mosaic-style. The challenge of finding just the right color piece is like a treasure hunt, and the final product is a unique piece of pop art.
24. Flying Straw Rocket Butterfly
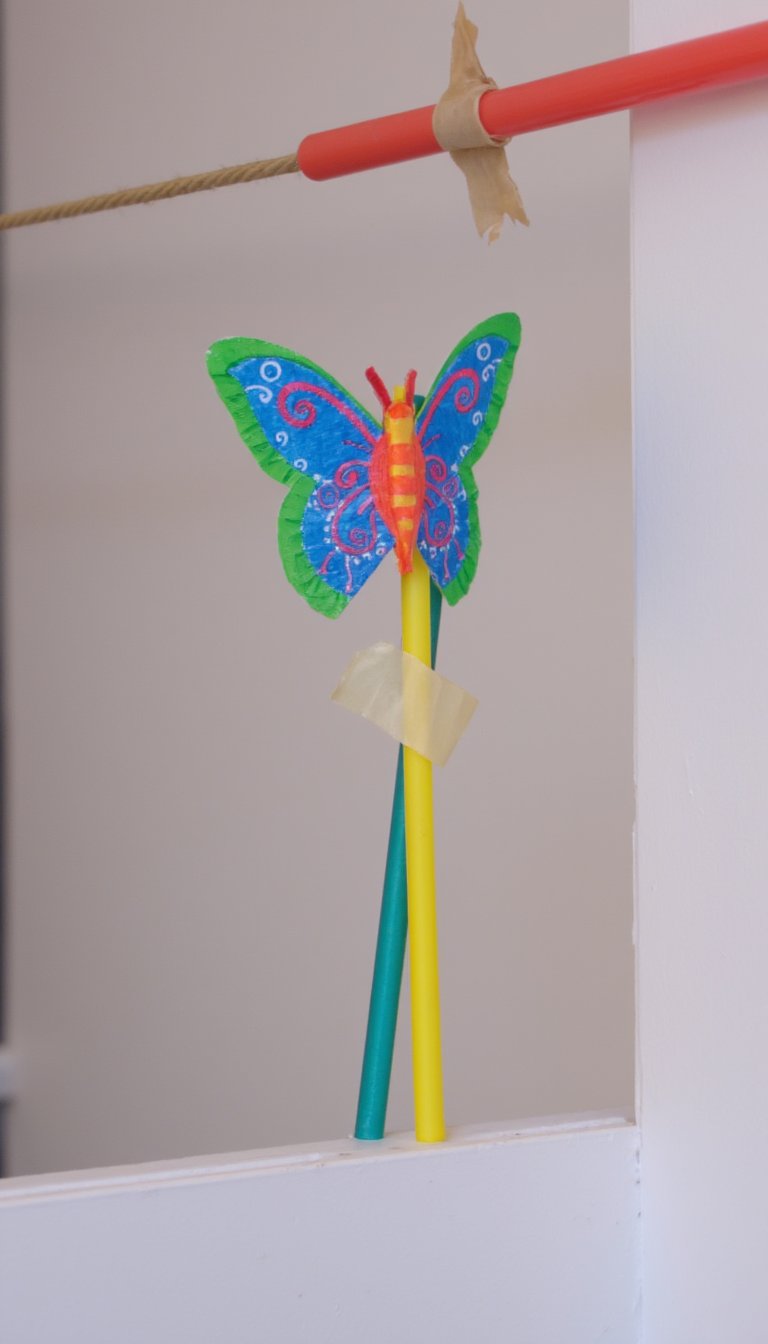
For the kid who loves things that go! Decorate a paper butterfly and tape it to the top of a drinking straw. On a string threaded through another straw taped to the wall or a doorframe, attach your butterfly straw. Blow hard, and watch your butterfly “fly” along the string! It’s a fantastic STEM addition that explains a little physics with a lot of fun.
25. Shaving Cream Marbled Paper Butterflies
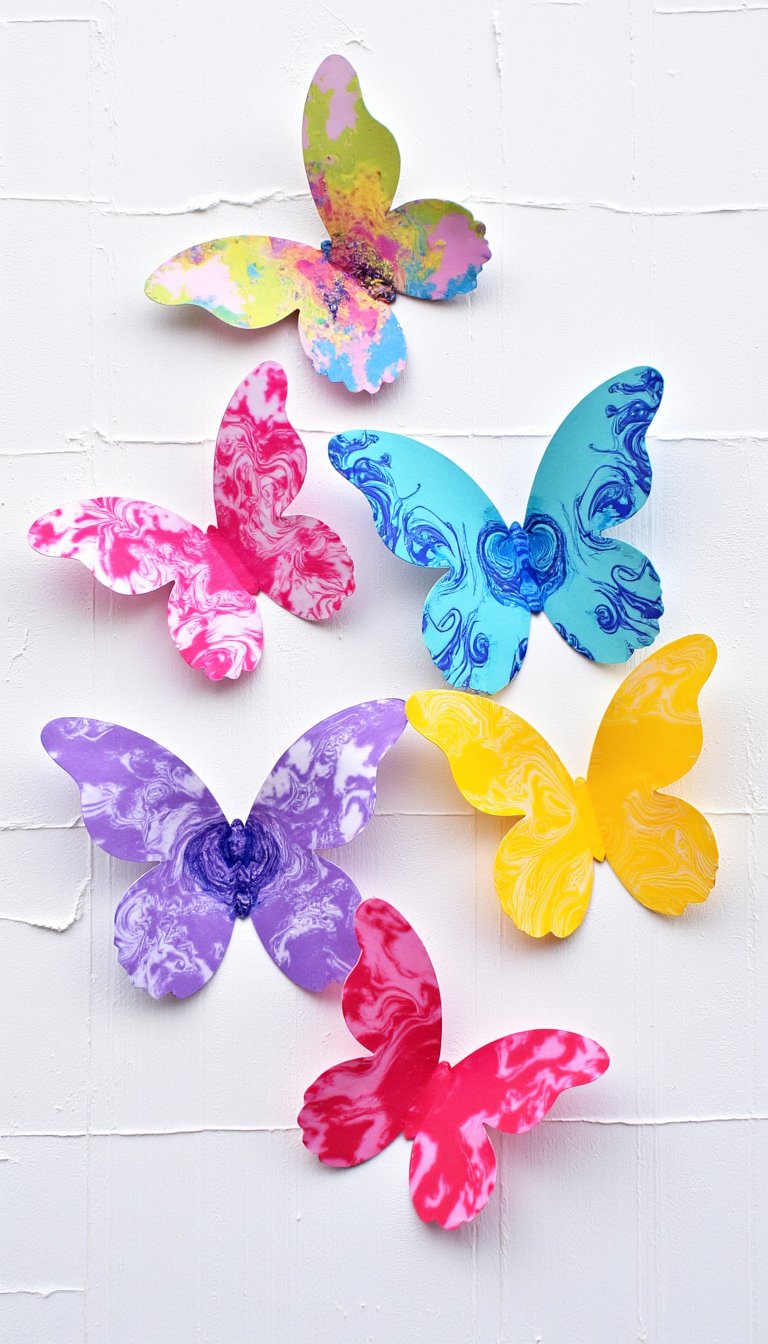
This sensory activity is a crowd-pleaser. Spray shaving cream on a tray, smooth it out, and drop liquid watercolors or food coloring on top. Swirl with a stick. Press a piece of cardstock onto the mixture, scrape off the cream, and reveal stunning marbled paper. Once dry, cut butterfly shapes from your custom paper. No two are ever alike!
26. Button Butterfly Art
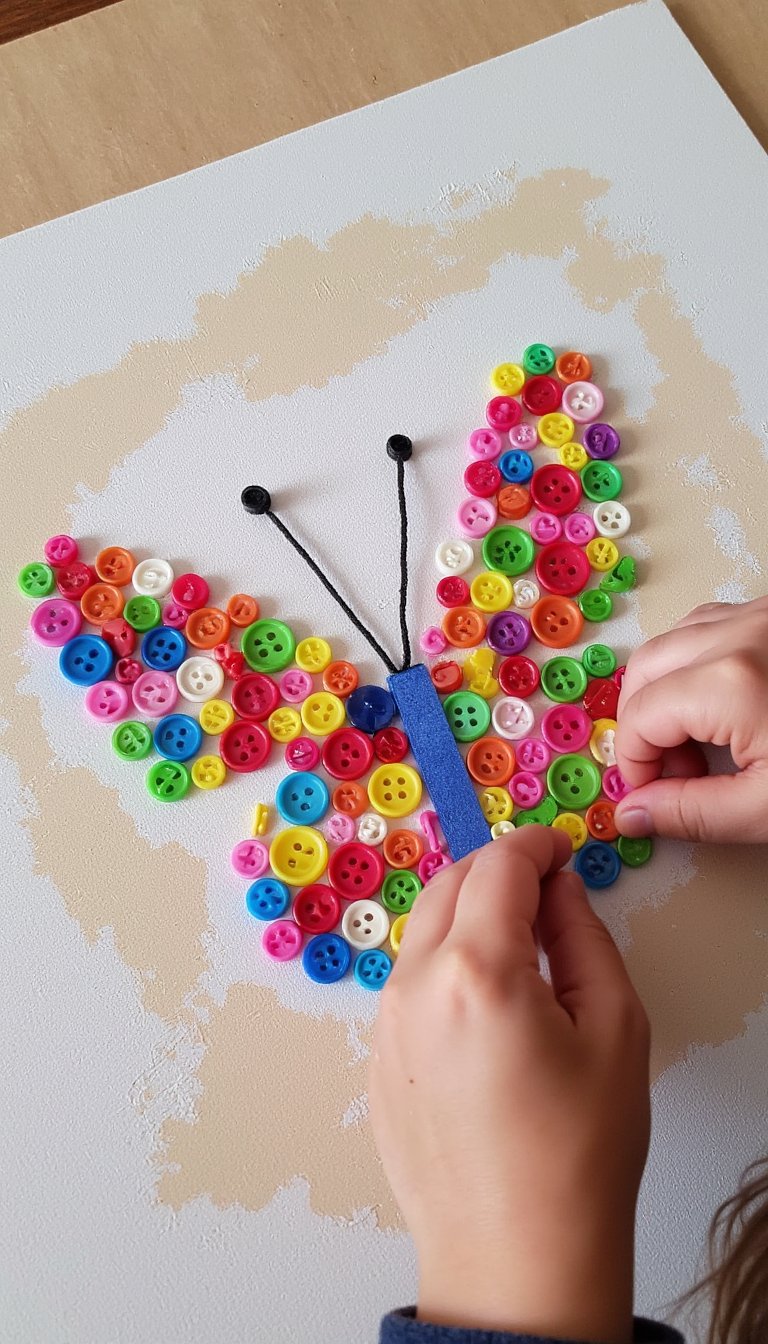
Dig out that random button jar. Draw or paint a simple butterfly body on canvas or heavy paper. Then, let your child arrange and glue buttons of all sizes and colors to form the wings. It’s a wonderful way to explore color sorting, size differentiation, and pattern-making. The 3D texture gives the artwork a lovely, rustic charm.
27. Glowing Firefly Butterflies
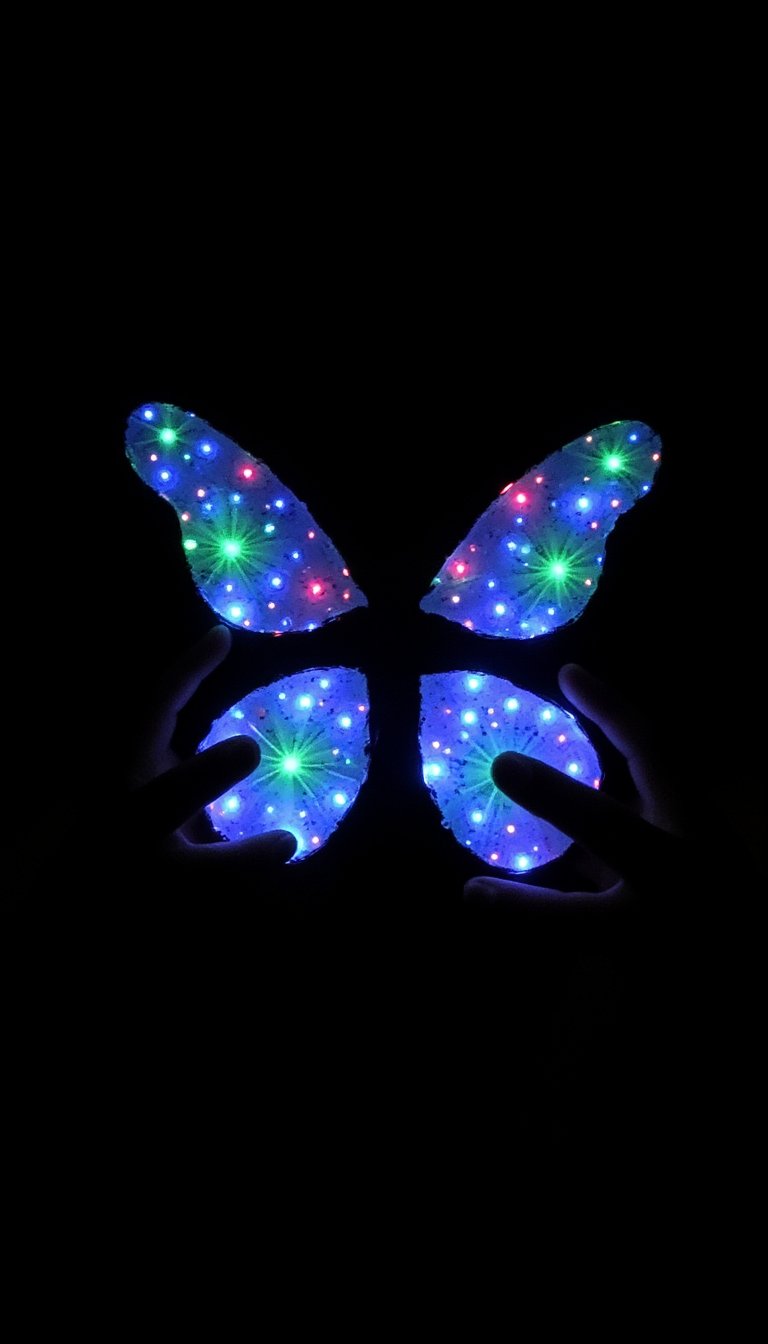
End your crafting day with a glow! Paint or color a butterfly on black construction paper with bright chalks or pastels. For the magical touch, use a glow-in-the-dark paint pen or sticker to color the lower body or add dots to the wings. Charge it up with a flashlight and turn off the lights for a magical, glowing display. The perfect quiet, end-of-day activity.
And there you have it—27 ways to turn an ordinary day into a fluttery festival of creativity. From quick 10-minute projects to afternoon-long explorations, these butterfly crafts for kids offer more than just a cute result. They build fine motor skills, teach scientific concepts, encourage recycling, and most importantly, create space for joyful, connected play. The best part? You likely have everything you need already hiding in your recycling bin or craft cupboard. So, pick a craft, embrace the glitter, and watch your little ones spread their creative wings. What will you make first? 🦋