
You know that feeling. The kids are buzzing with energy, the craft box is overflowing, and you’re staring at a blank piece of paper thinking, “What on earth can we make today?” We’ve all been there. But what if I told you the perfect, magical, and endlessly creative solution is fluttering right outside your window? That’s right, we’re talking about butterflies. These colorful creatures are the ultimate muse for kids’ art projects. They’re symmetrical, they’re colorful, and they let little hands explore everything from paint and glue to nature itself. So, let’s ditch the creative block and dive into these 17 butterfly art for kids that are guaranteed to be a hit.
1. The Classic Coffee Filter Butterfly
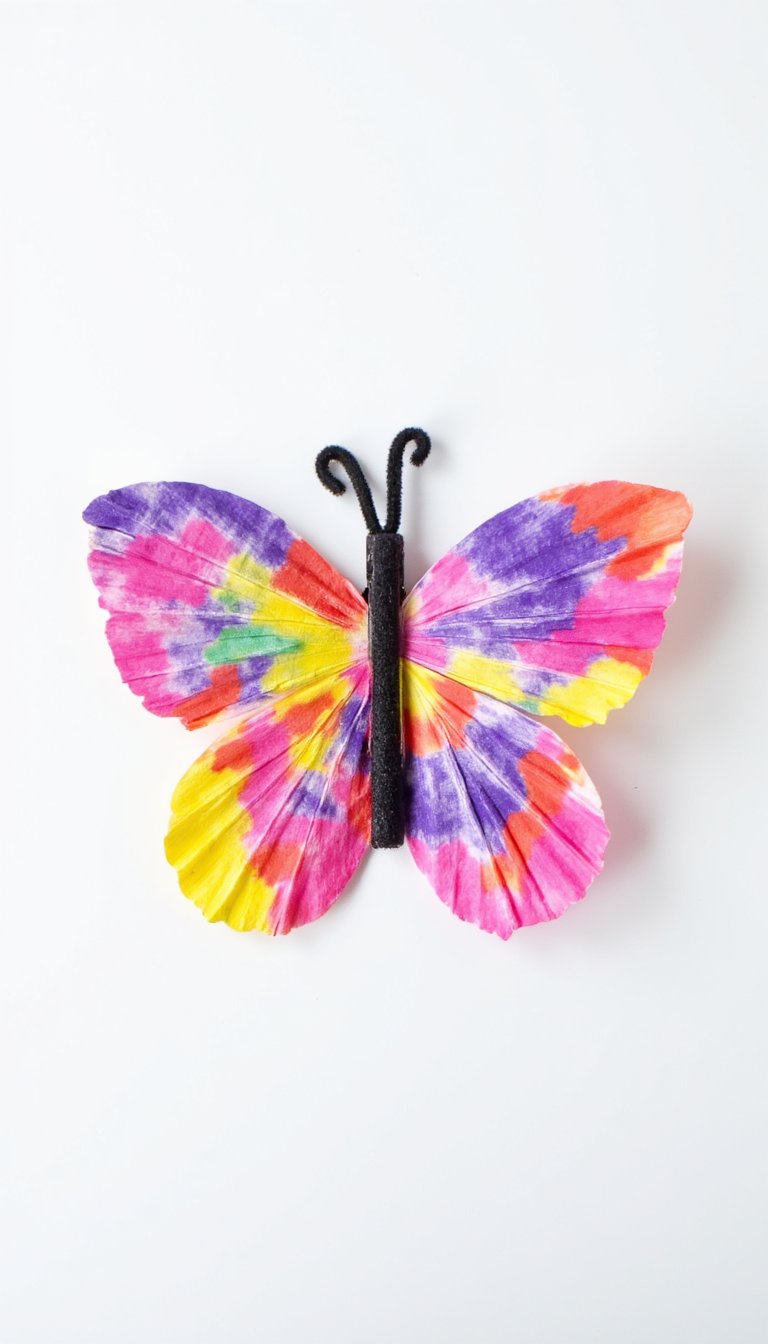
This is the O.G. of butterfly crafts, and for good reason. It’s simple, stunning, and uses supplies you definitely already have. Grab some white coffee filters, washable markers, and a spray bottle of water. Let the kids go wild coloring the filters with bright patterns. Then, watch the magic happen as you spritz it with water and the colors bleed together into a beautiful, marbled masterpiece. Once dry, just pinch the center, add a clothespin for the body, and pipe cleaner antennae. Instant gallery-worthy art!
2. Symmetrical Paint Smash Art
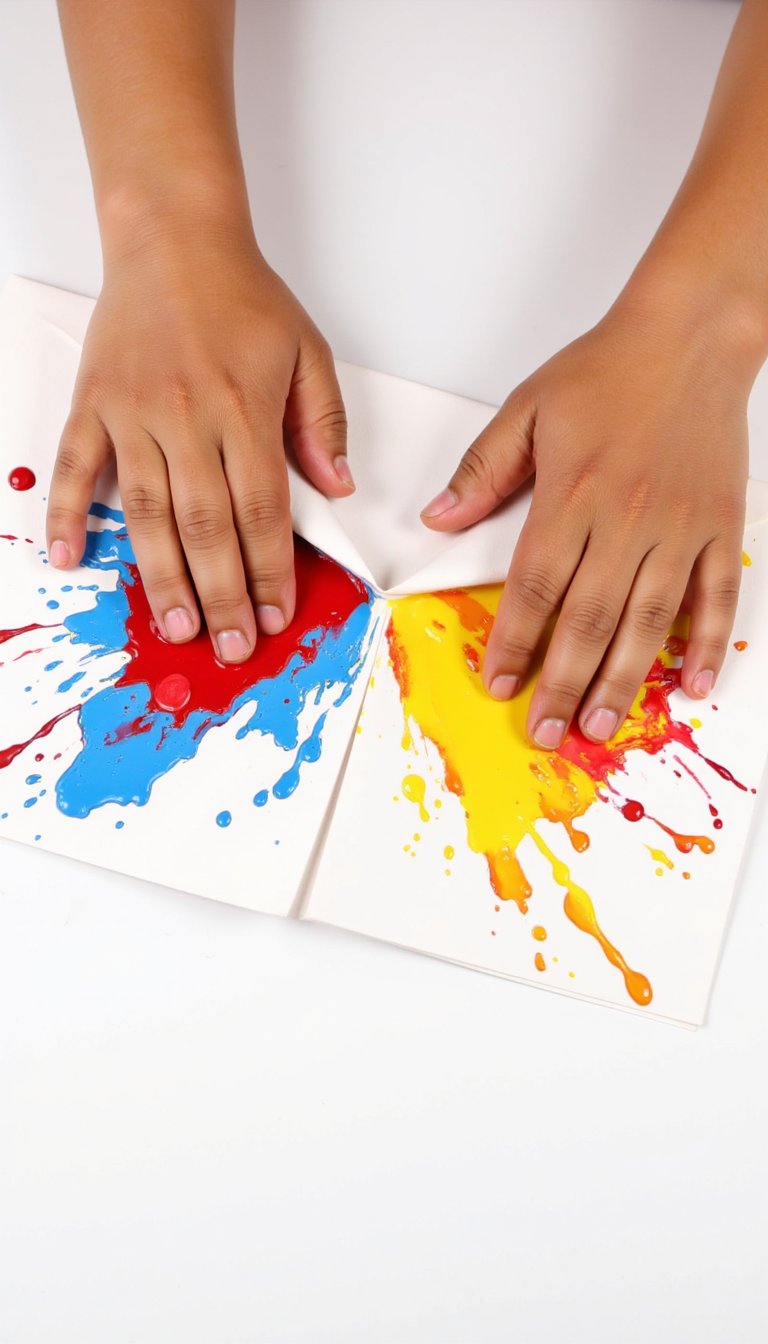
This one is gloriously messy and teaches a perfect lesson in symmetry. Fold a piece of paper in half, then open it up. On one side of the crease, let your child blob and drizzle different colors of paint. Now for the fun part: fold the paper back over and let them smash, rub, and press it all together. When they open it up? A perfectly symmetrical, unique butterfly wing pattern appears every single time. It’s like a colorful science experiment.
3. Pasta Butterfly Life Cycle
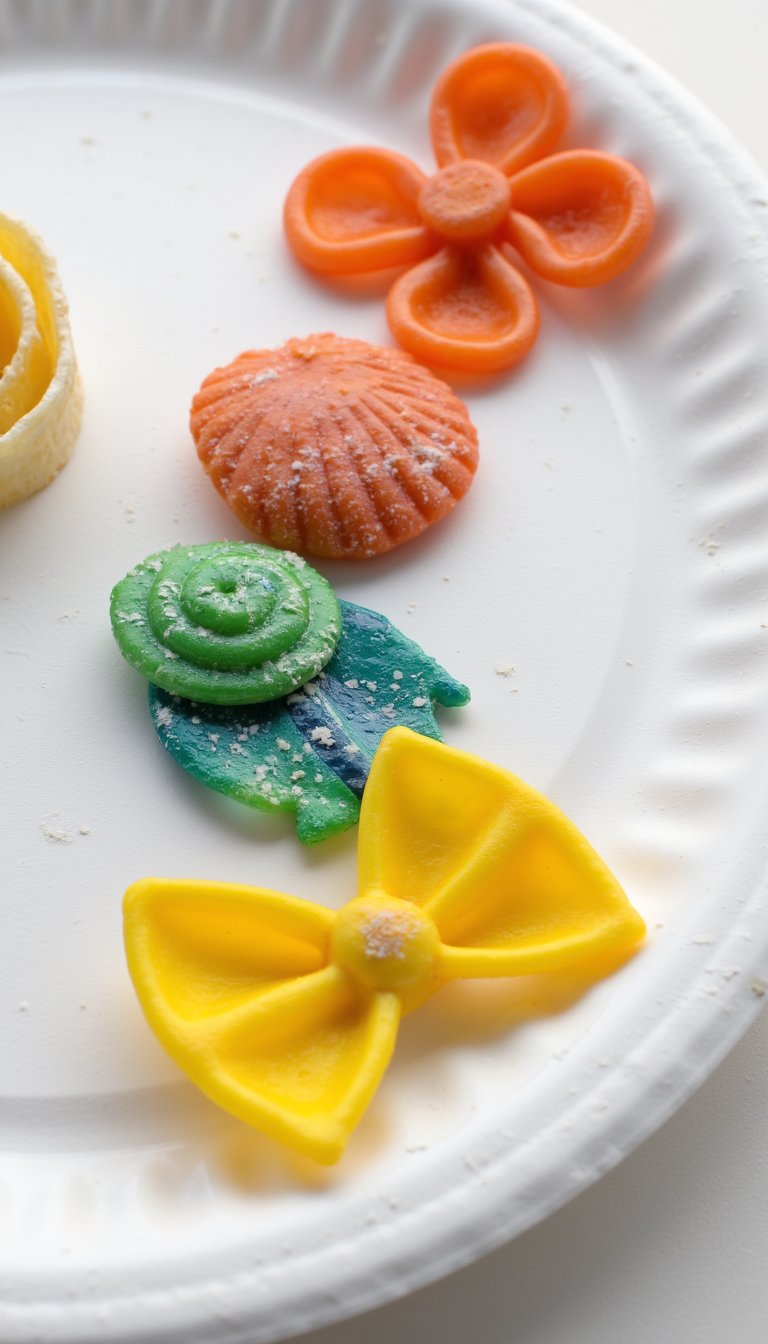
Why just make a butterfly when you can craft its entire life story? This project is both art and a sneaky science lesson. Use different types of pasta to represent each stage: a spiral shell for the egg, rotini for the caterpillar, a small shell for the chrysalis, and bowtie pasta for the butterfly. Glue them onto a paper plate or cardboard, paint them, and label each stage. It’s hands-on learning that sticks.
4. Nature Collage Butterfly Wings
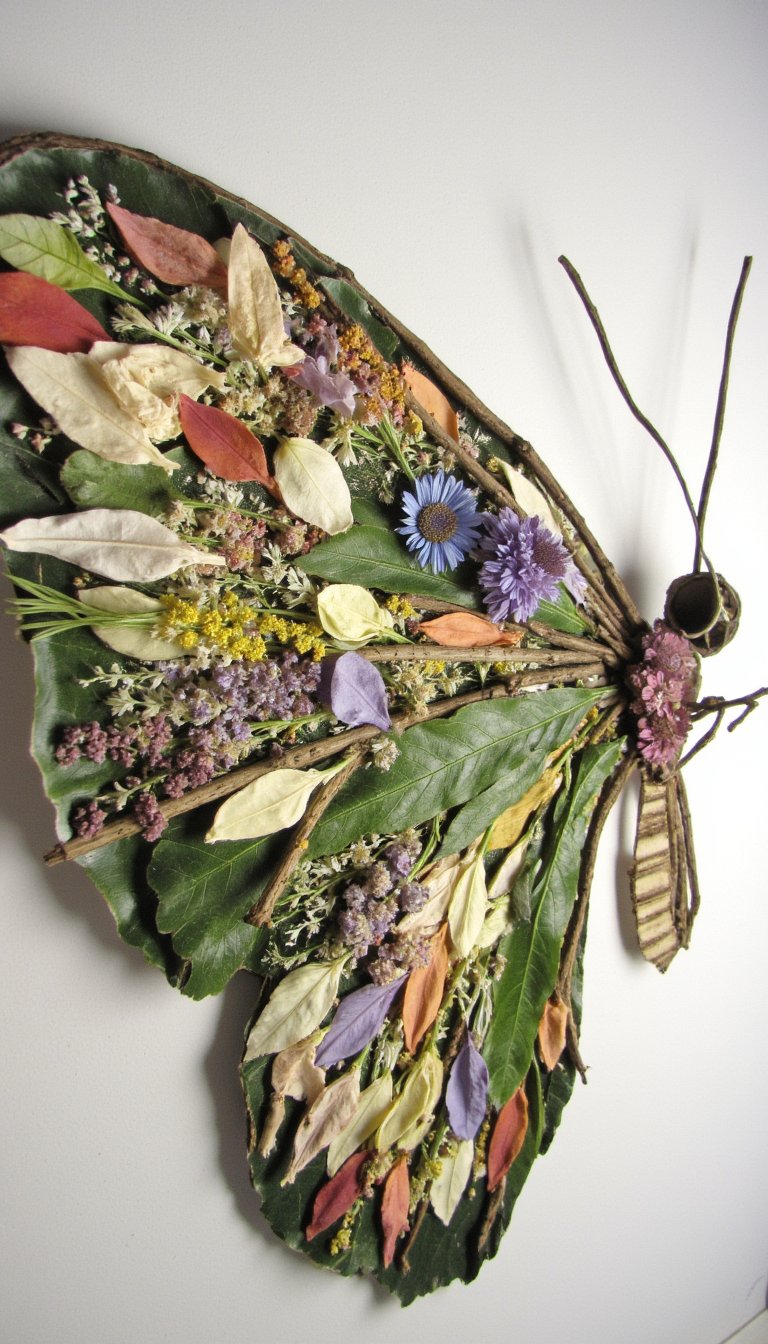
Take your art time outside! Go on a “treasure hunt” in the backyard or park to collect small, flat natural items: flower petals, leaves, tiny sticks, and blades of grass. Then, draw or cut out a simple butterfly shape from sturdy paper. Instead of paint, the kids get to glue their natural treasures onto the wings, creating a textured, earthy collage. Every butterfly will be as unique as a fingerprint.
5. Bubble Wrap Printed Wings
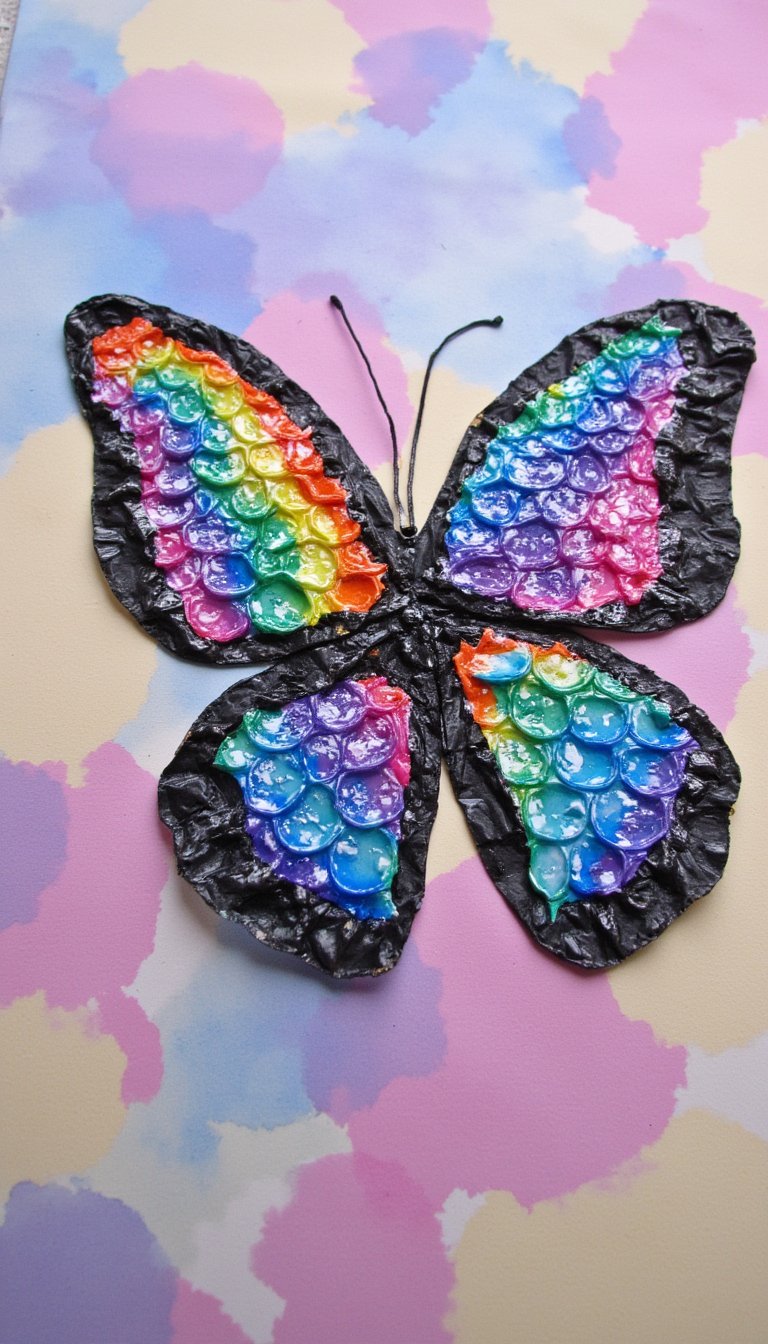
Got a package recently? Don’t throw away that bubble wrap! Cut it into wing shapes, dip it in paint, and press it onto paper. The resulting print makes the most fantastic, scale-like texture that looks just like a butterfly’s wing. You can use one color or layer a few for a really cool effect. Pro tip: the smaller the bubbles, the more detailed the print. It’s sensory play and art combined.
6. Clothespin & Tissue Paper Butterfly

This craft gives you a butterfly that can actually perch on things. Pinch squares of colorful tissue paper around the center of a pipe cleaner to create fluffy wings. Then, simply clip a wooden clothespin over the center—the clothespin becomes the body and head! Draw a face on it, add googly eyes, and you have a charming little friend that can clip onto curtains, plants, or your shirt.
7. Watercolor Resist with Crayons
The “resist” technique always feels like a secret art trick to kids. Have them draw a bold butterfly outline and intricate patterns on the wings using a white crayon or a light-colored crayon on white paper. It will seem almost invisible. Then, let them wash over the entire page with vibrant watercolors. Like magic, the crayon drawings resist the paint and pop right out! The look of wonder on their faces is the best part.
8. Paper Plate Butterfly
The humble paper plate is a craft room superhero. Cut a plate in half, and those halves instantly become rounded wings. Decorate them with anything: stickers, sequins, finger paints, or mosaic pieces of colored paper. Attach the wings to a full plate for a 3D effect, or staple them together at the top and add a rolled paper body hanging down. It’s sturdy, easy for little hands, and so versatile.
9. Butterfly Footprint Art
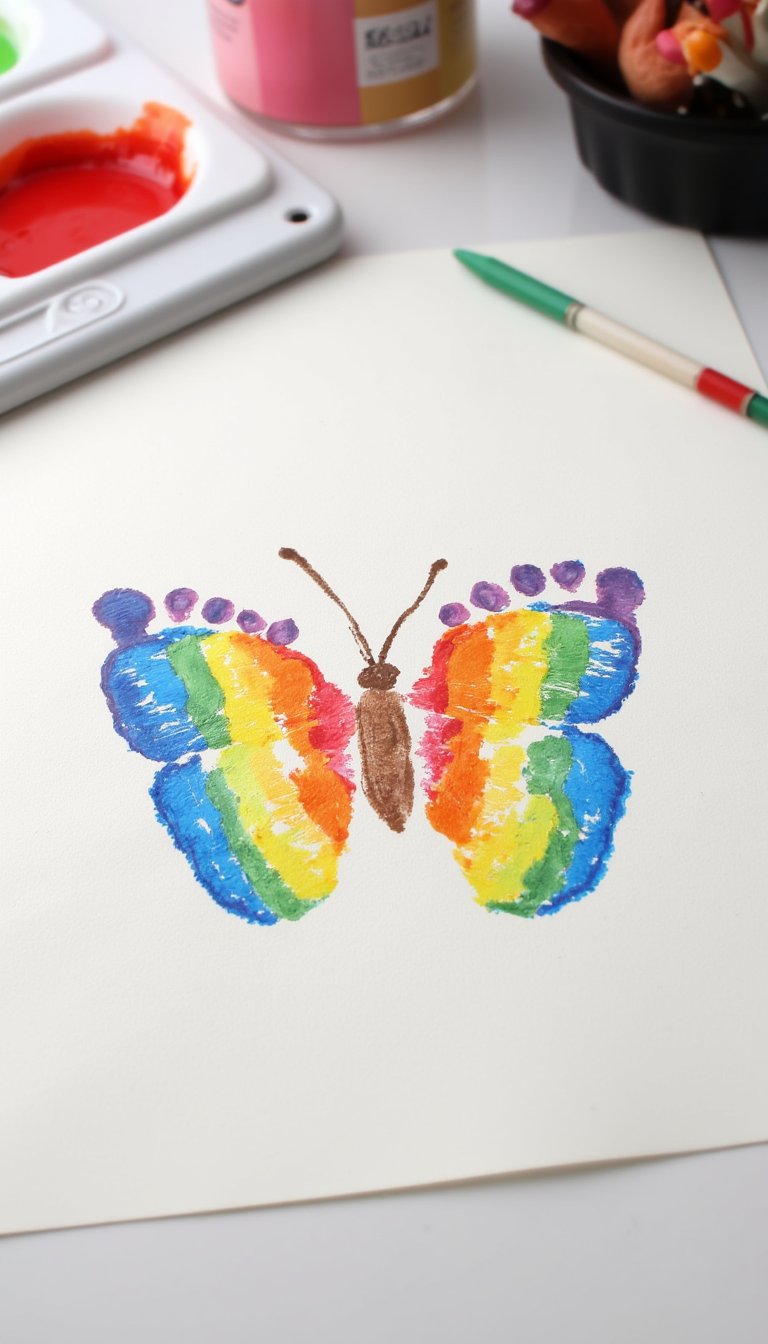
Ready for a keepsake you’ll treasure forever? This one is it. Paint the bottom of your child’s foot with washable paint and press it onto paper at an angle. Repeat with the other foot so the prints meet in the middle, forming perfect butterfly wings. Add a body, antennae, and a date once it’s dry. It’s a beautiful record of how tiny they once were. (Just have a wet towel ready—you’ll need it!)
10. Lego or Duplo Stamp Butterflies
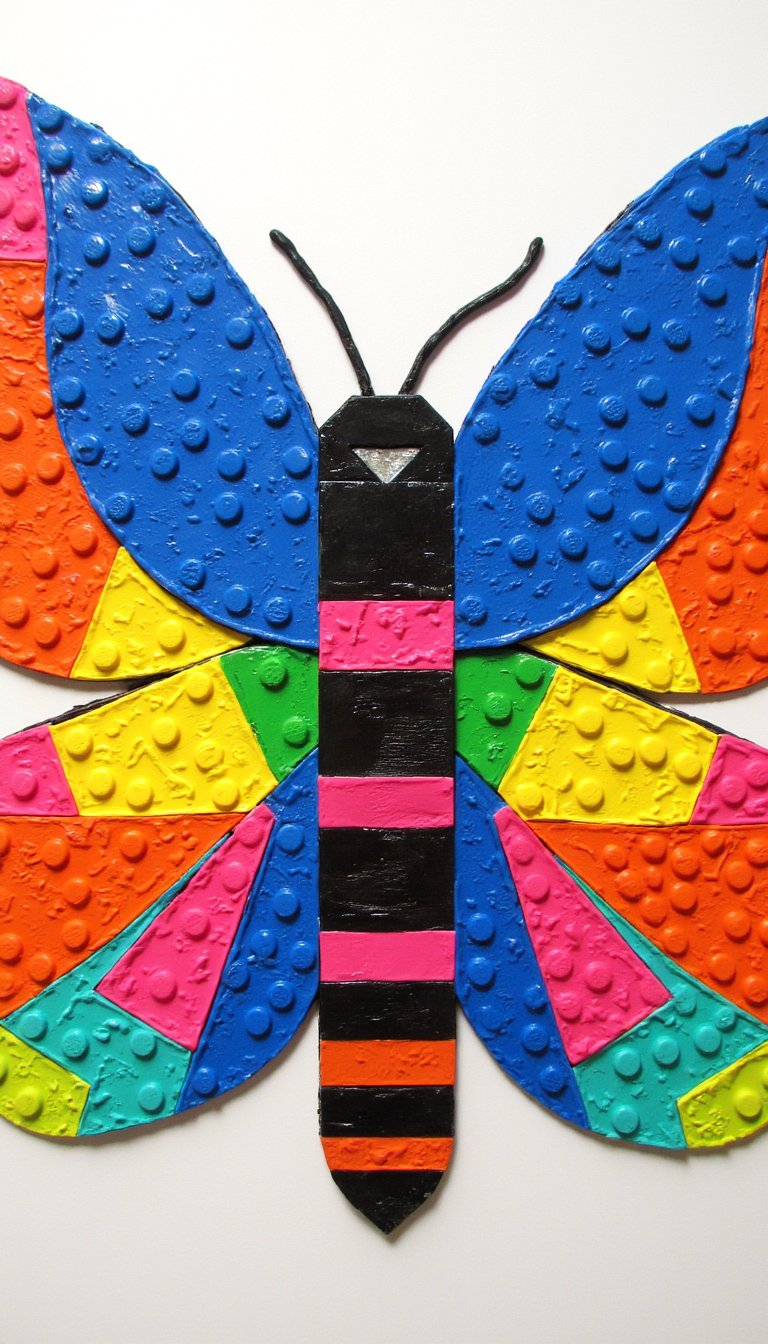
If your floor is constantly carpeted with building bricks, put them to work! The sides of Lego or Duplo blocks make fantastic stamps. Dip the flat, studded side into paint and press it onto paper in patterns to create geometric wing designs. You can use different sized blocks for variety. It’s a fantastic way to merge construction play with painting, and the clean-up is as easy as washing the blocks.
11. Chalk Pastel Butterflies on Black Paper
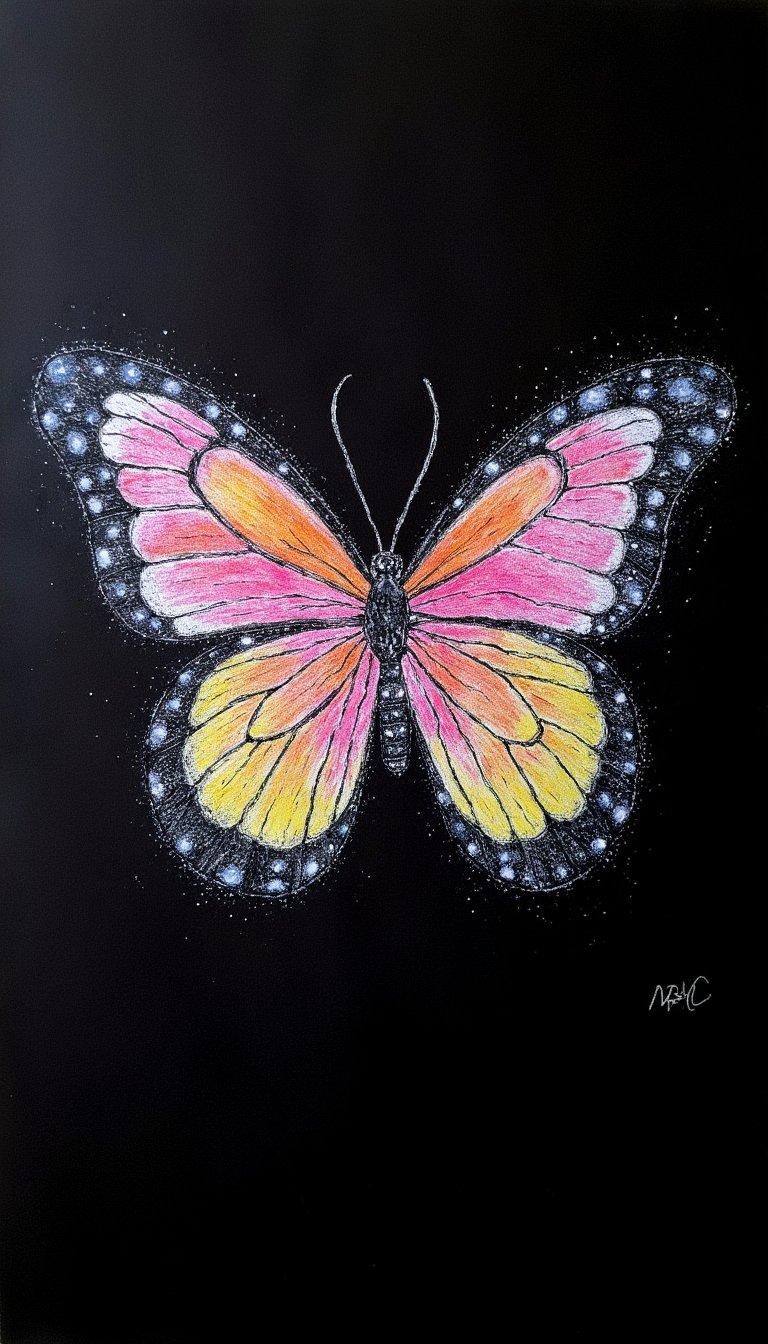
For a stunning, night-sky butterfly effect, break out the black construction paper and chalk pastels. The colors glow vibrantly against the dark background. Kids can blend colors with their fingers for soft, dreamy wings. To keep the chalk from smudging everywhere, a quick spritz of hairspray (done by an adult, away from kids) works as a perfect fixative. The results look professional and are so satisfying to make.
12. Collage Butterfly with Magazine Scraps
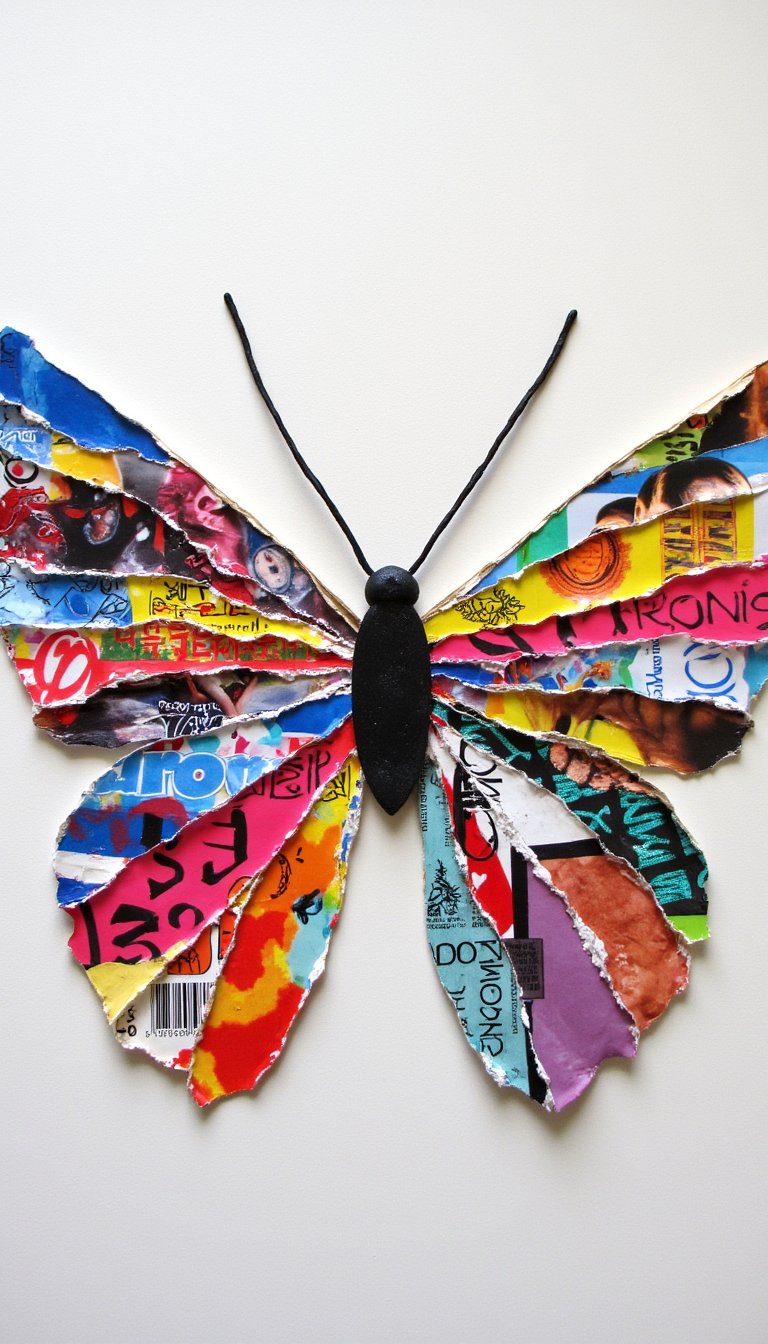
Recycle old magazines and catalogs into art! Cut or tear out pages with lots of color and patterns. Then, cut these scraps into shapes to assemble a butterfly mosaic on a background page. A solid-colored body and antennae help tie it all together. This project is fantastic for practicing scissor skills and thinking creatively about how colors and patterns can fit together.
13. Paper Bag Butterfly Puppet

This craft gets kids moving and storytelling. Decorate a small paper lunch bag to look like a butterfly—the bottom flap becomes the head. Create separate, larger wings from construction paper and glue them to the back of the bag. Now, your child can slip their hand inside and make their butterfly “fly,” act out stories, or put on a puppet show. It’s art that leads to play.
14. Salt Dough Butterfly Ornaments
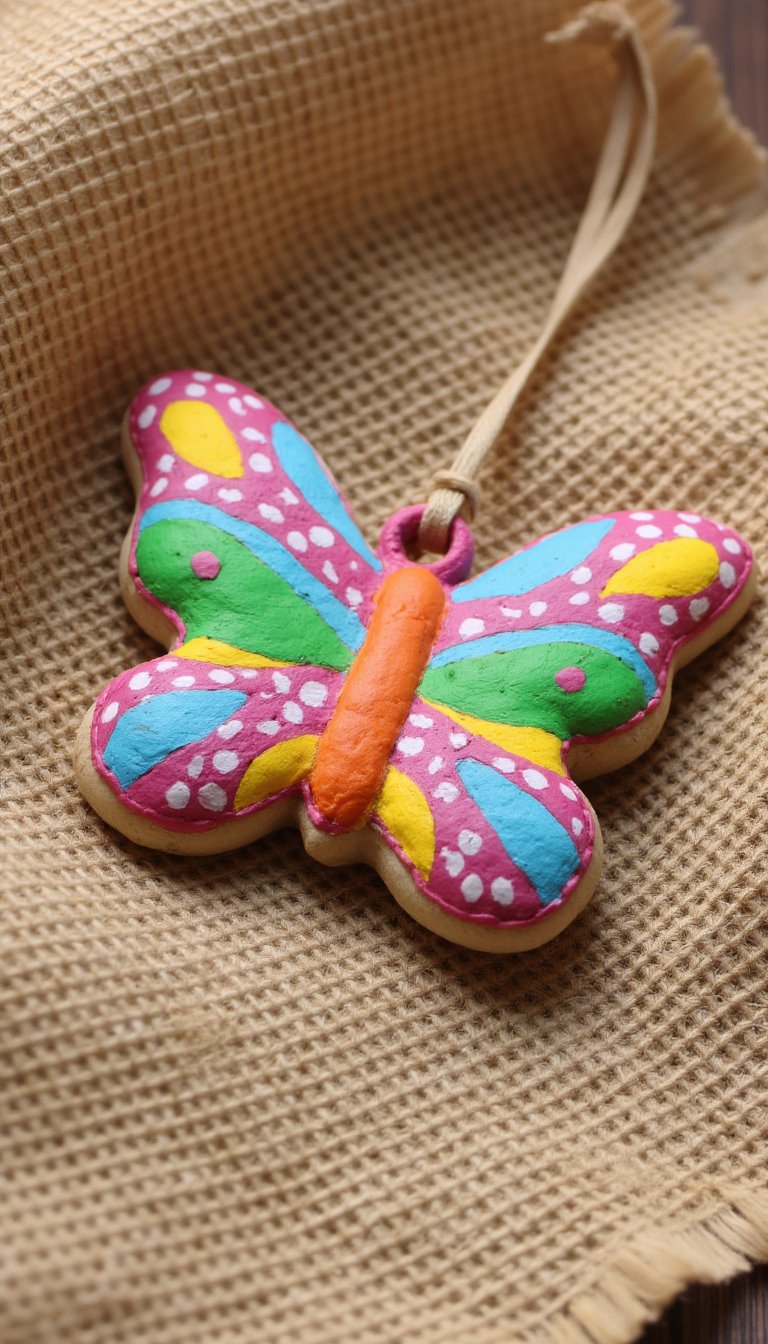
This is a longer project, but the payoff is a durable, lasting creation. Whip up a batch of salt dough (flour, salt, water), roll it out, and use cookie cutters or a knife to make butterfly shapes. Bake them, let them cool, and then paint and seal them. Poke a hole at the top before baking to thread ribbon through. They make wonderful gifts, holiday ornaments, or garden decorations.
15. “Stained Glass” Tissue Paper Window
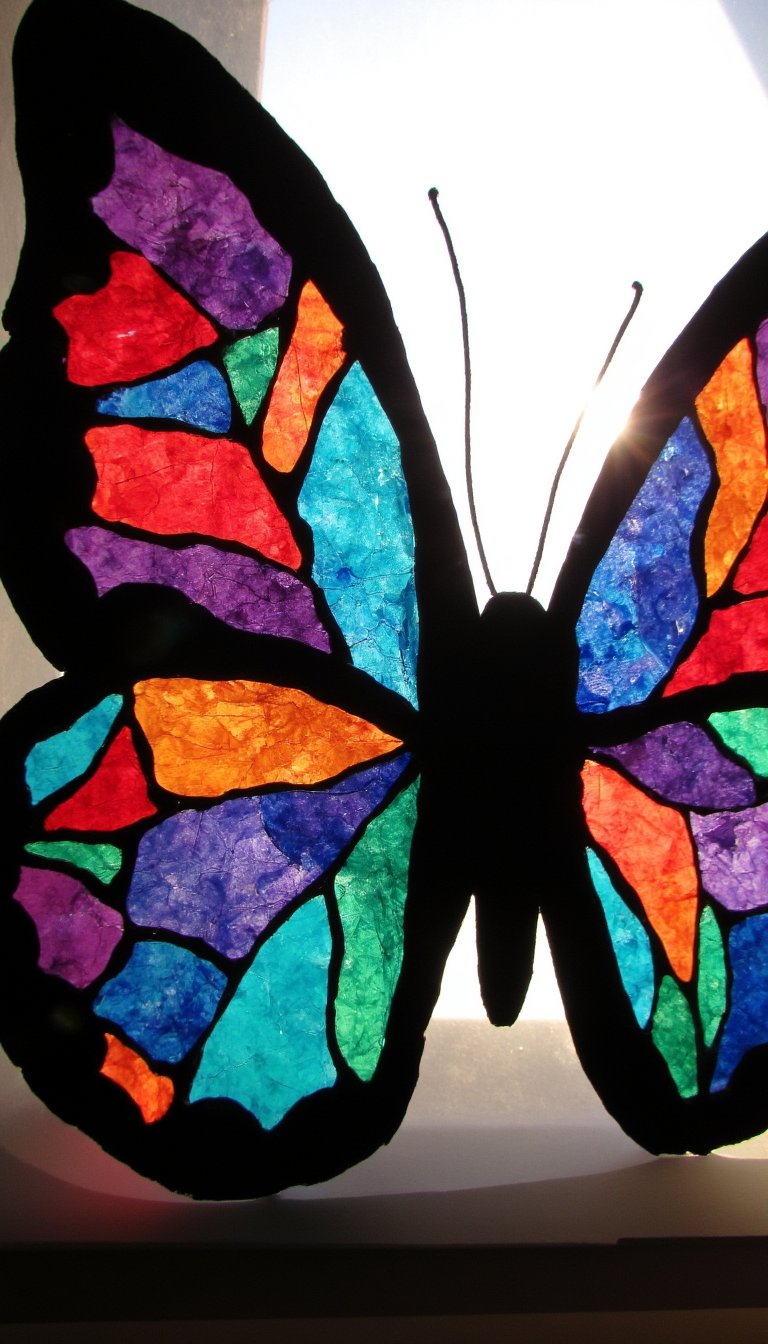
Brighten up any window with this translucent beauty. Cut a butterfly outline from black construction paper or cardstock to make a sturdy frame. Then, tape pieces of colorful tissue paper over the open wing spaces on the back. When you hang it on a sunny window, the light shines through just like stained glass. It’s a beautiful way to see colors in a new light.
16. Rock Painting: Garden Butterflies

Take the art outside permanently! Find smooth, flat rocks in your garden or a park. Clean them, paint them with a base color, and then transform them into butterflies with detailed wings. Seal them with a clear outdoor sealant, and place them in your flower beds. They add a whimsical, permanent touch to your outdoor space and make a great group activity.
17. Fly Swatter Splatter Paint Butterfly
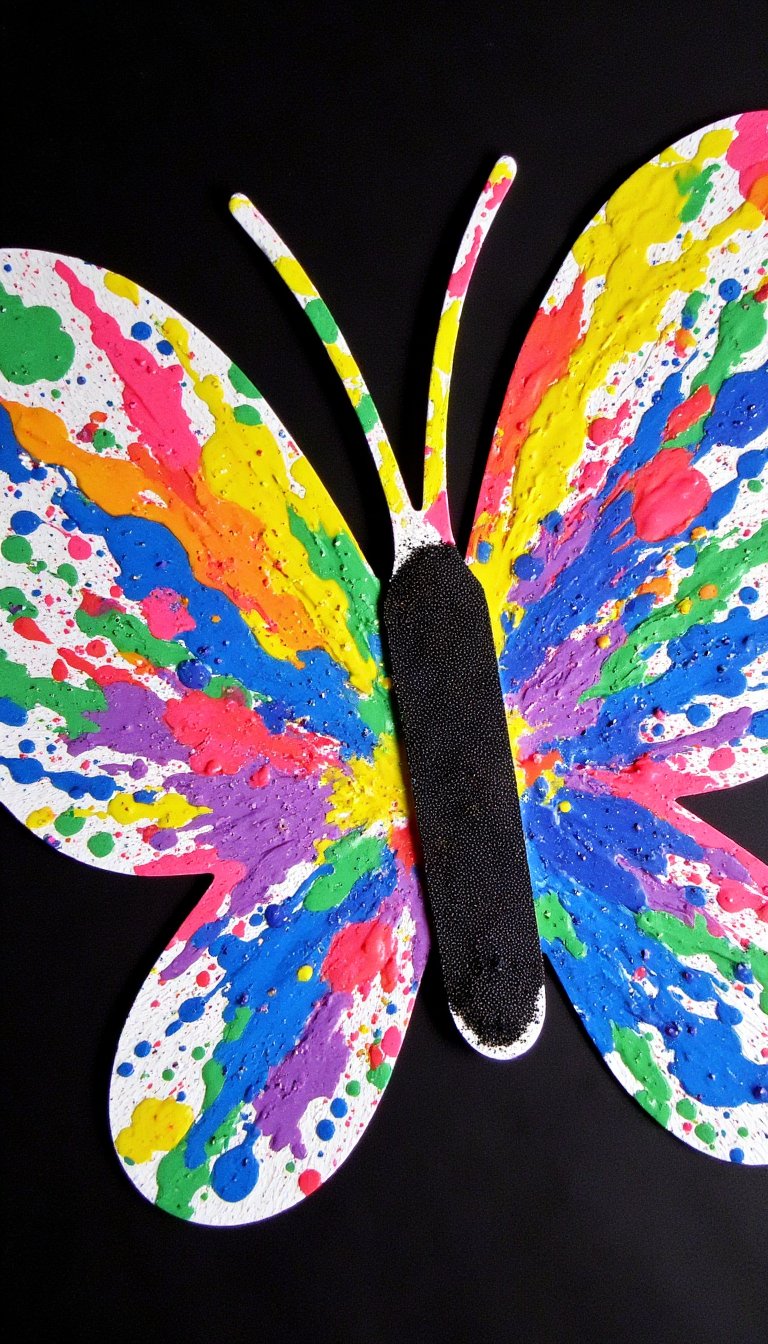
Okay, hear me out. This is the ultimate in controlled chaos and pure joy. Get a clean fly swatter (a new one, please!), dip it in washable paint, and gently swat it onto a large piece of paper. The splatter pattern creates wild, abstract wing shapes. Repeat with different colors. Once dry, cut out the wing shapes and add a body. It’s energetic, hilarious, and the results are surprisingly gorgeous. Just do this one outside!
And there you have it—17 butterfly art for kids projects that are way more exciting than just coloring in a worksheet. From the quiet focus of watercolor resists to the joyful mess of fly swatter painting, each idea offers a different path to creativity. The best part? You’re not just making cute decorations. You’re building fine motor skills, teaching basic science concepts, and creating memories that are as vibrant as the art itself. So, which one will you try first? I’m personally a sucker for the coffee filter classic, but that rock painting is calling my name. Happy crafting, and may your home be filled with colorful, fluttering masterpieces!