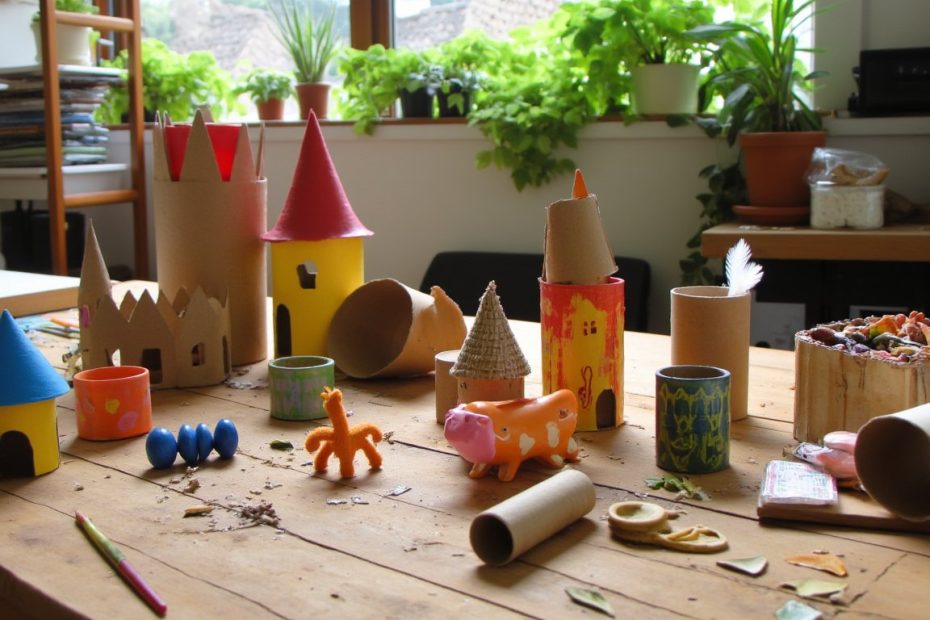
Okay, be honest. How many empty toilet paper tubes have you guiltily tossed this month? We’ve all been there. But what if I told you that little cardboard cylinder is a secret craft supply superstar, waiting to transform your home, entertain your kids, and spark pure creative joy? Forget “trash”—it’s time to see treasure. Let’s roll.
1. The Ultimate Upcycled Bird Feeder
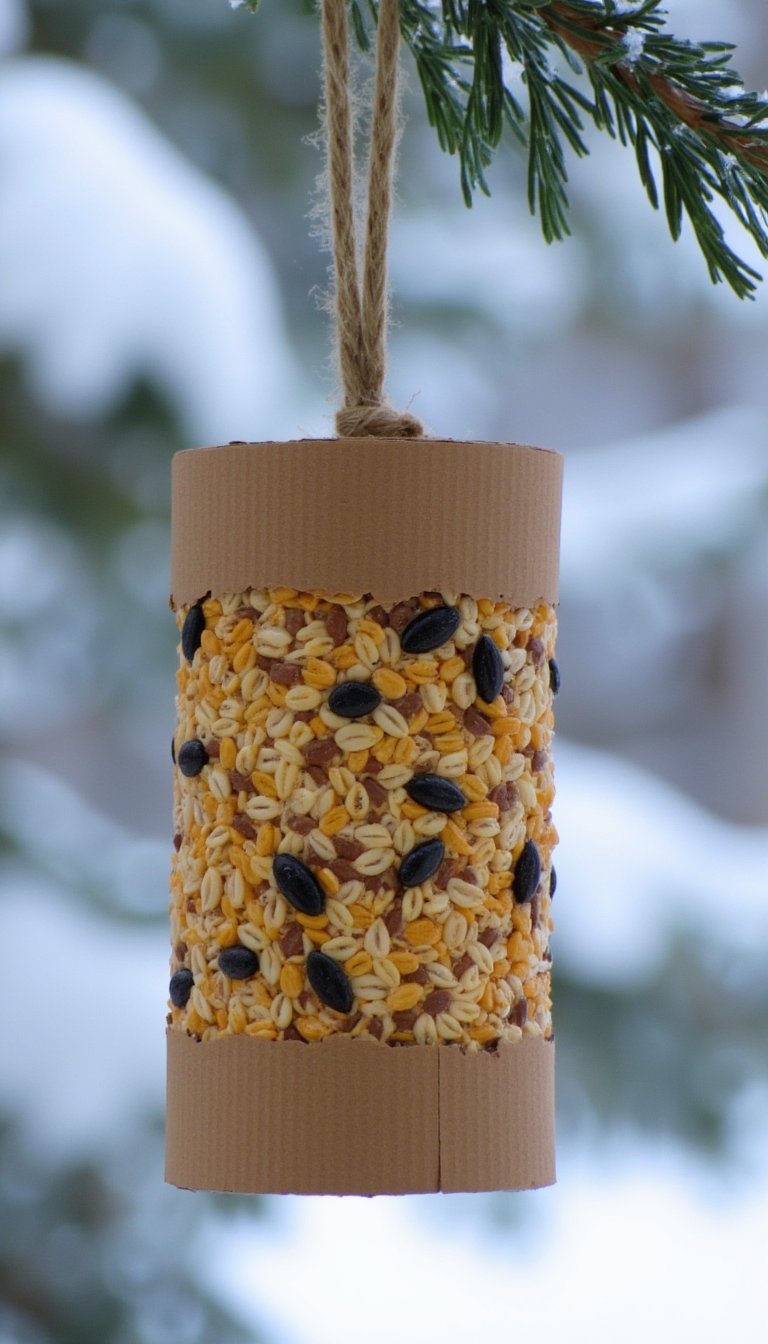
This craft is a triple win: you recycle, you feed your backyard friends, and you get a front-row seat to a nature show. Simply coat a roll in peanut butter (or suet for a nut-free option) and roll it in birdseed. Use a piece of string to hang it from a branch. The kids will love watching the birds flock to their handmade creation. Pro tip: Do this in the fall and winter when birds need the energy most.
2. Foolproof Seed Starter Pots
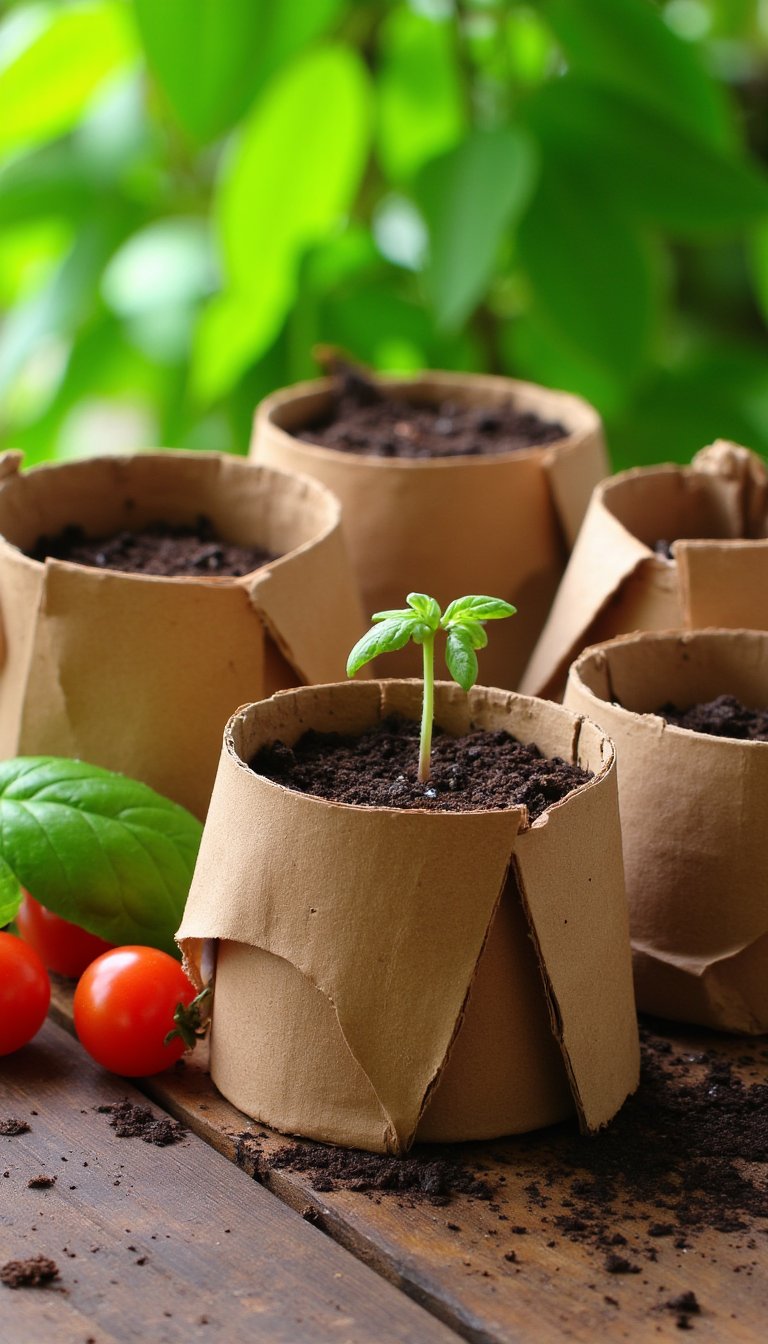
Stop buying those plastic trays! Toilet paper rolls make perfect biodegradable planters for starting tomatoes, herbs, or flowers. Just cut four slits about halfway up one end, fold the flaps in to create a bottom, fill with soil, and pop in a seed. When it’s time to transplant, you plant the entire roll right into the garden. The cardboard decomposes, giving the roots a stress-free transition. Your seedlings will thank you.
3. Chic (and Free) Napkin Rings
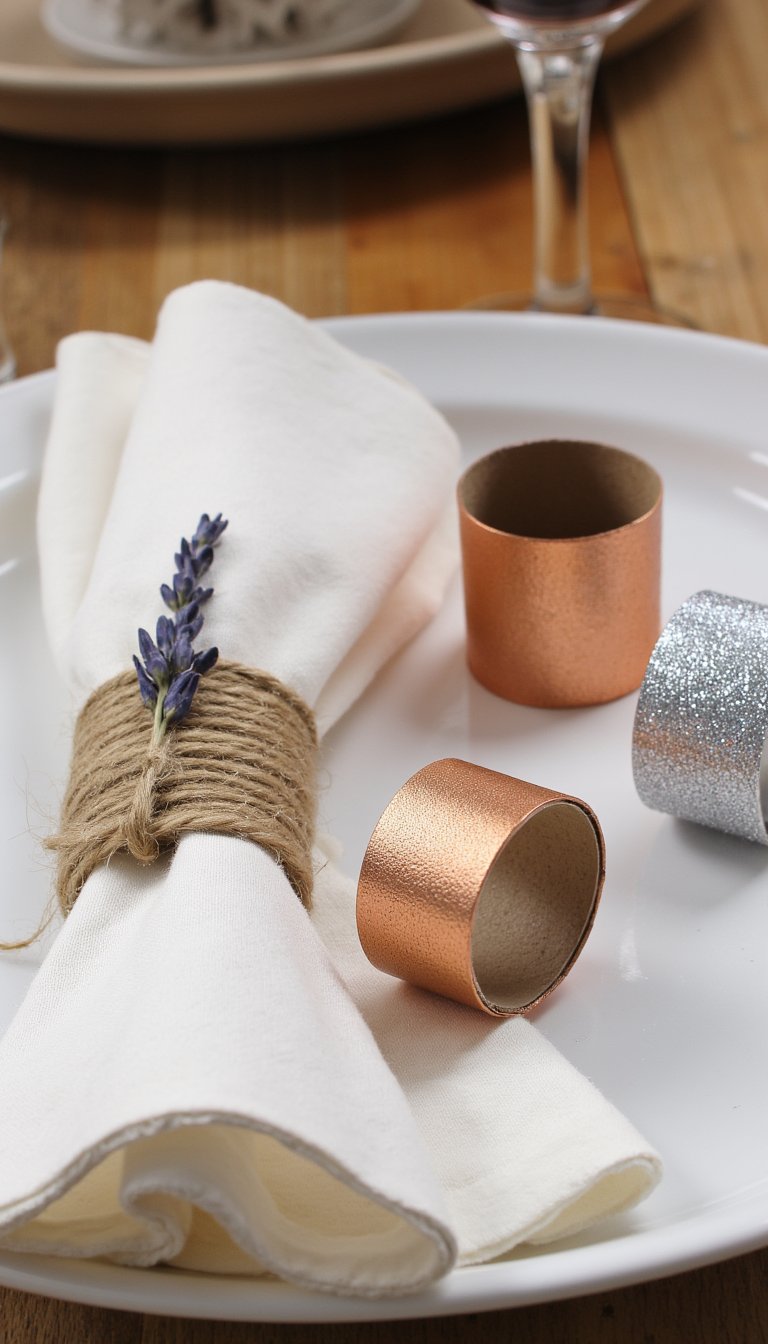
Elevate your next dinner party with personalized napkin rings that cost literally nothing. Flatten a roll slightly and cut it into 1-inch rings. Then, let your decor style run wild. Wrap them in twine for rustic charm, paint them metallic for glam, or let the kids go nuts with glitter glue. It’s an instant table upgrade that guests will genuinely admire. Who needs store-bought?
4. Tangle-Free Cord Organizers
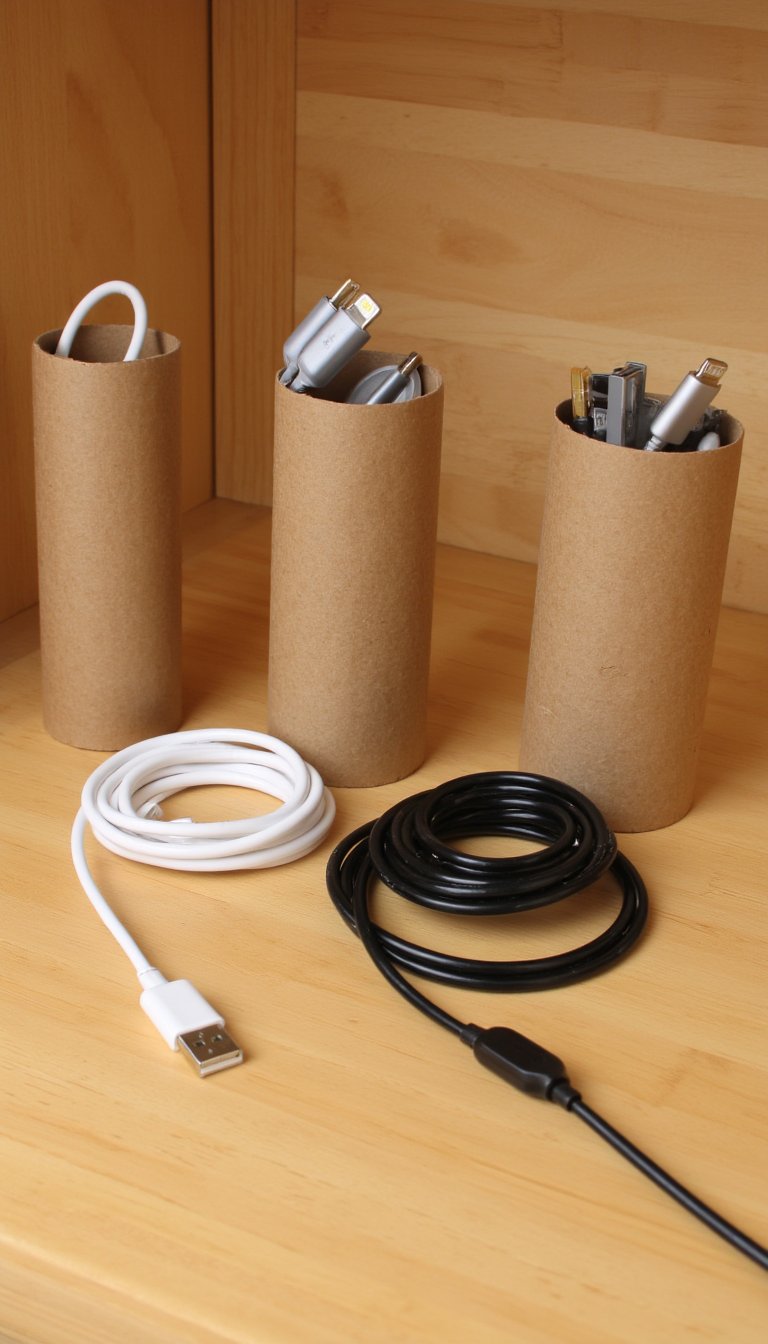
Is your desk drawer a nest of charging cables? This solution is embarrassingly simple. Label your rolls (“Phone,” “Tablet,” “Mystery Cable I Keep Just in Case”), then neatly coil each cord and slip it inside its designated tube. Stack them in a drawer or box. You’ll never waste time untangling knots again. Seriously, why haven’t we all been doing this forever?
5. Customizable Desk Organizer Caddy
Group several rolls together to create a modular organizer. Arrange them in a pattern that suits your needs—tall ones for pens, shorter ones for paperclips and thumbtacks. Secure the bundle with hot glue inside a shallow box or simply wrap the whole group with decorative tape or washi tape. You now have a one-of-a-kind desk caddy that matches your aesthetic perfectly. Goodbye, boring plastic cups.
6. Whimsical Holiday Ornaments
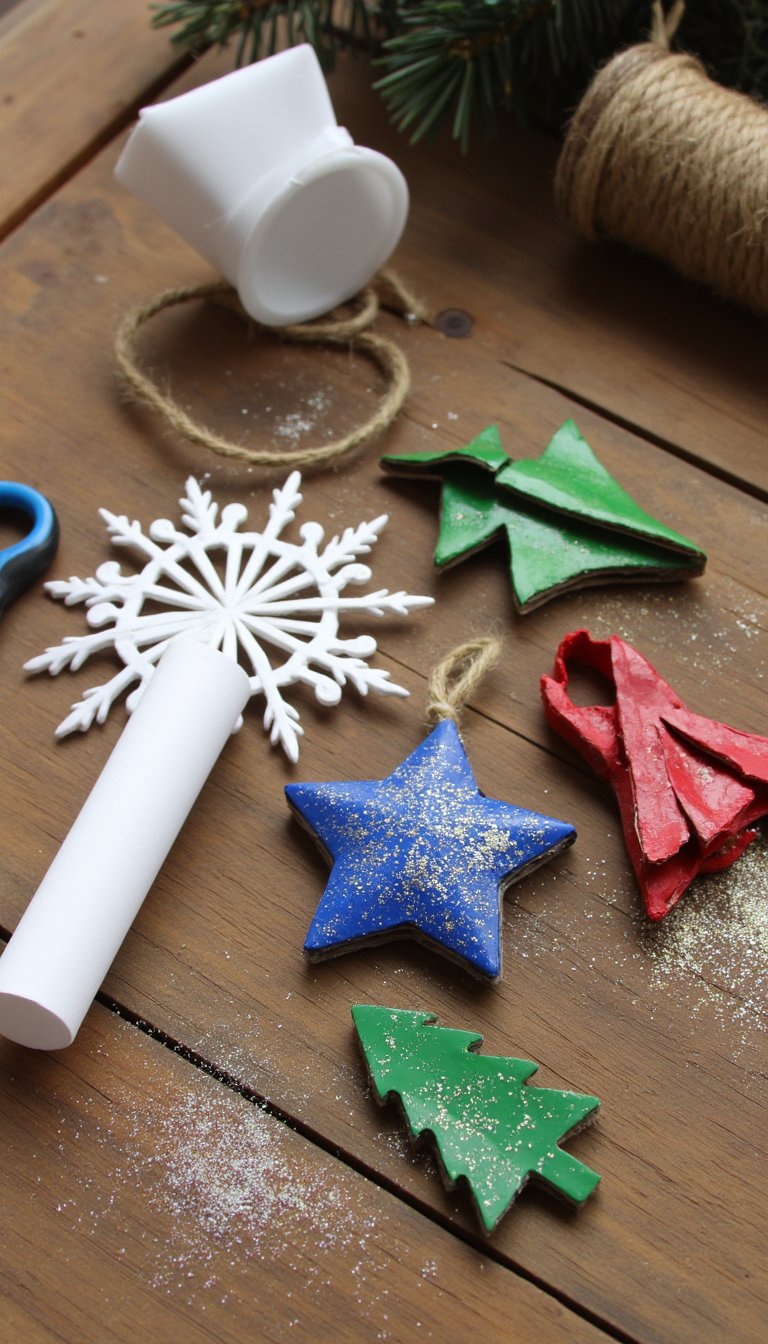
Shape rolls into stars, snowflakes, or even tiny Christmas trees. Flatten the roll, cut your desired shape, then pinch the middle to re-form a 3D ornament. Paint, add glitter, and attach a string loop. These lightweight ornaments are perfect for kids to make and add a heartfelt, handmade touch to your tree. They also make adorable gift tags for presents.
7. Spooky Halloween Decorations
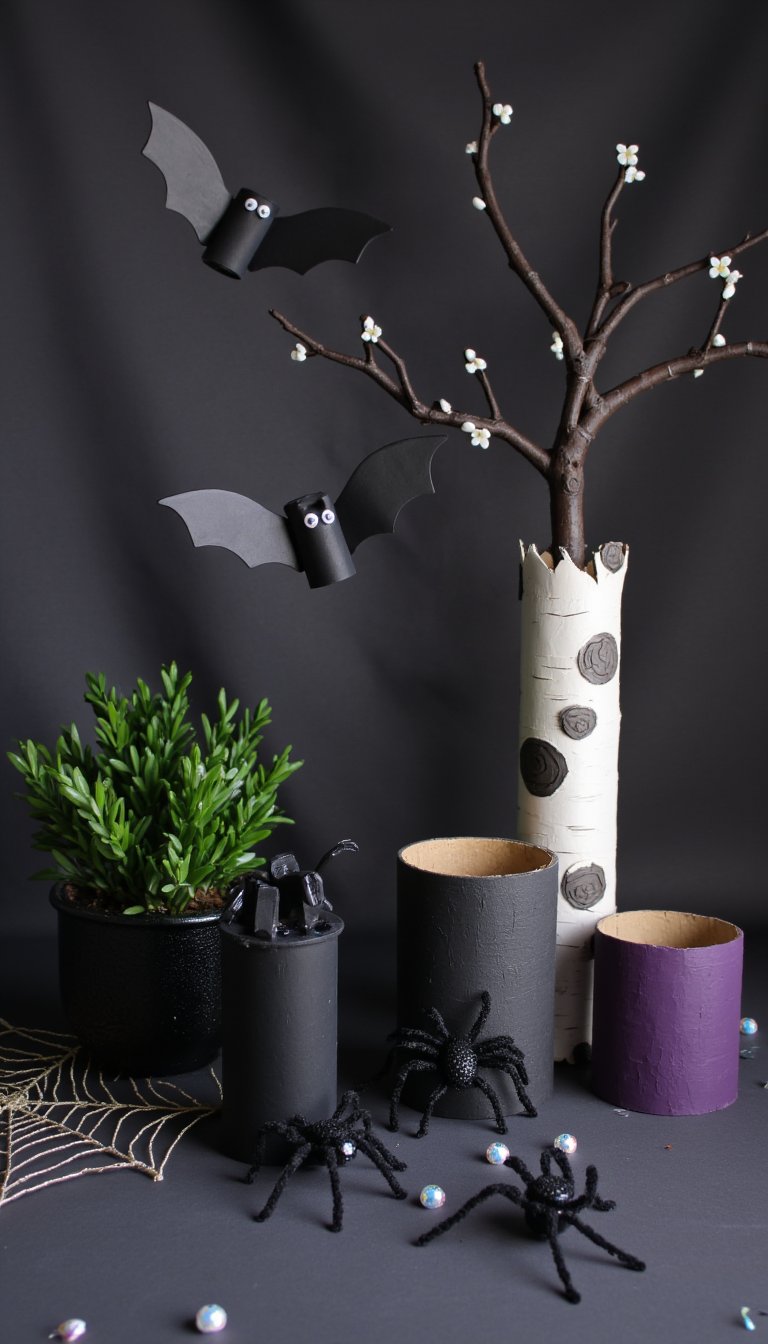
Turn tubes into a fleet of friendly bats, creepy crawling spiders, or elegant haunted trees. For bats, just paint the roll black, cut wing shapes from the sides, and add googly eyes. Stick them in potted plants or hang them from the ceiling. It’s a cheap and easy way to get your haunt on without the Halloween store markup. Boo-tiful, right?
8. Kid-Crafted Toy Cars & Rockets
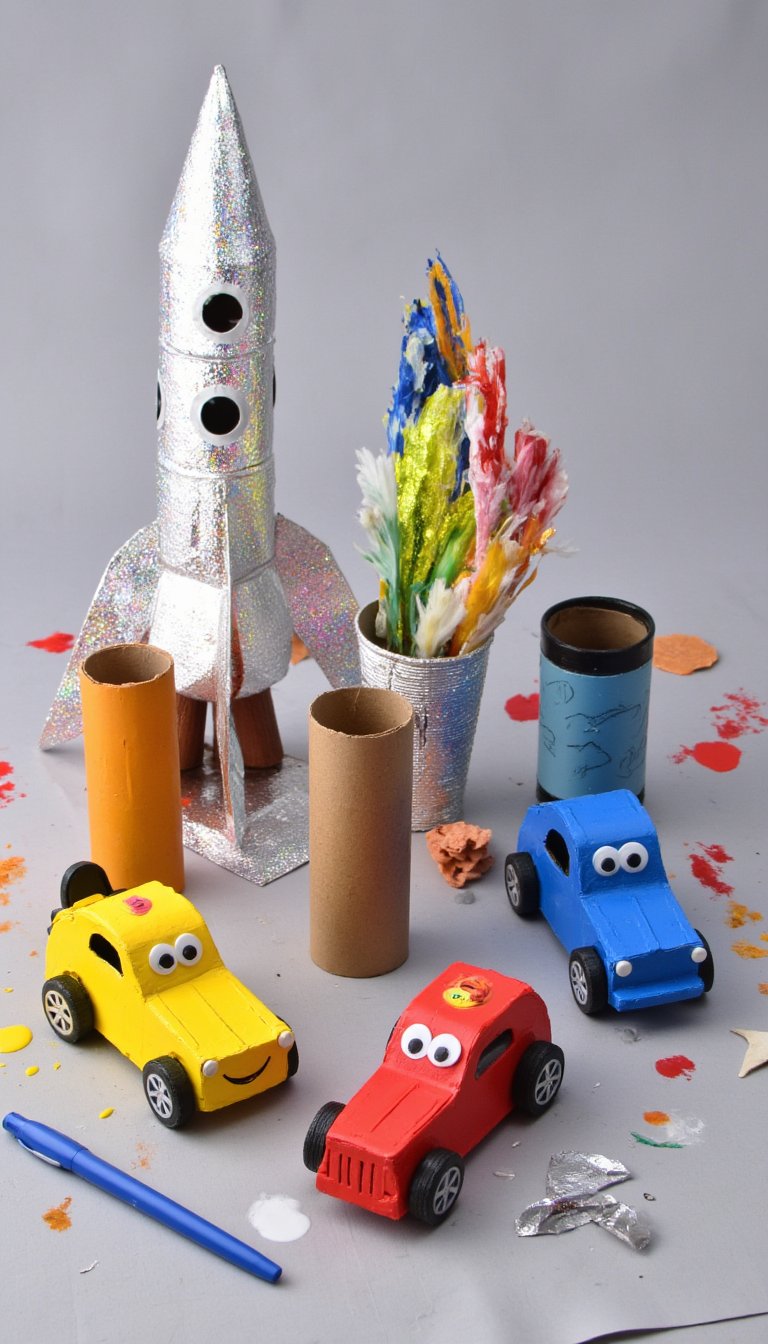
This is a childhood classic for a reason. Let your little engineers design their own fleet. Paint the roll, glue on cardboard wheels, and add details with markers. For a rocket, add a cone top made from paper and some foil flames at the bottom. The best part? When they inevitably get crushed, you can just make more. It’s endless, imaginative play.
9. Statement Wall Art
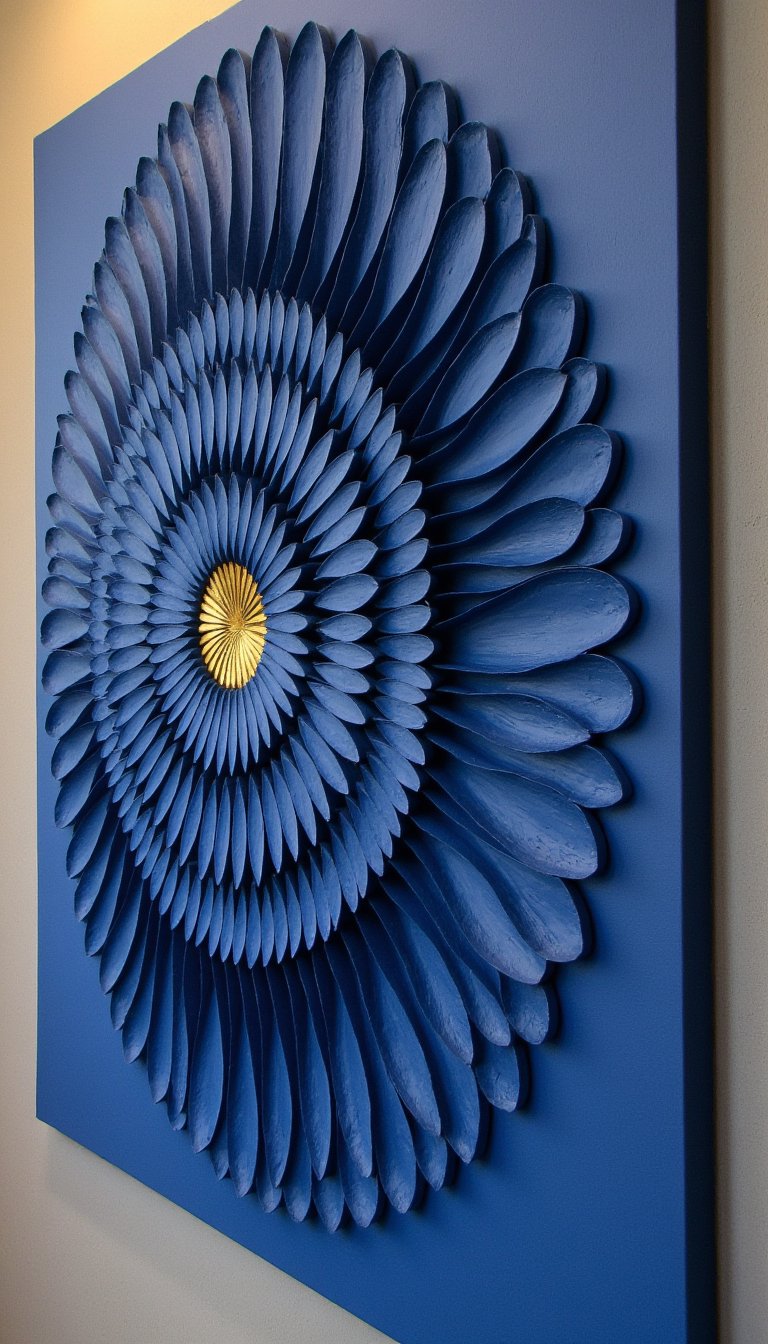
Think big! Flatten and cut rolls into hundreds of identical shapes—like petals, leaves, or circles. Arrange and glue them onto a canvas or wooden board in a stunning mosaic, mandala, or floral pattern. Paint the whole piece one color for a modern, textured look, or use a rainbow palette. This project is surprisingly meditative and results in a true conversation piece. Your guests will never guess the medium.
10. Dainty Jewelry Holder
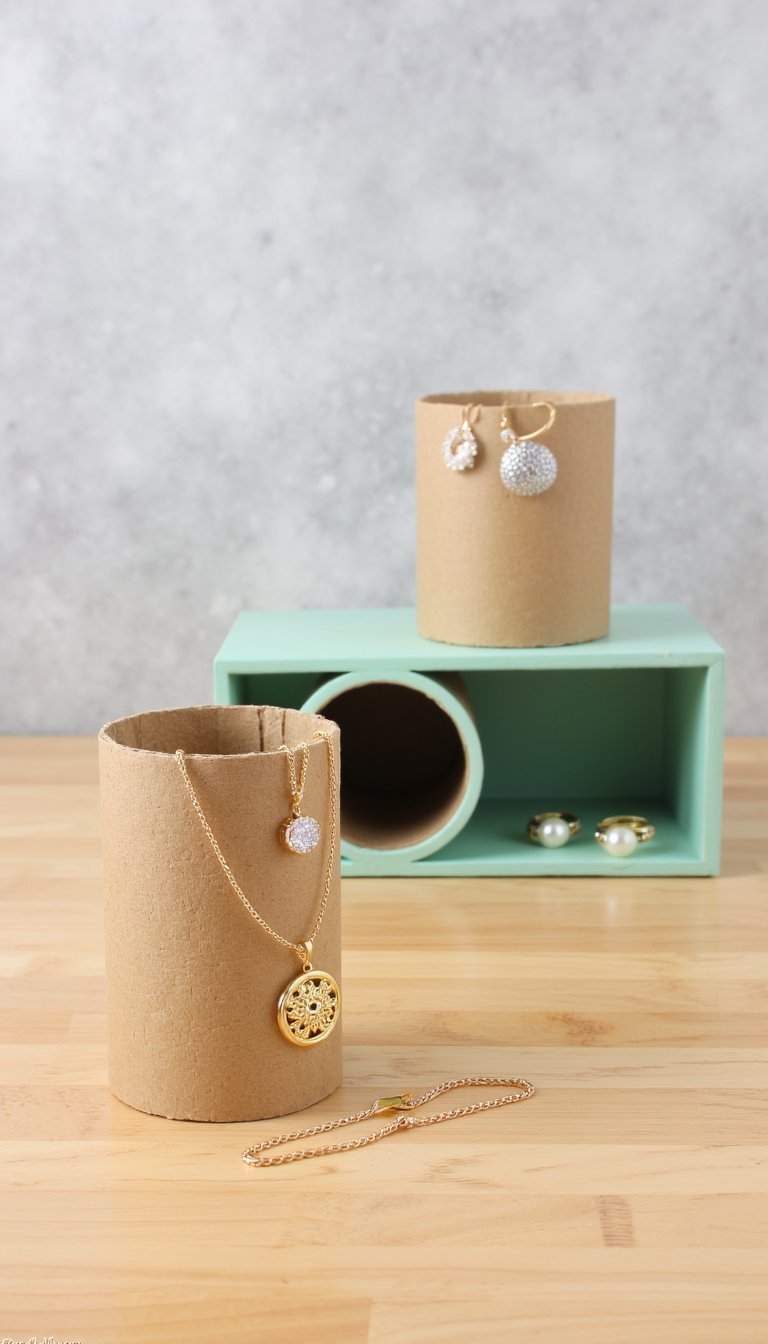
Tame your jewelry tangles with style. Stand a roll upright on your dresser and simply drape your necklaces or bracelets over it. For a more advanced version, stack and glue multiple rolls together horizontally on a backing board to create compartments for rings and earrings. It keeps your favorite pieces visible and accessible, not buried in a box. Simple, effective, and clutter-cutting.
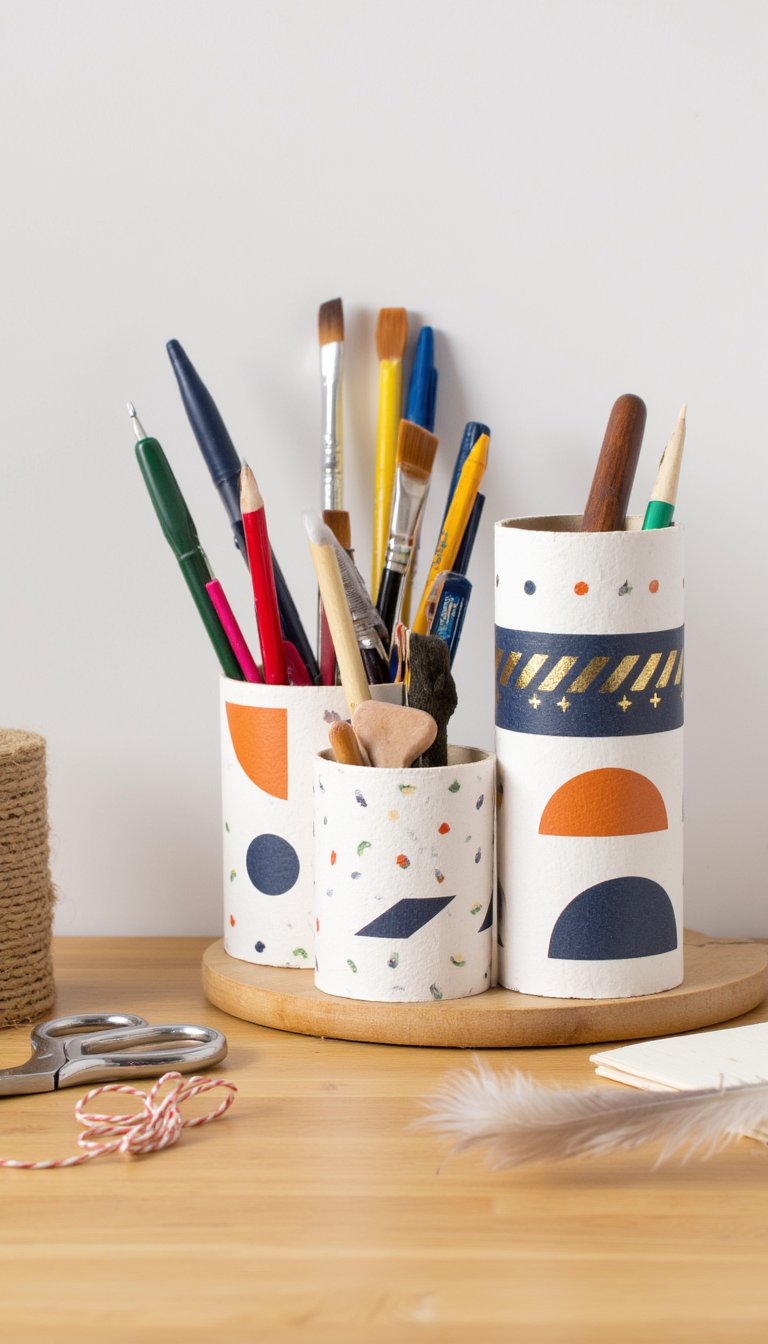
11. No-Slip Pen & Brush Holders
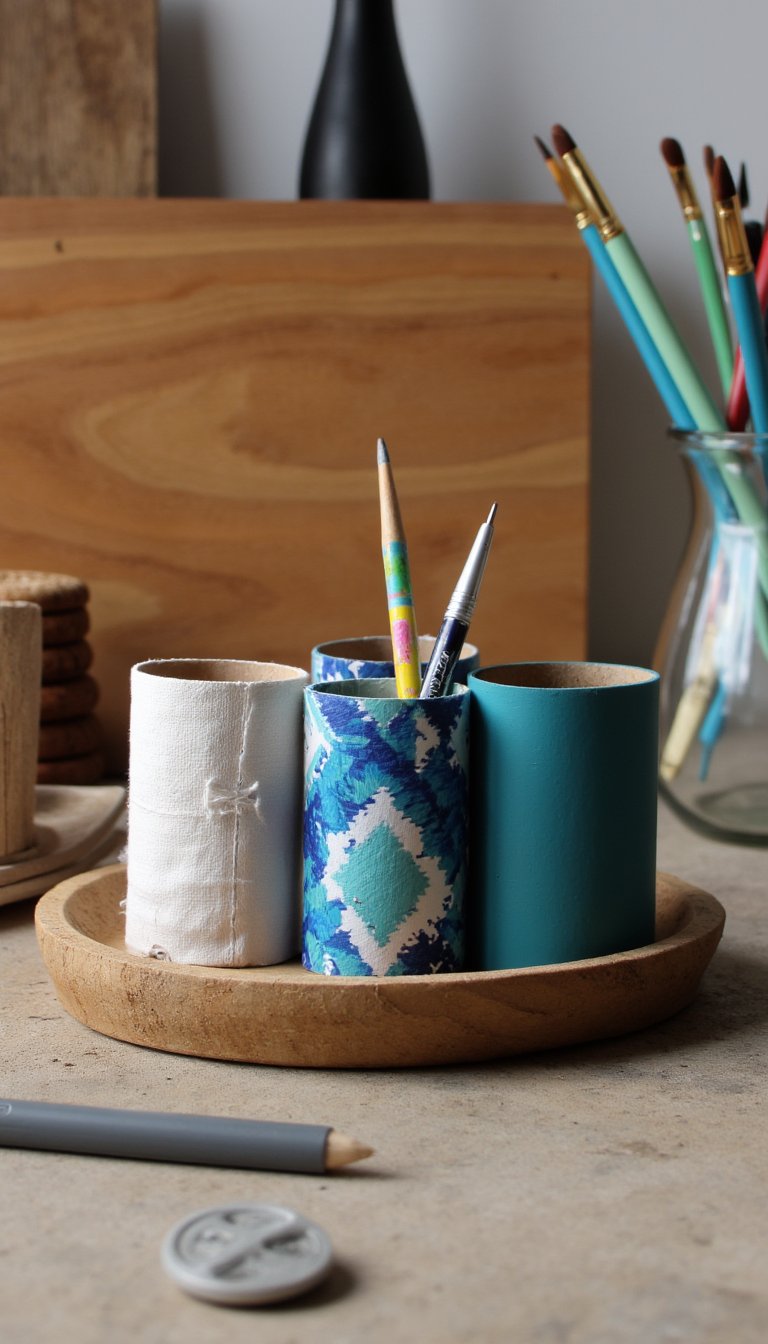
Artists and students, this one’s for you. Decorate your rolls with fabric, contact paper, or acrylic paint to match your workspace. They’re the ideal size for holding everything from pencils and paintbrushes to crochet hooks and knitting needles. Group a few together in a tray to separate your tools by type or color. Function meets fun, instantly.
12. Adorable Mini Gift Boxes
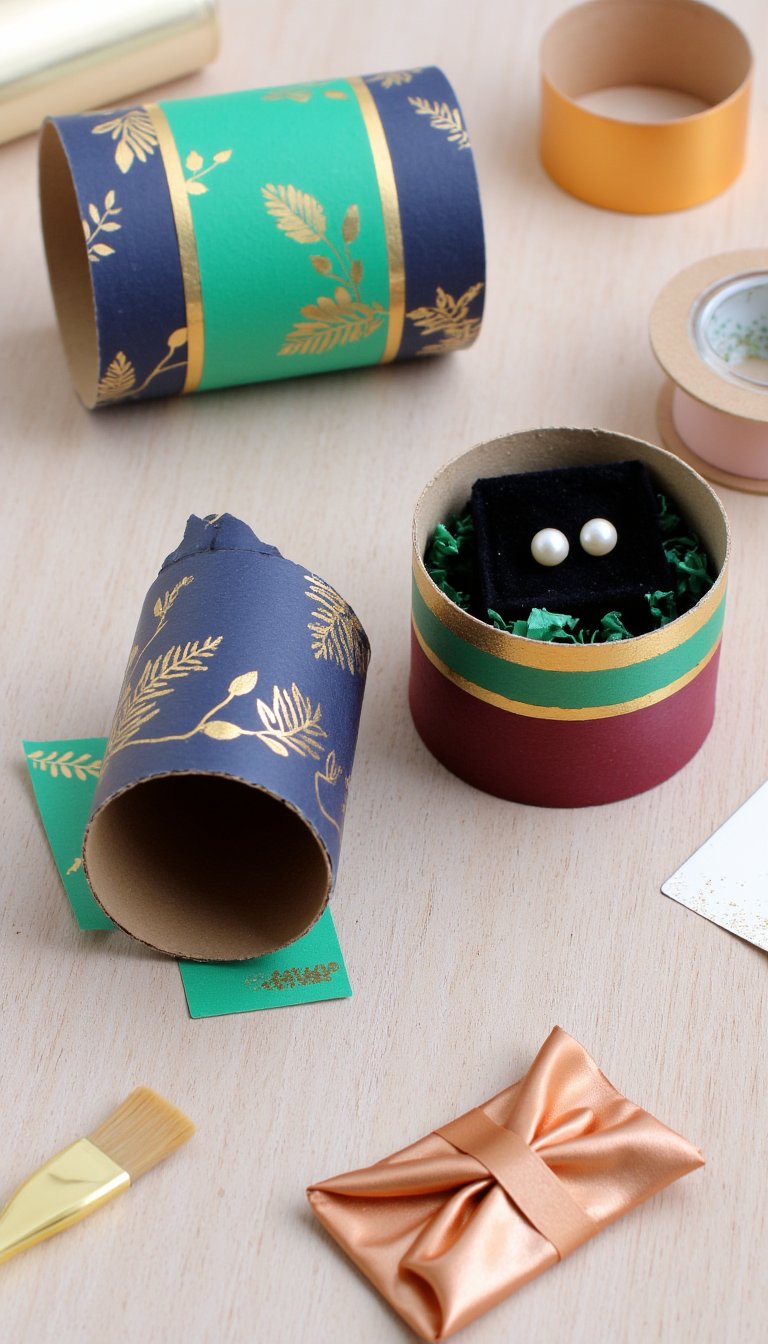
For small gifts like earrings, gift cards, or a wad of cash (the best gift), these are perfect. Seal one end of the roll with cardboard or washi tape. Decorate the outside, pop the gift inside, and seal the other end. It’s a presentation that shows you put in extra thought. Plus, the recipient gets to enjoy the fun of cracking open a unique package.
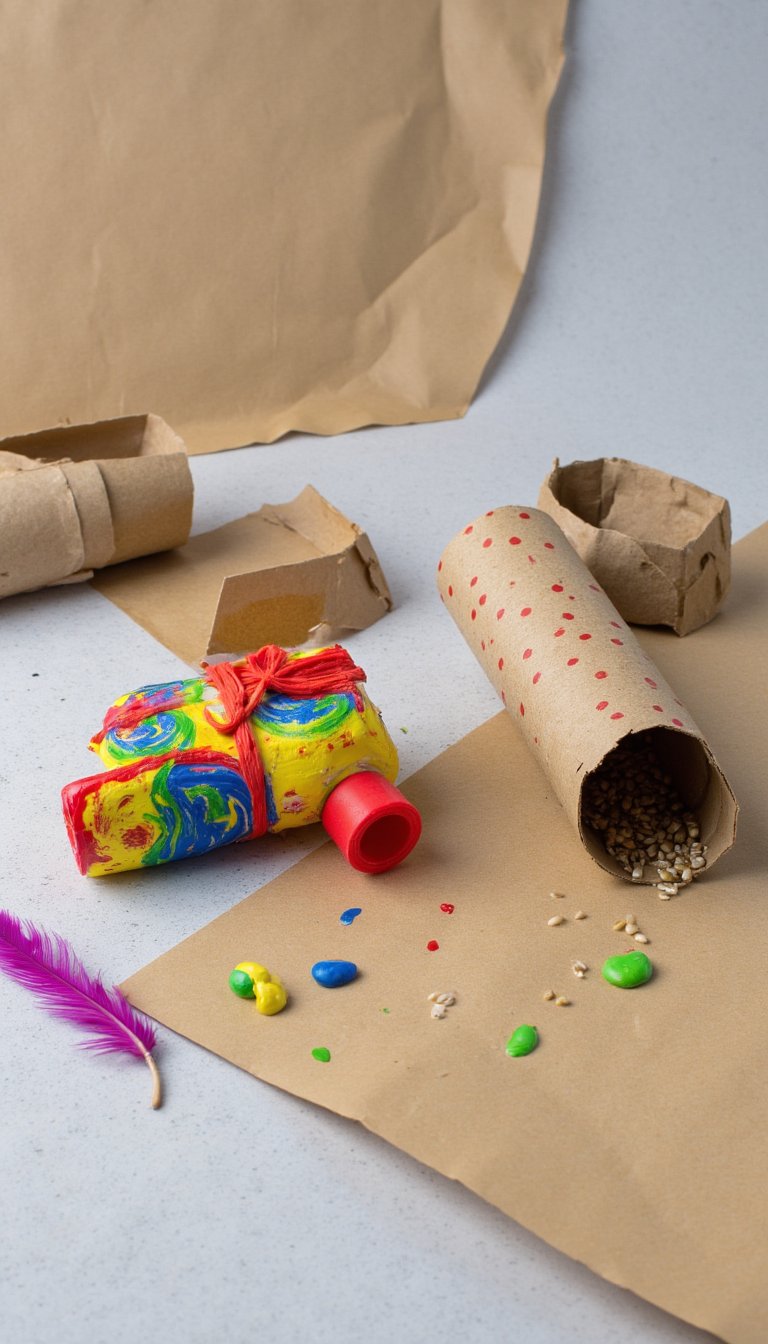
13. Instant Party Decorations

Birthdays, baby showers, you name it. Create festive bunting by stringing together painted rolls. Make confetti poppers by covering one end with tissue paper, filling with confetti, and stretching a balloon over the other end—pull and pop! These crafts are cheap, crowd-pleasing, and make cleanup a breeze. Well, except for the confetti. Sorry about that.
14. Charming Animal Figures
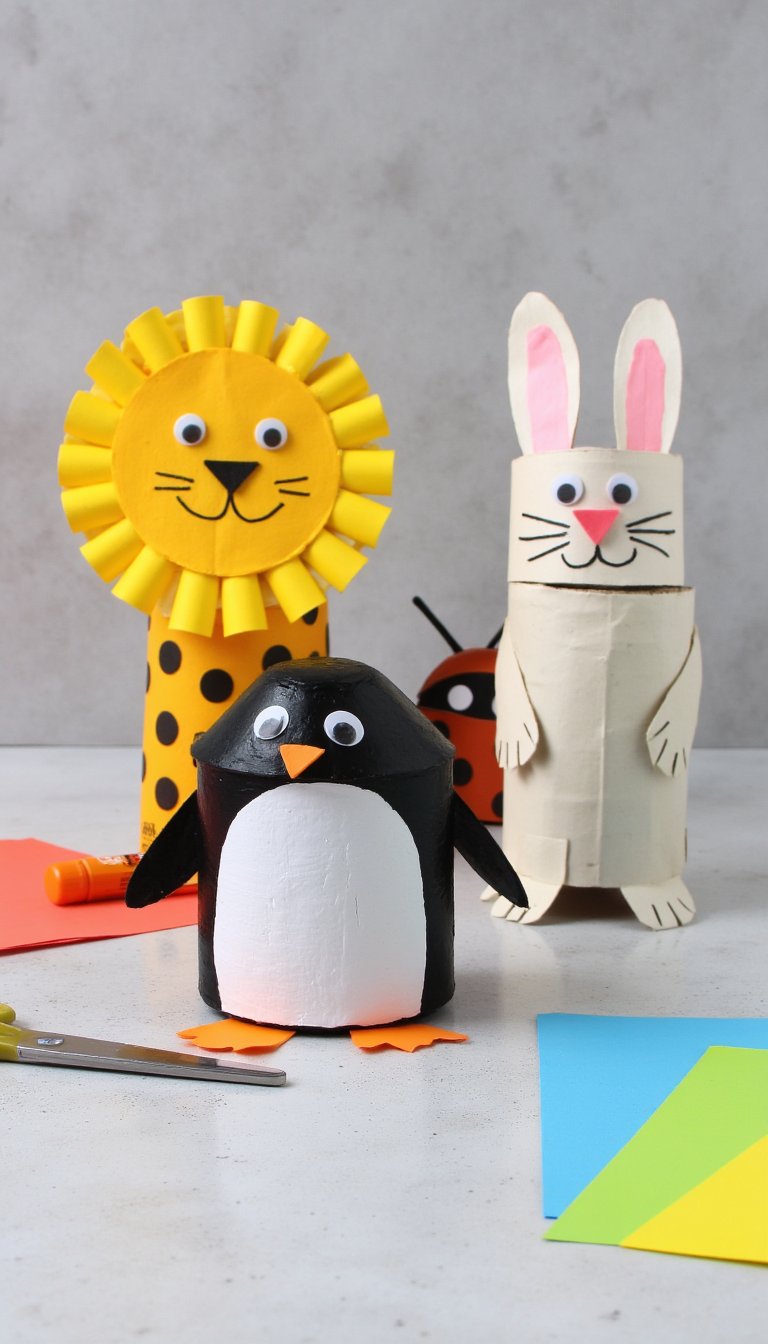
The zoo is open! With some construction paper, glue, and markers, a toilet paper roll can become anything: a ladybug, a lion, a penguin, or a rabbit. This is a fantastic rainy-day activity that boosts fine motor skills. Let the kids lead the creative direction and build an entire menagerie. You might just have a future zoologist or animator on your hands.
15. Homemade Musical Instruments
Introduce kids to rhythm and sound. Make a simple kazoo by covering one end with wax paper secured by a rubber band and humming into it. Decorate it like a colorful microphone. Or, fill a sealed roll with rice or beans to create a shaker. Congratulations, you’ve just formed a very loud, very proud cardboard band. Earplugs for parents are optional but recommended.
16. Hanging Planter for Succulents
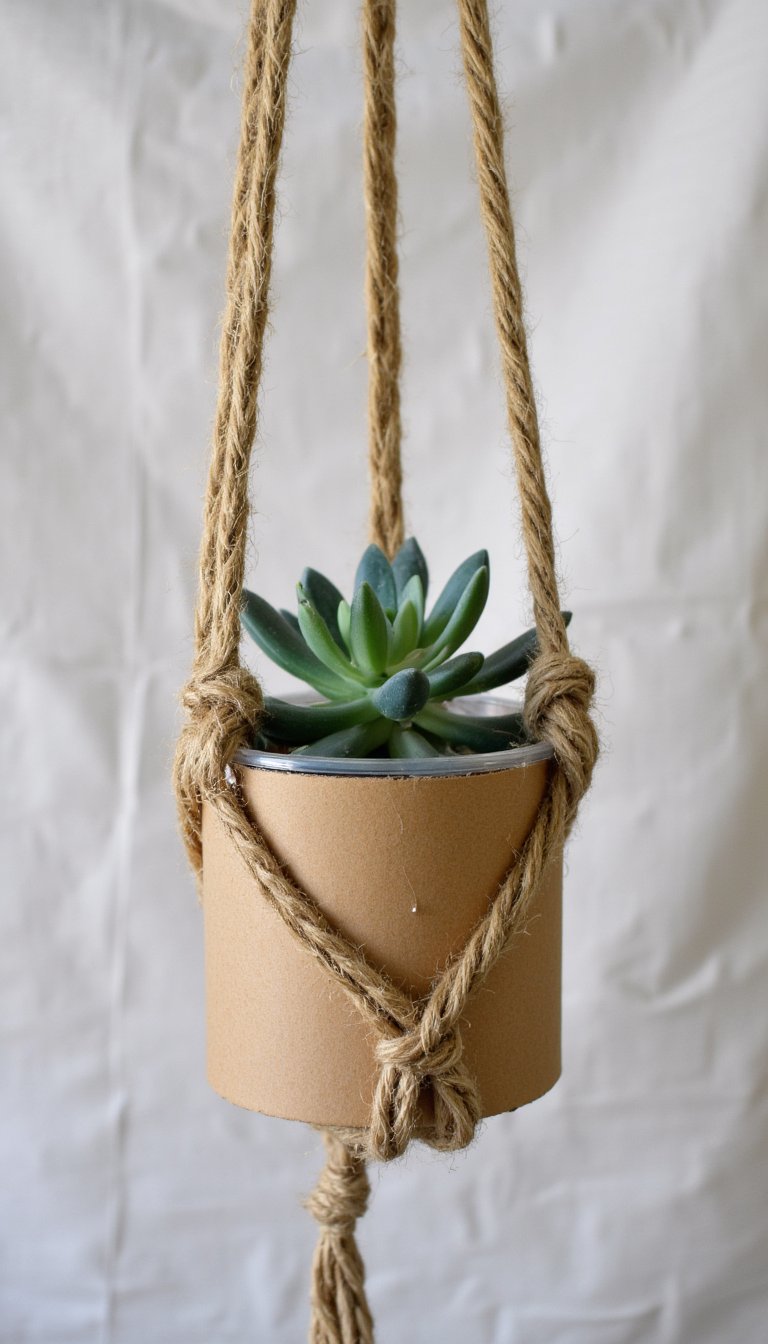
For small air plants or succulents, create a macramé-style hanger. Wrap jute or yarn around a roll in a pattern, leaving long ends at the top to tie into a loop for hanging. Insert a plastic liner or a small cup inside the roll, add your plant, and suspend it near a window. It’s a bohemian touch of green for any room. Just ensure your plant gets the light it needs.
17. Creative Bookmark
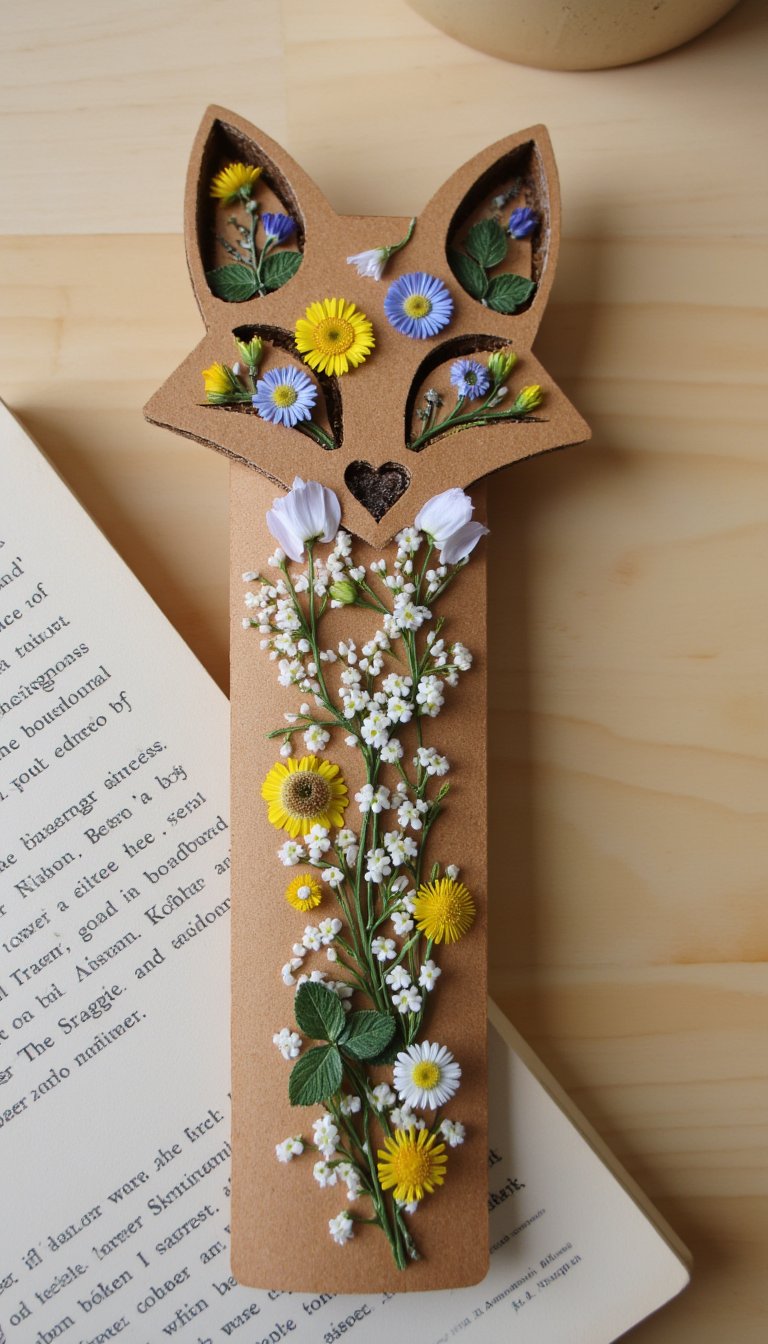
Flatten a roll completely and cut it into a strip. Decorate it with inspirational quotes, patterns, or pressed flowers sealed under clear tape. You can even cut a fun shape, like a animal head, at the top. It’s a sturdy, unique bookmark that won’t easily fall out of your book. A little reminder that creativity fits into every part of your day, even reading time.
18. DIY Photo Holder & Display
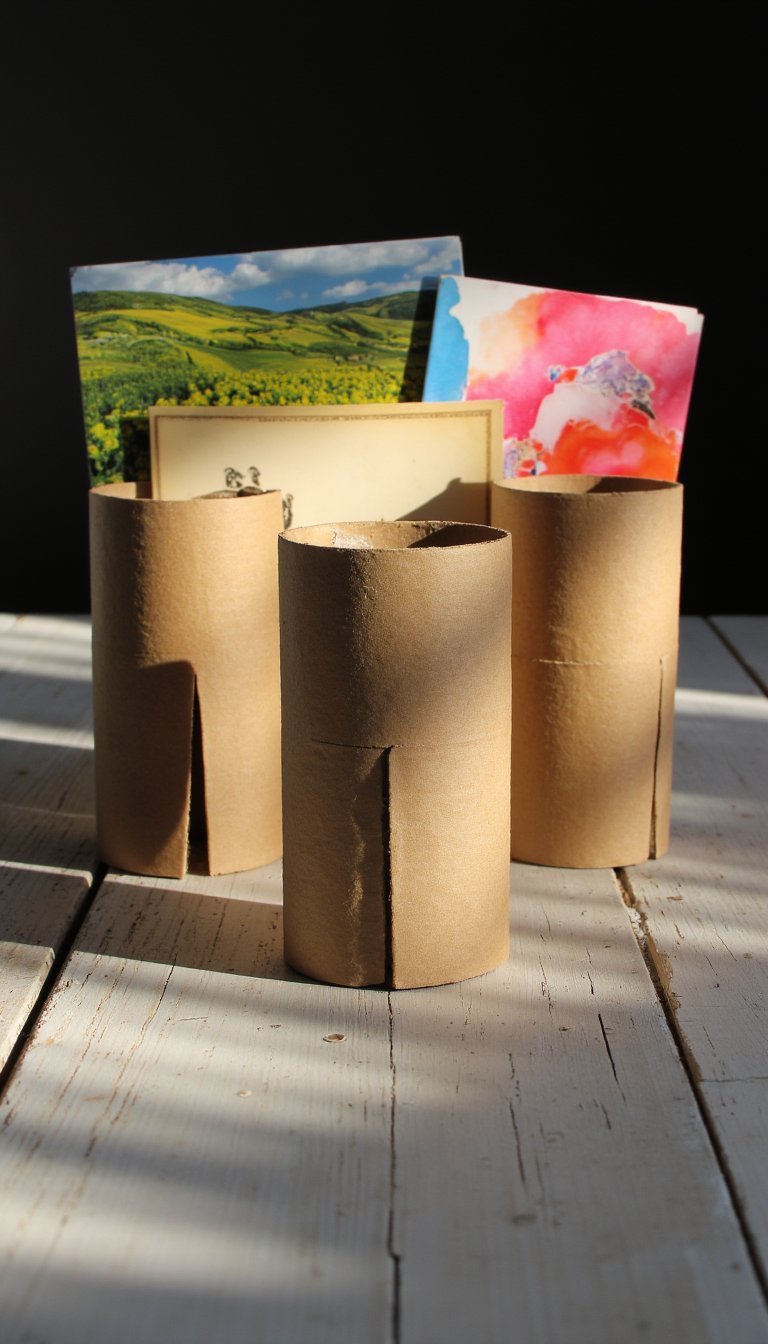
Stand a roll upright and make two vertical cuts on opposite sides at the top. Slide a favorite photo or a piece of art into the slots. You can make a whole series of these for a mantle or shelf display. It’s a wonderfully flexible way to rotate your memories without frames. Change the photos with your mood or the season.
19. Enchanted Fairy Lanterns
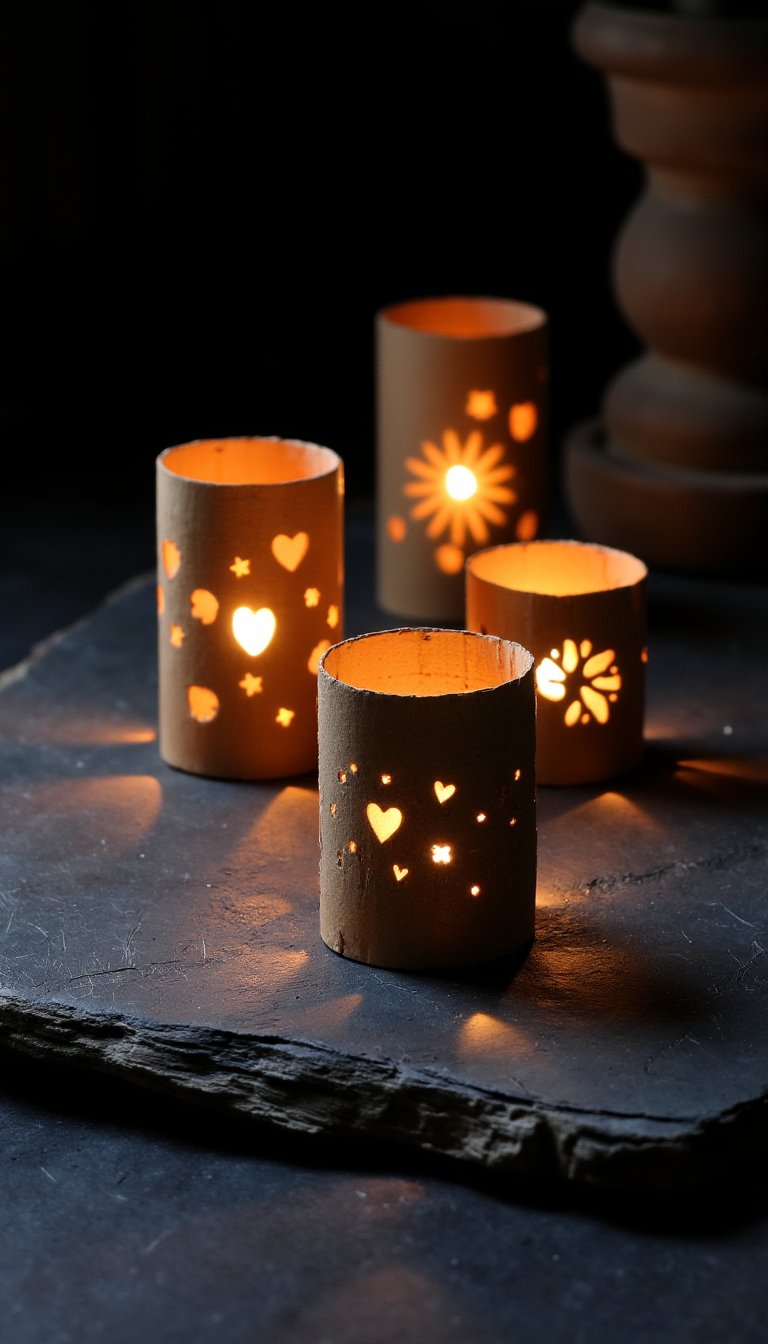
Punch or cut small shapes (stars, hearts, dots) into the sides of a roll. Place a battery-operated tea light inside. In a dark room, it will cast magical patterns on the walls. This is a safe and mesmerizing craft for kids’ bedrooms or outdoor evening gatherings. It feels like capturing a little bit of firefly magic in cardboard.
20. Epic Marble Run Track
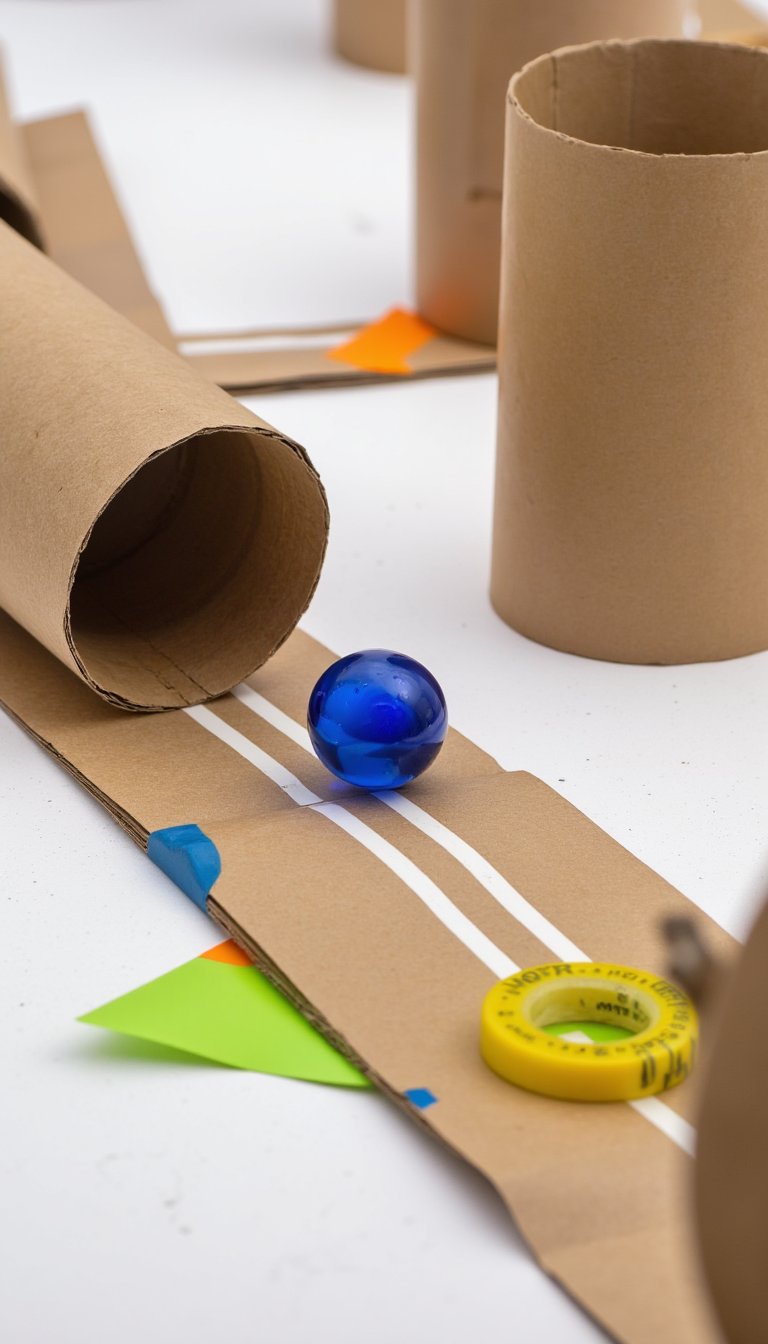
Unleash the laws of physics! Tape multiple rolls to a wall or large piece of cardboard, cutting some in half to create open chutes. Arrange them in a winding path from top to bottom. Watching the marble zip through your custom course is endlessly satisfying. This STEM activity teaches problem-solving and can be reconfigured a million different ways. Hours of quiet, focused fun? Yes, please.
21. Character Puppets for Story Time
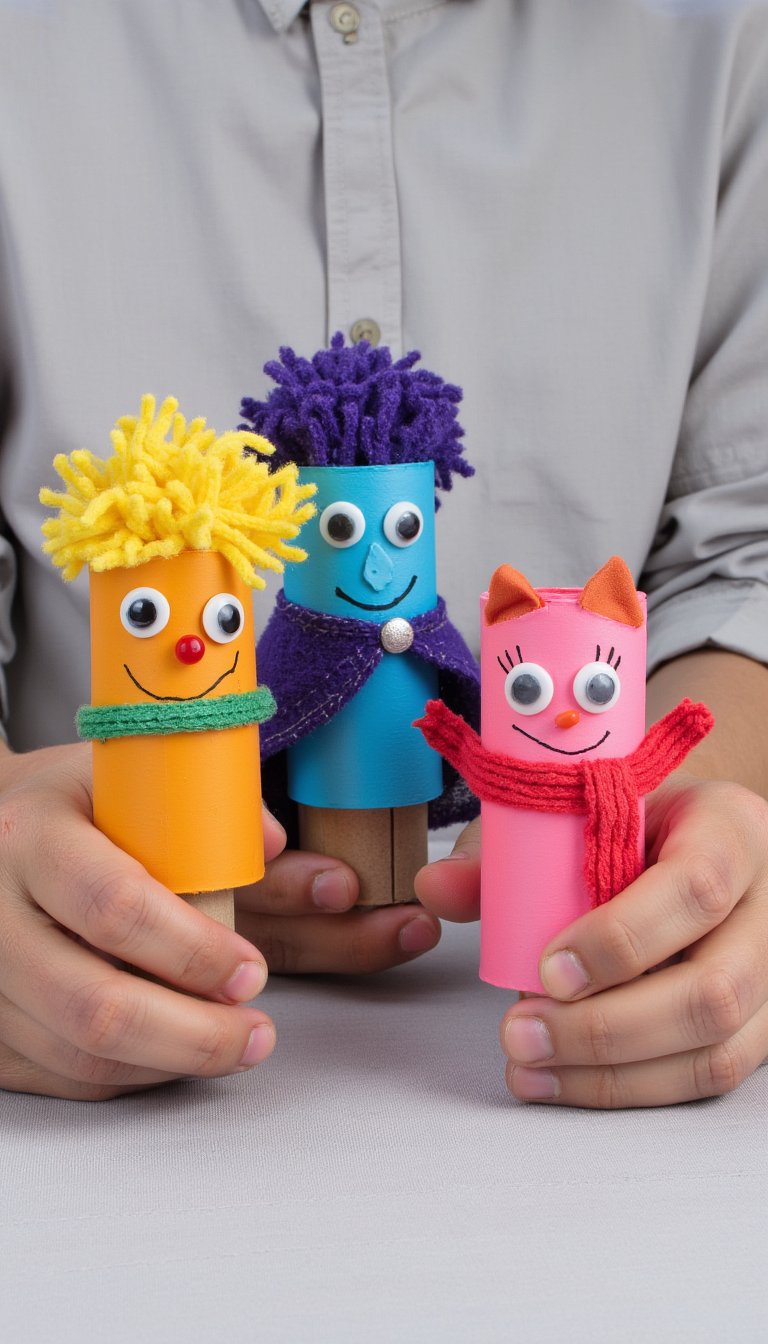
Slip a roll onto your hand—instant puppet stage. Create characters by adding yarn hair, googly eyes, and fabric clothes. Put on a show! This craft encourages storytelling, language development, and creative play. It’s also a great way to act out favorite books or help kids process big emotions through their puppet avatars.
22. Abstract Sculptures
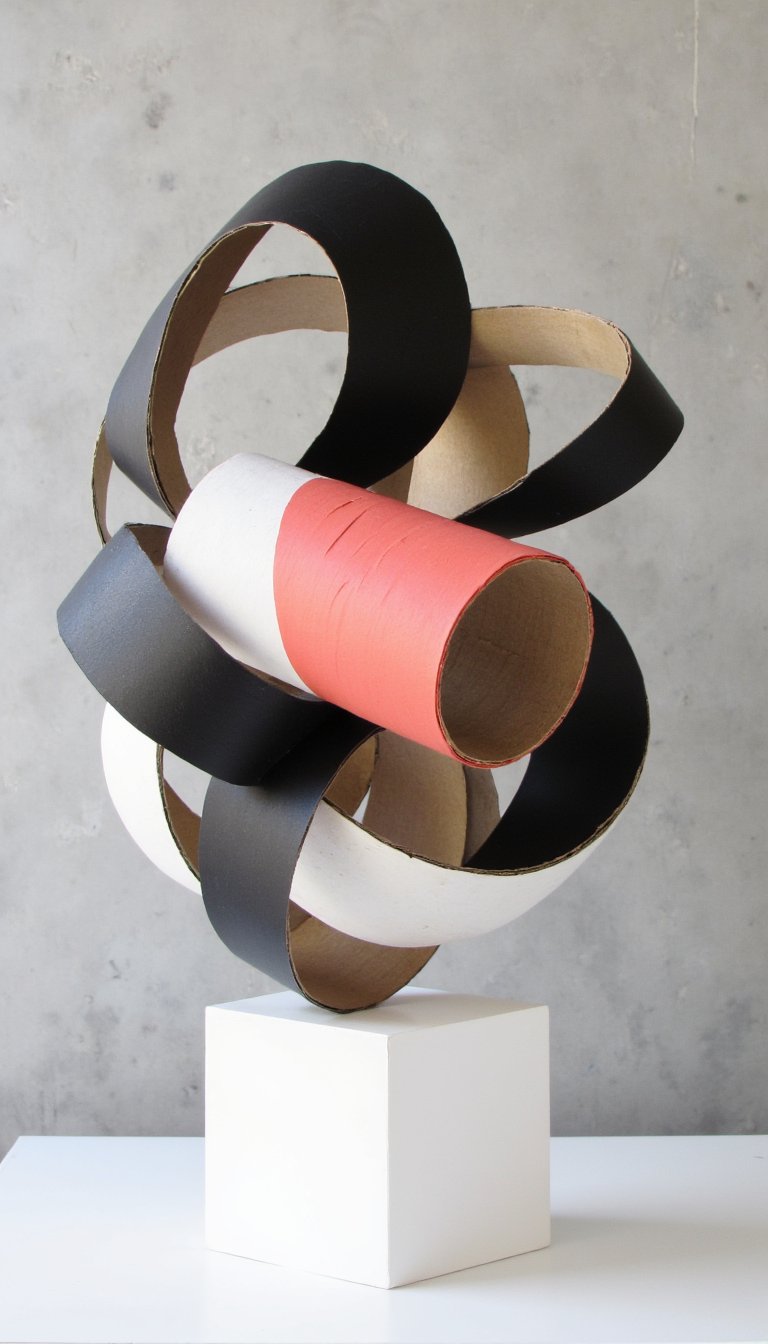
Channel your inner modern artist. Cut rolls into various rings and shapes. Paint them in monochromatic or contrasting colors. Then, glue them together in an interesting, free-form sculpture. There are no rules here, which is the whole point. It’s a therapeutic exercise in form and color that results in a unique decor object.
23. Countdown Advent Calendar
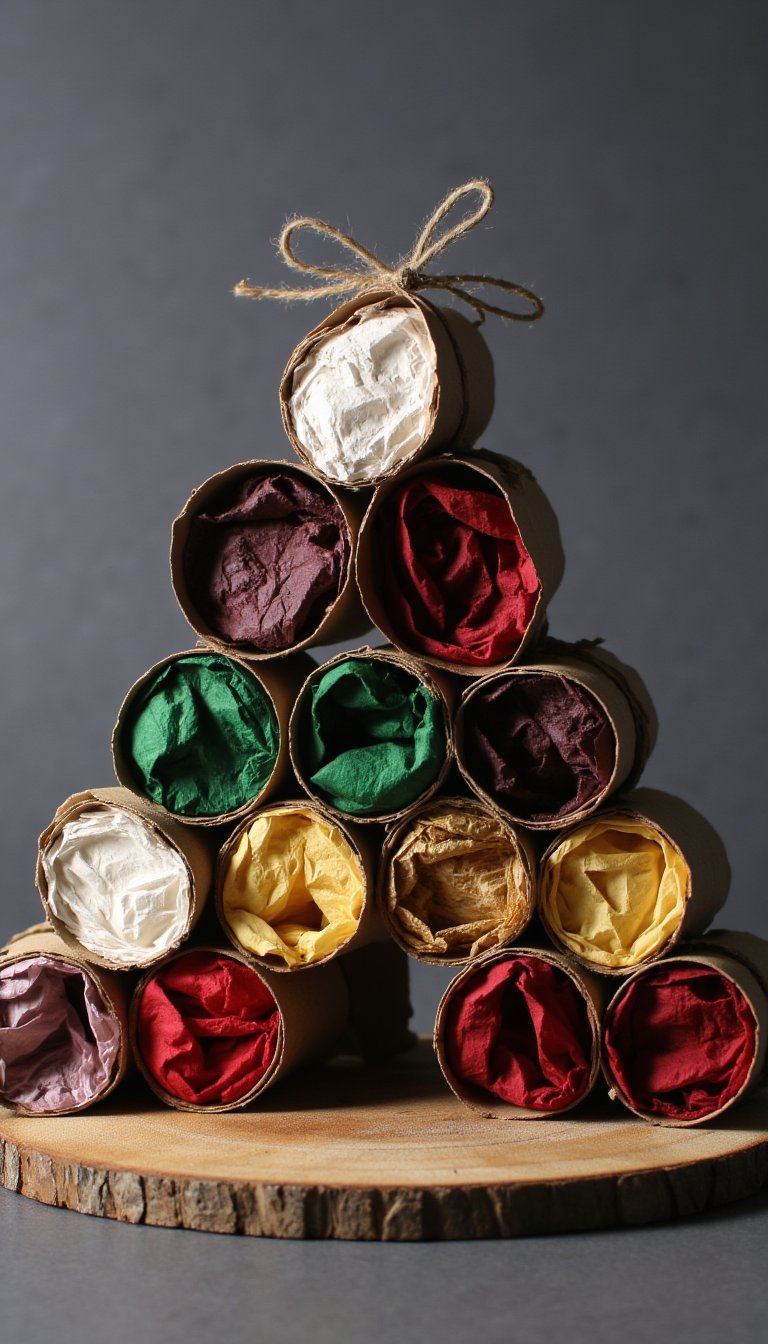
Number 24 rolls from 1 to 24 and arrange them in a festive shape on a board. Fill each with a small treat, a note with an activity, or a piece of a puzzle. Seal the ends with tissue paper. This builds anticipation far better than a store-bought chocolate calendar. The customizable surprise behind each door is what makes it special.
24. Smart Cable Management Sleeve
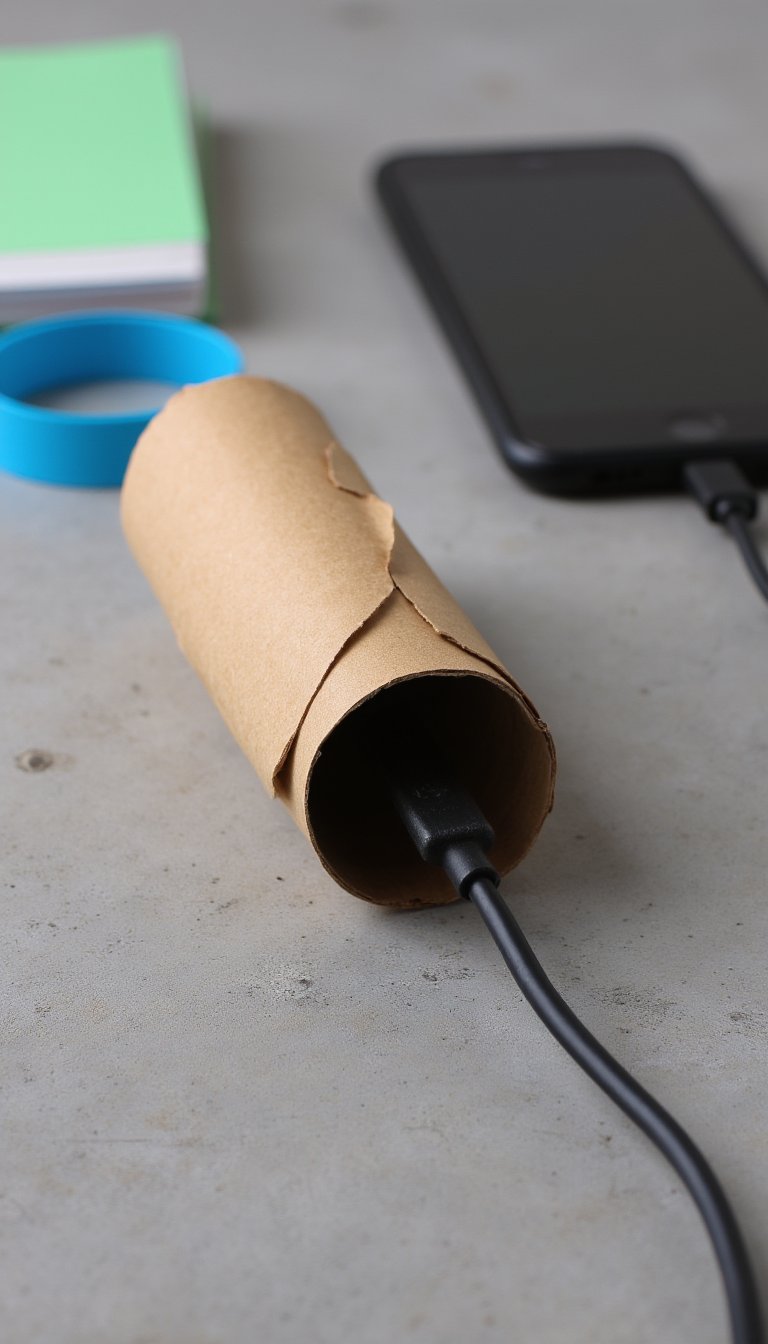
For a single, pesky cable (like behind your nightstand), slit a roll open lengthwise. Wrap it around the cord, and secure it with a bit of tape. It instantly bundles the cord and makes it look neater. You can even color-code them if you’re feeling extra organized. A sleek hack for a cleaner space.
25. Treasure Rolls for Kids
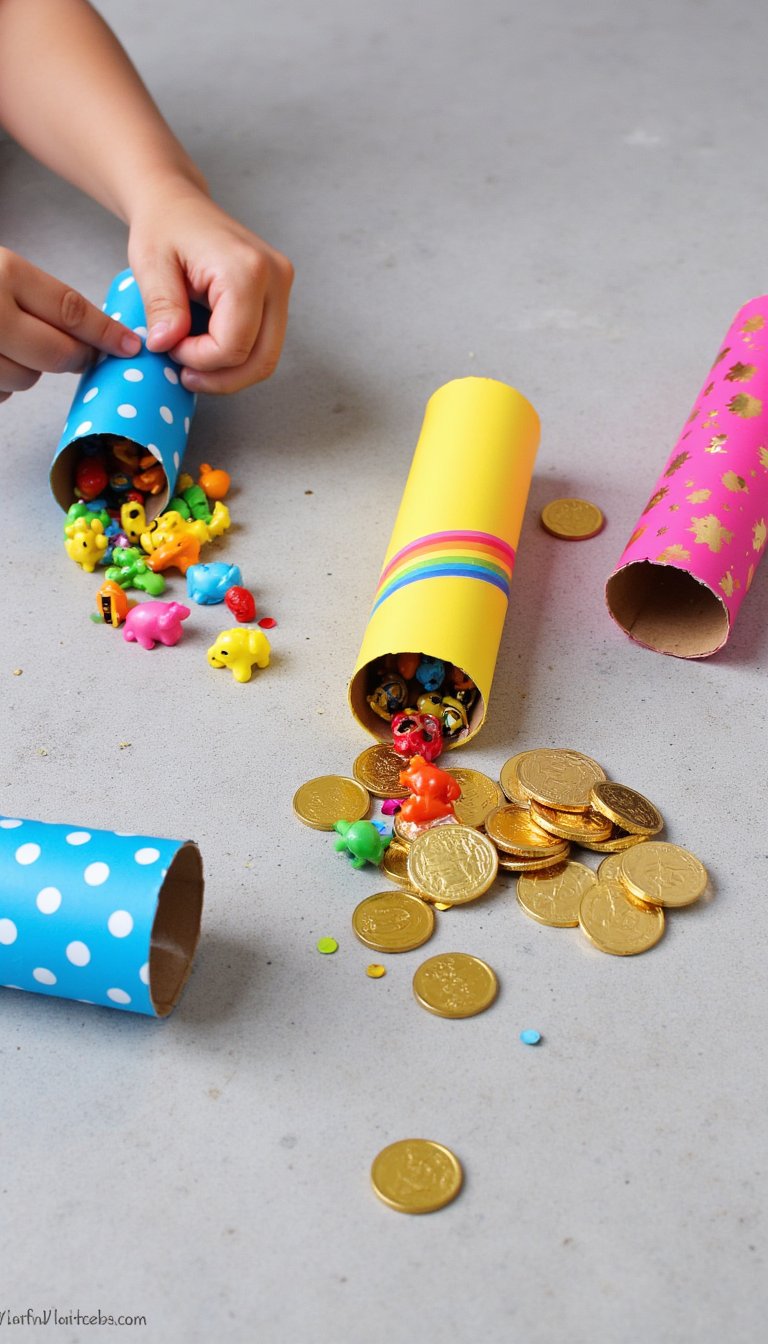
Fill a roll with small toys, stickers, or coins. Wrap it in colorful paper and twist the ends like a giant candy. It’s an inexpensive “pull-apart” gift that delights little ones. Perfect for party favors, good behavior rewards, or just because. The unwrapping is half the fun!
26. Efficient Fire Starters for Camping
Fill rolls with dry, combustible material like lint from your dryer, shredded paper, or sawdust. You can even drizzle in a little melted candle wax. When you’re ready for a campfire or fireplace, light the end of the roll. They catch easily and burn long enough to get your kindling going. A brilliant way to prep for cozy nights.
27. Yarn & Ribbon Dispenser
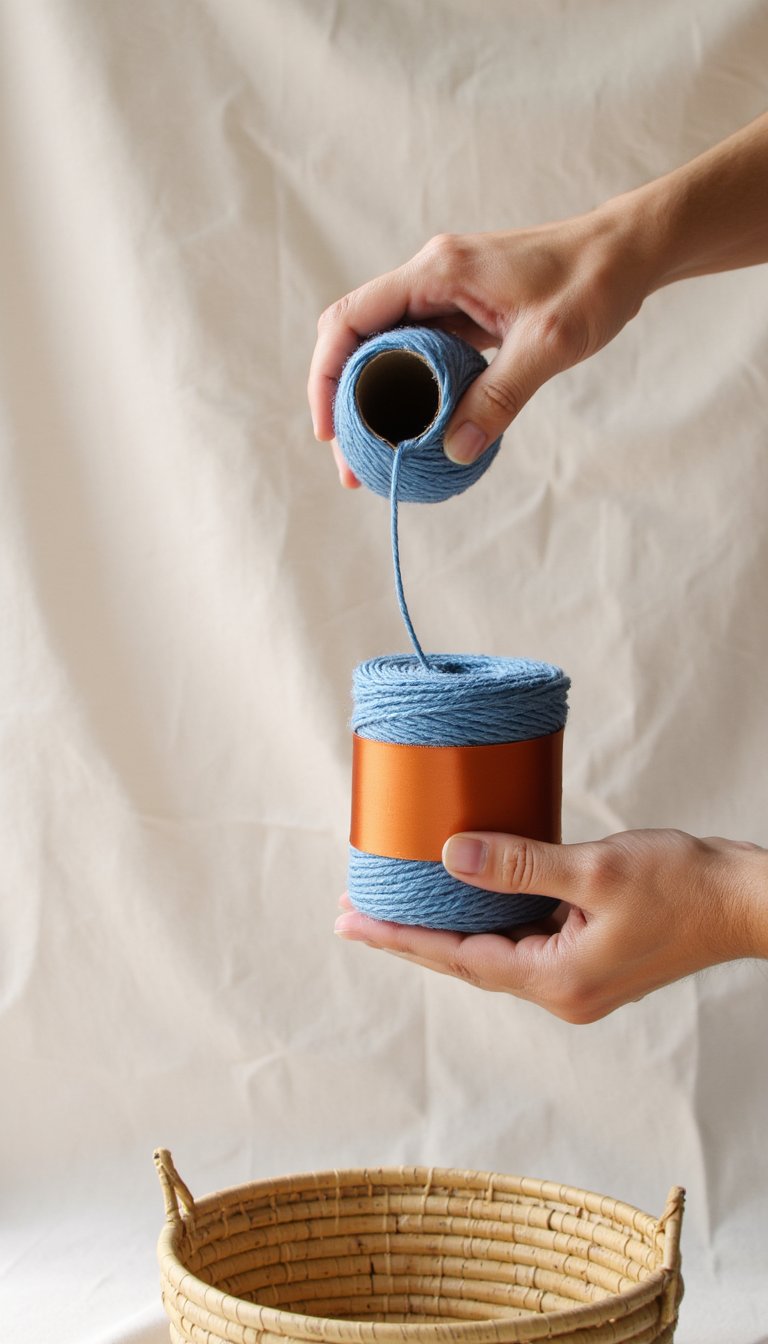
Keep your knitting or gift-wrapping station tidy. Thread the end of a yarn ball or ribbon through the roll, then place the whole thing in a basket. The roll keeps the strand from tangling as you pull. It’s a low-tech solution that works flawlessly. No more chasing runaway yarn across the room.
28. Fun Stamp Crafts for Patterns
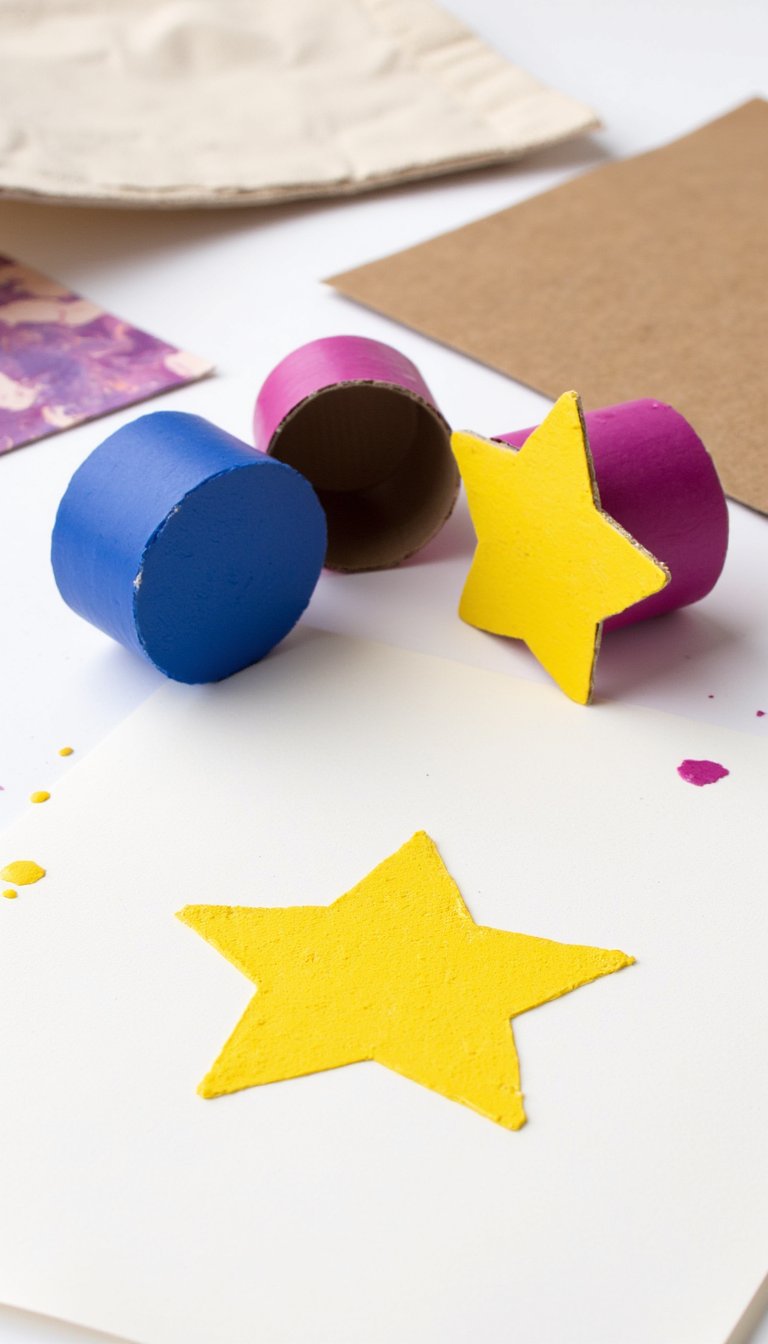
Shape the end of a roll into a heart, star, or crescent moon, or simply leave it round. Dip it in washable paint and stamp away on paper, fabric, or even a plain tote bag. You can create wrapping paper, custom cards, or decorative borders in minutes. The perfect geometric print, zero artistic pressure required.
29. Modern Geometric Wall Decor
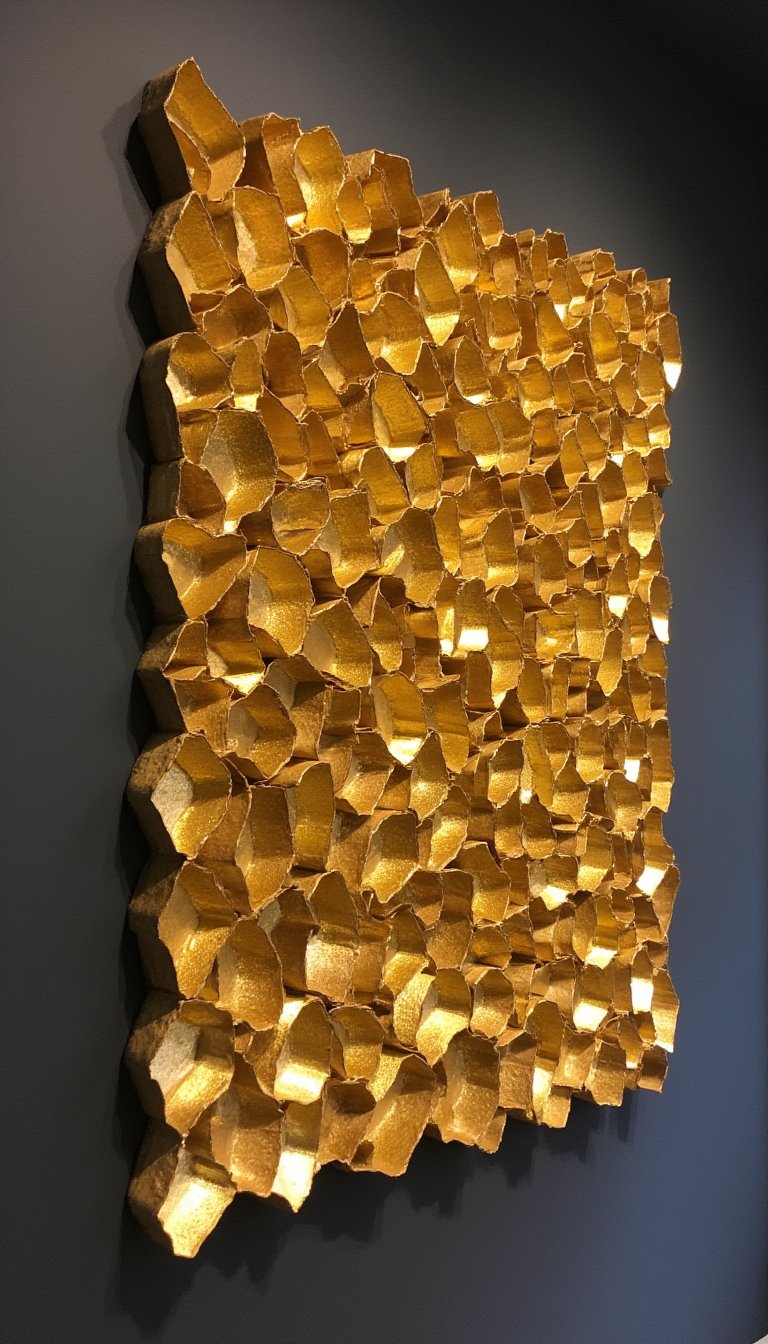
Cut rolls into uniform rings. Glue the rings together side-by-side to form honeycomb patterns, or stack them to create 3D wall art. Spray paint the entire structure gold, white, or black for a sleek, contemporary look. This is the pinnacle of upcycled chic—proof that high design can come from the humblest materials. It’s a stunning final project for our list.
So, there you have it—29 undeniable reasons to look at that empty toilet paper roll with newfound respect. From calming adult crafts to chaotic kid-friendly fun, this humble tube is a powerhouse of potential. It’s about more than just saving a few bucks or being eco-friendly (though those are fantastic perks). It’s about tapping into that creative spark we often box away as adults. The next time you go to toss one, pause. What tiny, wonderful thing could it become? Your craft supply bin is now, officially, your bathroom cabinet. Happy making! 😉