
Your phone is a digital graveyard of forgotten photos. You know it, I know it. We all have thousands of pictures trapped on a screen, destined to be lost in an endless scroll. But what if you could hold your best memories in your hands, flip through them with a friend, and create something that actually lasts? That’s the magic of a DIY photo book. Forget generic templates and overpriced packages. I’m talking about 29 wildly creative, deeply personal, and surprisingly easy projects that will make you fall in love with your photos all over again. Ready to get your hands a little dirty (in the best way)? Let’s go.
1. The “First Year” Fabric-Wrapped Chronicle
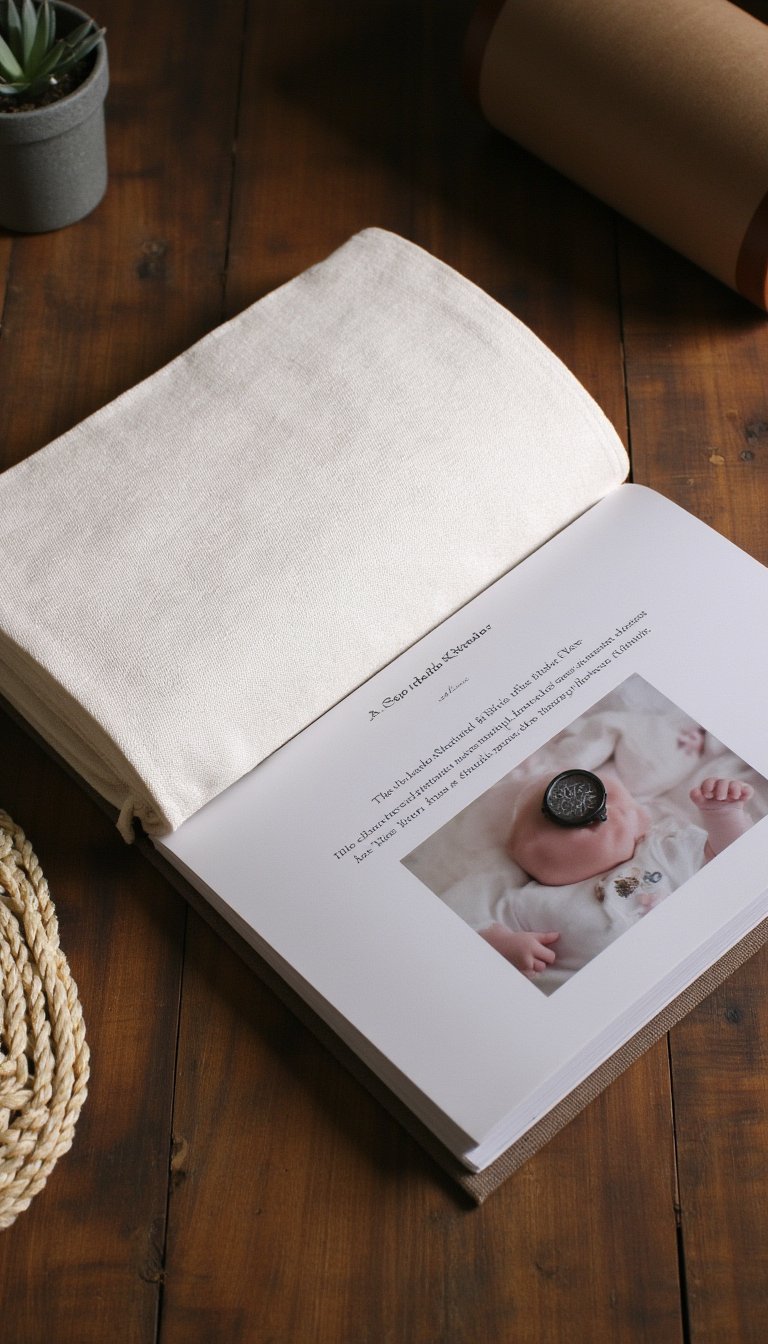
Celebrate a baby’s first year with a book that feels as soft and special as they are. Start with a simple blank sketchbook and wrap the cover in a beautiful, durable fabric—think linen, cotton, or even a piece of a sentimental blanket. Use acid-free glue to secure it. Inside, dedicate pages to monthly milestones, using handwritten notes, tiny mementos like a hospital bracelet, and of course, those priceless sleepy-smile photos. This isn’t just a photo book; it’s a future family heirloom.
2. The Adventure Zine Mini-Book

Got a single epic trip or event? Don’t make a novel, make a zine! This punk-rock, DIY approach is perfect for a weekend camping trip or a music festival. Fold a few sheets of paper into a small booklet. Use a photocopier or your home printer to transfer gritty, high-contrast photos. Add handwritten captions, ticket stubs, and doodles with markers. The lo-fi, personal vibe captures the raw energy of the experience way better than a polished album ever could.
3. The Polaroid & Washi Tape Wonder

For instant gratification, nothing beats the tactile joy of Polaroids. Grab a blank journal with thick pages. Simply arrange your instant photos on a page and use decorative washi tape to secure them at the corners (this is key—no permanent glue!). The tape adds color and pattern, and you can easily write notes right on the page or on the photo borders. It’s a living album you can add to anytime, and the mix of textures is incredibly satisfying.
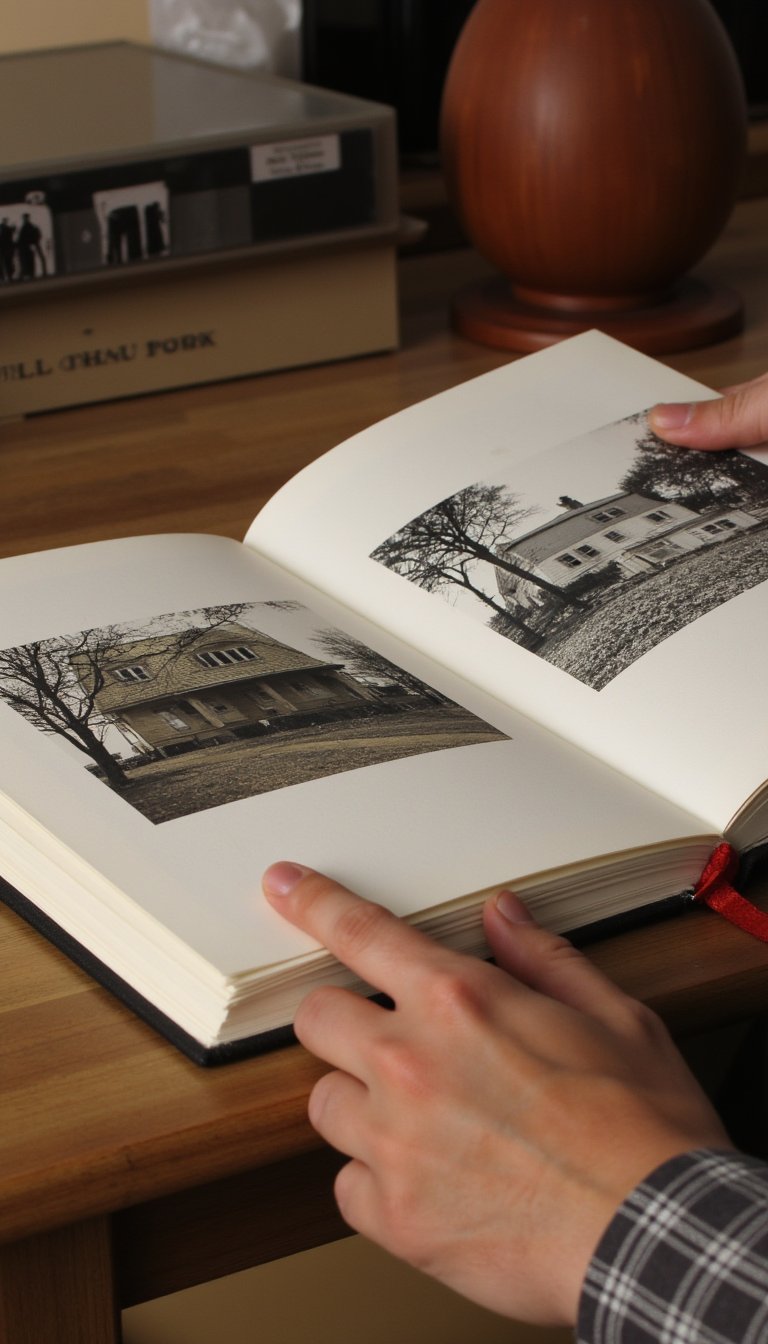
4. The Thrifted Book Altered Art Album
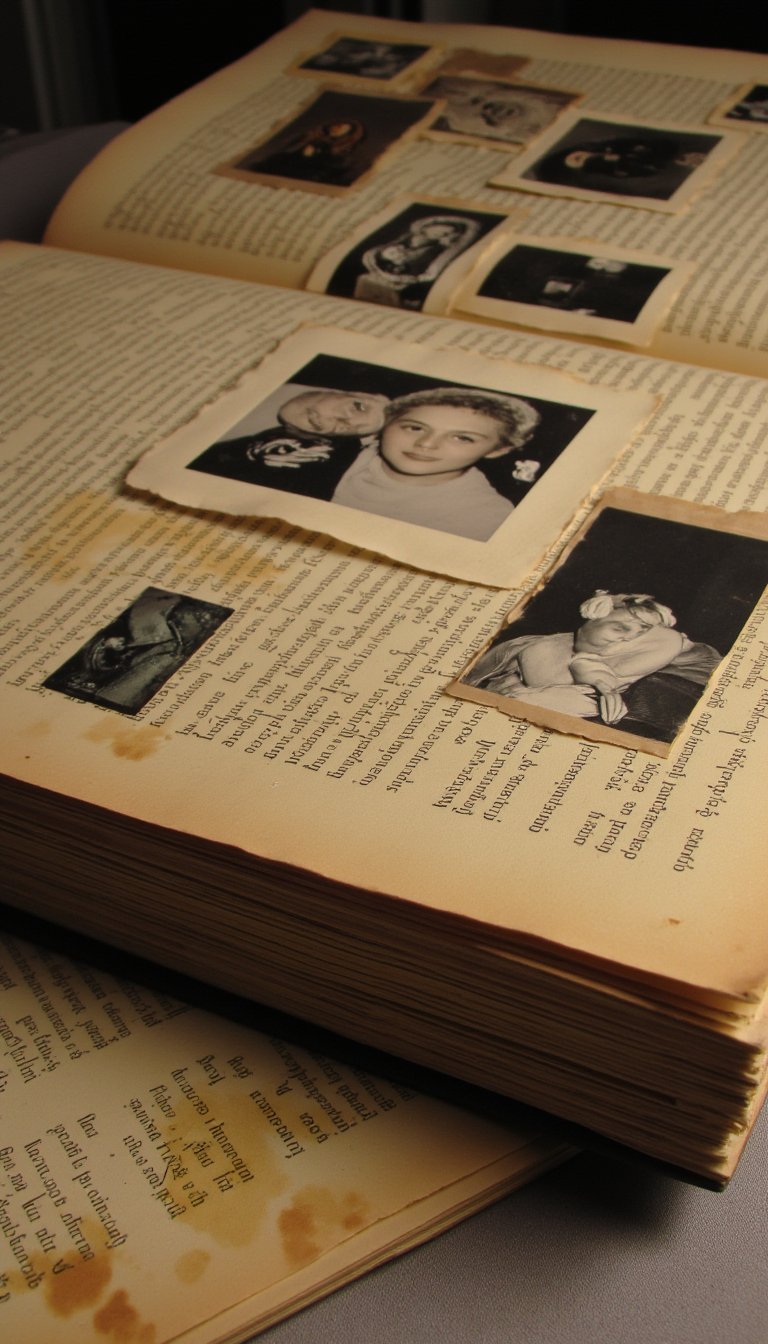
Head to a thrift store and find a hardcover book with a title that vaguely fits your theme—like an old cookbook for a foodie trip or a vintage novel for a romance-themed album. Now, here’s the fun part: alter it. You can carefully glue pages together to create thicker layers, then collage your photos right over the existing text and images. It creates a mysterious, layered look full of hidden meaning. Talk about a unique conversation starter.
5. The Binder Ring “Year in Review” Flip Book

This is modular, flexible, and brilliantly simple. Print your favorite photos of the year on cardstock, in a uniform size like 4×6 or 5×7. Punch a hole in the top corner of each card and bind them together with a large binder ring. You can add decorative index tabs between months or themes. The best part? You can easily add, remove, or rearrange pages as your year—and your photo collection—grows.
6. The Accordion-Fold Wall Art Book

Why should a photo book sit on a shelf? Create a long, continuous accordion fold from sturdy paper or cardstock. Print a series of photos that tell a sequential story—a sunrise to sunset, a hike from start to summit, your child’s growth over months. When folded, it’s a compact book. When unfolded, it becomes a stunning piece of narrative wall art you can display on a mantel or shelf.
7. The Embroidery Hoop Fabric Photo Transfer

For a rustic, handmade feel, transfer your photos onto fabric. Use iron-on transfer paper (available at any craft store) to print your images onto plain cotton. Stretch each fabric square into an embroidery hoop. You can then sew the hoops together along their edges with ribbon or twine to create a “book” that flips. Embroider dates or names around the photos for an extra-special touch.
8. The “Recipe” Box of Memories

Repurpose a classic wooden recipe box. Print your photos as small, standard-sized index cards. File them in the box, categorized by tabs you design: “Beach Days,” “Family Dinners,” “Silly Faces.” You can write the story behind the photo on the back of each card. It’s an interactive, non-linear way to browse memories, and it takes up minimal space. Perfect for a kitchen-centric family album.
9. The Leather Cord & Wood Slice Journal

Channel your inner artisan. Buy a few thin, sanded wood slices from a craft store. Drill two holes along one edge of each slice. Print your photos on transparent vellum or parchment paper and glue them to the wood. Thread leather cord through the holes to bind the “pages” together. The result is a rugged, organic, and stunningly beautiful album that smells amazing and feels solid in your hands.
10. The Clear Vinyl Pocket Portfolio

Use a hole punch and binder rings to assemble a book made entirely of clear vinyl sheets (like those used for report covers). Slip your photos, handwritten notes, pressed flowers, or other flat mementos between the sheets. The see-through layers create depth and let you overlay elements creatively. It has a modern, archival feel and protects everything without needing laminating.
11. The Comic Book Style Action Sequence

Turn a funny story or event—like learning to skateboard or a chaotic family game night—into a comic. Use photo editing software or even just markers to add speech bubbles, “POW!” sound effects, and panel borders to your pictures. Print them out and bind them into a small booklet. It’s a hilarious and dynamic way to relive a moment that felt larger than life.
12. The Painted Canvas Cover Album

Start with a plain canvas-covered sketchbook. Now, paint the cover yourself. It doesn’t have to be a masterpiece—abstract swirls, a simple landscape, or even just bold, solid colors work. This personalizes the book before you even put a single photo inside. It sets the tone and makes the album feel like a true piece of your own artwork from the very first glance.
13. The Mini Magnetic-Page Album
For a super sleek, modern look, use magnetic photo album pages. These are archival-safe pages where photos stick without adhesive. Buy a pack and a matching cover, or make your own cover from acrylic. The beauty is in the clean, seamless presentation. Your photos look like they’re floating on the page, and you can rearrange them endlessly without damage. Ideal for a minimalist aesthetic.
14. The “Found Objects” Shadow Box Book

Take the concept of a photo book into 3D. Use a deep, hinged shadow box or create “pages” from shallow wooden boxes. Affix a key photo to the back of each box, then use glue or small pins to attach related objects: a seashell from that beach, a cork from that wine, a charm from that trip. When closed, it’s a stack; when open, it’s a miniature museum of a memory.
15. The Sticker Bombed Childhood Album

Documenting a kid’s life? Let the album reflect their chaotic, colorful energy. Use a simple binder with plastic sleeves. Fill it with photos, but also let your child add to it. Include their drawings, award ribbons, and a whole bunch of stickers. Over time, they can keep adding to it. This isn’t a pristine archive; it’s a living, breathing, sticky record of their world. It’s pure joy.
16. The Travel Map Integration Album

Buy a large, beautiful map. Cut it up and use the relevant sections as the backing paper for your travel photos. Glue your picture of the Eiffel Tower onto the Paris part of the map. Use string or ribbon to connect the photo to a dot on the map. Bind these map-backed pages into a book. You’re not just showing what you saw, you’re charting the journey itself.
17. The Tea-Stained Ephemera Journal

Give your album an antique, timeless feel. Stain plain paper with tea or coffee and let it dry completely. Print your photos in sepia or black and white. Assemble the pages with old postcards, stamps, and typewritten notes. Bind it with twine. This method is perfect for family history projects or giving a recent vacation the feel of a cherished, old-world explorer’s log.
18. The Clipboard Flip-Book Display

Gather 5-10 small clipboards. Paint or decorate the backs. Clip a single standout photo to each one. Then, connect the clipboards at the top with a single bolt and wingnut through the clip hole, allowing them to fan out like a book. You can stand it up on a desk or hang it on the wall. Changing the photos is as easy as unclipping them—ultimate flexibility.
19. The Watercolor Wash Background Book

Before you add any photos, prepare the pages of a blank watercolor journal with soft, abstract washes of color. Let the colors match the mood of the photos you’ll add—blues for a beach trip, warm yellows for a fall album. Once dry, mount your photos on top. The painted backgrounds unify the book and make the images pop without competing with busy patterns.
20. The Digital-to-Handmade Hybrid

Use a free online design tool to create beautifully laid-out pages. But instead of having it professionally printed, print the pages yourself on high-quality paper at home or a copy shop. Then, bind them using a simple saddle-stitch (stapling) method or take them to a local copy shop for spiral binding. You get the control of digital design with the handmade charm of a physical object.
21. The “One Second Every Day” Video Print Book

If you do the “1 Second Everyday” video project, don’t let it just live on your phone. Take screenshots of key frames from each month’s video. Print these small images and arrange them in a grid on each page of a book. Add the date under each one. Flipping through it feels like walking through your year at high speed, and it tells a comprehensive story in a uniquely modern way.
22. The Chalkboard Cover & Label Album

Paint the cover of a plain book with chalkboard paint. You can now write and re-write the title with chalk whenever you want. “Mom’s 50th Birthday” one year, “European Adventure” the next. Inside, use small chalkboard labels as captions next to your photos. The erasable, changeable nature of this book makes it adaptable and endlessly reusable for different projects.
23. The Concert Poster Style Book

For a music lover, design each page of your album like a vintage concert poster. Use bold fonts for location and date (“Kitchen Disco – November 2020 – Lockdown Edition”). Incorporate ticket stubs, setlists, and photos of the “crowd” (aka your friends). The graphic, high-energy design will match the excitement of the memories you’re preserving.
24. The Glassine Envelope Archive
For a delicate, archival project, use glassine envelopes (those semi-transparent, acid-free envelopes). Staple or sew a stack of them along one edge to form a book. Slip a photo into each envelope. You can see the image through the paper, but it’s protected. You can also slide notes or small items behind the photo inside the envelope, adding a layer of mystery.
25. The Lego Mini-Figure Photo Stand-In

This one is pure fun. Take a Lego mini-figure (one that looks like you or a friend) on your adventures. Photograph it in front of landmarks, on your dinner plate, “driving” the car. Compile these hilarious, scaled-down photos into a book. It’s a whimsical, unique perspective that turns an ordinary trip into a playful story. Great for kids and kids-at-heart.
26. The Corkboard Pinboard Album

Cut cork sheets into uniform page-sized pieces. Bind them together along one edge with a strong fabric tape. Now, you can pin your photos directly to the “pages” using decorative push pins. Add ribbon, string, and notes that you can pin around the images. It’s completely changeable and has a fantastic tactile, bulletin-board feel.
27. The “Then & Now” Comparison Album
Choose a theme, like “My Childhood Home” or “Me & My Best Friend.” On each left page, place a photo from the past. On each facing right page, place a photo you recreate as closely as possible in the present. The powerful side-by-side comparison tells a profound story of change and continuity. It’s one of the most meaningful DIY photo book projects you can undertake.
28. The Painted Rock Photo Holder
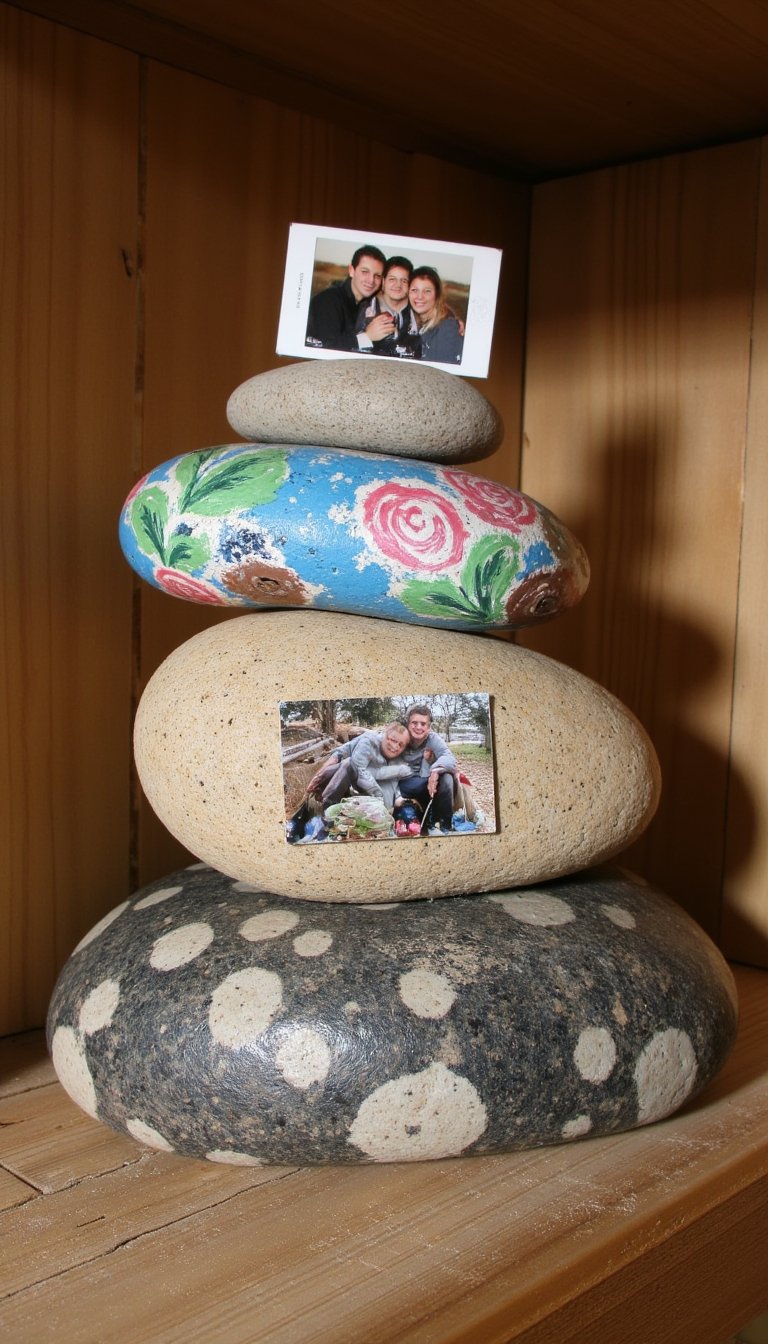
Find smooth, flat rocks. Paint one side beautifully. On the other side, use a strong adhesive putty to attach a photo. Stack the rocks in a nice box or on a shelf. To “read” the book, you simply flip through the rocks. It’s an earthy, permanent-feeling way to display a small series of very special images. Surprisingly elegant!
29. The “Family Recipe” Photo Hybrid

This is the ultimate gift. Document a beloved family recipe, but use photos instead of just instructions. Take pictures of each step: Grandma’s hands kneading the dough, the ingredients lined up, the finished pie on the table. Add the written recipe alongside. Bind it into a small book and make copies for the whole family. You preserve the food, the technique, and the person all in one.
So, there you have it—29 ways to break your photos out of the cloud and give them a real, tangible life. The best part? There’s no “right” way to do this. It’s about the process, the memories, and the joy of creating something uniquely yours. Whether you go for the rustic wood slices or the sleek magnetic pages, you’re doing more than just organizing pictures. You’re building a time capsule, crafting a story, and creating an object that someone will treasure long after a digital file format becomes obsolete. Now, which idea are you trying first? Your photos are waiting. 😊