
Okay, parents and caregivers, let’s be real for a second. March can be a long month. The excitement of the holidays is a distant memory, and spring feels like it’s taking its sweet time. You need something to break up the monotony, spark some joy, and maybe—just maybe—keep those little hands busy for more than five minutes. What if I told you the solution is hiding in a little green clover? Forget the pressure of a perfect leprechaun trap; we’re diving into the wonderfully messy, imaginative world of March art projects for kids. Get ready to raid the recycling bin and break out the glue, because these 17 ideas are about to make your March merrier.
1. Bleeding Tissue Paper Shamrocks

This project is pure magic, and I’m not just saying that for the leprechauns. It’s a fantastic way to explore color mixing and cause-and-effect. Cut shamrock shapes from thick white paper or cardstock. Then, let the kids tear or cut squares from green (and maybe a little yellow) bleeding tissue paper—the key word is bleeding; not all tissue paper works!
Layer the tissue squares onto the shamrock, spray them lightly with water using a spray bottle, and watch the color “bleed” onto the paper. Once it’s dry, peel off the tissue paper to reveal a beautifully textured, watercolor-like masterpiece. It’s science and art in one satisfying, mess-manageable package.
2. Fork-Painted Leprechaun Beards

Who needs a paintbrush when you have a fork? This technique creates the perfect fluffy, textured beard for a leprechaun face. Draw or print a simple leprechaun face on paper, leaving the beard area blank. Dip a plastic fork into orange paint (mix a little red and yellow for a perfect ginger shade) and dab it onto the beard area.
The tines create amazing texture that looks like curly hair. It’s silly, tactile, and a huge hit with preschoolers. Pro tip: Use a paper plate as a paint palette for easy cleanup. This is one of those March art projects for kids that proves the best tools are often the simplest.
3. Rainbow Spin Art

Ready for the ultimate “wow” factor? If you have a salad spinner, you’re in business. Cut a circle of paper to fit the bottom of the spinner. Let the kids drip liquid watercolors or diluted tempera paint in rainbow order onto the paper. Pop the lid on and give it a vigorous spin!
Open it up to reveal a stunning, psychedelic explosion of color. Once dry, you can add a pot of gold cutout at the end or turn it into a vibrant suncatcher. It’s controlled chaos at its finest, and every result is a unique surprise.
4. 3D Paper Plate Leprechaun Hat

This project adds a fun, wearable element to the craft session. Take a standard paper plate and cut out the center, leaving just the rim—this becomes the hat’s brim. Then, form a cone from green construction paper for the top of the hat and staple it to the brim.
Now comes the decorating! Add a black construction paper band and a yellow buckle. You can glue on glitter, stickers, or even rainbow ribbons. Suddenly, you have a fleet of tiny leprechauns running around. It’s a craft that turns into instant imaginative play.
5. Salt Painted Rainbows

Salt painting creates a gorgeous, crystalline texture that kids find mesmerizing. Start by drawing a simple rainbow arc with a line of glue. While the glue is still wet, generously sprinkle table salt over it, then shake off the excess. Now, the fun part: using watercolor paints or even food coloring mixed with a drop of water, gently touch the tip of your brush to the salted glue lines.
Watch as the color spreads like magic along the salt trail. It teaches patience and a gentle touch, and the raised, sparkly result is so rewarding. This is a sensory-friendly star among March art projects for kids.
6. Leprechaun Gold Slime

Is it a science experiment? Is it art? Is it just gloriously gooey fun? Yes. Making slime is a rite of passage. For a St. Paddy’s twist, make a clear or white glue base slime and mix in gold glitter and tiny gold coin charms.
Kids can “guard” their pot of gold slime, stretch it, and play for hours. It’s a fantastic sensory activity. Just be prepared for glitter to become a permanent part of your home decor—consider it festive confetti.
7. Bubble Wrap Printing a Field of Clovers

Reuse your bubble wrap for an amazing printing project! Cut a piece of bubble wrap and paint the bubble side with different shades of green paint. Press it onto a large sheet of paper to create a textured background that looks like grass or a field.
Once it dries, use fingerprints, small stamps, or cut-out shapes to add a whole field of shamrocks on top. The layered texture is fantastic, and kids love the popping sound and the stamping action. It’s a great way to make a big, collaborative piece of art.
8. Toilet Paper Roll Leprechauns

The humble toilet paper roll is the MVP of kids’ crafts. For this one, paint the roll green or wrap it in green paper. Add a face with googly eyes and marker details. Create a beard from orange yarn or cotton balls.
Top it off with a tiny black paper hat and a pipe cleaner belt. You can make a whole family! This project encourages recycling and 3D construction, and these little guys make adorable table decorations.
9. Watercolor Resist Celtic Knots

This project is perfect for older kids ready for a slight challenge. Start with simple, continuous line drawings that loop and cross to mimic basic Celtic knot designs. They can draw these with a white crayon or an oil pastel on white paper.
Then, wash over the entire paper with green and gold watercolors. The wax from the crayon will resist the paint, magically revealing the intricate knot design underneath. It feels like a secret code and the results are strikingly beautiful.
10. Handprint Rainbow with Pot of Gold

A timeless keepsake! Paint your child’s palm with red paint and their fingers in the other rainbow colors (orange, yellow, green, blue, purple). Carefully press their hand onto paper in an arc shape to create the rainbow. Wash up, then paint their fist brown or black and stamp it at the end of the rainbow for the “pot.”
Once dry, add gold fingerprint “coins” above the pot. It’s messy, personal, and you’ll love comparing their hand size year after year. These are the March art projects for kids you’ll actually want to frame.
11. Collage Lucky Four-Leaf Clovers

Gather all the green things! This is a fantastic way to explore different textures and materials. Cut out a large four-leaf clover shape from cardstock. Then, set out a “green station” with fabric scraps, magazine clippings, green buttons, sequins, tissue paper, and yarn.
Let the kids glue their chosen materials onto the clover to create a textured mosaic. One leaf might be bumpy with buttons, another smooth with paper. It’s a fantastic exercise in creativity and decision-making.
12. Coffee Filter Shamrocks

This is a classic technique with a festive twist. Flatten a white coffee filter and let the kids color it heavily with green washable markers. Then, using a spray bottle or an eyedropper, add a few drops of water. The colors will bleed and blend into beautiful, tie-dye-like patterns.
Let it dry completely (a hairdryer speeds this up). Once dry, fold it and cut it into a shamrock shape, or cut the shamrock shape first then color it. The translucent, colorful results are perfect for hanging in a window.
13. Construction Paper Rainbow Chains
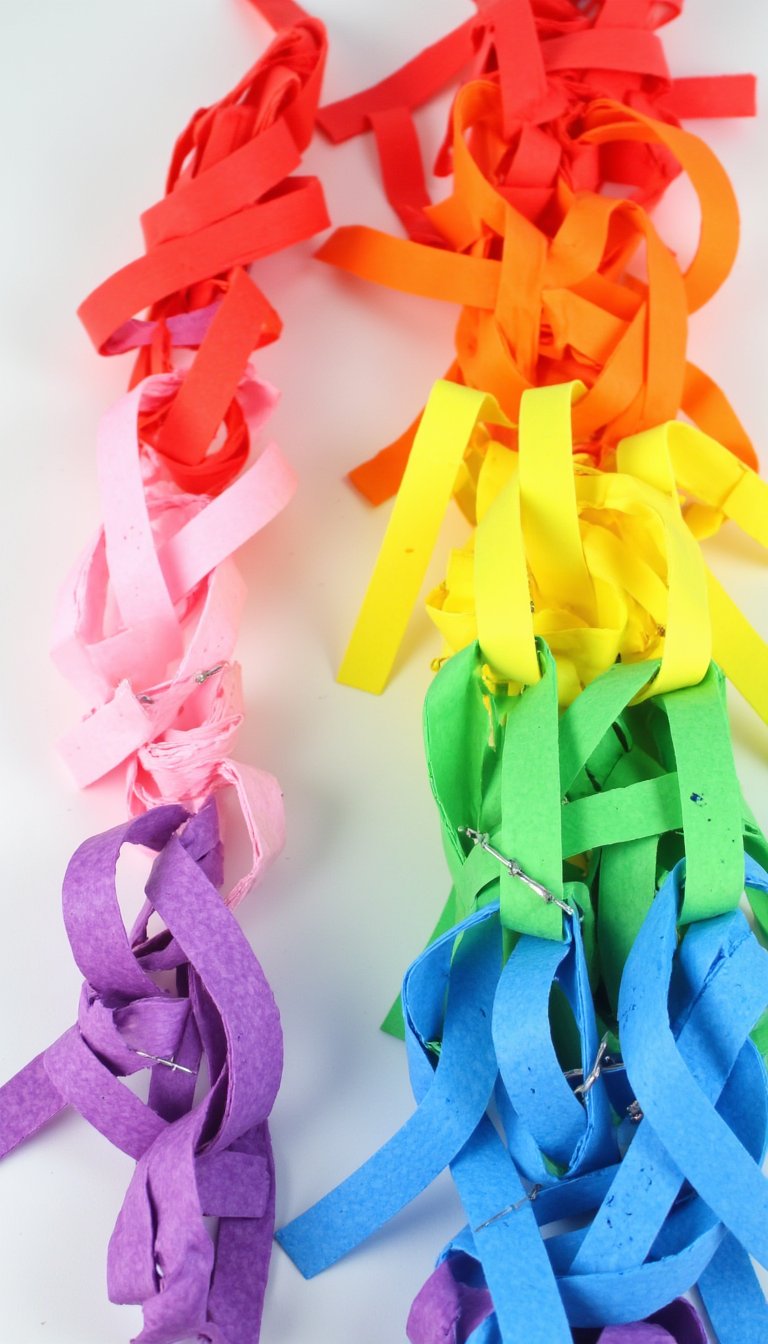
This is as much a fine-motor skills workout as it is a decoration. Cut strips of construction paper in all the rainbow colors. Show kids how to loop and glue or staple the strips into interlocking chains in the correct ROYGBIV order.
They can make a long chain to drape across the room or a shorter one to adorn a doorway. It’s a calming, repetitive craft with a big, colorful payoff. You’re basically building festive cheer, one loop at a time.
14. “I Am Lucky Because…” Writing & Art Prompt

Shift the focus from leprechaun gold to real gratitude. Have each child decorate a large shamrock or pot of gold shape. In the center, they write or dictate the sentence: “I am lucky because…” and finish the thought.
Their answers are often hilarious and heartwarming (“I am lucky because my dog licks my face”). Surround the writing with drawings of the things they listed. This is a meaningful project that builds emotional awareness alongside artistic skills.
15. Shamrock Stamping with Celery

Nature provides the perfect stamp! Take a bunch of celery and slice off the base so you have a flat, compact cluster of stalks. The cross-section looks uncannily like a clover. Dip the celery end into green paint and stamp it onto paper.
It creates a perfect, textured shamrock print every time. Kids love using “weird” tools, and it’s a great conversation starter about shapes in nature. Who knew veggies were so artistic?
16. Melted Crayon Rainbow Art

This one requires close adult supervision but is utterly mesmerizing. Arrange broken crayon pieces in rainbow order along the top of a canvas or thick cardstock. Secure them with a hot glue gun (adults only for this step).
Then, using a hairdryer on a high heat setting, melt the crayons so the wax drips down the canvas in vibrant rivers of color. Tilt the canvas to guide the drips. The result is a dynamic, abstract rainbow that feels like a professional piece of modern art.
17. Design Your Own Leprechaun Trap Blueprint

This is for the engineers and strategists! Instead of building the actual trap (which, let’s be honest, can get complicated), focus on the design phase. Provide large paper, rulers, markers, and stickers.
Challenge them to draw a detailed blueprint of their ultimate leprechaun trap. Where does the ladder go? How does the trap door work? What bait are they using? This encourages planning, storytelling, and drawing skills without the need for a hundred cardboard boxes. The ideas they come up with are pure genius.
And there you have it—17 ways to turn a dreary March afternoon into a kaleidoscope of green, gold, and rainbow creativity. The real treasure here isn’t a pot of gold (though that slime is pretty cool), it’s the time spent making memories, the pride on their faces when they show off their fork-painted beard, and the simple joy of getting messy together. So pick a project, embrace the glitter, and have a laugh. After all, isn’t that what makes us truly lucky? Happy crafting!